Lingjun local cache acceleration caches training data on compute nodes, eliminating repeated reads from remote storage on each epoch and significantly improving data read performance. This feature is suited for multi-epoch training and large-scale datasets that require repeated data access.
Key concepts
Local cache includes the following capabilities:
High-speed caching: Uses local disks on compute nodes to build a read cache, accelerating dataset and checkpoint access and reducing data access latency.
Horizontal scaling: Cache throughput scales linearly with the number of compute nodes, supporting clusters ranging from hundreds to thousands of nodes.
RDMA high-bandwidth acceleration: Uses the RDMA (Remote Direct Memory Access) protocol to maximize high-speed network bandwidth under high-concurrency data reads, boosting throughput.
Data warm-up: Loads specified data into the local cache before a training job starts, preventing cold-start delays on the first epoch.
Client-side bandwidth throttling: Caps the read bandwidth per DLC job client to prevent a single job from consuming excessive storage bandwidth and affecting other jobs.
Serverless operation: Enable or disable with one click. No code changes are required. The feature is non-intrusive and requires no operational maintenance.
Use cases
Local cache is suited for multi-epoch training jobs where the dataset is much larger than what's read in a single pass and the data is accessed repeatedly. RDMA acceleration, data warm-up, and client-side bandwidth throttling each address different training characteristics and can be combined as needed:
|
Scenario |
Recommended features |
Expected outcome |
|
High-concurrency data reads (large num_workers or batch_size) |
Local cache + RDMA acceleration |
Distributed cache nodes transfer data over RDMA, making full use of high-speed network bandwidth and significantly boosting throughput under high concurrency. |
|
Latency-sensitive first epoch |
Local cache + data warm-up |
Data is loaded into the cache before the job starts, eliminating cold-start delay on the first epoch. |
|
Multiple jobs sharing the same storage, or RDMA cache bandwidth competing with distributed training |
Local cache + client-side bandwidth throttling |
A read bandwidth cap per job ensures stable parallel execution across the cluster. |
|
Multi-epoch training on large video or image datasets |
Local cache + RDMA + data warm-up |
Video datasets generate heavy I/O load. RDMA boosts throughput; data warm-up eliminates cold-start. |
|
Standard training with many epochs and repeated data traversal |
Local cache |
Data is read from storage and written to cache on the first epoch; subsequent epochs read directly from the local cache, with read speed improving with each subsequent epoch. |
If your job has high-concurrency read pressure, enable RDMA acceleration. If you're sensitive to first-epoch latency, combine local cache with data warm-up. If multiple jobs in your cluster share the same storage, enable client-side bandwidth throttling to protect bandwidth.
Limitations
Storage support: Object Storage Service (OSS) and CPFS (Cloud Parallel File System) are supported.
Applicable resources: Lingjun computing resources only. When enabled, compute node resources are consumed: mounting one file system or OSS bucket uses 4 vCPUs and 14 GB of memory per node; each additional mount uses 1 vCPU and 2 GB of memory. Reserve resources before enabling.
RDMA resource consumption: In RDMA mode, mounting one file system or OSS bucket uses 8 vCPUs and 16 GB of RAM per node; each additional mount uses 1 vCPU and 2 GB of memory. Nodes must have RDMA network cards; high-spec Lingjun nodes support this by default.
Capacity and eviction policy: Maximum cache capacity depends on the Lingjun instance type. The eviction policy is LRU (Least Recently Used).
Acceleration scope: Read acceleration only. Write operations aren't accelerated.
Data availability: High availability isn't guaranteed. Cached data may be lost. Back up important training data promptly.
First-epoch performance: The first epoch reads from the storage instance (such as OSS or CPFS) and writes to the cache, which is slightly slower than reading directly from storage. Subsequent epochs read directly from the local cache at higher speed. To avoid first-epoch slowdown, use data warm-up.
Enable local cache acceleration
To enable local cache acceleration, complete the following steps:
Enable local cache for a resource quota.
Configure security group inbound rules.
Create a DLC job with cache enabled.
-
Optionally configure RDMA acceleration, client-side bandwidth throttling, and data warm-up.
Step 1: Enable local cache for a resource quota
-
In the left navigation pane, click Resource Quota > Intelligent Computing LINGJUN Resources, find the target quota name, and click it to open the management page.
NoteFor multi-level nested quotas, only the top-level quota supports enabling local cache.
-
Switch to the Local cache tab, turn on Local cache acceleration, and set the storage paths to cache. The cache paths should point to the storage directories where your training data resides.
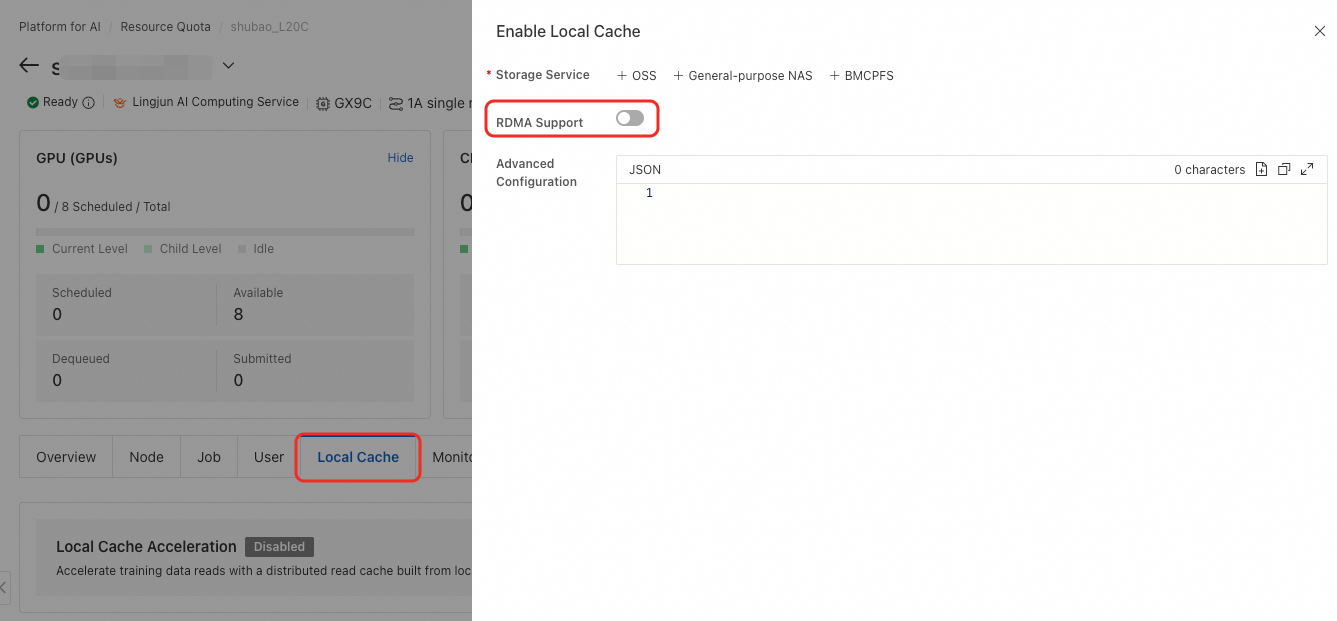
To use RDMA acceleration, turn on the Supports RDMA switch on the cache configuration page.
Step 2: Configure security group inbound rules
For enterprise security groups, configure an inbound rule to allow the cache service to communicate over the VPC network.
On the resource quota page, find the security group name or ID in the network information section.
-
Go to that security group. If the security group type is Enterprise, add an inbound rule with the following settings:
Set the authorization policy to Allow.
Set the priority to 1.
Set the protocol to Custom TCP.
Set the source to IPv4 and enter the VPC CIDR block, for example
10.0.0.0/8.Set the destination port range to
10080/(10080+n-1)and10070/(10070+n-1), where n is the number of storage service entries (n ≤ 10). For example, with 4 storage services configured, open ports10080/10083and10070/10073.
NoteSet the source to the CIDR block of the vSwitch used by the resource quota. The number of destination ports must match the number of storage services in the cache configuration.
Step 3: Create a DLC job with cache enabled
Create a DLC (Distributed Learning Container) job using the Lingjun resources of the target resource quota.
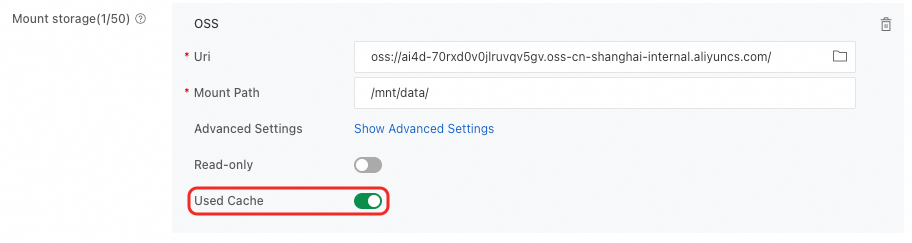
When configuring the Storage Mount parameter for the DLC job, select the OSS mount URI and mount path (for example,
/mnt/data/).-
When the mounted storage address matches a configured cache path, the Use Cache switch is turned on automatically (you can turn it off if needed).
Step 4: Configure client-side bandwidth throttling (optional)
When creating the DLC job, add the
mountOptionsparameter in the advanced dataset configuration to limit the read bandwidth per client:{ "mountOptions": "-o g_tier_DadiSdkGetTrafficLimit=3221225472" }Parameter description:
g_tier_DadiSdkGetTrafficLimit: Client read rate limit threshold, in B/s (bytes per second). The default value is3221225472(3 GB/s).
Common rate limit values:
Target limit
Value (B/s)
1 GB/s
1073741824
3 GB/s (default)
3221225472
4 GB/s
4294967296
5 GB/s
5368709120
Step 5: Set up data warm-up (optional)
Before a training job starts, use data warm-up to load specified data into the local cache and avoid a cold-start delay on the first epoch.
Console
Create a warm-up task
-
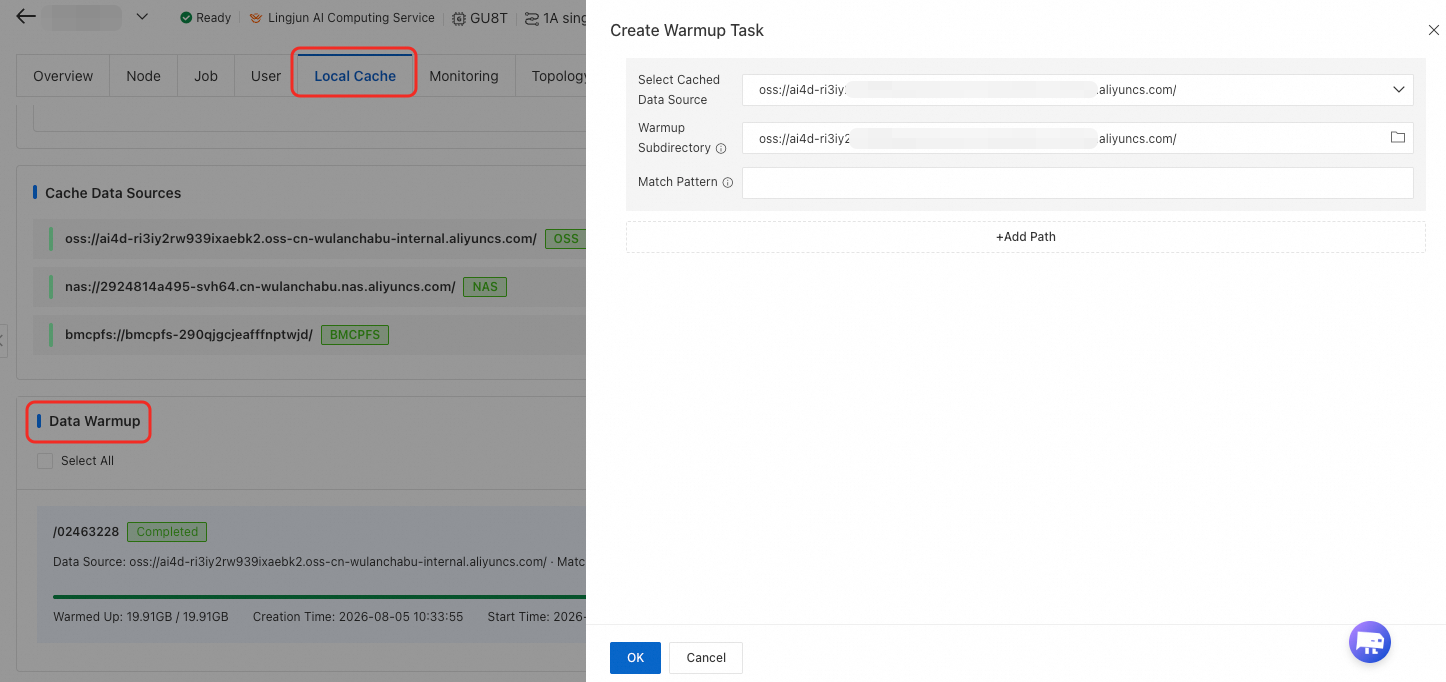
On the Local cache tab, scroll to the Data warm-up section and click + Create warm-up task in the upper right corner.
-
In the dialog box, fill in the following fields as needed:
Field
Required
Description
Recommendation
Cache data source
Yes
Select from the dropdown. Only storage instances configured in Step 1 are available.
Select the bucket your training job reads from.
Warm-up subdirectory
No
Specify a subdirectory within the selected data source. Enter a path manually or click the folder icon to browse. Leave blank to warm up the entire data source.
Specify the dataset or checkpoint subdirectory to reduce unnecessary traffic.
Match pattern
No
A regular expression relative to the subdirectory. Defaults to
.*(match all).For example, to warm up only JPEG files:
.*\.jpg$. To warm up multiple locations, click + Add path at the bottom to add another entry. Click the delete icon at the start of a row to remove it.
Click OK to submit. The task immediately appears in the data warm-up list.
Only one warm-up task runs at a time per cache instance. Additional tasks queue in FIFO order and remain in Creating status. The total warm-up volume shouldn't exceed the cache capacity, or data will be evicted by the LRU policy.
View warm-up progress
The warm-up task list shows the following information: task ID, path (data source + subdirectory + match pattern), status, creation time, completion time, matched file count/bytes, and failure reason.
Status descriptions:
Creating: Submitted and queued for execution.
Running: Pulling data into the local cache.
Completed: Warm-up complete and cache loaded.
Cancelled: Manually cancelled.
Failed: Warm-up failed. Check the failure reason. Common causes: the path doesn't exist, or no files matched the pattern.
Cancel or delete a warm-up task
For tasks in Creating or Running status, click Cancel at the end of the row to stop the task.
Completed or Failed records are kept for audit purposes only and can be deleted directly.
ImportantMake sure no running training jobs depend on the current cache before turning off the local cache acceleration master switch. Turning off this switch clears all warm-up records and cached data.
API
Determine the warm-up port
Each cache configuration entry has a dedicated warm-up port in the range 10070–10079:
Cache index
Warm-up port
1st cache
10070
2nd cache
10071
3rd cache
10072
Start data warm-up
Run the following command in a DSW (Data Science Workshop) or DLC instance under the same quota to start warm-up:
Note: The warm-up API can only be called from DSW or DLC instances under the same quota as the cache service. DSW instances have the required role permissions by default and don't need additional configuration.
# If isShareded = true in the getDataCacheService response, use this command:
curl -s "http://<CacheServiceId>-svc-0.t<AccountId>.svc.cluster.local.<clusterId>.t<AccountId>:<Port>/v1/warmup/load?target_path=<path1>,<path2>&pattern=<glob_pattern>"

# Otherwise, use this command:
curl -s "http://<CacheServiceId>.t<AccountId>.svc.cluster.local.<clusterId>.t<AccountId>:<Port>/v1/warmup/load?target_path=<path1>,<path2>&pattern=<glob_pattern>"
Parameter descriptions:
isShareded: On the quota details page in the console, go to the Local cache tab, open browser developer tools (F12), and check theisSharededfield in thegetDataCacheServiceAPI response.CacheServiceId: Call the GetQuota API to query the target resource quota. RetrieveCacheServiceIdfrom the response of the top-level quota (first-level resource quota).<primary account ID>: In the console, click your user avatar in the upper-right corner to view your primary account ID.clusterId: Same asisShareded— check thegetDataCacheServiceAPI response.Port: The warm-up port determined in the previous step.target_path: Paths to warm up, with multiple paths separated by commas. Must be relative paths under the mount directory. For example, to warm up/path1/path2on BMCPFS, settarget_path=path1/path2.pattern(optional): A file match pattern supporting regular expressions. For example,pattern=.*.txtwarms up only.txtfiles.
Example:
# Warm up all .txt files under dataset/train in the mount directory
curl -s "http://cacheservice-xxxx:t10953*******.svc.cluster.local.ca076dea628***********.t10953*******:10070/v1/warmup/load?target_path=dataset/train&pattern=.*.txt"
Check warm-up status
Run the following command to check warm-up progress:
# If isShareded = true in the getDataCacheService response, use this command:
curl -s "http://<CacheServiceId>-svc-0.t<AccountId>.svc.cluster.local.<clusterId>.t<AccountId>:<Port>/v1/warmup/stat?target_path=<path1>,<path2>&preceding_time=<minutes>"

# Otherwise, use this command:
curl -s "http://<CacheServiceId>.t<AccountId>.svc.cluster.local.<clusterId>.t<AccountId>:<Port>/v1/warmup/stat?target_path=<path1>,<path2>&preceding_time=<minutes>"
Parameter descriptions:
target_path: Same path as used in the warm-up request.preceding_time: Query the warm-up status for the last N minutes.
Example:
# Check warm-up status for dataset/train over the last 10 minutes
curl -s "http://cacheservice-xxxx:t10953*******.svc.cluster.local.ca076dea628***********.t10953*******:10070/v1/warmup/stat?target_path=dataset/train&preceding_time=10"
Usage notes
The warm-up API can only be called from DSW or DLC instances under the same quota as the cache service.
target_pathmust use paths relative to the mount directory. Don't use absolute paths.For multi-level nested resource quotas, make sure
CacheServiceIdcomes from the top-level (first-level) resource quota.Warm-up runs asynchronously. Track progress with the
/v1/warmup/statAPI.
-
FAQ
Q: Does RDMA acceleration speed up the first epoch?
Without data warm-up, the first epoch reads data from the storage instance and writes it to the cache, so performance is slightly slower than reading directly from storage. Acceleration is most noticeable on subsequent epochs when data is served from the cache. In RDMA mode, even the initial data pull benefits from higher network transfer efficiency than TCP, so the first epoch may also see some improvement. To guarantee acceleration on the first epoch, use data warm-up.
Q: How much extra resource does enabling local cache consume?
Mounting one file system or OSS bucket consumes 4 vCPUs and 14 GB of memory per node in standard mode, or 8 vCPUs and 16 GB of memory in RDMA mode. Each additional storage mount uses 1 vCPU and 2 GB of memory. Reserve resources before enabling.
Q: Is data warm-up supported for all instance types?
The warm-up API can be called from DSW or DLC instances under the same quota. DSW instances have the required role permissions by default and don't need additional configuration.