The TPC-DS benchmark is a widely recognized industry standard for measuring the performance and efficiency of large-scale data processing systems. Alibaba Cloud E-MapReduce (EMR) is the first big data system certified to run the 100 TB TPC-DS benchmark. This guide walks you through how to run the 99 TPC-DS SQL queries on an EMR cluster using OSS-HDFS, and how to apply optimization strategies for better performance.
Use cases
-
Big data performance evaluation
TPC-DS is a standard decision-support benchmark for evaluating the performance of big data workloads that use OSS-HDFS for data storage. It is especially useful for large-scale data analysis and query optimization workloads.
-
Data lake architecture validation
For data lake architectures built on Alibaba Cloud Object Storage Service (OSS), running the TPC-DS benchmark on an EMR cluster provides objective, standardized results to verify the efficiency of your architecture for complex query processing, ETL jobs, and data warehouse performance.
-
Understand performance trends
When you scale out a cluster, upgrade hardware, or adjust your storage strategy, the TPC-DS benchmark helps you understand how your system's overall performance changes with data volume and computing resources.
-
Cost-benefit analysis
OSS offers cost advantages over traditional HDFS. By measuring the performance of OSS-HDFS with the TPC-DS benchmark, you can analyze its cost-effectiveness for your specific business scenarios and make more economical decisions.
Background
TPC-DS is a global standard for evaluating data management systems, designed and maintained by the TPC. However, its official toolset is primarily for generating data and running SQL queries on a single machine, which is not suitable for performance evaluation in large-scale distributed environments. To run the benchmark in a big data analytics scenario, you need the following tools and an EMR cluster:
-
This tool, developed by Hortonworks, is customized for components like Hive and Spark in the Hadoop ecosystem. It effectively simulates big data query challenges and supports generating and executing complex SQL queries from the TPC-DS and TPC-H standards.
-
EMR cluster running version 5.15.1 or later
You must use an EMR cluster that runs version 5.15.1 or later. These versions are compatible with the Hortonworks Data Platform (HDP) 3 series, which corresponds to Hive 3.1.
Step 1: Create an EMR cluster and download the TPC-DS tool
-
Create an EMR cluster that runs version 5.15.1 or later.
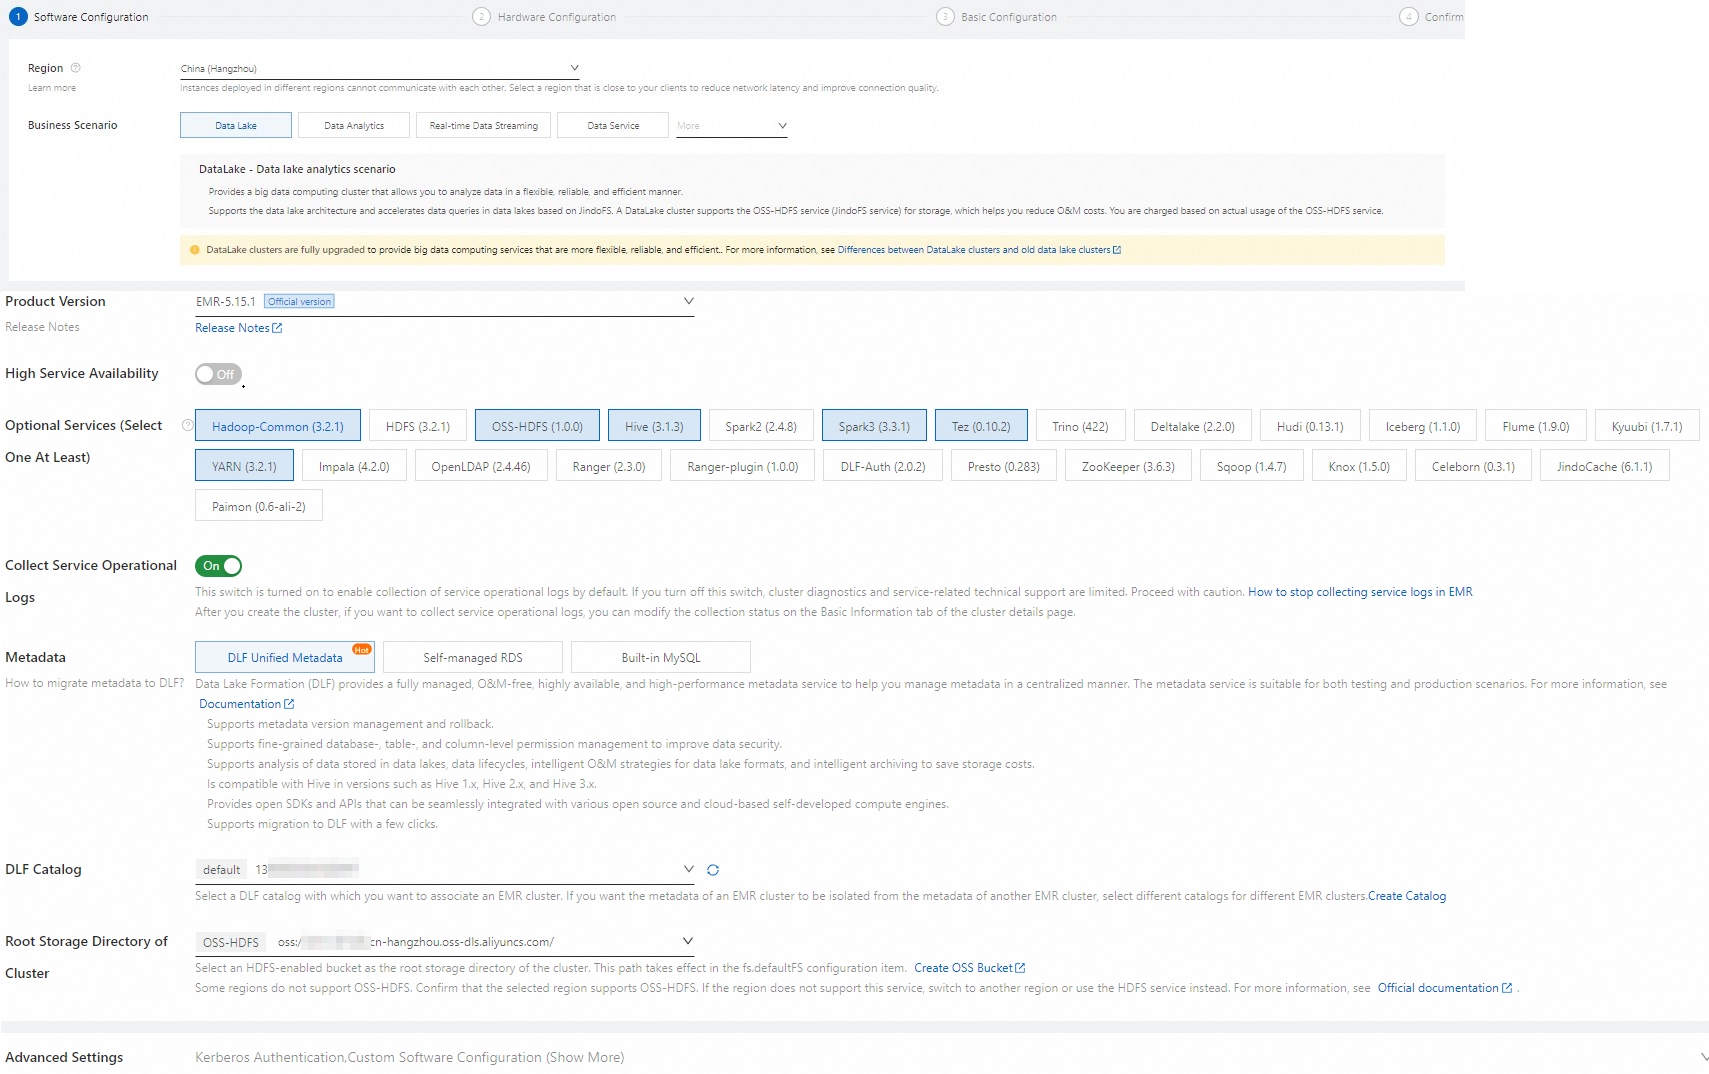
When you create the EMR cluster, note the following configurations. For information about other parameters, see Create a cluster.
Category
Parameter
Description
Software settings
Business scenario
Select New Data Lake.
Metadata
Select DLF Unified Metadata.
Root storage directory of cluster
Select a bucket for which OSS-HDFS is enabled.
Hardware settings
Node group
For the master node, enable Assign Public Network IP.
For optimal performance, select a big data or local SSD instance type for the core nodes. If you want to quickly complete the process with a small dataset, you can also select a general-purpose instance type with 4 vCPUs and 16 GiB of memory for the core nodes.
ImportantDetermine the cluster size based on the dataset you choose to run. Ensure that the total data disk capacity of the core nodes is more than three times the size of your dataset. For more information about datasets, see Step 3: Generate and load data.
-
Connect to the master node of the EMR cluster over SSH. For more information, see Connect to a cluster.
-
Install Git and Maven.
-
Run the following command to install Git.
sudo yum install -y git -
Download the latest binary tar.gz archive, such as apache-maven-3.9.6-bin.tar.gz, from the Apache Maven Project page.
-
Upload the downloaded file to the master node of the EMR cluster and decompress it.
tar zxf apache-maven-3.9.6-bin.tar.gz -
Configure the environment variables.
-
Go to the apache-maven-3.9.6 directory.
cd apache-maven-3.9.6 -
Configure the environment variables.
export MAVEN_HOME=`pwd`
export PATH=`pwd`/bin:$PATH
-
-
-
Download the TPC-DS benchmark tool.
-
Download the tool.
-
Download from GitHub
Access to GitHub from the Chinese mainland can be slow. If the download fails, you can download the tool locally.
git clone https://github.com/hortonworks/hive-testbench.git -
Download the hive-testbench-hdp3.zip file locally.
-
-
Upload the ZIP file to the master node of the EMR cluster.
-
On the master node of the EMR cluster, run the following command to decompress the ZIP file:
unzip hive-testbench-hdp3.zip
-
Step 2: Compile and package the data generator
-
(Optional) Configure an Alibaba Cloud mirror.
If you are in mainland China, you can use an Alibaba Cloud mirror to speed up Maven compilation. This reduces the compilation and packaging time for the data generator to 2 to 3 minutes.
-
Run the following command to create a directory.
mkdir -p ~/.m2/ -
Run the following command to copy the Maven configuration file to the new directory.
cp $MAVEN_HOME/conf/settings.xml ~/.m2/ -
In the
~/.m2/settings.xmlfile, add the mirror information as shown below.<mirror> <id>aliyun</id> <mirrorOf>central</mirrorOf> <name>Nexus aliyun</name> <url>http://maven.aliyun.com/nexus/content/groups/public</url> </mirror>
-
-
Go to the hive-testbench-hdp3 directory.
cd hive-testbench-hdp3 -
Download the tpcds-extern.patch file, upload it to the current directory, and then run the following command to copy it to the
tpcds-gen/patches/all/directory:cp tpcds-extern.patch ./tpcds-gen/patches/all/ -
Use the TPC-DS toolset to compile and package the data generator.
./tpcds-build.sh
Step 3: Generate and load data
-
Set the scale factor (SF).
The scale factor (SF) defines the dataset size, where SF=1 corresponds to 1 GB. For example, SF=1 means 1 GB, SF=100 means 100 GB, and SF=1000 means 1 TB. This tutorial uses a small dataset with a recommended SF of 3. Run the following command:
SF=3ImportantEnsure that the total data disk capacity is at least three times the dataset size. Otherwise, errors may occur in subsequent steps.
-
Check and clean up the Hive database.
-
Check whether the Hive database exists.
hive -e "desc database tpcds_bin_partitioned_orc_$SF" -
(Optional) Clean up an existing Hive database.
ImportantIf the
tpcds_bin_partitioned_orc_$SFHive database already exists, you must run the following command to drop it. Otherwise, subsequent steps will fail. If the database does not exist, skip this step.hive -e "drop database tpcds_bin_partitioned_orc_$SF cascade"
-
-
Configure the Hive service URL.
The default Hive service URL in the
tpcds-setup.shscript is inconsistent with the EMR cluster environment. Therefore, you must replace the Hive service URL in the script with the one from your EMR cluster. The specific command is as follows.sed -i 's/localhost:2181\/;serviceDiscoveryMode=zooKeeper;zooKeeperNamespace=hiveserver2?tez.queue.name=default/master-1-1:10000\//' tpcds-setup.shThe default Hive service URL configured in the script is:
jdbc:hive2://localhost:2181/;serviceDiscoveryMode=zooKeeper;zooKeeperNamespace=hiveserver2?tez.queue.name=default. The Hive service URL after it is replaced by using the preceding command is:jdbc:hive2://master-1-1:10000/. -
Fix an open source tool configuration issue.
Some parameters are not supported in open source versions such as Hive 2 and Hive 3. Using the TPC-DS tool without this change may cause job failures. Run the following command to replace the parameters.
sed -i 's/hive.optimize.sort.dynamic.partition.threshold=0/hive.optimize.sort.dynamic.partition=true/' settings/*.sql -
Generate and load the data.
When SF is 3, this step takes about 40 to 50 minutes. If the process runs correctly, the TPC-DS data tables are loaded into the
tpcds_bin_partitioned_orc_$SFdatabase. The generated data is automatically saved to the root storage directory that you specified when you created the EMR cluster, which is the root directory of the bucket where OSS-HDFS is enabled. Run the following command to load the data:./tpcds-setup.sh $SF -
Get Hive table statistics.
Run the Hive SQL
ANALYZEcommand to gather Hive table statistics, which can speed up subsequent queries. With SF=3, this step takes about 20 to 30 minutes.hive -f ./ddl-tpcds/bin_partitioned/analyze.sql \ --hiveconf hive.execution.engine=tez \ --database tpcds_bin_partitioned_orc_$SF
Step 4: Run the TPC-DS SQL queries
This step describes how to run TPC-DS SQL queries using Hive and Spark.
Run TPC-DS queries with Hive
-
Run a single SQL query using the following commands.
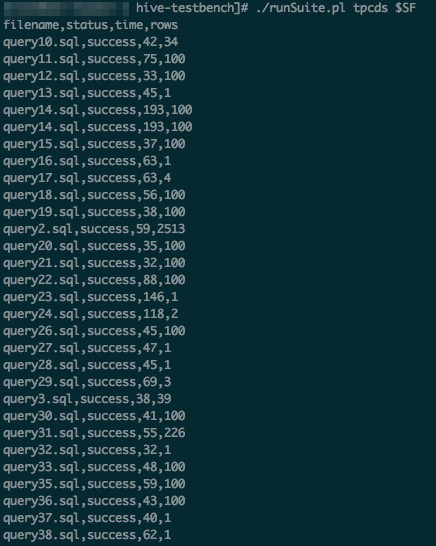
All 99 TPC-DS SQL files are stored in the sample-queries-tpcds working directory, including files such as query10.sql and query11.sql. At a scale factor (SF) of 3, all SQL queries can return results within 5 minutes.
ImportantBecause TPC-DS queries and data are randomly generated, it is normal for some SQL queries to return zero results.
cd sample-queries-tpcds hive --database tpcds_bin_partitioned_orc_$SF set hive.execution.engine=tez; source query10.sql; -
To run all 99 SQL queries sequentially with the provided script, run the following commands:
cd ~/hive-testbench-hdp3
# Generate a Hive configuration file and specify Tez as the execution engine.
echo 'set hive.execution.engine=tez;' > sample-queries-tpcds/testbench.settings
./runSuite.pl tpcds $SF
Run TPC-DS queries with Spark
This section demonstrates how to run TPC-DS SQL queries on the dataset from Step 3 using Spark Beeline connected to a Spark Thrift server.
E-MapReduce Spark supports data tables stored on various media, such as HDFS and OSS, and supports metadata from Data Lake Formation (DLF).
-
Run the Spark Beeline ANALYZE command to collect Hive table statistics. This accelerates subsequent SQL queries.
cd ~/hive-testbench-hdp3 spark-beeline -u jdbc:hive2://master-1-1:10001/tpcds_bin_partitioned_orc_$SF \ -f ./ddl-tpcds/bin_partitioned/analyze.sql -
Switch to the directory where the sample Spark SQL queries are located.
cd spark-queries-tpcds/ -
Run a single SQL query using the following command.
spark-beeline -u jdbc:hive2://master-1-1:10001/tpcds_bin_partitioned_orc_$SF -f q1.sql -
Run all 99 SQL queries sequentially using a script.
The TPC-DS toolset does not include a script for running Spark SQL queries in a batch. You can use the following sample script.
for q in `ls *.sql`; do spark-beeline -u jdbc:hive2://master-1-1:10001/tpcds_bin_partitioned_orc_$SF -f $q > $q.out doneImportantIn the q30.sql file, the column name c_last_review_date_sk is misspelled as c_last_review_date. Therefore, this SQL script is expected to fail.