Object Storage Service (OSS) lets you ingest audio and video streams to a bucket by using RTMP and store them in the HLS format. OSS also provides various authentication and authorization mechanisms for fine-grained access control over your audio and video data.
Prerequisites
Create a bucket. For more information, see Create buckets.
Basic operations
OSS supports using RTMP to upload H.264-encoded video and AAC-encoded audio. You can then access the media data by using a PlayURL.
Upload audio and video data
Call the PutLiveChannel operation to create a LiveChannel.
This operation returns a PublishURL for RTMP ingest and a PlayURL for playback.
Use the PublishURL to ingest audio and video streams.
OSS converts the uploaded streams to the HLS format, which consists of one M3U8 index file and multiple TS video segments. For more information, see RTMP stream ingest.
Obtain audio and video data
You can retrieve the audio and video data by accessing the PlayURL, which points to the M3U8 index file, in a web browser.
Mobile platforms like Android and iOS, and some desktop browsers like Microsoft Edge and Safari, can play videos directly by accessing the M3U8 file. Other browsers, such as Chrome, require an embedded JavaScript library like Video.js to play the video.
If you upload and retrieve media from a public-read-write bucket, anyone can access and modify your data. This can lead to data leaks and unexpected charges. By default, access to an OSS bucket is private, and all cross-origin requests are denied. To protect your data, we recommend using one or more of the following security features based on your use case: cross-origin resource sharing (CORS), hotlink protection, or signed URLs for private buckets.
Cross-origin resource sharing (CORS)
If you embed an OSS video on a third-party webpage instead of accessing it directly from the browser, you may encounter a cross-origin issue that prevents playback. This happens because web browsers enforce a same-origin policy. If your web server and OSS bucket are not in the same domain, the browser blocks the request by default.
For example, consider a web server at http://192.168.xx.xx:8080. A user visits a page from this server that contains an embedded video from an OSS bucket. The browser must then send a separate request to OSS to fetch the video data. The browser detects that the origin of the webpage (http://192.168.xx.xx:8080) is different from the origin of the OSS bucket. It then sends a pre-flight request to the bucket to request permission. By default, OSS does not have a CORS configuration and denies the request, which prevents the video from playing. The following figure illustrates this process: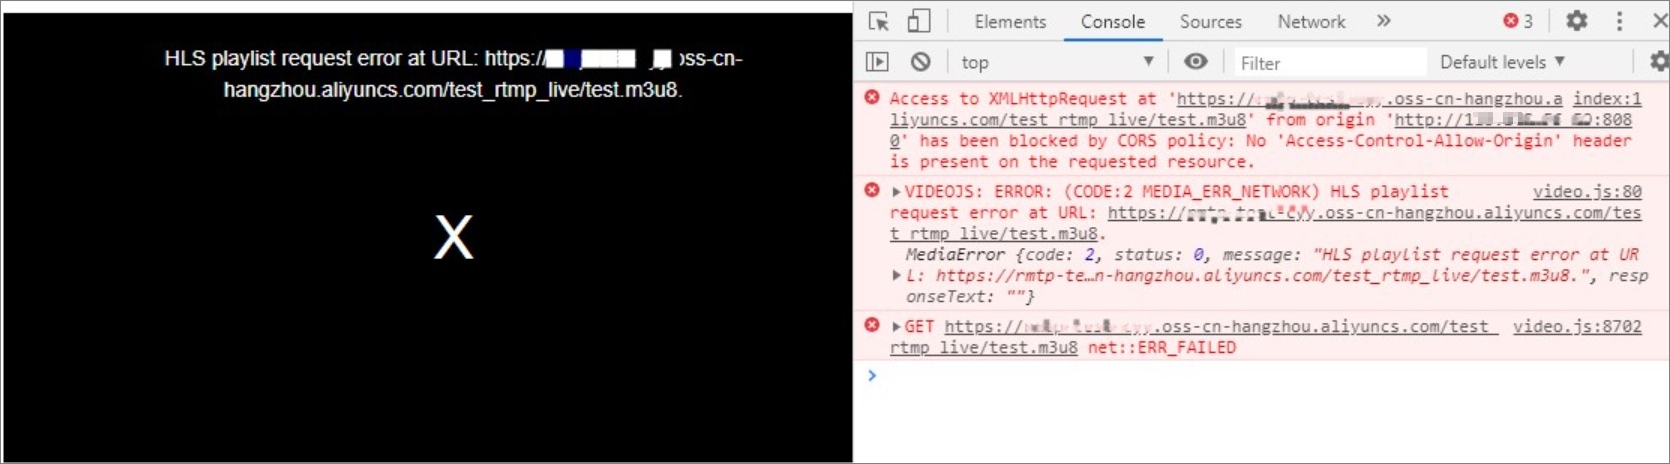
You can resolve this playback issue by configuring cross-origin resource sharing for your OSS bucket.
Log on to the OSS console.
Click Buckets, and then click the name of the target bucket.
In the left-side navigation pane, click .
Click Create Rule.
On the Create Rule panel, configure the parameters.
For this example, set Origin to http://192.168.xx.xx:8080. For information about other parameters, see Configure CORS.
If the origin is a specific domain name, enter the full domain name, such as www.example.com. Do not omit the subdomain, for example, example.com.
If the origin is a specific IP address, enter the full URL, including the protocol and port number, such as http://xx.xx.xx.xx:80. Do not enter only the IP address, for example, xx.xx.xx.xx.
Browsers typically cache CORS configurations for a few seconds to several minutes. If you want the new configuration to take effect immediately, clear your browser's cache and refresh the page.
Hotlink protection
While a CORS rule effectively prevents other websites from embedding your media resources, it does not apply if a user accesses the content in your OSS bucket directly. In this scenario, you can use the hotlink protection feature in OSS. This feature allows you to configure a Referer whitelist for your bucket to prevent unauthorized access.
By default, a bucket allows requests with an empty referer. This means a user can watch a video by directly accessing its PlayURL from a local browser. To prevent unauthorized use of your media, you can configure the bucket to disallow requests with an empty referer and add your trusted domains or IP addresses to a Referer whitelist. After this configuration, any third-party access from outside the whitelist is denied with a 403 Forbidden error.
Log on to the OSS console.
Click Buckets, and then click the name of the target bucket.
In the left-side navigation pane, choose Content Security>Hotlink Protection.
On the Hotlink Protection page, turn on Hotlink Protection.
Referer Whitelist: Enter the domain names or IP addresses, for example, *.aliyun.com.
You can set different Referer fields based on your use case. For examples, see Configure hotlink protection for a bucket.
Allow Empty Referer: Select No.
NoteIf you disallow requests with an empty referer and configure a Referer whitelist, only requests that include a Referer header from the whitelist can access your OSS resources.
If you disallow requests with an empty referer but do not configure a Referer whitelist, the setting has no effect, and requests with an empty referer are still allowed.
Click Save.
Signature mechanism for private buckets
To protect your data, the access control level of an OSS bucket is private by default. Therefore, when you need to read from or write to a private bucket, you must include a signature in your request to verify your permissions.
When you ingest a stream to a private bucket, you must sign the ingest URL before you can upload the audio and video files. For more information, see RTMP ingest URLs and signatures.
The following Python SDK example shows how to obtain a signed ingest URL:
The example returns a string in the following format:
rtmp://xxx.oss-cn-beijing.aliyuncs.com/live/xxx?playlistName=xxx&OSSAccessKeyId=xxx&Expires=xxx&Signature=xxx
The value of Signature is the signature, and the preceding parameters contain information about the video stream.
# -*- coding: utf-8 -*-
import oss2
from oss2.credentials import EnvironmentVariableCredentialsProvider

# Obtain access credentials from environment variables. Before you run this code, make sure that the OSS_ACCESS_KEY_ID and OSS_ACCESS_KEY_SECRET environment variables are set.
auth = oss2.ProviderAuth(EnvironmentVariableCredentialsProvider())
# The endpoint of the region where the bucket is located. For example, if the bucket is in the China (Hangzhou) region, set the endpoint to https://oss-cn-hangzhou.aliyuncs.com.
# The name of the bucket, for example, examplebucket.
bucket = oss2.Bucket(auth, 'https://oss-cn-hangzhou.aliyuncs.com', 'examplebucket')

# Create and configure the live channel.
# The index file contains three TS files, each with a duration of 5 seconds. The 5-second duration is a recommended value and the actual duration depends on the keyframe interval.
channel_name = "your_channel_name"
playlist_name = "your_playlist_name.m3u8"
frag_count_config = 3
frag_duration_config = 5
create_result = bucket.create_live_channel(
        channel_name,
        oss2.models.LiveChannelInfo(
            status = 'enabled',
            description = 'your description here',
            target = oss2.models.LiveChannelInfoTarget(
                playlist_name = playlist_name,
                frag_count = frag_count_config,
                frag_duration = frag_duration_config)))

# Get the signed RTMP ingest URL.
# The 'expires' parameter specifies the URL's validity period in seconds from the current time.
# After you obtain the signed_url, you can use an ingest tool to push the stream. The URL's expiration is checked only upon the initial connection. Once established, the stream will not be disconnected even if the URL expires.
signed_rtmp_url = bucket.sign_rtmp_url(channel_name, playlist_name, expires=3600)
print(signed_rtmp_url)
When accessing files in a private bucket, you must include a signature in the URL. HLS works by dynamically accessing an M3U8 index file and then sending multiple requests to download the latest TS segments based on the index. Each of these requests must include a signature in the URL.
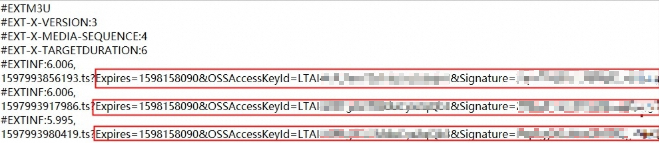
To simplify this process, OSS provides a dynamic signature mechanism for media access. You only need to add the x-oss-process=hls/sign parameter to the URL when you first access the M3U8 file. OSS then automatically signs all TS file URLs in the returned playlist using the same method as the M3U8 URL.
The following Python SDK example shows how to use the dynamic signature mechanism to access audio and video data:
# Get the dynamically signed URL for viewing the stream.
your_object_name = "test_rtmp_live/test.m3u8"
style = "hls/sign"
# By default, when OSS generates a signed URL, it escapes the forward slashes (/) in the full object path. This can render the URL unusable.
# Set slash_safe to True to prevent OSS from escaping the forward slashes. This ensures the signed URL is directly usable.
signed_download_url = bucket.sign_url('GET', your_object_name, 3600, params={'x-oss-process': style}, slash_safe=True)
print(signed_download_url)