This tutorial walks you through deploying an NGINX web server on Elastic Compute Service (ECS) using Resource Orchestration Service (ROS) for automated infrastructure provisioning and Object Storage Service (OSS) to host the NGINX installation package.
By the end of this tutorial, you will have:
Uploaded the NGINX installation package to an OSS bucket and obtained its public URL
Created a ROS stack that automatically provisions an ECS instance and installs NGINX
Verified that NGINX is running by accessing its homepage in a browser
Prerequisites
Before you begin, make sure you have:
An OSS bucket with its access control list (ACL) set to Private. See Create buckets.
An existing virtual private cloud (VPC), vSwitch, and security group. The security group must allow inbound TCP traffic on port 80 (HTTP) — NGINX serves traffic on this port. If the rule is missing, add it before you proceed. See Add a security group rule.
The NGINX installation package downloaded to your local machine.
Step 1: Upload the NGINX installation package to OSS
Upload the installation package to your bucket and set its ACL to Public Read so the ROS stack can download it during ECS instance initialization.
Log on to the OSS console.
In the navigation pane, click Buckets, then click the target bucket.
In the left-side navigation tree, choose Object Management > Objects.
Upload the NGINX installation package. When prompted, set Object ACL to Public Read and keep all other settings at their defaults. For upload instructions, see Upload objects.
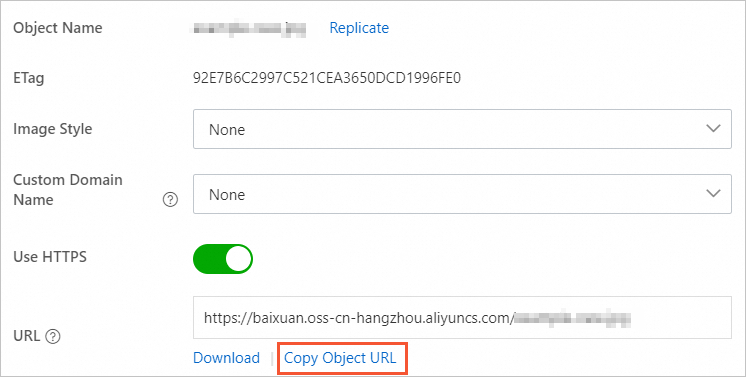
After the upload completes, click View Details to the right of the installation package, then click Copy Object URL.
Note: Save this URL — you will enter it as a template parameter in the next step.
Step 2: Create a ROS stack
ROS uses the template below to provision an ECS instance and run a startup script that downloads and installs NGINX automatically.
How it works
The ROS template does the following:
Accepts your VPC, vSwitch, security group, and ECS configuration as input parameters.
Provisions an ECS instance running CentOS 7.
Runs a user data script on first boot that downloads the NGINX installation package from OSS, installs it, and starts the NGINX service.
Outputs the NGINX URL (
http://<PublicIp>:80) once the stack is created.
Create the stack
Log on to the ROS console.
In the navigation pane, click Stacks.
In the top navigation bar, select China (Hangzhou) from the region drop-down list.
On the Stacks page, click Create Stack. Set Specify Template to Select an Existing Template and Template Import Method to Enter Template Content. In the Template Content section, select ROS and JSON, paste the following template into the code editor, then click Next. The template defines three sections:
Parameters: the inputs you configure in the next step (VPC, vSwitch, security group, ECS specs, and the NGINX download URL from Step 1)
Resources: the ECS instance (
WebServer) and the user data script that installs NGINX on first bootOutputs: the NGINX URL constructed from the instance's public IP
   {
     "ROSTemplateFormatVersion": "2015-09-01",
     "Description": "",
     "Parameters": {
       "NginxDownloadUrl": {
         "Type": "String",
         "Description": {
           "en": "The download path of nginx-*.rpm"
         },
         "Label": {
           "en": "Nginx Download Url"
         }
       },
       "ZoneId": {
         "AssociationProperty": "ALIYUN::ECS::Instance:ZoneId",
         "Type": "String",
         "Description": {
           "en": "Availability Zone ID.<br><b>note: <font color='blue'>before you make a selection, please confirm that the Availability Zone supports the specification of creating ECS resources, which is recommended to be different from other VSwitch Availability Zone</font></b>"
         },
         "Label": {
           "en": "VSwitch Availability Zone"
         }
       },
       "ImageId": {
         "Default": "centos_7",
         "Type": "String",
         "Description": {
           "en": "Image ID,Please use Centos7, see detail: <b><a href='https://www.alibabacloud.com/help/en/doc-detail/112977.html' target='_blank'><font color='blue'>Find the mirror</font></a></b>"
         },
         "Label": {
           "en": "Image"
         }
       },
       "InstanceType": {
         "AssociationProperty": "ALIYUN::ECS::Instance::InstanceType",
         "AssociationPropertyMetadata": {
           "ZoneId": "ZoneId"
         },
         "Label": {
           "en": "Instance Type"
         },
         "Type": "String",
         "Description": {
           "en": "<font color='blue'><b>1.Before selecting the model please confirm that the current available zone under the model is in stock, some models need to be reported in advance</b></font><br><font color='blue'><b>2.List of optional models</font><br></b></font>[ecs.c5.large <font color='green'>2vCPU 4GiB Intranet bandwidth1Gbps In-grid sending and receiving packages30MillionPPS</font>]<br></b>[ecs.c5.xlarge <font color='green'>4vCPU 8GiB Intranet bandwidth1.5Gbps In-grid sending and receiving packages50MillionPPS</font>]<br></b>[ecs.c5.2xlarge <font color='green'>8vCPU 16GiB Intranet bandwidth2.5Gbps In-grid sending and receiving packages80MillionPPS</font>]"
         }
       },
       "SystemDiskCategory": {
         "Default": "cloud_efficiency",
         "Label": {
           "en": "System Disk Type"
         },
         "Type": "String",
         "Description": {
           "en": "<font color='blue'><b>Optional values:</b></font><br>[cloud_efficiency: <font color='green'>Efficient Cloud Disk</font>]<br>[cloud_ssd: <font color='green'>SSD Cloud Disk</font>]<br>[cloud_essd: <font color='green'>ESSD Cloud Disk</font>]<br>[cloud: <font color='green'>Cloud Disk</font>]<br>[ephemeral_ssd: <font color='green'>Local SSD Cloud Disk</font>]"
         },
         "AllowedValues": [
           "cloud_efficiency",
           "cloud_ssd",
           "cloud",
           "cloud_essd",
           "ephemeral_ssd"
         ]
       },
       "InstancePassword": {
         "Type": "String",
         "Description": {
           "en": "Server login password, Length 8-30, must contain three(Capital letters, lowercase letters, numbers, ()`~!@#$%^&*_-+=|{}[]:;'<>,.?/ Special symbol in)."
         },
         "MinLength": 8,
         "Label": {
           "en": "Instance Password"
         },
         "AllowedPattern": "[0-9A-Za-z\\_\\-\\&:;'<>,=%`~!@#\\(\\)\\$\\^\\*\\+\\|\\{\\}\\[\\]\\.\\?\\/]+$",
         "NoEcho": true,
         "MaxLength": 30,
         "ConstraintDescription": {
           "en": "Length 8-30, must contain three(Capital letters, lowercase letters, numbers, ()`~!@#$%^&*_-+=|{}[]:;'<>,.?/ Special symbol in)."
         }
       },
       "SecurityGroup": {
         "Type": "String",
         "AssociationProperty": "ALIYUN::ECS::SecurityGroup::SecurityGroupId",
         "Description": {
           "en": "Please search the business security group ID starting with(sg-xxx)from console-ECS-Network & Security"
         },
         "Label": {
           "en": "Security Group ID"
         }
       },
       "VPC": {
         "AssociationProperty": "ALIYUN::ECS::VPC::VPCId",
         "Type": "String",
         "Description": {
           "en": "Please search the ID starting with (vpc-xxx)from console-Virtual Private Cloud"
         },
         "Label": {
           "en": "Existing VPC Instance ID"
         }
       },
       "VSwitch": {
         "AssociationProperty": "ALIYUN::ECS::VSwitch::VSwitchId",
         "Type": "String",
         "Description": {
           "en": "Please search the business vswitch ID starting with(vsw-xxx)from console-Virtual Private Cloud-VSwitches"
         },
         "Label": {
           "en": "VSwitch ID"
         }
       }
     },
     "Metadata": {
       "ALIYUN::ROS::Interface": {
         "ParameterGroups": [
           {
             "Parameters": [
               "VPC",
               "VSwitch",
               "SecurityGroup"
             ],
             "Label": {
               "default": {
                 "en": "Infrastructure Configuration"
               }
             }
           },
           {
             "Parameters": [
               "ZoneId",
               "ImageId",
               "InstanceType",
               "SystemDiskCategory",
               "InstancePassword",
               "NginxDownloadUrl"
             ],
             "Label": {
               "default": {
                 "en": "ECS Configuration"
               }
             }
           }
         ],
         "TemplateTags": [
           "acs:example:Linux application service: Create an NGINX application by using ROS_OOS"
         ]
       }
     },
     "Resources": {
       "WebServer": {
         "Type": "ALIYUN::ECS::Instance",
         "Properties": {
           "InternetMaxBandwidthOut": 80,
           "IoOptimized": "optimized",
           "VpcId": {
             "Ref": "VPC"
           },
           "UserData": {
             "Fn::Join": [
               "",
               [
                 "#!/bin/bash \n",
                 "NginxUrl=",
                 {
                   "Ref": "NginxDownloadUrl"
                 },
                 "\n",
                 "yum -y install aria2 \n",
                 "aria2c $NginxUrl \n",
                 "rpm -ivh nginx-*.rpm \n",
                 "yum -y install nginx \n",
                 "systemctl enable nginx.service \n",
                 "systemctl restart nginx.service \n"
               ]
             ]
           },
           "SecurityGroupId": {
             "Ref": "SecurityGroup"
           },
           "VSwitchId": {
             "Ref": "VSwitch"
           },
           "ImageId": {
             "Ref": "ImageId"
           },
           "InstanceType": {
             "Ref": "InstanceType"
           },
           "SystemDiskCategory": {
             "Ref": "SystemDiskCategory"
           },
           "Password": {
             "Ref": "InstancePassword"
           }
         }
       }
     },
     "Outputs": {
       "NginxUrl": {
         "Value": {
           "Fn::Join": [
             "",
             [
               "http://",
               {
                 "Fn::GetAtt": [
                   "WebServer",
                   "PublicIp"
                 ]
               },
               ":80"
             ]
           ]
         }
       }
     }
   }
In the Configure Parameters step, set the Stack Name, then configure the following parameters.
Section Parameter Value Infrastructure Configuration Existing VPC Instance ID Select a VPC from the drop-down list Infrastructure Configuration VSwitch ID Select a vSwitch from the drop-down list Infrastructure Configuration Security Group ID Select a security group from the drop-down list ECS Configuration VSwitch Availability Zone Select a zone based on your requirements, such as Zone G ECS Configuration Image Enter centos_7ECS Configuration Instance Type Select an instance type based on your requirements ECS Configuration System Disk Type Select cloud_ssdECS Configuration Instance Password Enter a custom login password for the ECS instance ECS Configuration Nginx Download Url Paste the object URL you copied in Step 1 In the Configure Stack Settings section, keep the default settings.
Click Create.
Verify the deployment
After the stack is created, confirm that NGINX is running:
Click the stack you created.
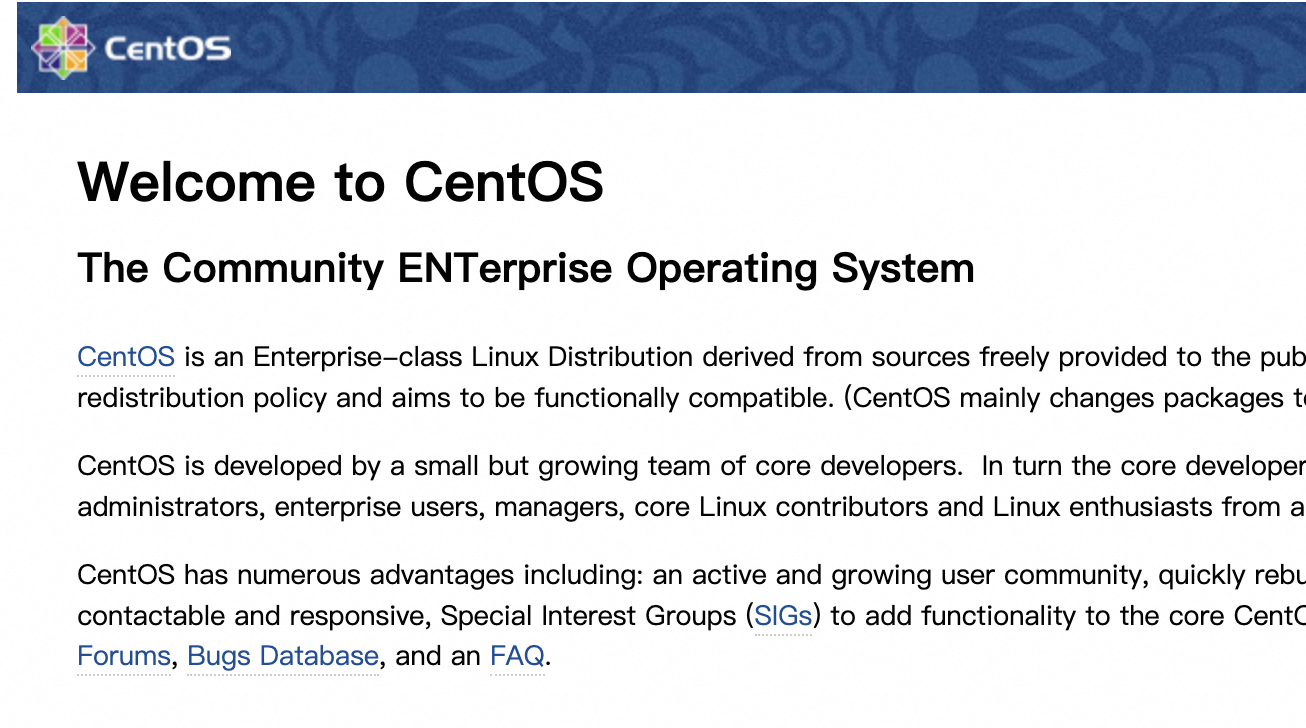
Click the Outputs tab, then click the NGINX URL.

Confirm that the CentOS homepage loads in your browser. This indicates that NGINX is running properly.
Troubleshooting
Cannot access the NGINX homepage
If the page does not load, the security group is likely missing an inbound rule for port 80. Add an inbound rule that allows TCP traffic on port 80 (HTTP). See Add a security group rule.