The bucket inventory feature periodically scans a bucket and generates CSV files with object metadata such as size and storage class. Use it when listing objects individually via the ListObjects API is too slow or costly.
Limits
-
Bucket inventory is available only for buckets in a specific region.
-
To use the incremental inventory feature, contact technical support.
Use cases
OSS provides full and incremental inventories. A full inventory snapshots all objects at a point in time; an incremental inventory captures objects added or modified within a time window. Full inventories generate daily or weekly; incremental inventories generate approximately every 10 minutes. Use cases include:
-
One-time data analysis: Configure a full inventory rule to generate a complete metadata snapshot for offline analysis.
-
Ongoing data analysis: Combine full and incremental inventories to build a unified metadata table. Write object metadata into your own table and query it with your Spark cluster or analytics engine.
How it works
-
Full inventory: Generates a complete snapshot of all objects in the bucket, daily or weekly.
-
Obtain permissions: OSS assumes a pre-authorized RAM role to scan the source bucket and write the report to the destination bucket.
-
Scan objects: OSS scans all matching objects based on the filter criteria in the inventory rule (prefix, version status, creation time, or size).
-
Generate inventory report: OSS aggregates scan results and writes a Gzip-compressed CSV file to the destination bucket.
-
-
Incremental inventory: Generated approximately every 10 minutes, capturing object change events (creations, metadata updates, and deletions).
-
Obtain permissions: OSS assumes a pre-authorized RAM role to scan the source bucket logs and write the report to the destination bucket.
-
Scan objects: OSS scans incremental logs based on the filter criteria in the inventory rule (prefix).
-
Generate inventory report: OSS aggregates scan results by backend partitions and writes a CSV file to the destination bucket.
-
Inventory generation runs asynchronously and does not affect normal bucket access.
Create a service role
OSS inventory uses a RAM role to read from the source bucket and write to the destination bucket. Create a dedicated service role following the principle of least privilege.
When you configure inventory via the console, the system automatically creates a role namedAliyunOSSRole. You can use this default role without creating one yourself. However, this role has full management permissions for all buckets in your account. Do not useAliyunOSSRolein production.
To manually create a least-privilege role, follow these steps:
-
Create a RAM role: Go to the Create RAM Role page. For Trusted entity type, select Cloud service. For Trusted service, select OSS.
-
Grant the RAM role permission to write to the destination bucket:
-
On the Create Policy page, click the Script editor tab. Paste the following policy into the policy editor and replace
dest-bucketwith the name of your destination bucket.{ "Version": "1", "Statement": [ { "Effect": "Allow", "Action": "oss:PutObject", "Resource": [ "acs:oss:*:*:dest-bucket/*" ] } ] } -
(Optional) Configure KMS encryption permissions: If the inventory report needs to be encrypted with a KMS key, you also need to grant the RAM role the
AliyunKMSCryptoUserAccesspermission or more fine-grained KMS-related permissions. -
On the Authorize page, click Add permissions. For Principal, select the RAM role that you created. For Permission policy, select the policy that you just created. Then, click Confirm authorization.
-
-
Record the role ARN: On the Roles page, find the RAM role that you created. Go to the Basic information page and copy the ARN of the role. You will need the role ARN to create an inventory rule. The ARN is in the format
acs:ram::{AccountID}:role/{RoleName}.
Full inventory
A full inventory scans all objects in the bucket or under a specified prefix. Note:
-
An inventory report is a snapshot taken when the scan starts. Changes made during the scan may not be reflected.
-
The first report generates immediately. Subsequent reports generate daily or weekly in early morning batches (UTC+8). Latency depends on object count and task queue depth.
Inventory rules
Console
-
Sign in to the OSS Management Console.
-
Navigate to the source bucket where you want to generate an inventory. In the left navigation pane, choose Data Management > Bucket inventory.
-
On the Bucket Inventory page, click Create Inventory.
-
In the Create Inventory panel, configure the following parameters:
Parameter
Description
Status
Set the status of the inventory configuration. Select Start.
Rule Name
Enter a unique ID for the inventory configuration. The ID must contain only lowercase letters, digits, and hyphens (-) and must not start or end with a hyphen (-).
Destination bucket
Specify the destination for the inventory. The destination bucket must be in the same region and Alibaba Cloud account as the source bucket.
-
To save the inventory to the
exampledir1/prefix in theexamplebucketbucket, enterexampledir1/. If the prefix does not exist, OSS automatically creates it. -
If you leave this field blank, the inventory is saved to the root directory of the destination bucket.
ImportantTo prevent impacts on OSS-HDFS services or data corruption risks, do not set the destination prefix to
.dlsdata/when you configure an inventory for a bucket where OSS-HDFS is enabled.Scope
-
Entire bucket: Scan all objects in the bucket.
-
Object Prefix: Scan only objects that have a specific prefix, such as exampledir1/.
Encryption Method
Select whether to encrypt the inventory file.
-
None: The inventory is not encrypted.
-
AES256: Encrypts the inventory by using the AES256 encryption algorithm.
-
KMS: Encrypts the inventory by using a KMS key. You can use an OSS-managed KMS key or create a KMS key in the same region as the destination bucket.
Frequency
Select how often the inventory is generated. Options are Weekly, Daily, or One-time export. If the bucket contains more than 10 billion objects, select Weekly to reduce costs and scan load.
Optional Fields
Select the object information to include in the inventory:
-
System metadata: Object Size, Storage Class, Last Modified Date, ETag, TransitionTime, Multipart Upload Status, Encryption Status, Object ACL, Object Type, CRC64, Last Access Time, and Last Access Timestamp.
NoteTo export the Last Access Time and Last Access Timestamp fields, you must first enable access tracking for the bucket. Otherwise, the values for these fields are null.
-
Custom metadata: Number of Tags
Advanced Filtering
ImportantThe following filter options are supported only in the China (Qingdao), China (Hohhot), and Germany (Frankfurt) regions.
To filter exported objects by size or last modified time, turn on the Advanced Filtering toggle.
The supported filter options are:
-
Time Range: Set a start and end time for the last modification date of the objects to be exported. The time is accurate to the second.
-
Object Size Range: Set the minimum and maximum size of the objects to be exported.
ImportantThe minimum and maximum values must be greater than 0 B. The maximum value cannot exceed 48.8 TB.
-
Storage Class: Specify which storage classes to export. You can export objects from Standard, Infrequent Access, Archive, Cold Archive, and Deep Cold Archive storage classes.
Object Versions
If versioning is enabled for the bucket, you can choose to export the Current version or All versions.
-
-
Select I understand and agree to grant Alibaba Cloud OSS the permissions to access bucket resources, then click OK.
If the bucket contains many objects, generating the inventory may take some time. For information about how to check whether an inventory has been generated, see How do I check whether an inventory has been generated?.
SDK
import com.aliyun.oss.*;
import com.aliyun.oss.common.auth.*;
import com.aliyun.oss.common.comm.SignVersion;
import com.aliyun.oss.model.*;
import java.util.ArrayList;
import java.util.List;

public class Demo {

    public static void main(String[] args) throws Exception {
        // In this example, the endpoint of the China (Hangzhou) region is used. Specify your actual endpoint.
        String endpoint = "https://oss-cn-hangzhou.aliyuncs.com";
        // Obtain access credentials from environment variables. Before you run the sample code, make sure that the OSS_ACCESS_KEY_ID and OSS_ACCESS_KEY_SECRET environment variables are configured.
        EnvironmentVariableCredentialsProvider credentialsProvider = CredentialsProviderFactory.newEnvironmentVariableCredentialsProvider();
        // Specify the name of the bucket. Example: examplebucket.
        String bucketName = "examplebucket";
        // Specify the name of the bucket in which you want to store the generated inventory lists.
        String destBucketName ="yourDestinationBucketName";
        // Specify the account ID granted by the bucket owner.
        String accountId ="yourDestinationBucketAccountId";
        // Specify the name of the RAM role that is granted the permissions to read all objects in the bucket for which you want to configure the inventory and the permissions to write data to the bucket in which you want to store the generated inventory lists.
        String roleArn ="yourDestinationBucketRoleArn";
        // Specify the region in which the bucket is located. For example, if the bucket is located in the China (Hangzhou) region, set the region to cn-hangzhou.
        String region = "cn-hangzhou";

        // Create an OSS Client instance.
        // Call the shutdown method to release associated resources when the OSS Client is no longer in use.
        ClientBuilderConfiguration clientBuilderConfiguration = new ClientBuilderConfiguration();
        clientBuilderConfiguration.setSignatureVersion(SignVersion.V4);
        OSS ossClient = OSSClientBuilder.create()
        .endpoint(endpoint)
        .credentialsProvider(credentialsProvider)
        .clientConfiguration(clientBuilderConfiguration)
        .region(region)
        .build();

        try {
            // Create an inventory.
            InventoryConfiguration inventoryConfiguration = new InventoryConfiguration();

            // Specify the inventory name.
            String inventoryId = "testid";
            inventoryConfiguration.setInventoryId(inventoryId);

            // Specify the object attributes that are included in inventory lists.
            List<String> fields = new ArrayList<String>();
            fields.add(InventoryOptionalFields.Size);
            fields.add(InventoryOptionalFields.LastModifiedDate);
            fields.add(InventoryOptionalFields.IsMultipartUploaded);
            fields.add(InventoryOptionalFields.StorageClass);
            fields.add(InventoryOptionalFields.ETag);
            fields.add(InventoryOptionalFields.EncryptionStatus);
            inventoryConfiguration.setOptionalFields(fields);

            // Specify whether to generate inventory lists on a daily or weekly basis. The following code provides an example on how to generate the inventory lists on a weekly basis. Weekly indicates that the inventory lists are generated once a week and Daily indicates that the inventory lists are generated once a day.
            inventoryConfiguration.setSchedule(new InventorySchedule().withFrequency(InventoryFrequency.Weekly));

            // Specify that the inventory lists include only the current version of objects. If you set the InventoryIncludedObjectVersions parameter to All, all versions of objects are included in the inventory lists. This configuration takes effect only when you enable versioning for the bucket.
            inventoryConfiguration.setIncludedObjectVersions(InventoryIncludedObjectVersions.Current);

            // Specify whether the inventory is enabled. Valid values: true and false. Set the value to true to enable the inventory. Set the value to false to disable the inventory.
            inventoryConfiguration.setEnabled(true);

            // Specify the rule used to filter the objects to include in the inventory lists. The following code provides an example on how to filter the objects by prefix.
            InventoryFilter inventoryFilter = new InventoryFilter().withPrefix("obj-prefix");
            inventoryConfiguration.setInventoryFilter(inventoryFilter);

            // Specify the destination bucket in which you want to store the generated inventory lists.
            InventoryOSSBucketDestination ossInvDest = new InventoryOSSBucketDestination();
            // Specify the prefix of the path in which you want to store the generated inventory lists.
            ossInvDest.setPrefix("destination-prefix");
            // Specify the format of the inventory lists.
            ossInvDest.setFormat(InventoryFormat.CSV);
            // Specify the ID of the account to which the destination bucket belongs.
            ossInvDest.setAccountId(accountId);
            // Specify the role ARN of the destination bucket.
            ossInvDest.setRoleArn(roleArn);
            // Specify the name of the destination bucket.
            ossInvDest.setBucket(destBucketName);

            // The following code provides an example on how to encrypt the inventory lists by using customer master keys (CMKs) hosted in Key Management System (KMS).
            // InventoryEncryption inventoryEncryption = new InventoryEncryption();
            // InventoryServerSideEncryptionKMS serverSideKmsEncryption = new InventoryServerSideEncryptionKMS().withKeyId("test-kms-id");
            // inventoryEncryption.setServerSideKmsEncryption(serverSideKmsEncryption);
            // ossInvDest.setEncryption(inventoryEncryption);

            // The following code provides an example on how to encrypt the inventory lists on the OSS server.
            // InventoryEncryption inventoryEncryption = new InventoryEncryption();
            // inventoryEncryption.setServerSideOssEncryption(new InventoryServerSideEncryptionOSS());
            // ossInvDest.setEncryption(inventoryEncryption);

            // Specify the destination for the generated inventory lists.
            InventoryDestination destination = new InventoryDestination();
            destination.setOssBucketDestination(ossInvDest);
            inventoryConfiguration.setDestination(destination);

            // Configure the inventory for the bucket.
            ossClient.setBucketInventoryConfiguration(bucketName, inventoryConfiguration);
        } catch (OSSException oe) {
            System.out.println("Caught an OSSException, which means your request made it to OSS, "
                    + "but was rejected with an error response for some reason.");
            System.out.println("Error Message:" + oe.getErrorMessage());
            System.out.println("Error Code:" + oe.getErrorCode());
            System.out.println("Request ID:" + oe.getRequestId());
            System.out.println("Host ID:" + oe.getHostId());
        } catch (ClientException ce) {
            System.out.println("Caught an ClientException, which means the client encountered "
                    + "a serious internal problem while trying to communicate with OSS, "
                    + "such as not being able to access the network.");
            System.out.println("Error Message:" + ce.getMessage());
        } finally {
            if (ossClient != null) {
                ossClient.shutdown();
            }
        }
    }
}const OSS = require('ali-oss');
const client = new OSS({
// The region of the bucket. For example, for China (Hangzhou), use oss-cn-hangzhou.
region: 'yourregion',
// Obtain access credentials from environment variables. Before running this example, ensure the OSS_ACCESS_KEY_ID and OSS_ACCESS_KEY_SECRET environment variables are set.
accessKeyId: process.env.OSS_ACCESS_KEY_ID,
accessKeySecret: process.env.OSS_ACCESS_KEY_SECRET,
// The name of the bucket.
bucket: 'yourbucketname'
});
const inventory = {
// The inventory ID.
id: 'default',
// Specifies whether the inventory is enabled. Valid values: true and false.
isEnabled: false,
// (Optional) The prefix for filtering objects.
prefix: 'ttt',
OSSBucketDestination: {
// The format of the inventory.
format: 'CSV',
// The account ID of the destination bucket owner.
accountId: '<Your AccountId>',
// The name of the role configured for the destination bucket.
rolename: 'AliyunOSSRole',
// The name of the destination bucket.
bucket: '<Your BucketName>',
// (Optional) The prefix for the destination storage path.
prefix: '<Your Prefix>',
// To encrypt the inventory by using SSE-OSS, use the following code.
//encryption: {'SSE-OSS': ''},
// To encrypt the inventory by using SSE-KMS, use the following code.
/*
encryption: {
'SSE-KMS': {
keyId: 'test-kms-id',
},
*/
},
// The frequency at which the inventory is generated. `WEEKLY` generates a report once a week; `DAILY` generates one once a day.
frequency: 'Daily',
// The object versions to include in the report. `All` includes all versions; `Current` includes only the current version.
includedObjectVersions: 'All',
optionalFields: {
// (Optional) The optional fields to include in the inventory.
field: ["Size", "LastModifiedDate", "ETag", "StorageClass", "IsMultipartUploaded", "EncryptionStatus"]
},
}
async function putInventory(){
// The name of the bucket for which to add the inventory configuration.
const bucket = '<Your BucketName>';
try {
await client.putBucketInventory(bucket, inventory);
console.log('Inventory configuration added.')
} catch(err) {
console.log('Failed to add inventory configuration: ', err);
}
}
putInventory()import argparse
import alibabacloud_oss_v2 as oss
# Create a command line parameter parser and describe the purpose of the script. The example describes how to create an inventory for a bucket.
parser = argparse.ArgumentParser(description="put bucket inventory sample")
# Specify the command line parameters, including the required region, bucket name, endpoint, user ID, Alibaba Cloud Resource Name (ARN) of the RAM role, and inventory name.
parser.add_argument('--region', help='The region in which the bucket is located.', required=True)
parser.add_argument('--bucket', help='The name of the bucket.', required=True)
parser.add_argument('--endpoint', help='The domain names that other services can use to access OSS')
parser.add_argument('--user_id', help='User account ID.', required=True)
parser.add_argument('--arn', help='The Alibaba Cloud Resource Name (ARN) of the role that has the permissions to read all objects from the source bucket and write objects to the destination bucket. Format: `acs:ram::uid:role/rolename`.', required=True)
parser.add_argument('--inventory_id', help='The name of the inventory.', required=True)
def main():
# Parse the command line parameters to obtain the values specified by the user.
args = parser.parse_args()
# Obtain access credentials from environment variables for authentication.
credentials_provider = oss.credentials.EnvironmentVariableCredentialsProvider()
# Use the default configurations of the SDK to create a configuration object and specify the credential provider.
cfg = oss.config.load_default()
cfg.credentials_provider = credentials_provider
# Specify the region attribute of the configuration object based on the command line parameters specified by the user.
cfg.region = args.region
# If a custom endpoint is provided, modify the endpoint parameter in the configuration object.
if args.endpoint is not None:
cfg.endpoint = args.endpoint
# Use the preceding configurations to initialize the OSSClient instance and allow the instance to interact with OSS.
client = oss.Client(cfg)
# Send a request to create an inventory for a bucket.
result = client.put_bucket_inventory(oss.PutBucketInventoryRequest(
bucket=args.bucket, # The name of the bucket.
inventory_id=args.inventory_id, # The ID of the inventory.
inventory_configuration=oss.InventoryConfiguration(
included_object_versions='All', # Specify that inventory lists include all versions of objects.
optional_fields=oss.OptionalFields(
fields=[ # The optional fields, such as the size and last modified time of objects.
oss.InventoryOptionalFieldType.SIZE,
oss.InventoryOptionalFieldType.LAST_MODIFIED_DATE,
],
),
id=args.inventory_id, # The ID of the inventory.
is_enabled=True, # Specify whether to enable the inventory feature for the bucket. In this example, the inventory feature is enabled.
destination=oss.InventoryDestination(
oss_bucket_destination=oss.InventoryOSSBucketDestination(
format=oss. InventoryFormatType.CSV, # Specify that the output format of the inventory lists is CSV.
account_id=args.user_id, # The account ID of the user.
role_arn=args.arn, # The ARN of the RAM role, which has the permissions to read the objects in the source bucket and write objects to the destination bucket.
bucket=f'acs:oss:::{args.bucket}', # The name of the destination bucket.
prefix='aaa', # Specify the prefix contained in the names of the objects that you want to include in inventory lists.
),
),
schedule=oss.InventorySchedule(
frequency=oss. InventoryFrequencyType.DAILY, # Specify whether to generate inventory lists on a daily or weekly basis. In this example, inventory lists are generated on a daily basis.
),
filter=oss.InventoryFilter(
lower_size_bound=1024, # Specify the minimum size of the object that you want to include in inventory lists. Unit: bytes.
upper_size_bound=1048576, # Specify the maximum size of the object that you want to include in inventory lists. Unit: bytes.
storage_class='ColdArchive', # # Specify the storage classes of objects that you want to include in inventory lists.
prefix='aaa', # Specify the prefix that is used to filter inventories.
last_modify_begin_time_stamp=1637883649, # Specify the beginning of the time range during which the object was last modified.
last_modify_end_time_stamp=1638347592, # Specify the end of the time range during which the object was last modified.
),
),
))
# Display the HTTP status code of the operation and request ID to check the request status.
print(f'status code: {result.status_code},'
f' request id: {result.request_id},'
)
# Call the main function to start the processing logic when the script is directly run.
if __name__ == "__main__":
main() # Specify the entry points in the functions of the script. The control program flow starts here.using Aliyun.OSS;
using Aliyun.OSS.Common;
// Specify the endpoint of the region in which the bucket is located. For example, if the bucket is located in the China (Hangzhou) region, set the endpoint to https://oss-cn-hangzhou.aliyuncs.com.
var endpoint = "yourEndpoint";
// Obtain access credentials from environment variables. Before you run the sample code, make sure that the OSS_ACCESS_KEY_ID and OSS_ACCESS_KEY_SECRET environment variables are configured.
var accessKeyId = Environment.GetEnvironmentVariable("OSS_ACCESS_KEY_ID");
var accessKeySecret = Environment.GetEnvironmentVariable("OSS_ACCESS_KEY_SECRET");
// Specify the name of the bucket.
var bucketName = "examplebucket";
// Specify the account ID granted by the bucket owner.
var accountId ="yourDestinationBucketAccountId";
// Specify the name of the RAM role that is granted the permissions to read all objects in the bucket for which you want to configure the inventory and the permissions to write data to the bucket in which you want to store the generated inventory lists.
var roleArn ="yourDestinationBucketRoleArn";
// Specify the name of the bucket in which you want to store the generated inventory lists.
var destBucketName ="yourDestinationBucketName";
// Specify the region in which the bucket is located. For example, if the bucket is located in the China (Hangzhou) region, set the region to cn-hangzhou.
const string region = "cn-hangzhou";
// Create a ClientConfiguration instance and modify the default parameters based on your requirements.
var conf = new ClientConfiguration();
// Use the signature algorithm V4.
conf.SignatureVersion = SignatureVersion.V4;
// Create an OSSClient instance.
var client = new OssClient(endpoint, accessKeyId, accessKeySecret, conf);
client.SetRegion(region);
try
{
// Create an inventory for the bucket.
var config = new InventoryConfiguration();
// Specify the name of the inventory.
config.Id = "report1";
// Specify whether to enable the inventory for the bucket. Valid values: true and false. If this parameter is set to true, the inventory is enabled.
config.IsEnabled = true;
// Specify the rule that is used to filter the objects included in inventory lists. The following code provides an example on how to filter the objects by prefix.
config.Filter = new InventoryFilter("filterPrefix");
// Configure the bucket in which you want to store the generated inventory lists.
config.Destination = new InventoryDestination();
config.Destination.OSSBucketDestination = new InventoryOSSBucketDestination();
// Specify the format of the inventory lists.
config.Destination.OSSBucketDestination.Format = InventoryFormat.CSV;
// Specify the ID of the account to which the destination bucket belongs.
config.Destination.OSSBucketDestination.AccountId = accountId;
// Specify the Alibaba Cloud Resource Name (ARN) of the RAM role that is used to access the destination bucket.
config.Destination.OSSBucketDestination.RoleArn = roleArn;
// Specify the name of the bucket in which you want to store the generated inventory lists.
config.Destination.OSSBucketDestination.Bucket = destBucketName;
// Specify the prefix of the path in which you want to store the generated inventory lists.
config.Destination.OSSBucketDestination.Prefix = "prefix1";
// Specify whether to generate the inventory lists on a daily or weekly basis. The following code provides an example on how to generate the inventory lists on a weekly basis. A value of Weekly indicates that the inventory lists are generated on a weekly basis. A value of Daily indicates that the inventory lists are generated on a daily basis.
config.Schedule = new InventorySchedule(InventoryFrequency.Daily);
// Specify that the inventory lists include only the current versions of objects. If you set the InventoryIncludedObjectVersions parameter to All, all versions of objects are included in the inventory lists. This configuration takes effect only when versioning is enabled for the bucket.
config.IncludedObjectVersions = InventoryIncludedObjectVersions.All;
// Specify the object attributes that are included in the inventory lists.
config.OptionalFields.Add(InventoryOptionalField.Size);
config.OptionalFields.Add(InventoryOptionalField.LastModifiedDate);
config.OptionalFields.Add(InventoryOptionalField.StorageClass);
config.OptionalFields.Add(InventoryOptionalField.IsMultipartUploaded);
config.OptionalFields.Add(InventoryOptionalField.EncryptionStatus);
config.OptionalFields.Add(InventoryOptionalField.ETag);
var req = new SetBucketInventoryConfigurationRequest(bucketName, config);
client.SetBucketInventoryConfiguration(req);
Console.WriteLine("Set bucket:{0} InventoryConfiguration succeeded", bucketName);
}
catch (OssException ex)
{
Console.WriteLine("Failed with error code: {0}; Error info: {1}. \nRequestID:{2}\tHostID:{3}",
ex.ErrorCode, ex.Message, ex.RequestId, ex.HostId);
}#include <alibabacloud/oss/OssClient.h>
using namespace AlibabaCloud::OSS;
int main(void)
{
/* Initialize information about the account that is used to access OSS. */
/* Specify the endpoint of the region in which the bucket is located. For example, if the bucket is located in the China (Hangzhou) region, set the endpoint to https://oss-cn-hangzhou.aliyuncs.com. */
std::string Endpoint = "yourEndpoint";
/* Specify the region in which the bucket is located. For example, if the bucket is located in the China (Hangzhou) region, set the region to cn-hangzhou. */
std::string Region = "yourRegion";
/* Specify the name of the bucket. Example: examplebucket. */
std::string BucketName = "examplebucket";
/* Initialize resources, such as network resources. */
InitializeSdk();
ClientConfiguration conf;
conf.signatureVersion = SignatureVersionType::V4;
/* Obtain access credentials from environment variables. Before you run the sample code, make sure that the OSS_ACCESS_KEY_ID and OSS_ACCESS_KEY_SECRET environment variables are configured. */
auto credentialsProvider = std::make_shared<EnvironmentVariableCredentialsProvider>();
OssClient client(Endpoint, credentialsProvider, conf);
client.SetRegion(Region);
InventoryConfiguration inventoryConf;
/* Specify the name of the inventory. The name must be globally unique in the current bucket. */
inventoryConf.setId("inventoryId");
/* Specify whether to enable inventory for the bucket. Valid values: true and false. */
inventoryConf.setIsEnabled(true);
/* (Optional) Specify the prefix in the names of the objects. After you specify the prefix, information about the objects whose names contain the prefix is included in the inventory lists. */
inventoryConf.setFilter(InventoryFilter("objectPrefix"));
InventoryOSSBucketDestination dest;
/* Specify the format of the exported inventory lists. */
dest.setFormat(InventoryFormat::CSV);
/* Specify the ID of the Alibaba Cloud account to which the bucket owner grants the permissions to perform the operation. */
dest.setAccountId("10988548********");
/* Specify the name of the RAM role to which the bucket owner grants permissions to perform the operation. */
dest.setRoleArn("acs:ram::10988548********:role/inventory-test");
/* Specify the bucket in which you want to store the generated inventory lists. */
dest.setBucket("yourDstBucketName");
/* Specify the prefix of the path in which you want to store the generated inventory lists. */
dest.setPrefix("yourPrefix");
/* (Optional) Specify the method that is used to encrypt inventory lists. Valid values: SSEOSS and SSEKMS. */
//dest.setEncryption(InventoryEncryption(InventorySSEOSS()));
//dest.setEncryption(InventoryEncryption(InventorySSEKMS("yourKmskeyId")));
inventoryConf.setDestination(dest);
/* Specify the time interval at which inventory lists are exported. Valid values: Daily and Weekly. */
inventoryConf.setSchedule(InventoryFrequency::Daily);
/* Specify whether to include all versions of objects or only the current versions of objects in the inventory lists. Valid values: All and Current. */
inventoryConf.setIncludedObjectVersions(InventoryIncludedObjectVersions::All);
/* (Optional) Specify the fields that are included in inventory lists based on your requirements. */
InventoryOptionalFields field {
InventoryOptionalField::Size, InventoryOptionalField::LastModifiedDate,
InventoryOptionalField::ETag, InventoryOptionalField::StorageClass,
InventoryOptionalField::IsMultipartUploaded, InventoryOptionalField::EncryptionStatus
};
inventoryConf.setOptionalFields(field);
/* Configure the inventory. */
auto outcome = client.SetBucketInventoryConfiguration(
SetBucketInventoryConfigurationRequest(BucketName, inventoryConf));
if (!outcome.isSuccess()) {
/* Handle exceptions. */
std::cout << "Set Bucket Inventory fail" <<
",code:" << outcome.error().Code() <<
",message:" << outcome.error().Message() <<
",requestId:" << outcome.error().RequestId() << std::endl;
return -1;
}
/* Release resources, such as network resources. */
ShutdownSdk();
return 0;
}package main
import (
"context"
"flag"
"log"
"github.com/aliyun/alibabacloud-oss-go-sdk-v2/oss"
"github.com/aliyun/alibabacloud-oss-go-sdk-v2/oss/credentials"
)
// Define global variables.
var (
region string // The region in which the bucket is located.
bucketName string // The name of the bucket.
)
// Specify the init function used to initialize command line parameters.
func init() {
flag.StringVar(®ion, "region", "", "The region in which the bucket is located.")
flag.StringVar(&bucketName, "bucket", "", "The name of the bucket.")
}
func main() {
// Parse command line parameters.
flag.Parse()
var (
accountId = "account id of the bucket" // Specify the ID of the Alibaba Cloud account to which the bucket owner grants permissions to perform the operation. Example: 109885487000****.
inventoryId = "inventory id" // The name of the inventory. The name must be globally unique in the bucket.
)
// Check whether the name of the bucket is specified.
if len(bucketName) == 0 {
flag.PrintDefaults()
log.Fatalf("invalid parameters, bucket name required")
}
// Check whether the region is specified.
if len(region) == 0 {
flag.PrintDefaults()
log.Fatalf("invalid parameters, region required")
}
// Load the default configurations and specify the credential provider and region.
cfg := oss.LoadDefaultConfig().
WithCredentialsProvider(credentials.NewEnvironmentVariableCredentialsProvider()).
WithRegion(region)
// Create an OSS client.
client := oss.NewClient(cfg)
// Create a request to configure an inventory for the bucket.
putRequest := &oss.PutBucketInventoryRequest{
Bucket: oss.Ptr(bucketName), // The name of the bucket.
InventoryId: oss.Ptr(inventoryId), // The name of the inventory specified by the user.
InventoryConfiguration: &oss.InventoryConfiguration{
Id: oss.Ptr(inventoryId), // The name of the inventory specified by the user.
IsEnabled: oss.Ptr(true), // Enable the inventory.
Filter: &oss.InventoryFilter{
Prefix: oss.Ptr("filterPrefix"), // Specify the rule that is used to filter the objects included in inventories.
LastModifyBeginTimeStamp: oss.Ptr(int64(1637883649)), // The timestamp that specifies the start time of the last modification.
LastModifyEndTimeStamp: oss.Ptr(int64(1638347592)), // The timestamp that specifies the end time of the last modification.
LowerSizeBound: oss.Ptr(int64(1024)), // The lower size limit of files (unit: bytes).
UpperSizeBound: oss.Ptr(int64(1048576)), // The upper size limit of files (unit: bytes).
StorageClass: oss.Ptr("Standard,IA"), // The storage class.
},
Destination: &oss.InventoryDestination{
OSSBucketDestination: &oss.InventoryOSSBucketDestination{
Format: oss.InventoryFormatCSV, // The format of the exported inventory lists.
AccountId: oss.Ptr(accountId), // Specify the ID of the account that is granted permissions by the bucket owner to perform the operation. Example: 109885487000****.
RoleArn: oss.Ptr("acs:ram::" + accountId + ":role/AliyunOSSRole"), // Specify the name of the RAM role that is granted permissions by the bucket owner to perform the operation. Example: acs:ram::109885487000****:role/ram-test.
Bucket: oss.Ptr("acs:oss:::" + bucketName), // Specify the name of the bucket in which you want to store the generated inventory lists.
Prefix: oss.Ptr("export/"), // Specify the prefix of the path in which you want to store the generated inventory lists.
},
},
Schedule: &oss.InventorySchedule{
Frequency: oss.InventoryFrequencyDaily, // The frequency at which the inventory list is exported (daily).
},
IncludedObjectVersions: oss.Ptr("All"), // Specify whether to include all versions of objects or only the current versions of objects in the inventory list.
},
}
// Execute the request.
putResult, err := client.PutBucketInventory(context.TODO(), putRequest)
if err != nil {
log.Fatalf("failed to put bucket inventory %v", err)
}
// Display the result.
log.Printf("put bucket inventory result:%#v\n", putResult)
}
ossutil
Create a file named inventory-configuration.xml and add the following content:
<?xml version="1.0" encoding="UTF-8"?>
<InventoryConfiguration>
  <Id>report1</Id>
    <IsEnabled>true</IsEnabled>
  <Destination>
    <OSSBucketDestination>
      <Format>CSV</Format>
      <AccountId>100000000000000</AccountId>
      <RoleArn>acs:ram::100000000000000:role/AliyunOSSRole</RoleArn>
      <Bucket>acs:oss:::destbucket</Bucket>
      <Prefix>prefix1/</Prefix>
      <Encryption>
        <SSE-KMS>
          <KeyId>keyId</KeyId>
        </SSE-KMS>
      </Encryption>
    </OSSBucketDestination>
  </Destination>
  <Schedule>
    <Frequency>Daily</Frequency>
  </Schedule>
    <IncludedObjectVersions>All</IncludedObjectVersions>
  <OptionalFields>
    <Field>Size</Field>
    <Field>LastModifiedDate</Field>
    <Field>ETag</Field>
    <Field>StorageClass</Field>
    <Field>IsMultipartUploaded</Field>
    <Field>EncryptionStatus</Field>
  </OptionalFields>
</InventoryConfiguration>
Run the following command:
ossutil api put-bucket-inventory --bucket examplebucket --inventory-id report1 --inventory-configuration file://inventory-configuration.xmlNote: For more information about the put-bucket-inventory command, see put-bucket-inventory.
API
Call the PutBucketInventory API operation to configure or modify an inventory configuration. This method is suitable for advanced customization, as you must manually construct the HTTP request and calculate the signature.
Inventory analysis
Inventory tasks run asynchronously. Each inventory report is stored in its own folder, named after the scan's start time. The core files include manifest.json and the .csv.gz data files in the data/ directory. To confirm task completion, check the destination for the generated manifest.json file.
-
Parse the
manifest.jsonfile: Parse themanifest.jsonfile to get the correct column order and data file information, focusing on the following two fields:-
fileSchema: A string that defines the column names and exact order in the CSV data file.
-
files: An array listing the details of each
.csv.gzdata file generated for this report, including:-
key: File path -
size: File size -
MD5checksum: MD5 checksum
-
-
-
Parse the CSV data files according to the
fileSchema-
Download and decompress the data files: For each data file in the
filesarray ofmanifest.json, use itskey(the file path) to download the corresponding.csv.gzarchive. Decompress the archive to get the data in CSV format. -
Parse the data in order:
Use the field order from
fileSchemaas the column headers. Read the decompressed CSV file line by line. Each line is a complete record of an object, and each column corresponds to a field infileSchema.CSV content example: If the
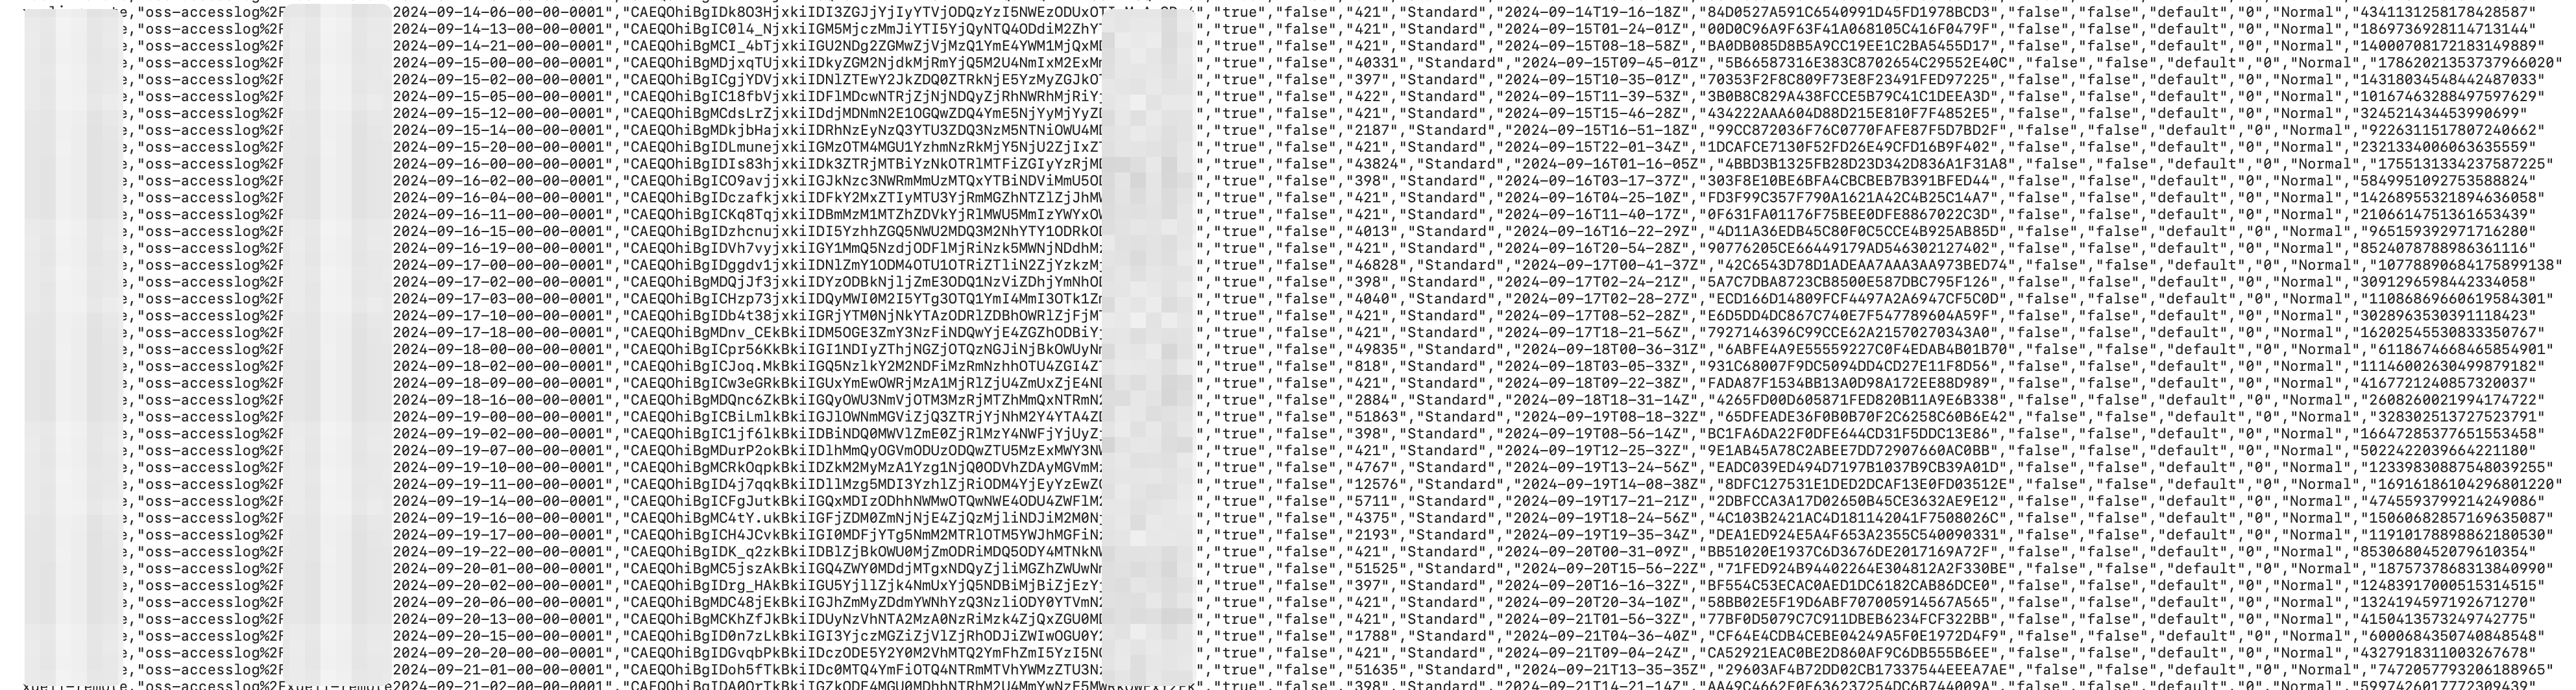
fileSchemais"Bucket,Key,Size,StorageClass,LastModifiedDate", the decompressed CSV content is formatted as follows:source-bucket,"dir%2Fbody.xml","102400","Standard","2025-04-14T07-06-00Z" source-bucket,"dest.png","312049","Standard","2025-04-14T07-05-59Z"The
Keyvalue is URL-encoded and can be decoded as needed.
-
Full inventory file
After you configure an inventory task, OSS generates inventory files based on the export period in the inventory rule. The directory structure for the inventory files is as follows:
<dest-bucket-name>/
└── <dest-prefix>/
    └── <source-bucket-name>/
        └── <inventory-id>/
            ├── YYYY-MM-DDTHH-MMZ/  (UTC timestamp when the scan started)
            │   ├── manifest.json   (Metadata file for the inventory task)
            │   └── manifest.checksum (MD5 checksum of the manifest.json file)
            └── data/
└── <uuid>.csv.gz (One or more GZIP-compressed inventory data files)|
Directory structure |
Description |
|
dest-prefix |
This directory is named after the specified inventory report prefix. If no prefix is specified, this directory is omitted. |
|
source-bucket-name |
This directory is named after the source bucket for the inventory report. |
|
inventory-id |
This directory is named after the rule name of the inventory task. |
|
YYYY-MM-DDTHH-MMZ |
This directory is named using the UTC timestamp of the scan start time (e.g., 2025-05-17T16-00Z). It contains the manifest.json and manifest.checksum files. |
|
data |
This directory contains GZIP-compressed CSV inventory files. These files list the objects in the source bucket and their corresponding metadata. Important
|
Manifest file
The manifest file consists of manifest.json and manifest.checksum, as detailed below:
-
manifest.json: Contains metadata and other basic information about the inventory.
{
    "creationTimestamp": "1642994594",
    "destinationBucket": "dest-bucket-name",
    "fileFormat": "CSV",
    "fileSchema": "Bucket, Key, VersionId, IsLatest, IsDeleteMarker, Size, StorageClass, LastModifiedDate, ETag, IsMultipartUploaded, EncryptionStatus, ObjectAcl, TaggingCount, ObjectType, CRC64",
    "files": [{
            "MD5checksum": "F77449179760C3B13F1E76110F07****",
            "key": "dest-prefix/source-bucket-name/inventory-id/data/a1574226-b5e5-40ee-91df-356845777c04.csv.gz",
            "size": 2046}],
    "sourceBucket": "source-bucket-name",
    "version": "2019-09-01"
}
The following table describes each field.
Parameter
Description
creationTimestamp
The timestamp when the scan of the source bucket began.
destinationBucket
The destination bucket that stores the inventory files.
fileFormat
The format of the inventory file.
fileSchema
The fields in the inventory file, which are categorized as fixed and optional. The order of fixed fields is constant. The order of optional fields depends on the order in which you selected them when configuring the inventory rule. To avoid mismatches, parse the data columns in the .csv.gz file according to the field order in fileSchema.
-
If you select the current version for the object version when you configure an inventory rule, the fileSchema lists the fixed fields
Bucket, Keyfirst, followed by the optional fields. -
When you configure an inventory rule to include all object versions, the fileSchema lists the fixed fields
Bucket, Key, VersionId, IsLatest, IsDeleteMarkerfirst, followed by the optional fields.
files
A list of inventory files. Each entry specifies the MD5 checksum, key, and size for one file.
sourceBucket
The source bucket where the inventory rule is configured.
version
The inventory version.
-
-
manifest.checksum: The
manifest.checksumfile contains the MD5 hash of themanifest.jsonfile. Use this hash to verify the integrity ofmanifest.json. For example: F77449179760C3B13F1E76110F07****.
Full inventory
The inventory report is stored in the data/ directory and lists the files exported by the inventory feature. The following is an example:
|
Parameter |
Description |
|
bucket |
The source bucket where the inventory task runs. |
|
key |
The object's key. This key is URL-encoded and can be decoded as needed. |
|
VersionId |
The version ID of the object. This field is present only when the inventory is configured to include all object versions.
|
|
IsLatest |
Indicates whether the object version is the latest. This field is present only when the inventory is configured to include all object versions.
|
|
IsDeleteMarker |
Indicates whether the object version is a delete marker. This field is present only when the inventory is configured to include all object versions.
|
|
size |
The size of the object. |
|
StorageClass |
The storage class of the object. |
|
LastModifiedDate |
The time the object was last modified, in Coordinated Universal Time (UTC), which is 8 hours behind Beijing Time. |
|
TransitionTime |
The time the object was transitioned to the Cold Archive or Deep Cold Archive storage class by a lifecycle rule. |
|
ETag |
The object's ETag. An identifier for the object's content, generated when the object is created.
|
|
IsMultipartUploaded |
true if the object was created by a multipart upload; false otherwise. |
|
EncryptionStatus |
true if the object is encrypted; false otherwise. |
|
ObjectAcl |
The object's ACL. Object ACL. |
|
TaggingCount |
The number of tags on the object. |
|
ObjectType |
The object type. object type. |
|
CRC64 |
The CRC64 checksum of the object. |
|
LastAccessDate |
The last access time of the object, in Coordinated Universal Time (UTC). Note
This field is available only when access tracking is enabled for the bucket. Otherwise, this field is null. |
|
LastAccessTimestamp |
The last access time of the object, as a Unix timestamp. Note
This field is available only when access tracking is enabled for the bucket. Otherwise, this field is null. |
Incremental inventory
An incremental inventory runs approximately every 10 minutes to capture and report object changes, including creations, metadata updates, and deletions.
Configure an inventory rule
Console
-
Log in to the OSS console.
-
Navigate to the source bucket for which you want to generate an inventory. In the navigation pane on the left, choose Data Management > Bucket Inventory.
-
On the Bucket Inventory page, click Create Inventory.
-
In the Create Inventory panel:
-
Configure the Basic Settings parameters.
Parameter
Description
Status
Set the status of the incremental inventory task. Select Start.
Rule Name
Enter a name for the inventory task. The name can contain only lowercase letters, digits, and hyphens (-), and cannot start or end with a hyphen.
The list report is stored in
Specify the storage path for the inventory report. The source bucket and the destination bucket must belong to the same Alibaba Cloud account and be in the same region.
-
To save the report to the exampledir1/ path in the examplebucket bucket, enter
exampledir1/. If the specified path does not exist in the bucket, OSS automatically creates it. The destination path prefix cannot exceed 128 characters in length. -
If you leave this field blank, the report is saved to the root directory.
ImportantTo prevent impacts on OSS-HDFS and avoid potential data corruption, do not set the inventory report directory to
.dlsdata/when you configure an inventory rule for a bucket for which OSS-HDFS is enabled.Scan range of the inventory file
-
Scan Entire Bucket: Scan all objects in the bucket.
-
Object Prefix: Scan only objects with a specified prefix, such as exampledir1/.
-
-
In the Track and generate incremental metadata updates area, enable Obtain incremental metadata updates, and select the Metadata field to export.
Parameter
Description
Metadata field
Select the object metadata to include in the report.
-
Event metadata: Sequence Number, Event Type, Timestamp, User ID, Request ID, and Request Source IP.
-
System metadata: Object Size, Storage Class, Last Modified Date, ETag, Multipart Upload Status, object type, object ACL, CRC64, and Encryption Status.
-
-
-
Select I acknowledge and agree to grant Alibaba Cloud OSS the permissions to access bucket resources, and then click OK.
Ossutil
Create a file named incremental-inventory.xml. The key difference from a full inventory configuration is the addition of the <IncrementalInventory> section.
<?xml version="1.0" encoding="UTF-8"?>
<InventoryConfiguration>
    <Id>Report-1</Id>
    <IsEnabled>true</IsEnabled>
    <Filter>
      <Prefix>test</Prefix>
    </Filter>
    <Destination>
      <OSSBucketDestination>
        <Format>CSV</Format>
        <AccountId>12xxxxxx29</AccountId>
        <RoleArn>acs:ram::12xxxxxx29:role/AliyunOSSRole</RoleArn>
        <Bucket>acs:oss:::test-inc-bi-bj</Bucket>
        <Prefix>Report-1</Prefix>
      </OSSBucketDestination>
    </Destination>
    <Schedule>
      <Frequency>Weekly</Frequency>
    </Schedule>
    <IncludedObjectVersions>All</IncludedObjectVersions>
    <OptionalFields>
      <Field>Size</Field>
      <Field>LastModifiedDate</Field>
      <Field>ETag</Field>
      <Field>StorageClass</Field>
    </OptionalFields>
    <IncrementalInventory>
      <IsEnabled>true</IsEnabled>
      <Schedule>
        <Frequency>600</Frequency>
      </Schedule>
      <OptionalFields>
        <Field>SequenceNumber</Field>
        <Field>RecordType</Field>
        <Field>RecordTimestamp</Field>
        <Field>Requester</Field>
        <Field>RequestId</Field>
        <Field>SourceIp</Field>
        <Field>Size</Field>
        <Field>StorageClass</Field>
        <Field>LastModifiedDate</Field>
        <Field>ETag</Field>
        <Field>IsMultipartUploaded</Field>
        <Field>ObjectType</Field>
        <Field>ObjectAcl</Field>
        <Field>Crc64</Field>
        <Field>EncryptionStatus</Field>
      </OptionalFields>
    </IncrementalInventory>
  </InventoryConfiguration>
Run the following command:
ossutil api put-bucket-inventory --bucket examplebucket --inventory-id report1 --inventory-configuration file://inventory-configuration.xmlNote: For more information about the put-bucket-inventory command, see put-bucket-inventory.
API
Call the PutBucketInventory operation to configure or modify an inventory configuration. This method is suitable for highly customized scenarios, as it requires you to manually construct an HTTP request and calculate a signature.
Parse an inventory report
After an inventory task is complete, OSS generates report files at the specified path in the destination bucket. The core files include:
-
A
manifest.jsonfile -
.csvdata files in thedata/directory
To confirm task completion, check for the manifest.json file in the destination bucket.
Follow these steps to parse the report:
-
Read the
manifest.jsonfile: The column order in an inventory report is dynamic and depends on the fields selected when you configure the inventory rule. You must first parse thefileSchemafield in themanifest.jsonfile. This field defines the name and order of each column in the CSV file. -
Parse the CSV data files based on the
fileSchema-
Use the order defined in the
fileSchemaas the column headers for the CSV file. -
Read the CSV file row by row. Each row represents a complete object record, and each column corresponds to a field declared in the
fileSchema.
-
Incremental inventory files
After you configure an inventory task, OSS generates inventory files at the frequency specified in the inventory rule. The directory structure of the inventory files is as follows:
<dest-bucket-name>/
└── <dest-prefix>/
    └── <source-bucket-name>/
       └── <inventory-id>/
          └── incremental_inventory/
             └── YYYY-MM-DDTHH-MMSSZ/
                 ├── manifest.json
                 └── data/
                     ├── uuid1_0.csv
└── ......|
Directory structure |
Description |
|
dest-prefix |
This directory is generated based on the specified prefix for the inventory report. If no prefix is specified, this directory is omitted. |
|
source-bucket-name |
This directory is generated based on the name of the source bucket. |
|
inventory_id |
This directory is named after the inventory rule name. |
|
incremental_inventory |
A fixed prefix for the incremental inventory that distinguishes it from a full inventory. |
|
YYYY-MM-DDTHH-MMSSZ |
A standard UTC timestamp that indicates when the bucket scan started. Example: 2020-05-17T16-0000Z. |
|
data |
This directory contains the inventory files in CSV format. The files list the objects and their metadata that were modified in the source bucket within the specified time period. |
Manifest file
{
    "startTimestamp": "1759320000",
    "endTimestamp": "1759320600",
    "destinationBucket": "destbucket",
    "fileFormat": "CSV",
    "fileSchema": "Bucket, Key, VersionId, IsDeleteMarker, SequenceNumber, RecordType, RecordTimestamp, Requester, RequestId, SourceIp, Size, StorageClass, LastModifiedDate, ETag, IsMultipartUploaded, ObjectType, ObjectAcl, CRC64, EncryptionStatus",
    "files": [{
            "MD5checksum": "60463A9A34019CF448A730EB2CB3****",
            "key": "dest-prefix/source-bucket-name/inventory-id/incremental_inventory/2025-09-28T07-4000Z/data/5b7c6cf0db490db906c60e87b917b148_5550506986a37a62abce56a83db6736d_0.csv",
            "size": 2046}],
    "sourceBucket": "srcbucket",
    "version": "2025-09-30"
}
The following table describes each field.
|
Field |
Description |
|
startTimestamp |
The timestamp that indicates the start of the time window covered by this incremental inventory report. |
|
endTimestamp |
The timestamp that indicates the end of the time window covered by this incremental inventory report. |
|
destinationBucket |
The destination bucket where the inventory files are stored. |
|
fileFormat |
The format of the inventory file. |
|
fileSchema |
Specifies the fields in the inventory file. The schema includes fixed fields, which have a constant order, and optional fields, whose order depends on the selection sequence during rule configuration. To prevent column mismatches, always parse the CSV data based on the field order defined in
|
|
files |
A list containing the MD5 checksum, full key, and size for each inventory file. |
|
sourceBucket |
The source bucket for which the inventory rule is configured. |
|
version |
The version of the inventory. |
Incremental inventory report fields
|
Metadata type |
Field |
Description |
|
System metadata |
Bucket |
The name of the source bucket on which the inventory task runs. |
|
Event metadata |
Sequence number |
A unique sequence number for each record. Sorting records for the same object by |
|
Record type |
The record type: CREATE, UPDATE_METADATA, or DELETE.
|
|
|
Record timestamp |
A timestamp in UTC with millisecond precision. Example: "2024-08-25 18:08:01.024". |
|
|
Requester |
The requester's Alibaba Cloud ID or principal ID. |
|
|
Request ID |
The unique identifier of the request. |
|
|
Source IP |
The source IP address of the requester. |
|
|
System metadata |
Key |
The name of the object in the bucket. The name is URL-encoded. |
|
Version ID |
The version ID of the object. This field is included only when the inventory rule is configured to export all versions.
|
|
|
Is delete marker |
Indicates whether the object version is a delete marker. This field is included only when the inventory rule is configured to export all versions.
|
|
|
Size |
The size of the object in bytes. |
|
|
Storage class |
The storage class of the object. |
|
|
Last modified date |
The last modified time of the object. The time is in UTC, which is 8 hours behind Beijing Time (UTC+8). |
|
|
ETag |
An entity tag (ETag) that identifies the object's content.
|
|
|
Is multipart uploaded |
Indicates whether the object was created by a multipart upload. A value of true indicates it was; false indicates it was not. |
|
|
Encryption status |
Indicates whether the object is encrypted. A value of true indicates it is; false indicates it is not. |
|
|
Object ACL |
The object's ACL. Object ACL. |
|
|
Object type |
The type of the object. For more information, see Object types. |
|
|
CRC64 |
The CRC64 value of the object. |
Limits
Each bucket supports up to 1,000 inventory rules through the API or SDK, or 10 through the console.
Billing
Bucket inventory itself is free, but the following fees apply:
-
API request fees:
PutandGetrequests for configuring or retrieving inventory rules. PUT requests when OSS writes reports to the destination bucket. GET requests when you download reports. -
Storage fees: Standard storage fees apply to inventory reports (
manifestandcsv.gzorcsvfiles) in the destination bucket. -
Outbound traffic fees: Downloading inventory reports from a public endpoint incurs outbound traffic fees.
-
Delete inventory rules you no longer need and use lifecycle rules to auto-clean expired report files.
Production guidelines
Best practices
-
Least privilege: Always use a dedicated RAM role with least privilege. Never use
AliyunOSSRolein a production environment. -
Performance recommendation: For high-traffic source buckets, store inventory reports in a separate bucket to avoid bandwidth contention with online services.
-
Cost optimization: For buckets with over ten billion objects, use weekly exports. Configure a lifecycle rule on the destination bucket to auto-delete reports older than a specified number of days, such as 30.
Number of objects
Export recommendation
<10 billion
Configure daily or weekly exports as needed
10 billion to 50 billion
Export weekly
≥50 billion
-
Export in batches by matching prefixes
-
to increase the export limit
-
-
Prefix partitioning: For extremely large buckets (hundreds of billions of objects), create multiple inventory rules based on business prefixes to generate reports in a divide-and-conquer manner.
Risk prevention
-
Data audit: An inventory report may not list every object. The report includes objects whose last modified time is earlier than
createTimeStampin manifest.json. Objects modified after this timestamp may be excluded. Before acting on inventory data, verify the object's current properties via the HeadObject API. -
Monitoring and alerts: Monitor destination bucket storage usage to prevent uncontrolled costs. Monitor API calls such as
PutBucketInventoryto track configuration changes. -
Change management: Changes to an inventory rule (prefix, frequency, etc.) can affect downstream data analysis workflows. Incorporate changes into your version control and review processes.