When your Go application runs in a distributed architecture, tracing requests across services is essential for identifying bottlenecks and failures. SkyWalking agents instrument your Go application and report trace data to the Managed Service for OpenTelemetry console, where you can view application topology, traces, abnormal and slow transactions, and SQL analysis.
Alibaba Cloud Application Real-Time Monitoring Service (ARMS) provides a commercially supported, self-developed agent for Go applications. The ARMS agent enables non-intrusive instrumentation with a richer feature set and enhanced stability.
Choose an agent
SkyWalking offers two Go agents with different integration models.
| skywalking-go (recommended) | Go2Sky (legacy) | |
|---|---|---|
| Instrumentation | Non-intrusive. Compile with the -toolexec flag -- no source code changes required. | Intrusive. Add a hook for every plug-in in your source code. |
| Maintenance | Actively maintained by the SkyWalking community. | Retired. No longer accepting pull requests. |
| Supported frameworks | Same libraries as Go2Sky, plus gRPC. No per-library installation needed. | 13 libraries, each requiring a separate go get command. |
| Adoption | Growing. | Widely used in existing projects. |
Use skywalking-go for new projects. It requires fewer integration steps and receives ongoing community support.
Prerequisites
Get the SkyWalking endpoint from the Managed Service for OpenTelemetry console:
Log on to the Managed Service for OpenTelemetry console.
In the left-side navigation pane, click Cluster Configurations. On the page that appears, click the Access point information tab.
In the top navigation bar, select a region. In the Cluster Information section, turn on Show Token.
Set the Client parameter to SkyWalking.
In the Related Information column, copy the endpoint.
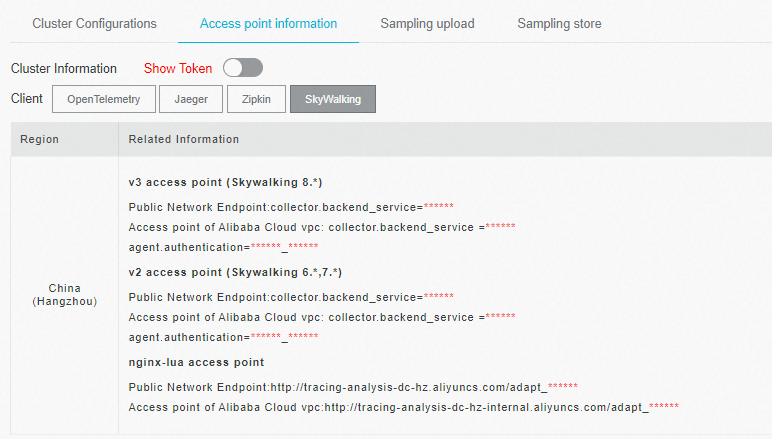
If your application runs in an Alibaba Cloud production environment, use the VPC endpoint. Otherwise, use the public endpoint.
Sample code
For complete working examples, see the skywalking-demo repository on GitHub.
Report trace data with skywalking-go
The workflow has three stages: build the agent, configure it, and compile your project.
Step 1: Build the agent
Clone the repository:
git clone https://github.com/apache/skywalking-go.gitBuild the agent binary: The build produces an executable in the
skywalking-go/bin/directory. The filename varies by operating system -- for example,skywalking-go-agent--darwin-amd64on macOS.cd skywalking-go && make build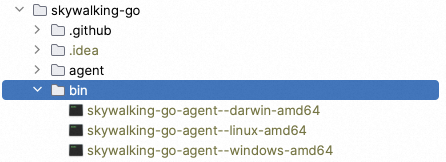
Step 2: Import and configure the agent
Import the SkyWalking module
Add the SkyWalking module to your project using one of the following methods.
Method A: Code dependency (add an import)
Add the following import to your main package:
package main

import (
	_ "github.com/apache/skywalking-go"
)
Method B: Agent injector (no source code changes)
Run the injector against your project directory:
skywalking-go/bin/skywalking-go-agent--darwin-amd64 -inject path/to/your-projectIf the inject method fails, fall back to Method A.
Configure the agent
Create a config.yaml file based on the default template at skywalking-go/tools/go-agent/config/config.default.yaml.
Three parameters are required to connect to the Managed Service for OpenTelemetry console. All other parameters have usable defaults.
| Parameter | Environment variable | Description | Example |
|---|---|---|---|
agent.service_name | SW_AGENT_NAME | Name of your Go application | my-go-service |
reporter.grpc.backend_service | SW_AGENT_REPORTER_GRPC_BACKEND_SERVICE | SkyWalking endpoint (from Prerequisites) | <your-endpoint>:11800 |
reporter.grpc.authentication | SW_AGENT_REPORTER_GRPC_AUTHENTICATION | Authentication token (from Prerequisites) | <your-auth-token> |
Set each parameter in one of two ways:
Option 1 (recommended): Set values in config.yaml
agent:
  service_name: ${SW_AGENT_NAME:<your-service-name>}

reporter:
  grpc:
    backend_service: ${SW_AGENT_REPORTER_GRPC_BACKEND_SERVICE:<your-endpoint>}
    authentication: ${SW_AGENT_REPORTER_GRPC_AUTHENTICATION:<your-auth-token>}
Option 2: Set environment variables
export SW_AGENT_NAME=<your-service-name>
export SW_AGENT_REPORTER_GRPC_BACKEND_SERVICE=<your-endpoint>
export SW_AGENT_REPORTER_GRPC_AUTHENTICATION=<your-auth-token>
Replace the placeholders with your actual values:
| Placeholder | Description |
|---|---|
<your-service-name> | A descriptive name for your Go application |
<your-endpoint> | The SkyWalking endpoint copied in Prerequisites |
<your-auth-token> | The authentication token shown in the console |
Disable specific plug-ins (optional)
By default, skywalking-go automatically instruments all supported plug-ins. To disable instrumentation for specific plug-ins, set the excluded parameter:
# Disable a single plug-in
plugin:
  excluded: ${SW_AGENT_PLUGIN_EXCLUDES:sql}

# Disable multiple plug-ins (comma-separated)
plugin:
excluded: ${SW_AGENT_PLUGIN_EXCLUDES:sql,gorm}Step 3: Compile and run your project
Rebuild the project with the -toolexec flag to activate the agent:
sudo go build -toolexec "path/to/skywalking-go-agent -config path/to/config.yaml" -aReplace the paths:
| Placeholder | Description |
|---|---|
path/to/skywalking-go-agent | Absolute path to the executable built in Step 1 |
path/to/config.yaml | Absolute path to the config.yaml created in Step 2 |
Start the compiled binary. The skywalking-go agent automatically begins reporting trace data to the Managed Service for OpenTelemetry console.
Environment variables reference
| Environment variable | Description | Default |
|---|---|---|
SW_AGENT_NAME | Application name | None |
SW_AGENT_INSTANCE_NAME | Instance name | Auto-generated |
SW_AGENT_SAMPLE | Sample rate (0 to 1) | 1 |
SW_AGENT_REPORTER_GRPC_BACKEND_SERVICE | gRPC endpoint for reporting trace data | 127.0.0.1:11800 |
SW_AGENT_REPORTER_GRPC_AUTHENTICATION | Authentication token for the gRPC endpoint | None |
SW_AGENT_PLUGIN_EXCLUDES | Plug-ins to exclude from instrumentation (comma-separated) | None |
Report trace data with Go2Sky
Go2Sky is retired and no longer maintained. Use the skywalking-go agent for new projects.
Step 1: Configure the reporter
Configure Go2Sky by either hard-coding parameters or setting environment variables.
Option A: Hard-code parameters
report, err := reporter.NewGRPCReporter(
    "<your-backend-server-address>",
    reporter.WithAuthentication("<your-auth-token>"))
Option B: Set environment variables
# Permanent: add to your shell profile
echo 'export SW_AGENT_COLLECTOR_BACKEND_SERVICES=<your-endpoint>' >> ~/.bash_profile
source ~/.bash_profile

# Temporary: set in the current terminal session
export SW_AGENT_COLLECTOR_BACKEND_SERVICES=<your-endpoint>
The Go2Sky agent reads the following environment variables:
SW_AGENT_AUTHENTICATIONSW_AGENT_LAYERSW_AGENT_COLLECTOR_HEARTBEAT_PERIODSW_AGENT_COLLECTOR_GET_AGENT_DYNAMIC_CONFIG_INTERVALSW_AGENT_COLLECTOR_BACKEND_SERVICESSW_AGENT_COLLECTOR_MAX_SEND_QUEUE_SIZESW_AGENT_PROCESS_STATUS_HOOK_ENABLESW_AGENT_PROCESS_LABELS
Step 2: Create a tracer
Set the service name and create a tracer instance:
serviceName := "<your-service-name>"
tracer, err := go2sky.NewTracer(serviceName, go2sky.WithReporter(report))
Step 3: Add plug-in hooks
Go2Sky requires a hook in your source code for each plug-in. Refer to the go2sky-plugins repository on GitHub, where each plug-in folder contains a README with integration instructions.
The following example adds the gin middleware hook:
package main

import (
	"log"

	"github.com/SkyAPM/go2sky"
	v3 "github.com/SkyAPM/go2sky-plugins/gin/v3"
	"github.com/SkyAPM/go2sky/reporter"
	"github.com/gin-gonic/gin"
)

func main() {
	// Use gRPC reporter for production
	re, err := reporter.NewLogReporter()
	if err != nil {
		log.Fatalf("new reporter error %v \n", err)
	}
	defer re.Close()

	tracer, err := go2sky.NewTracer("gin-server", go2sky.WithReporter(re))
	if err != nil {
		log.Fatalf("create tracer error %v \n", err)
	}

	gin.SetMode(gin.ReleaseMode)
	r := gin.New()

	// Add the go2sky middleware for tracing
	r.Use(v3.Middleware(r, tracer))

	// Add your route handlers here
}
Step 4: Restart the application
Restart your application. Go2Sky begins reporting trace data to the Managed Service for OpenTelemetry console.
Environment variables reference
| Environment variable | Description | Default |
|---|---|---|
SW_AGENT_NAME | Application name | None |
SW_AGENT_LAYER | Layer to which the application instance belongs | None |
SW_AGENT_INSTANCE_NAME | Instance name | Random (auto-generated) |
SW_AGENT_SAMPLE | Sample rate. 1 = full sampling. | 1 |
SW_AGENT_COLLECTOR_BACKEND_SERVICES | Endpoint for reporting trace data | None |
SW_AGENT_AUTHENTICATION | Authentication token | None |
SW_AGENT_COLLECTOR_HEARTBEAT_PERIOD | Heartbeat interval in seconds | 20 |
SW_AGENT_COLLECTOR_GET_AGENT_DYNAMIC_CONFIG_INTERVAL | Dynamic configuration fetch interval in seconds | 20 |
SW_AGENT_COLLECTOR_MAX_SEND_QUEUE_SIZE | Queue buffer size for sending spans | 30000 |
SW_AGENT_PROCESS_STATUS_HOOK_ENABLE | Enable process status hooks | false |
SW_AGENT_PROCESS_LABELS | Process labels (comma-separated) | None |
Supported instrumentation libraries
Both agents support the following libraries. Go2Sky requires a separate go get command for each library. skywalking-go instruments all supported libraries automatically at compile time -- no installation needed.
| Library | Go2Sky installation |
|---|---|
| sql | go get -u github.com/SkyAPM/go2sky-plugins/sql |
| dubbo-go | go get -u github.com/SkyAPM/go2sky-plugins/dubbo-go |
| gear | go get -u github.com/SkyAPM/go2sky-plugins/gear |
| gin | go get -u github.com/SkyAPM/go2sky-plugins/gin/v2 or go get -u github.com/SkyAPM/go2sky-plugins/gin/v3 |
| go-restful | go get -u github.com/SkyAPM/go2sky-plugins/go-restful |
| gorm | go get -u github.com/SkyAPM/go2sky-plugins/gorm |
| http | go get -u github.com/SkyAPM/go2sky |
| go-kratos v2 | go get -u github.com/SkyAPM/go2sky-plugins/kratos |
| logrus | go get -u github.com/SkyAPM/go2sky-plugins/logrus |
| go-micro V3.5.0 | go get -u github.com/SkyAPM/go2sky-plugins/micro |
| mongo | go get -u github.com/SkyAPM/go2sky-plugins/mongo |
| go-resty V2.2.0 | go get -u github.com/SkyAPM/go2sky-plugins/resty |
| zap V1.16.0 | go get -u github.com/SkyAPM/go2sky-plugins/zap |
skywalking-go also supports the gRPC framework, which Go2Sky does not.
FAQ
The inject method fails with skywalking-go

If the -inject command fails, use the code dependency method instead: add import _ "github.com/apache/skywalking-go" to your main package.
Cross-process traces are not connected when using Go2Sky
Managed Service for OpenTelemetry connects traces across processes using trace IDs carried in HTTP headers. If traces for a cross-process call appear disconnected, the trace context is not being propagated correctly between services.
To propagate context, create the correct span types at process boundaries:
CreateEntrySpan-- extracts the trace context (including the trace ID) from an incoming HTTP request.CreateExitSpan-- injects the trace context into an outgoing HTTP request.
// Create a local span within a single process
span, ctx, err := tracer.CreateLocalSpan(context.Background())
subSpan, newCtx, err := tracer.CreateLocalSpan(ctx)

// At a process boundary: extract context from the incoming request
span, ctx, err := tracer.CreateEntrySpan(r.Context(), "/api/login", func(key string) (string, error) {
    return r.Header.Get(key), nil
})

// Before calling a remote service: inject context into the outgoing request
span, err := tracer.CreateExitSpan(req.Context(), "/service/validate", "tomcat-service:8080", func(key, value string) error {
    req.Header.Set(key, value)
    return nil
})
Both the upstream and downstream services must use CreateEntrySpan and CreateExitSpan at their boundaries for the trace to connect end-to-end.