When alerts fire across your infrastructure, notification policies determine which team members are contacted, through which channels, and how unresolved alerts are escalated. Each policy uses tag-based matching rules to filter incoming alert events, groups related events to reduce noise, and routes notifications to contacts via email, phone, instant messaging, or webhooks.
How notification policies work
When an alert fires, Managed Service for OpenTelemetry evaluates your notification policies in order:
Match -- The policy checks each incoming alert event against its matching rules. Rules use tag-based expressions (for example,
severity = P1orclustername = prod-cluster) to filter which alerts the policy handles.Group -- Matched alerts are grouped by a shared field value so that related events arrive in a single notification instead of flooding recipients with individual messages.
Notify -- The policy sends notifications to the configured contacts through the specified channels (email, phone, IM, or webhook).
Repeat or escalate -- If an alert remains unresolved, the policy resends notifications at a set interval or escalates to additional contacts.
Silence policies take precedence over notification policies. Alerts that match a silence policy are suppressed and skip notification policy evaluation entirely.
Create a notification policy
Before you begin, make sure you have a notification object (contact, contact group, or shift).
Log on to the Managed Service for OpenTelemetry console.
In the left-side navigation pane, choose Alert Management > Alarm policy.
On the Notification Policy tab, click Create Notification Policy and enter a name.
Step 1: Define matching rules
In the Matching Rule step, specify which alert events this policy handles.
Select a data source.
To filter alerts from a specific source, select that source. The policy applies its matching rules only to alerts from that source.
To match all alerts regardless of source, select No Preset Source.
Specify one or more tag-based expressions. Use existing tags or add custom ones. Tags from alert rule expressions are also available. To create a tag for an alert rule in Managed Service for Prometheus, see Create an alert rule for a Prometheus instance.
Available tags
Category Tag Description Common fields alertnameAlert name Common fields clusternameKubernetes cluster name Common fields severitySeverity level: P1,P2,P3,P4, orDefaultCommon fields namespaceKubernetes namespace Common fields pod_nameKubernetes pod name Preset system fields _aliyun_arms_integration_nameIntegration data source name. Default: ARMS-DEFAULTPreset system fields _aliyun_arms_involvedObject_idID of the object that triggered the alert Preset system fields _aliyun_arms_involvedObject_nameName of the object that triggered the alert Preset system fields _aliyun_arms_region_idARMS region ID Preset system fields _aliyun_arms_alert_rule_idAlert rule ID Preset system fields _aliyun_arms_alert_typeAlert rule type: 101(Prometheus),5(Application Monitoring),4(Browser Monitoring)Combine conditions
Logic Action Result AND (all conditions must match) Click + Add Condition within the same matching rule The policy triggers only when every condition in the rule is met OR (any condition can match) Click + Add Rule to add a separate matching rule The policy triggers when any one of the rules is matched Click Next.
Step 2: Group alert events
In the Event Group step, choose how to handle related alert events.
| Option | Behavior |
|---|---|
| No grouping | Every matched alert event is sent individually to the configured contacts. |
| Group by field | Select a field (for example, clustername or namespace). Alerts that share the same field value are batched into a single notification, reducing alert noise. |
Click Next.
Step 3: Configure notification recipients
In the Notification Objects step, define who receives notifications and through which channels.
Click + Add Notification Object and select one or more recipients.
Recipient type Supported channels Contact Phone call, text message, email Contact group Phone call, text message, email Shift (on-call rotation) Phone call, text message, email IM application DingTalk, Lark, WeCom Webhook Custom HTTP endpoint 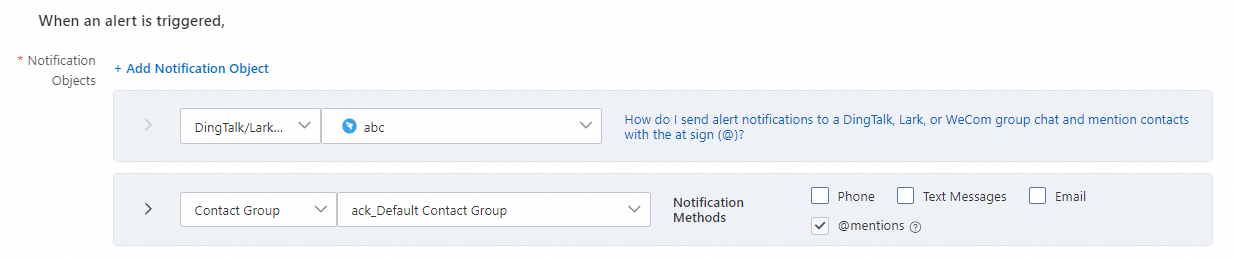
Choose whether to send clearing notifications. If you select Send Notifications, the system automatically marks an alert as Resolved when all related events are handled and sends a clearing notification to contacts.
Select a notification template. See Configure a notification template and a webhook template.
Set the time window during which alert notifications are sent.
(Optional) Select a ticket system for alert notifications. See Notification integrations.
Click Next.
Step 4: Set repeat, escalation, and recovery behavior
In the Policy to Repeat/Escalate/Clear Alerts step, configure how the policy handles unresolved alerts.
| Setting | Behavior |
|---|---|
| Whether to Resend Notifications | Enable this to resend notifications at a specified interval until the alert is cleared. |
| Whether to configure an escalation policy for alerts -- Disabled | A notification is sent only once before the alert is cleared. |
| Whether to configure an escalation policy for alerts -- Enabled | Notifications are sent to additional contacts based on the escalation policy until the alert is cleared. |
| Whether to enable manual recovery of alerts | When enabled, an alert is not automatically cleared if no alert event is triggered within the automatic recovery time configured on the Alert Integrations tab of the Integrations page. |
Click Next.
Step 5: Add an action integration
In the Action Integration step, specify automated actions to run when an alert is triggered or cleared.
Step 6: Save the policy
Click Save.
Manage notification policies
On the Notification Policy tab, manage existing policies with the following operations:
| Operation | Steps |
|---|---|
| Edit | Click the policy name, or click Edit in the Actions column. Update the settings, then click Save. |
| Enable or disable | Toggle the switch in the Status column. |
| Delete | Click Delete in the Actions column, then click OK to confirm. |
| Copy | Click Copy in the Actions column to duplicate the policy. |