Instance list page

The instance management page displays all instances that you have purchased. You can perform the following operations in the Actions column of the list:
Manage: goes to the instance details page by default.
Query data: allows you to run simple search tests on an instance that is serving online.
Upgrade/Downgrade: allows you to add or remove query nodes and data nodes.
Basic information
On the OpenSearch Vector Search Edition > Instances page, find the instance and click "Manage" in the Actions column on the right to go to the instance details page:
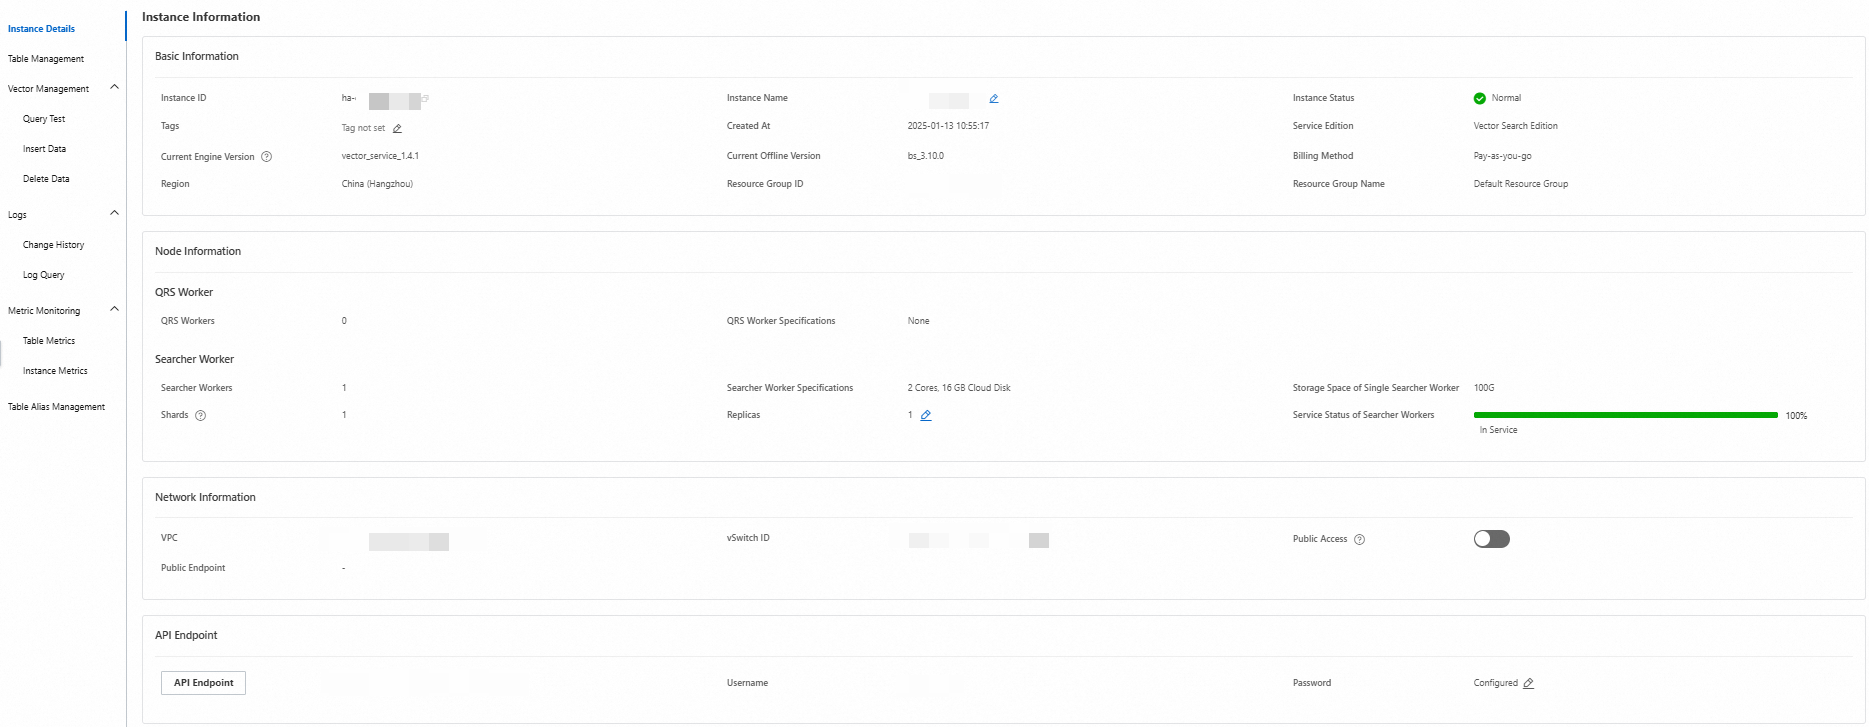
Field | Description |
Instance name/Instance ID | The name of the instance. By default, the instance name is the instance ID. Instances of the same user can have the same name./The instance ID that is automatically generated after the user completes the purchase. |
Instance status | The billing status of the instance, which can be Normal or Frozen (overdue payment for pay-as-you-go). |
Instance creation time | The time when the user created the instance. |
Product edition | Vector Search Edition |
Current engine version | The new version is vector_service_1.0.0. The old version is ha3_3.10.0. |
Billing method | Pay-as-you-go |
Region | The region where the instance resides. |
Node information
On the instance details page, you can view the specifications and purchased quantities of query nodes and data nodes in the node information section.

Node category | Field | Description |
Query node | Number of query nodes | The number of query nodes purchased by the user. |
Query node specifications | The specifications of the query nodes purchased by the user. | |
Query node service status | The availability status of the query nodes after the engine is built. | |
Data node | Number of data nodes | The number of data nodes purchased by the user. |
Data node specifications | The specifications of the data nodes purchased by the user. | |
Storage space per data node | The specifications of the data nodes purchased by the user. | |
Number of replicas | Default value: 1. You can scale out as needed. | |
Number of shards | The number of node columns configured by the user, which can be used to expand the memory space of the instance. | |
Data node service status | The availability status of the data nodes after the engine is built. |
Network information
VPC, vSwitch ID, and Internet access: the virtual private cloud (VPC) and vSwitch in the same region and the Internet access settings that the user selected on the buy page for accessing the instance. The details are shown in the following figure:

Add an Internet access whitelist: Internet access is disabled by default, as shown in the following figure:

You can manually enable it. After it is enabled, the whitelist configuration entry is displayed:

Click Internet Access Whitelist to add, delete, or edit whitelist entries. If you exit the page in edit mode without saving, you must confirm the exit, and your edits are not saved after you exit.
Add a whitelist: Manually enter IP addresses. Separate multiple IP addresses with commas, as shown in the following figure:

Verify that the whitelist is added: Log on to a machine whose IP address has been added to the whitelist and ping the API domain name shown in the API endpoint section. The following example adds the IP address of the local machine. Add the local IP address 30.197.xxx.xxx:
Obtain the domain name from the API endpoint section by clicking API Domain Name to copy it.

You must add public to the domain name before you can access it, for example, ha-cn-5yd35gift03.public.ha.aliyuncs.com.
Ping the API domain name from the local machine. If the ping succeeds, the whitelist is added successfully, as shown in the following figure:

API endpoint
Also known as the endpoint (available to ECS instances in the same region, including in VPC environments). The API domain name differs by region. When you use APIs or SDKs to access OpenSearch, you must use the API endpoint provided here. Select an appropriate domain name based on your actual deployment, and ping it before use to make sure that it is accessible.
The API endpoint can be accessed only from the VPC that was specified when the instance was purchased.

Username and password: the username and password that the user entered on the buy page for accessing the instance. Click the Configured button to change the username and password of the current instance. The details are shown in the following figure:

Limits on changing the password:
Username: 0 to 30 characters in length. It can contain uppercase and lowercase letters, underscores, and digits, and must start with a letter.
Password: 6 to 8 characters in length and consists of lowercase letters and digits.