MaxCompute, formerly known as Open Data Processing Service (ODPS), is an open computing platform. If your data is generated on the MaxCompute platform, you can configure it as a data source in your OpenSearch application. When you trigger an application reindex task, the system automatically fetches the full data from the specified MaxCompute tables. You must push subsequent incremental data using SDK or API calls.
Set up an AccessKey
After you configure a MaxCompute data source in OpenSearch, OpenSearch uses the AccessKey and AccessKey Secret that you provide to download data from MaxCompute tables. Therefore, before you configure the data source, you must have an AccessKey and AccessKey Secret ready.
Your MaxCompute project and OpenSearch application must belong to the same Alibaba Cloud account.
-
You can use the AccessKey pair of your Alibaba Cloud account to access the tables within the MaxCompute project that belongs to the same account.
-
For enhanced security, we recommend using a RAM user instead. Follow these steps.
-
Create a RAM user under your Alibaba Cloud account. For more information, see Create a RAM user.
-
Add the RAM user as a member in MaxCompute.
In your DataWorks workspace, choose Member Management from the left navigation pane. On the member management page, click Add Member in the upper-right corner. To view the permissions of each role, click View Role Permissions.
Available roles include: Workspace Administrator, Developer, O&M, Deployer, Visitor, Security Administrator, and Model Designer. In the Add Member dialog box, move the RAM user from the Accounts to Add list to the Added Accounts list. In the Batch Set Roles area, select the required roles and click OK.
-
After adding the member, run the
list users;command on the MaxCompute data development page to view their account name:
OK
OK
OK
OK
OK
OK
OK
OK
A xxx xxx xxx xxx
RAM$op xxx h_test@test.xxx xxx xxx st_1
2022-02-10 18:34:33 INFO xxx======================================================
2022-02-10 18:34:33 INFO Exit code of the Shell command 0
2022-02-10 18:34:33 INFO -- Invocation of Shell command completed ----
Copy the full account name, and then grant permissions to the account. In the following commands, replace xxx with the account name you copied.
-- 1. Grant the CreateInstance and List permissions on the project.
grant CreateInstance,List on project zy_ts_test to user xxx;
-- 2. Grant the SELECT, DESCRIBE, and DOWNLOAD permissions on the table.
GRANT select,describe,download ON TABLE people_info TO USER xxx;
-- 3. (Optional) Grant the label permission on the ODPS table.
set label 2 to USER  xxx;
-- Query the permissions and assigned roles for a specified user.
show grants for xxx;
After granting the permissions, you can configure the MaxCompute data source in OpenSearch.
Configure the data source
In the OpenSearch console, select Use Data Source to start the application creation process.
-
Click Connect to Database to configure your MaxCompute (formerly ODPS) information. Enter the project name, and the AccessKey and AccessKey Secret of the authorized account:
From the data source type list, select MaxCompute. On the table selection page, move the people_info table from the table list on the left to the selected list on the right.
After you complete this step, the system automatically maps the table fields. You can adjust the mappings based on your business requirements. When you are finished, click Next.
When you configure the application schema, OpenSearch requires that you specify a primary table and a unique primary key field for each table.
-
Configure the index schema. Select a suitable analyzer based on your search requirements. For more information, see Index schema. When you are finished, click Next:
The index schema configuration page has three sections: Index Fields (set the index name, included fields, and analysis method, such as Chinese - General Analysis or Keyword), Attribute Fields (used for filtering, aggregation, sorting, and distinct operations with filter, aggregate, sort, and distinct clauses), and Default Display Fields (configure the fields to be displayed in search results).
-
Configure the data source: This step includes configuring field mappings, selecting partition information, and choosing a data synchronization concurrency control mechanism.
5.1. Configure field mappings: Click Edit in the Action column. OpenSearch provides several data source plug-ins for MaxCompute (formerly ODPS) data. To use a plug-in, click the plus sign (+) in the Content Conversion column while configuring field mappings. The plug-in transforms the source field before it is synchronized to OpenSearch. If a plug-in fails because of a configuration or connection error, the source field is synchronized without conversion.
Configure the plug-in: In the Plugin and Parameter Settings dialog box, choose from four content conversion plug-ins on the left: HTMLTagRemover, JsonKeyValueExtractor, KeyValueExtractor, and StringCatenateExtractor. After selecting a plug-in, configure its parameters on the right and click Save.
-
For the DATETIME type in ODPS tables, the system automatically converts values to milliseconds. Set the corresponding OpenSearch field type to INT.
The following MaxCompute (formerly ODPS) field types are supported: Bigint, Double, Boolean, Datetime, String, and Decimal.
The field mapping interface displays the source-to-target field relationships in a table. Each row includes the source field name, target field name, and the Content Conversion column. You can click the "+" button in the Content Conversion column to add a plug-in, and use the Edit button in the Action column to modify the mapping configuration.
5.2. Specify partitions: OpenSearch allows you to specify which partitions to import from your MaxCompute (formerly ODPS) data based on your requirements. You can use regular expressions to select partitions, for example, to import data from the previous day. By combining this feature with the scheduled reindex function, you can automatically import new data partitions every day.
Regular expression: The equal sign (=), comma (,), semicolon (;), and double vertical bar (||) are reserved characters. For example, to automatically import the full data from the previous day's partition, use ds=%Y%m%d || -1 days.
After configuration, the data source list displays the added ODPS table record, including fields such as Project Name (example: search_offline_dev), Table Name (example: agg_pv_log_test), Partition Import Condition, and Data Time. You can Delete a configured data source from the Action column.
ds is the partition field name. Do not add spaces or other invisible characters on either side of the equals sign (=).
The following examples show how to use MaxCompute (formerly ODPS) partition conditions in different scenarios:
-
1. Multiple partition filter rules are supported. Separate different rules with a semicolon (;). For example,
pt=1;pt=2matches all partitions where the partition fieldptis1or2. -
2. A filter rule can specify values for multiple partition fields. Separate different fields with a comma (,). For example,
pt1=1,pt2=2,pt3=3matches all partitions that simultaneously satisfypt1=1,pt2=2, andpt3=3. Note: The time function feature, such as%Y%m%d || -1 days, is not supported for multiple partitions.
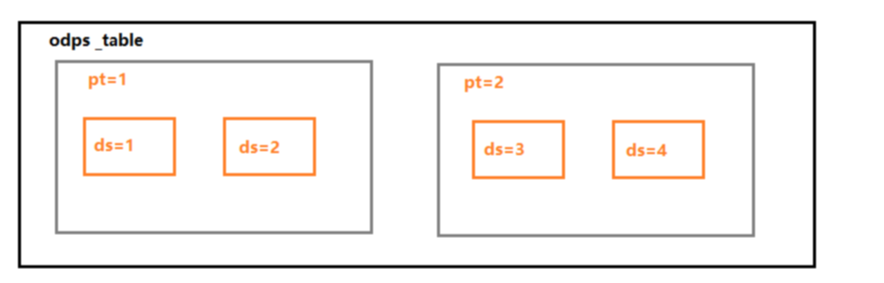
Example: (The figure above shows an ODPS table that has a ds sub-partition under the pt partition)
-
Multiple partitions:
pt=1;pt=2syncs all data from partitionspt=1andpt=2. -
Specify values for multiple partition fields:
pt=1,ds=1syncs data from the partition wherept=1andds=1. -
Unsupported cases: Cases like
pt=1,ds=%Y%m%d || -1 daysorpt=1;pt=%Y%m%d || -1 daysare not currently supported. -
3. The value of a partition field supports the wildcard character (*), which means the field can have any value. In this case, you can omit the field from the filter rule.
-
4. The value of a partition field supports regular expressions. For example,
pt=[0-9]*matches all partitions where the value ofptis a number. -
5. The value of a partition field supports time matching. The rule is:
pt=<partition column value with formatted time>||<time interval expression>. For example,ds=%Y%m%d || -1 daysmeans the partition field isds, the format is20150510, and you need to access data from one day ago. -
5.1 The formatted time parameters support standard time format specifiers, as shown in the table below.
-
5.2 The time interval expression supports
+/- n week|weeks|day|days|hour|hours|minute|minutes|second|seconds|microsecond|microseconds. The plus sign (+) indicates a time n units after the task creation time, and the minus sign (-) indicates a time n units before the task creation time. -
5.3 By default, the system applies a
+0 daysoffset to all filter rules. Therefore, note that field values used for filtering cannot contain strings that match time format specifiers. For example, for a task created on a Wednesday,pt=%abcmatches partitions where the value ofptisWedbc, not%abc.
The following table describes all available regular expression parameters and their meanings:
%d: Day of the month ([01-31])
%H: Hour in 24-hour format ([00, 23])
%m: Month ([01, 12])
%M: Minute ([00, 59])
%S: Second ([00, 61])
%y: Year as a 2-digit number
%Y: Year as a 4-digit number
5.3. Choose a data synchronization concurrency control mechanism:
When you select Use DONE file, you can control the timing of full data pulls by uploading a DONE file. This ensures the integrity of the full data. Before pulling full data from MaxCompute (formerly ODPS), the system checks for a DONE file for the current day. If the file does not exist, the system waits. The default timeout is one hour.
-
Download odpscmd from the official ODPS website. The file name is
odps_clt_release_64.tar.gz. -
You must have the
CreateResourcepermission for the project workspace. -
After installation, run the following command in your terminal. The naming rule for the DONE file is $prefix_%Y-%m-%d, where $prefix is the file name prefix (defaults to the table name). %Y-%m-%d represents the date of the reindex task because the minimum granularity for scheduled tasks is one day.
odpscmd -u accessid -p accesskey --project=<prj_name> -e "add file <done file>;" -
For instructions on how to use the MaxCompute client odpscmd, see Connect by using a client (odpscmd).
-
The DONE file must be in JSON format and specify a timestamp in milliseconds for the batch of full data. Incremental data is retained for a maximum of three days, so this timestamp cannot be more than three days in the past.
-
This timestamp indicates the point in time from which to backfill incremental data. If not configured, the system appends data starting from the reindex task's start time by default.
-
For example, your full data is generated at 09:00. ODPS finishes processing it at 10:00. The scheduled OpenSearch reindex task runs at 10:30. To ensure data integrity, the DONE file must specify the timestamp for 09:00 (in milliseconds). This way, after the full data is processed, the system appends all incremental data generated after 09:00. If you do not specify this timestamp, the system defaults to the task start time (10:30), and any incremental data from 09:00 to 10:30 will be lost. If you have no incremental data, you do not need to configure the timestamp.
-
The content of a DONE file for an Advanced Edition application is shown below. Note: The data time value required in Standard Edition applications works on a similar principle; both are used to catch up on incremental data from API calls during a reindex.
{
"timestamp":"1234567890000"
}
Precedence of DONE file and Data Time:
-
The Data Time setting for an ODPS data source is required and takes precedence over the DONE file.
-
If you are creating only a single version, you need to specify only the Data Time. You cannot use a DONE file alone.
-
If you use scheduled reindexing, you must configure both Data Time and a DONE file. The first version gives precedence to Data Time, and all subsequent versions give precedence to the DONE file.
The MaxCompute data source supports only full data synchronization. It does not support incremental data synchronization.