This topic describes how to implement automated image updates by using Jenkins, CloudOps Orchestration Service (OOS), and Object Storage Service (OSS).
Overview
In this example, automated image updates for a WordPress blog is implemented by using Jenkins, OOS, and OSS.
For more information about WordPress, visit WordPress on GitHub.
OOS is an automated O&M service that is provided by Alibaba Cloud for software version management and phased release.
OSS is used to store the built software packages.
Jenkins is used to automate the build process and update software packages in OSS and OOS upon triggers.
Resource Orchestration Service (ROS) is an automated resource deployment service that is provided by Alibaba Cloud. ROS allows you to deploy cloud resources such as Elastic Compute Service (ECS), ApsaraDB RDS, and Server Load Balancer (SLB) that the system depends on with a few clicks.
Prepare a WordPress server
To create a WordPress environment with ECS and ApsaraDB RDS by using ROS, perform the following steps:
Log on to the ROS console.
In the left-side navigation pane, choose .
On the Sample Templates page, find the template named Create a WordPress Environment Based on ECS and ApsaraDB for RDS.
Click Create Stack.
Configure parameters such as Instance Type and Instance Password, click Create, and wait for a while. If the environment is created, the output result of the stack that is shown in the following figure appears on the Outputs tab.
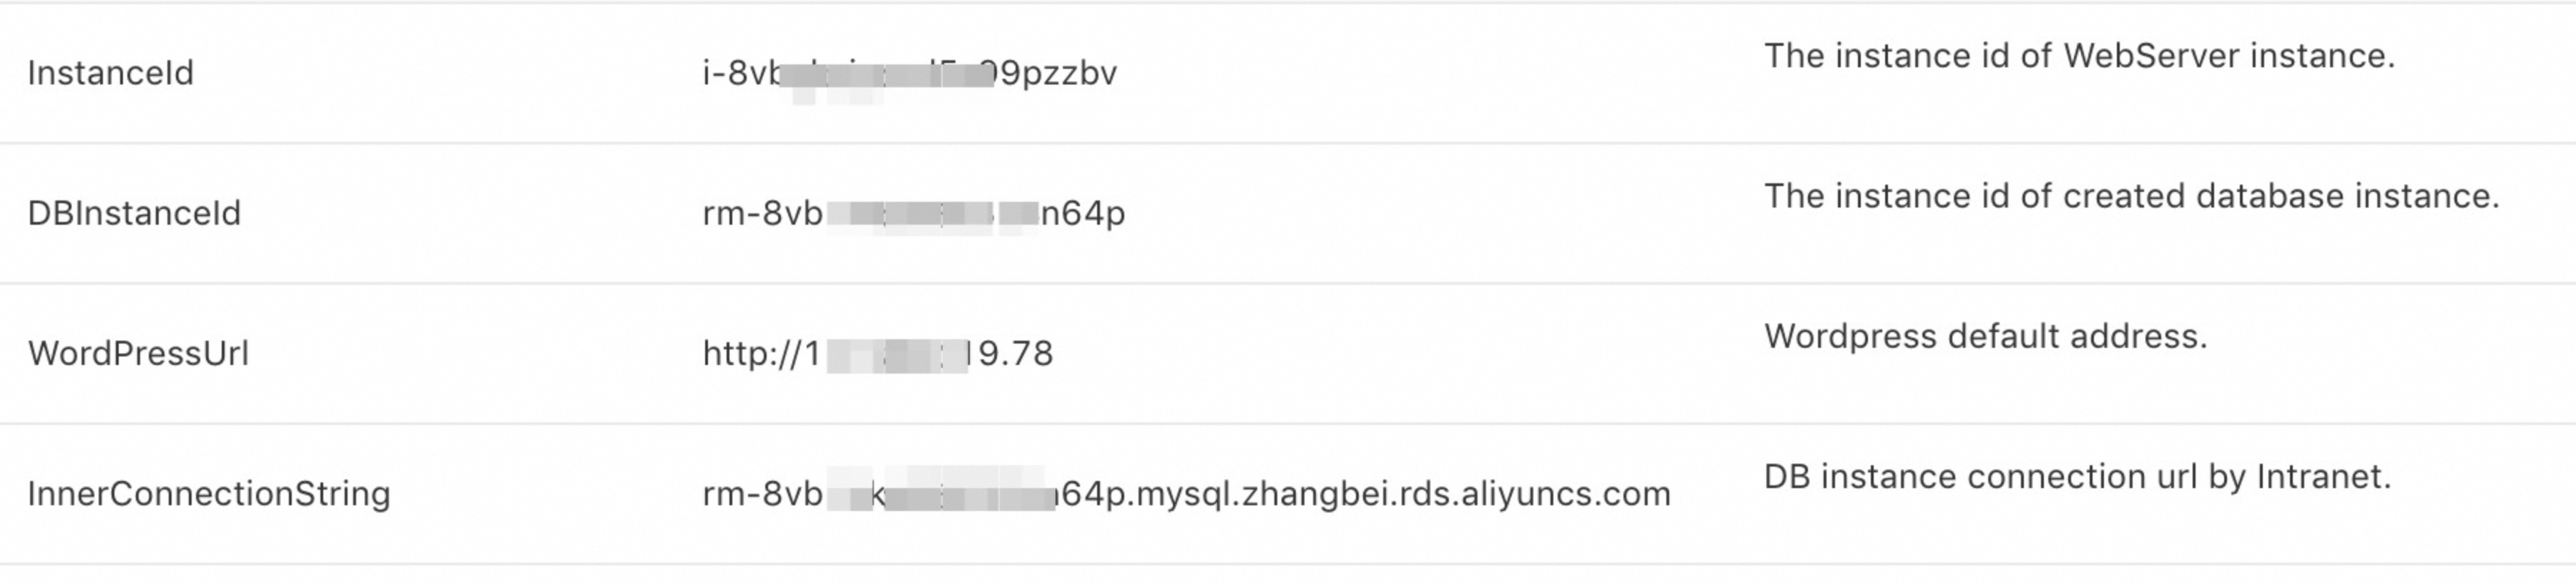
Check the value of the WordPressUrl parameter, which indicates the URL of a standalone WordPress website. Open the URL in a browser to verify whether the website has been deployed.
Create and configure a Jenkins instance
In this example, an ECS instance on which Jenkins is installed is created and configured by using ROS, and the operating system Alibaba Cloud Linux is installed on the ECS instance.
Log on to the ROS console.
In the left-side navigation pane, choose .
On the Sample Templates page, find the template named Installs Jenkins on an ECS instance (Existing VPC).
Click Create Stack.
Configure parameters such as Instance Type and Instance Password, click Create, and then wait for a while. If the environment is created, the output result of the stack that is shown in the following figure appears on the Outputs tab.
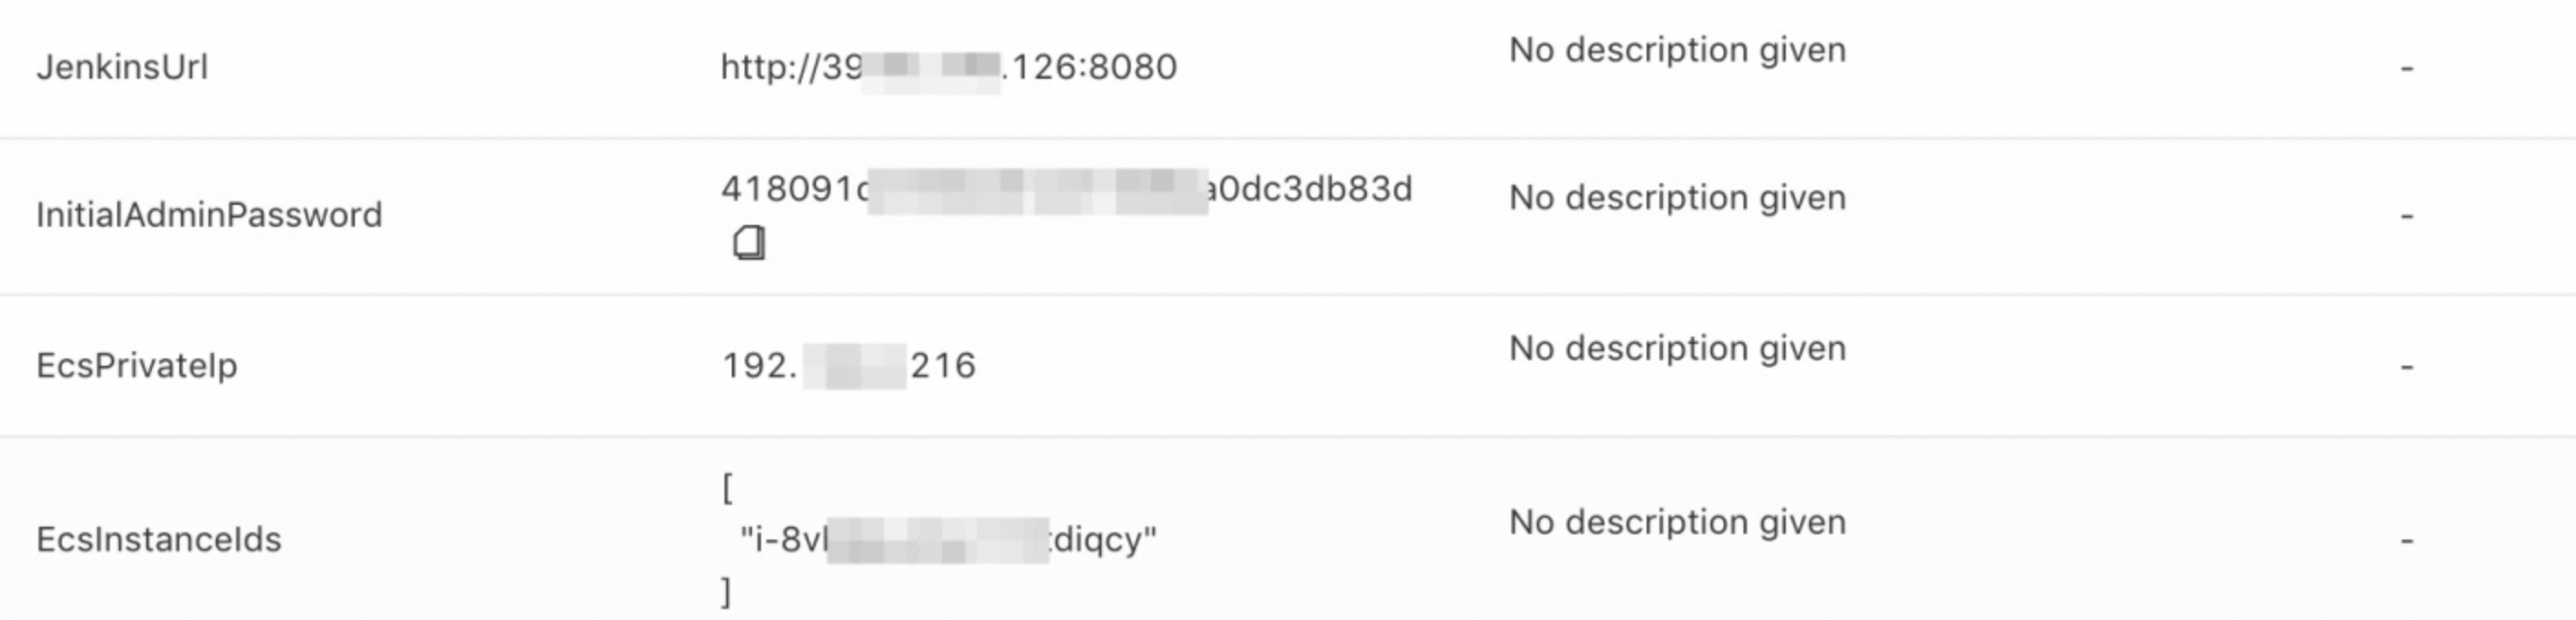
Check the value of the JenkinsUrl parameter, which is the URL of the Jenkins website, such as http://39.**.**.168:8080. Open the URL in a browser.
Copy and paste the value of the InitialAdminPassword parameter into the Administrator Password field, and click Continue.
Select and install the recommended components.
Set the username and password to log on to the instance.
Verify whether Git is installed
Connect to the Jenkins instance and verify whether Git is installed.
git --versionIf Git is not installed, run the following command to install Git:
yum install git -y
Install and configure Alibaba Cloud CLI
Attach a Resource Access Management (RAM) role to the Jenkins instance that you created in the previous steps. For more information, see Grant ECS access to resources of other Alibaba Cloud services by using instance RAM roles.
After the RAM role is attached to the Jenkins instance, run the following commands to connect to the instance and install and configure Alibaba Cloud CLI for the instance:
mkdir -p  $HOME/aliyun
cd $HOME/aliyun
wget https://aliyuncli.alicdn.com/aliyun-cli-linux-3.0.51-amd64.tgz
tar xzvf aliyun-cli-linux-3.0.51-amd64.tgz
sudo cp $HOME/aliyun/aliyun /usr/local/bin
Update images
Click New Item on the Jenkins dashboard.
Select Freestyle project, enter the name of your project in the Enter an item name field, and then click OK.
Go to the Source Code Management tab, select Git, and then enter the repository URL. In this example,
https://github.com/WordPress/WordPress.gitis used.Go to the Build tab, click Add build step in the Build section, and then select Execute shell from the drop-down list. Copy and paste the following script to the Command field. The script is used to package the master branch of WordPress, copy the package to the oss://wordpress-test-oos path, and then create a software package named wordpress in OOS.
# Produce a package.
version=`date +%s`

# Generate the wordpress_$version.tar package.
tar -cvf wordpress_$version.tar `find .|grep -v wp-config-sample.php|grep -v targets|grep -v .git|grep -v ^\.$`

# Grant permissions to a RAM role.
# Set the ramRoleName parameter to the RAM role that is attached to the Jenkins instance. In this example, InstanceRole is used.
ramRoleName="InstanceRole"
aliyun configure set --profile ecsRamRoleProfile --mode EcsRamRole --region cn-zhangjiakou --ram-role-name $ramRoleName

# Copy the package to OSS.
aliyun oss cp wordpress_$version.tar oss://wordpress-test-oos/wordpress_$version.tar

# The content of the package.
templateName=wordpress
# Specify the value of Location and include the installation script in templateContent.
# {
#         "FormatVersion": "OOS-2020-01-01-Package",
#         "Description": "",
#         "Packages": [{
#                 "Name": "wordpress_$version.tar",
#                 "Location": "oss://wordpress-test-oos/wordpress_$version.tar",
#                 "InstallScript": "test -e wordpress || mkdir wordpress && cd wordpress && mv ../wordpress_1594290375.tar . && tar xvf wordpress_1594290375.tar > /dev/null && rm wordpress_1594290375.tar &&  test -d  /var/www/html/ &&  cp -rf * /var/www/html/  || mkdir -p  /var/www/html && cp -rf * /var/www/html/"
#                 "UninstallScript": "echo uninstall",
#                 "Targets": [{
#                         "PlatForm": "centos",
#                         "Architect": "x86_64"
#                 }]
#         }]
# }


templateContent="{\"FormatVersion\":\"OOS-2020-01-01-Package\",\"Description\":\"\",\"Packages\":[{\"Name\":\"wordpress_$version.tar\",\"Location\":\"oss://wordpress-test-oos/wordpress_$version.tar\",\"InstallScript\":\"test -e wordpress || mkdir wordpress && cd wordpress && mv ../wordpress_$version.tar . && tar xvf wordpress_$version.tar > /dev/null && rm wordpress_$version.tar && test -d /var/www/html/ &&  cp -rf * /var/www/html/  || mkdir -p /var/www/html && cp -rf * /var/www/html \",\"UninstallScript\":\"echo uninstall\",\"Targets\":[{\"PlatForm\":\"centos\",\"Architect\":\"x86_64\"}]}]}"

# Update or create the software package in OOS.
aliyun oos CreateTemplate --TemplateName=$templateName --Content "$templateContent" || aliyun oos UpdateTemplate --TemplateName=$templateName --Content "$templateContent"
# Delete the temporary package.
rm wordpress_$version.tar

# Use OOS to update an image.
# Specify the parameters that are required to execute the template for image updates. For more information about the parameters, visit https://oos.console.alibabacloud.com/cn-zhangjiakou/execution/create/ACS-ECS-UpdateImage.
regionId="cn-zhangjiakou"  # The region in which the execution task is run.
ramRoleName="InstanceRole"  # The RAM role that is attached to the temporary instance.
securityGroupId="sg-8vb9b*****wvnuqy6" # The security group that is used to create a temporary instance.
vSwitchId="vsw-8vb5p1******zv01c" # The vSwitch that is used to create a temporary instance.
instanceType="ecs.g5.large" # The instance type of the temporary instance.

sourceImageId="centos_7_8_x64_20G_alibase_20200622.vhd" # The source image to be updated.

commandType="RunShellScript" # The type of the script.

## The content of the commandContent script.
#version=v1.0.3
#utilPath=/usr/local/share/aliyun-oosutil
#binaryPath=/usr/local/share/aliyun-oosutil/$version
#test -e $binaryPath || mkdir -p $binaryPath
#test -e $binaryPath/oosutil_linux || wget "https://oos-public-cn-zhangjiakou.oss-cn-zhangjiakou-internal.aliyuncs.com/oosutil/$version/linux/oosutil_linux" -O $binaryPath/oosutil_linux -q
#chmod +x $binaryPath/oosutil_linux
#$binaryPath/oosutil_linux configure_package install wordpress
# The script that is used to install a software named wordpress.
commandContent='version=v1.0.3\nutilPath=/usr/local/share/aliyun-oosutil\nbinaryPath=/usr/local/share/aliyun-oosutil/$version\ntest -e $binaryPath || mkdir -p $binaryPath\ntest -e $binaryPath/oosutil_linux || wget \"https://oos-public-cn-zhangjiakou.oss-cn-zhangjiakou-internal.aliyuncs.com/oosutil/$version/linux/oosutil_linux\" -O $binaryPath/oosutil_linux -q\nchmod +x $binaryPath/oosutil_linux\n$binaryPath/oosutil_linux configure_package install wordpress\n'
parameters="{
  \"securityGroupId\": \"$securityGroupId\",
  \"commandType\": \"$commandType\",
  \"sourceImageId\": \"$sourceImageId\",
  \"regionId\": \"$regionId\",
  \"vSwitchId\": \"$vSwitchId\",
  \"instanceType\": \"$instanceType\",
  \"commandContent\": \"$commandContent\",
  \"ramRoleName\": \"$ramRoleName\"
}"

aliyun oos StartExecution --TemplateName ACS-ECS-UpdateImage --Parameters "${parameters}"
Click Save.
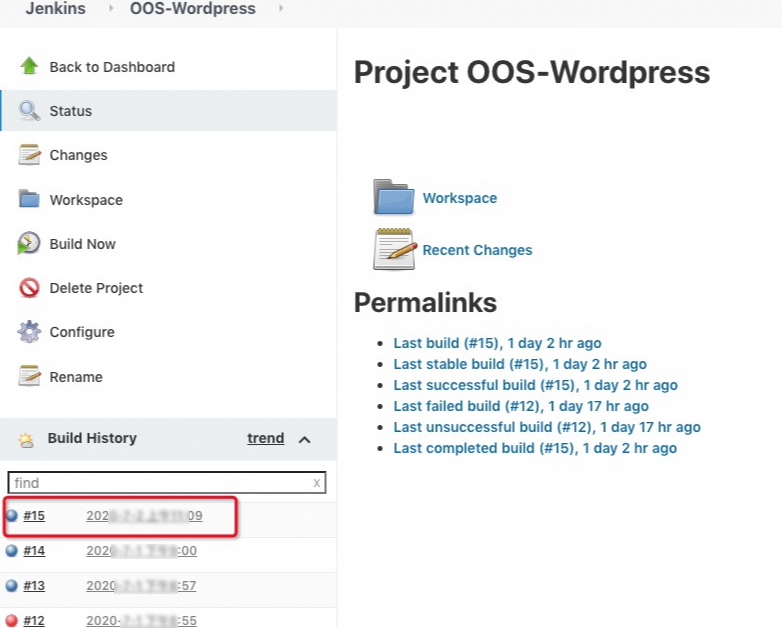
Click Build Now to start deployment. Verify the deployment status by clicking the build number under Build History.
On the Console Output page, view the logs of the deployment. The whole process includes pulling code from Git, running the tar command to generate a package, copying the package to OSS, creating or updating a package named wordpress in OOS, and then executing the public template named ACS-ECS-UpdateImage to generate the image in which the latest software is installed. To view the package, log on to the OOS console, and choose Server Management > Extensions in the left-side navigation pane. On the Extensions page, click the Custom Extensions tab.
On the Custom Extensions tab, click Details in the Actions column of the package to view the details of the package, including the package name, storage location, installation script, uninstallation script, and historical versions.
On the Task Execution Management page of the OOS console, view the execution that is triggered by Jenkins. If you use the generated image to create an instance, you can find that data stored in the /var/www/html/ directory of the instance is updated when the image is generated.