In this topic, WordPress is used to describe how to use Jenkins, CloudOps Orchestration Service (OOS), and Object Storage Service (OSS) to implement automated deployment.
Background information
For more information about WordPress, see GitHub.
CloudOps Orchestration Service: an automated O&M service provided by Alibaba Cloud, which is used for software version management and phased release. For more information, see What is OOS?
OSS: used to store the built software packages. Multiple storage types are supported. For more information, see What is OSS?
Jenkins: used to automate the build process and update software packages in OSS and OOS upon triggers. For more information, see Jenkins official website.
Resource Orchestration Service (ROS): an automated resource deployment service that is provided by Alibaba Cloud. ROS allows you to deploy cloud resources such as Elastic Compute Service (ECS), ApsaraDB RDS, and Server Load Balancer (SLB) that the system depends on with a few clicks. For more information, see What is ROS?
Create a WordPress environment
To create a WordPress environment with ECS and ApsaraDB RDS by using ROS, perform the following steps:
Log on to the ROS console.
In the left-side navigation pane, choose .
On the Sample Templates page, find the template named Create a WordPress Environment Based on ECS and ApsaraDB for RDS and click Create Stack.
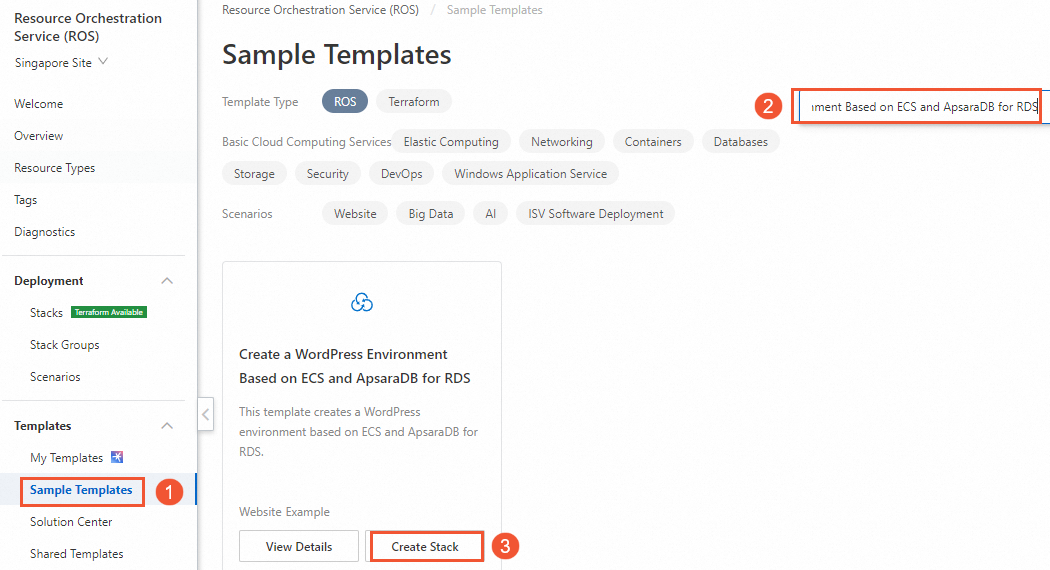
Set the parameters and click Create.
After the stack is created, you can view the WordPress stack in the stack list. Sample output:
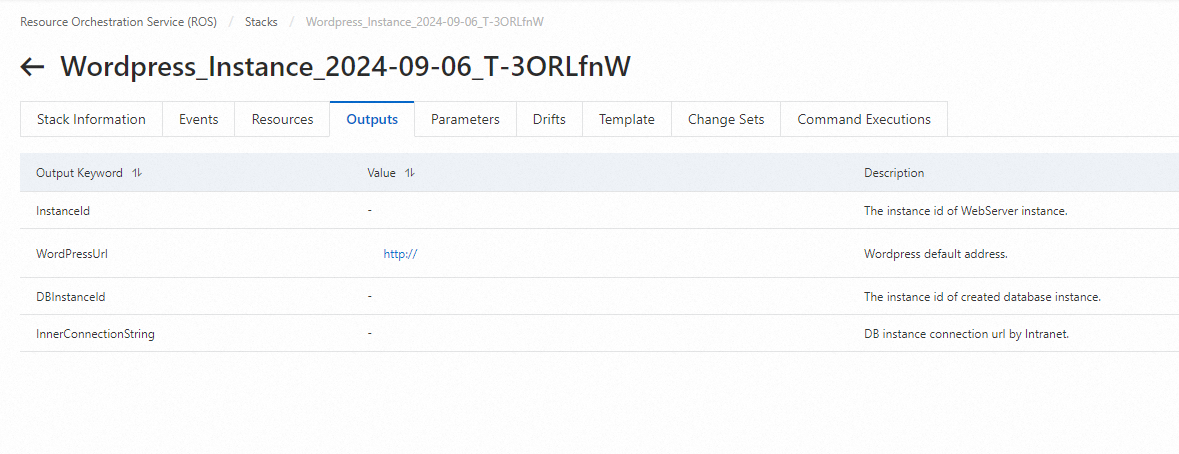
Click the WordPress URL in the Value column corresponding to WordPressUrl to view the WordPress website.
Check the value of the WordPressUrl parameter, which indicates the URL of a standalone WordPress website. Open the URL in a browser to confirm that the website is deployed.
Install and configure Alibaba Cloud CLI
In this example, macOS is used.
Alibaba Cloud CLI creates a RAM user to obtain the AccessKey pair.
For more information about how to create a RAM user, see Create a RAM user.
Install Alibaba Cloud CLI.
brew install aliyun-cliConfigure Alibaba Cloud CLI.
aliyun configureVerify whether Alibaba Cloud CLI is available. If so, you can view the supported regions in the command output.
aliyun ecs DescribeRegionsInstall and configure Jenkins
In this example, macOS is used. For more information about how to install Jenkins in other operating systems, see Install Jenkins.
Install the latest version.
brew install jenkinsInstall the LTS version.
brew install jenkins-ltsStart Jenkins.
brew services start jenkins-ltsOpen
localhost:8080in a browser.Copy the password from the provided directory, paste it in the Administrator password field, and then click Continue.

Install the default plug-ins.

Configure the username and password and then log on to Jenkins.
Use Jenkins to update a software package
Click New Item on the homepage of Jenkins.
Select Freestyle project, enter the name of your project in the Enter an item name field, and then click OK.
Go to the Source Code Management tab, select Git, and then enter the repository URL.
https://github.com/WordPress/WordPress.gitGo to the Build tab, click Add build step, and then select Execute shell from the drop-down list. Copy the following script and paste it to the Command field. The script is used to package the master branch of WordPress, copy the package to the oss://wordpress-test-oos path, and then create a software package named wordpress in OOS.
version=`date +%s`
# Generate the wordpress_$version.tar package.
tar -cvf wordpress_$version.tar `find .|grep -v wp-config-sample.php|grep -v targets|grep -v .git|grep -v ^\.$`
# Copy the package to OSS.
/usr/local/bin/aliyun oss cp wordpress_$version.tar oss://wordpress-test-oos/wordpress_$version.tar
templateName=wordpress
# Specify the OSS path of the package and configure the installation script.
# {
#   "FormatVersion": "OOS-2020-01-01-Package",
#   "Description": "",
#   "Packages": [{
#       "Name": "wordpress_$version.tar",
#       "Location": "oss://wordpress-test-oos/wordpress_$version.tar",
#       "InstallScript": "test -e wordpress || mkdir wordpress && cd wordpress && mv ../wordpress_$version.tar . && tar xvf wordpress_$version.tar > /dev/null && rm wordpress_$version.tar && cp -rf * /var/www/html/",
#       "UninstallScript": "echo uninstall",
#       "Targets": [{
#           "PlatForm": "centos",
#           "Architect": "x86_64"
#       }]
#   }]
# }
templateContent="{\"FormatVersion\":\"OOS-2020-01-01-Package\",\"Description\":\"\",\"Packages\":[{\"Name\":\"wordpress_$version.tar\",\"Location\":\"oss://wordpress-test-oos/wordpress_$version.tar\",\"InstallScript\":\"test -e wordpress || mkdir wordpress && cd wordpress && mv ../wordpress_$version.tar . && tar xvf wordpress_$version.tar > /dev/null && rm wordpress_$version.tar && cp -rf * /var/www/html/\",\"UninstallScript\":\"echo uninstall\",\"Targets\":[{\"PlatForm\":\"centos\",\"Architect\":\"x86_64\"}]}]}"
# Update the software package in OOS.
/usr/local/bin/aliyun oos CreateTemplate --TemplateName=$templateName --Content "$templateContent" || /usr/local/bin/aliyun oos UpdateTemplate --TemplateName=$templateName --Content "$templateContent"
# Delete the temporary package.
rm wordpress_$version.tar
Click Save.
Click Build Now to start deployment. You can click the build number under Build History to verify the deployment status.

In the Console Output, you can see the log of this deployment.
The whole process includes pulling code from Git, running the tar command to generate a package, copying the package to OSS, and creating a package named wordpress in OOS. To view the package, log on to the OOS console and choose Server Management > Extensions in the left-side navigation pane. On the Extensions page, click the Custom Extensions tab.

On the Custom Extensions tab, click Details in the Actions column of the package to view the details of the package, including the package name, storage location, installation script, uninstallation script, and historical versions.

Deploy the software package in the OOS console
Log on to the OOS console.
Choose and click Create.
On the Create Task Batch Software Management page, select a public extension (WordPress-One-Click) and the instance, and then click Create.
NoteIn this example, select the instance that is created by ROS.

Configure a role for the instance and click Authorize.
If the Select Instances option is dimmed, perform this step to configure a role for the instance. OOS assumes this role to obtain the package information and the permissions to download OSS buckets. In other scenarios, skip this step.


Grant permissions to the role.
If an existing RAM role is attached with the AliyunOOSReadOnlyAccess and AliyunOSSReadOnlyAccess policies and ECS is selected as the trusted service, click Create. The execution is successful in the execution list.
To create a RAM role for the instance, perform the following steps:
Log on to the RAM console. On the Roles page, click Create Role. In the Select Role Type step of the Create Role wizard, select Alibaba Cloud Service as Select Trusted Entity. In the Configure Role step, select Elastic Compute Service from the Select Trusted Service drop-down list, configure other parameters, and click OK. The RAM role is created.
Attach the AliyunOOSReadOnlyAccess and AliyunOSSReadOnlyAccess policies to the created RAM role.

Go to the Create Task Batch Instance Operations page, select Instance Operations as Task Type, click Add Role in the Operations to Be Performed section, and then assign the created RAM role to the instance.
After the RAM role is assigned, return to the Create Task Batch Software Management page, select the instance to which the RAM role is assigned, and then click Create.

On the Task Execution Management page, check the execution status. In this example, the execution is successful and the latest WordPress files are displayed in /var/www/html. You can click Details in the Actions column to view the execution details.

Conclusion
The continuous integration or continuous delivery (CI/CD) process is complete by using OOS and Jenkins. OOS provides the Extensions feature that allows you to manage software versions and deploy applications in phased release mode. In Jenkins, you can also directly call the Extensions feature of OOS to automate the deployment process. For more information about how to use OOS and Jenkins to automatically update images, see the "Implement automated image updates by using Jenkins, OOS, and OSS" topic.