CloudOps Orchestration Service (OOS) allows you to manage Alibaba Cloud agents, software management tools, and custom extensions on Elastic Compute Service (ECS) instances. Custom extensions support regular packages such as RPM, DEB, and MSI. This topic describes how to manage custom extensions on ECS instances in an effective manner by using OOS.
Preparations
Create an ECS instance in a virtual private cloud (VPC).
For more information, see Create an instance on the Custom Launch tab. Only an ECS instance in a VPC supports installing and uninstalling of custom extensions. Make sure that the ECS instance is deployed in a VPC.
Log on to the ECS console.
In the left-side navigation pane, choose .
Find the ECS instance and make sure that VPC is displayed in the Network Type column.

Create a RAM role and attach the role to the ECS instance.
For more information, see Instance RAM roles. Take note of the following parameters:
Create a custom policy.
For more information, see Create a custom policy. Make sure that the policy in the following JSON script is attached to the RAM role.
Create a RAM role.
For more information, see Create a regular service role. Take note of the following parameters:
Select Trusted Entity: Select Alibaba Cloud Service.
Role Type: Select Normal Service Role.
Select Trusted Service: Select Elastic Compute Service.
Grant permissions to the instance RAM role.
When you grant permissions to the RAM role, set Policy to the policy created in 2.a Create a custom policy. For more information, see Grant permissions to a RAM role.
Attach the RAM role to the ECS instance.
Select the RAM Role created in the preceding step. For more information, see Instance RAM roles.
Create an Object Storage Service (OSS) bucket to store custom extensions.
For more information, see Create buckets. When you specify Region, select Specify Region from the drop-down list and specify the same region as OOS.
Create a custom extension
Go to the OOS console>Server Management>Extensions page and click the Custom Extensions tab.
Click Create Custom Extension, set the Basic Information as prompted, and then click Next Step.
Only you can view, install, and uninstall the custom extensions. Key parameters:
Parameter
Description
Extension Type
You can select Driver, Performance Acceleration, Application, and Agent.
Version Description
V1 is automatically used for the first creation. After the extension is created, you can view the version number and version details on the extension details page.
NoteYou can use the extension update feature to modify the extension. When you update the extension, the system automatically generates the v2 version. Later versions are generated in the same manner.
Extension Applicable Scope
Specify the applicable conditions of the extension, including the supported instance families, image types, and operating systems and versions. After you specify this parameter, you can select only extensions that meet the conditions on the ECS buy page or details page.
Command Parameter
Specify the input parameters of the extension. You can add multiple parameters. The parameter type can be String, Numeric, or Boolean. You can define the parameter name, default value, and parameter description for each parameter. You must assign values to these parameters when you install the extension on the ECS buy page or the details page of an ECS instance.
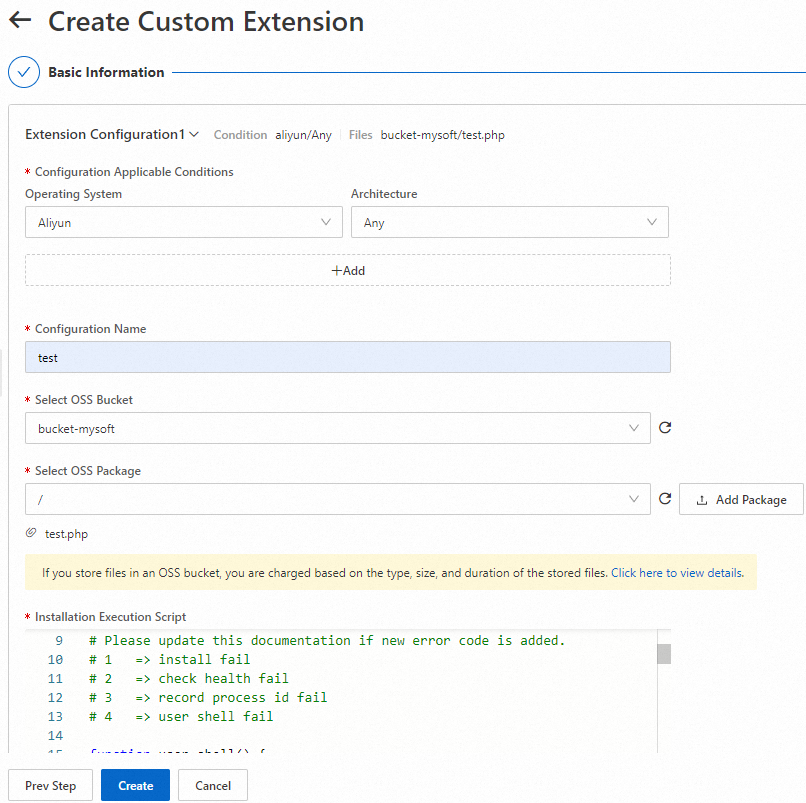
In the Extension Configuration step, set the parameters as prompted.
NoteYou can add configurations for multiple extensions. When you install an extension on an ECS instance, the system finds the extension configuration that is applicable to the operating system and architecture of the ECS instance, downloads the specified software package, and then runs the installation or uninstallation script.
Examples for installation script and uninstallation script:
Click Create.
After the extension is created, you can view it on the Custom Extensions tab.

Install a custom extension
Go to the OOS console>Automated Task>Common O&M Tasks>Batch Software Management page and click Create.
On the Create Task Batch Software Management page, set the parameters as prompted and click Create.
Set Operation to Install.
Set Extension Name to Custom Extension and select the custom extension to be installed.
Set Select Instances to Manually Select Instances and select the ECS instances on which you want to install the extension. Make sure that the ECS instances are deployed in a VPC.
In the Parameter Confirmation dialog box, confirm the parameters and click OK.
After the custom extension is created, you can view the installation task on the Task Execution Management page.

Uninstall a custom extension
Go to the OOS console>Automated Task>Common O&M Tasks>Batch Software Management page and click Create.
On the Create Task Batch Software Management page, set the parameters as prompted and click Create.
Set Operation to Uninstall.
Set Extension Name to Custom Extension and select the custom extension to be uninstalled.
Set Select Instances to Manually Select Instances and select the ECS instances on which you want to uninstall the extension.
In the Parameter Confirmation dialog box, confirm the parameters and click OK.
After the custom extension is uninstalled, you can view the uninstallation task on the Task Execution Management page.