The NAT Gateway console does not support directly switching Internet NAT Gateway instances within the same VPC. To change the vSwitch or private IP address of an Internet NAT Gateway, you can create a new Internet NAT Gateway instance in the same VPC and then modify the route entry with a destination CIDR block of 0.0.0.0/0.
Procedure
This topic uses an example to demonstrate how to switch to a different Internet NAT Gateway to change its associated vSwitch within a VPC.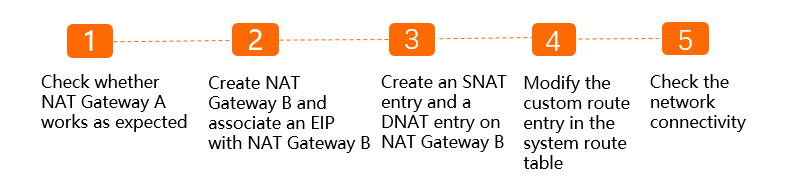
Prerequisites
Before you start, make sure that the following requirements are met:
-
A VPC named VPC1 is created in the China (Hangzhou) region. The VPC contains two vSwitches: VSW1 in availability zone B and VSW2 in availability zone H. For more information, see Create an IPv4 VPC.
-
An ECS instance named ECS1 is created in vSwitch VSW1. No public IP address is associated with the ECS instance. For more information, see Create an instance on the Custom Launch tab.
-
An Internet NAT Gateway instance, named NAT Gateway A, is created in vSwitch VSW1. The instance is configured with an SNAT entry for VPC1 and a port-forwarding DNAT entry. The DNAT entry uses the private IP address of ECS1, maps public port 22 to private port 22, and uses the TCP protocol.
Step 1: Verify the functionality of NAT Gateway A
-
Log on to the ECS1 instance in vSwitch VSW1. For more information, see Overview of connection methods.
-
Run the
pingcommand to test network connectivity. -
Run the
curl myip.ipip.netcommand to check the outbound public IP address of the ECS1 instance.The test result shows that the outbound public IP address of the ECS1 instance is the same as the IP address in the SNAT entry of NAT Gateway A. This indicates that the ECS1 instance accesses the internet through the SNAT feature of NAT Gateway A.
[root@iZm5e5s2jiy4hpbp345r4jZ ~]# curl myip.ipip.net Current IP: 118.xxx.xxx.230 From: China, Shandong, Qingdao, Alibaba Cloud/Telecom/Unicom/Mobile/Education Network -
Log on to your on-premises Linux device.
-
Run the
ssh root@<Public IP address>command. Replace <Public IP address> with the public IP address specified in the DNAT entry of NAT Gateway A. Then, enter the password of the ECS1 instance to connect to the instance.If the "Welcome to Alibaba Cloud Elastic Compute Service !" message appears, the connection is successful. This indicates that the ECS1 instance provides services to the internet through the DNAT feature of NAT Gateway A.
[root@iZm5e6xxx jfzdlZ ~]# ssh 118.xxx.xxx.230
The authenticity of host '118.xxx.xxx.230 (118.xxx.xxx.230)' can't be established.
ECDSA key fingerprint is SHA256:uyobLEZxxxgmd4f/sqWRrcnqjLxxxpNQnCyBzNw.
Are you sure you want to continue connecting (yes/no/[fingerprint])? yes
Warning: Permanently added '118.xxx.xxx.230' (ECDSA) to the list of known hosts.
root@118.xxx.xxx.230's password:
Welcome to Alibaba Cloud Elastic Compute Service !
Last login: Thu Aug 12 17:26:53 2021 from 100.xxx.xxx.237
[root@iZm5e5xxx 45r4jZ ~]#
Step 2: Create NAT Gateway B and associate an EIP
In this example, NAT Gateway B is associated with vSwitch VSW2.
-
Log on to the NAT Gateway console.
-
On the Internet NAT Gateway page, click Create Internet NAT Gateway.
-
On the NAT Gateway page, configure the following parameters and click Buy Now.
Parameter
Description
Region
Select the region where you want to create the Internet NAT gateway.
Network And Zone
Select the VPC and vSwitch to which the NAT gateway belongs. After the NAT gateway is created, you cannot change the VPC or vSwitch.
Network Type
In this example, Internet NAT Gateway is selected.
Internet NAT Gateway: provides Network Address Translation capabilities and can be associated with EIPs to allow ECS instances to access the Internet, enabling communication between private and public networks.
VPC NAT Gateway: also provides Network Address Translation capabilities but cannot be associated with EIPs. It can only provide address translation within private networks for ECS instances, suitable for scenarios such as hiding internal addresses and avoiding address conflicts.
Elastic IP Address
In this example, Purchase And Associate EIP is selected.
Select Existing
EIP Instance: Select an EIP that is Not Associated With An Instance.
Purchase And Associate EIP: By default, a pay-by-traffic BGP (Multi-ISP) EIP is created. You can select a Bandwidth Peak based on your business requirements.
NoteIf you want to associate an EIP with a different line type or billing method, first apply for an EIP, and then Select An Existing EIP to associate.
Each EIP that you associate with a NAT gateway occupies a private IP address of the vSwitch to which the NAT gateway belongs. Make sure that the vSwitch has sufficient available private IP addresses. Otherwise, you cannot associate new EIPs with the NAT gateway.
Configure Later: The created NAT gateway will not have Internet access capabilities. You need to manually associate an EIP with the NAT gateway.
Step 3: Create SNAT and DNAT entries
For NAT Gateway B, the SNAT and DNAT entries must be identical to those for NAT Gateway A, except for the public IP address.
- Log on to the NAT Gateway console.
- In the top navigation bar, select the region where you want to create the NAT gateway.
- On the Internet NAT Gateway page, find the NAT gateway that you want to manage and click Configure SNAT in the Actions column.
On the SNAT Management tab, click Create SNAT Entry.
-
On the Create SNAT Entry page, configure the following parameters and click OK.
Parameter
Description
SNAT Entry
In this example, VPC is selected. You can select an SNAT entry type based on your business requirements.
VPC: Suitable for scenarios where all ECS instances in the VPC, along with ECS instances in other VPCs or data centers that are connected through CEN or dedicated lines and have 0.0.0.0/0 routes pointing to this VPC, need to access the Internet through the same EIP.
VSwitch: Suitable for scenarios where fine-grained control over Internet access is required, allowing only specified vSwitches to have Internet access capabilities.
ECS/ENI: Suitable for scenarios where fine-grained control over Internet access is required, allowing only specified ECS instances or elastic network interfaces (ENIs) to have Internet access capabilities.
Custom CIDR Block: Suitable for scenarios where you need to flexibly specify any IP CIDR block to configure Internet access capabilities through NAT gateway. This can cover various network environments within a VPC, across VPCs, or across on-premises data centers, meeting the requirements of complex or customized network structures.
NoteIf you select multiple vSwitches or ECS instances/ENIs, multiple SNAT entries will be created using the same public IP address.
Select EIP
Select the EIP that is used to access the Internet.
-
Return to the Internet NAT Gateway page, find the NAT Gateway B instance, and click Configure DNAT in the Actions column.
On the DNAT Management tab, click Create DNAT Entry.
-
On the Create DNAT Entry page, configure the following parameters and click OK.
Parameter
Description
Select EIP
Select the public IP address for internet communication. In this example, select the EIP associated with NAT Gateway B.
Select private IP address
Select the ECS instance that will use the DNAT rule for public communication.
In this example, select Select by ECS or ENI and then select ECS1 from the drop-down list.
Port settings
Select a DNAT mapping method.
This example uses Specific Port for port forwarding. Set Public port to 22, Private port to 22, and Protocol to TCP.
Entry name
Enter a name for the DNAT entry.
The name must be 2 to 128 characters in length, start with a letter or a Chinese character, and can contain digits, underscores (_), and hyphens (-).
Step 4: Modify the custom route entry
When you create the first Internet NAT Gateway in a VPC, the system automatically adds a route entry to the VPC's system route table. This route entry has a destination CIDR block of 0.0.0.0/0 and the Internet NAT Gateway as the next hop, which directs traffic to that gateway. However, the system does not automatically create a route entry for NAT Gateway B, so it cannot forward traffic. To switch from NAT Gateway A to NAT Gateway B, you must manually change the next hop of the 0.0.0.0/0 route entry to NAT Gateway B.
Log on to the VPC console.
In the left-side navigation pane, click Route Tables.
In the top navigation bar, select the region to which the route table belongs.
-
On the Route tables page, find the route table for VPC1 and click its ID.
-
On the tab, find the custom route entry where the destination CIDR block is 0.0.0.0/0 and the next hop is NAT Gateway A. In the Actions column, click Delete.
-
In the Delete route entry dialog box, click OK.
-
Click Add route entry. In the Add route entry panel, set the following parameters for the custom route entry, and then click OK.
Parameter
Description
Name
Enter a name for the route entry.
The name must be 2 to 128 characters in length, start with a letter or a Chinese character, and can contain digits, hyphens (-), and underscores (_).
Destination CIDR block
Enter the destination CIDR block to which traffic is routed. This example uses IPv4 CIDR Block and enters 0.0.0.0/0.
Next hop type
Select the type of the next hop. This example uses NAT Gateway.
NAT Gateway
Select the next hop instance. This example uses NAT Gateway B.
NoteSwitching the route entry interrupts existing connections, which must then be re-established. We recommend that you perform this operation during off-peak hours.
Step 5: Test and verify
Verify that traffic is now routed through NAT Gateway B instead of NAT Gateway A. Although this example shows how to change the associated vSwitch, you can follow the same steps to switch to a new gateway in the same vSwitch to change only its private IP address.
-
Log on to the ECS1 instance in vSwitch VSW1.
-
Run the
pingcommand to test network connectivity. -
Run the
curl myip.ipip.netcommand to check the outbound public IP address of the ECS1 instance.The test result shows that the outbound public IP address of the ECS1 instance is the same as the IP address in the SNAT entry of NAT Gateway B. This indicates that the ECS1 instance accesses the internet through the SNAT feature of NAT Gateway B.
[root@iZm5e5xxx ~]# curl myip.ipip.net Current IP: 47.3x.xxx.215 From: China, Shandong, Qingdao, Alibaba Cloud/Telecom/Unicom/Mobile/Education Network -
Log on to your on-premises Linux device.
-
Run the
ssh root@<Public IP address>command. Replace <Public IP address> with the public IP address specified in the DNAT entry of NAT Gateway B. Then, enter the password of the ECS1 instance to connect to the instance.If the "Welcome to Alibaba Cloud Elastic Compute Service !" message appears, the connection is successful. This indicates that the ECS1 instance provides services to the internet through the DNAT feature of NAT Gateway B.
[root@iZmxxxxxxxxxxxxxjfzdlZ ~]# ssh 47.xxx.xxx.215
root@47.xxx.xxx.215's password:
Welcome to Alibaba Cloud Elastic Compute Service !
Last login: Thu Aug 12 17:07:54 2021 from 47.xxx.xxx.0.13
[root@iZm5xxx345r4jZ ~]#