This guide explains how to use the rsync tool to safely migrate Extreme NAS file system (v1) instances created before May 20, 2020, to new instances and perform a service switchover.
Migration process
The migration process consists of four main stages. You must follow these stages in order:
Preparation: Identify the old instance. Create and configure a new instance.
Data migration: Use the rsync tool to synchronize data.
Service switchover: Switch your applications to the new file system instance.
Resource cleanup: After you confirm that your services are stable, safely release the old file system and related resources.
Stage 1: Preparation and planning
You must migrate Extreme NAS file system instances that are version 1.
Step 1.1: Identify the old instances to migrate
Use the NAS console
Log on to the Apsara File Storage NAS console.
In the navigation pane on the left, choose File System > File System List.
Set the filter condition to Extreme NAS.
Click the name of the Extreme NAS file system to go to its details page.
On the Basic Information tab, check the Version field.
If the Version is 1, you must migrate this file system.
Record its File System ID and Mount Target for later use.
Use the API
Log on to the Alibaba Cloud OpenAPI Portal and call the DescribeFileSystems operation.
Set the request parameters:
Region: Select the region where the NAS instance is located.
FileSystemType: Enter `extreme` to query for Extreme NAS file systems.
In the response, filter for all instances where the Version field is "1" and record their
FileSystemId.Sample JSON response:
{
  "FileSystems": {
    "FileSystem": [
      {
        "Version": "1",  // <-- Confirm that this field is "1"
        "FileSystemId": "31a****-****", // <-- Record this field
        // ... Other fields
      }
    ]
  }
}
Based on the recorded
FileSystemId, go to the Apsara File Storage NAS console to find and record its mount target address.
Step 1.2: Plan and create a new file system
For each old instance you need to migrate, create a new Extreme NAS file system as the migration destination.
Before planning, create a test instance in the destination zone to confirm that resources are available.
In the Apsara File Storage NAS console, click Create File System.
In the panel that appears, select Create Extreme NAS File System.
On the creation page, refer to the following table to configure the key parameters:
Parameter
Configuration Guide (for this migration)
Description
Region
Must be the same region as the old instance.
Direct cross-region access over a VPC is not supported. This would greatly increase migration complexity and cost.
Zone
Recommended: Select the same zone as the old instance.
This is critical for ensuring that the migration ECS instance can mount both the old and new instances simultaneously for optimal performance.
Storage Class
Select Standard or Advanced as needed.
Each zone supports only one type. We recommend selecting Advanced for better performance.
Protocol Type
NFS. This is automatically selected and cannot be changed.
Extreme NAS file systems only support the NFS protocol.
Provisioned Capacity of Extreme NAS File System
Set the capacity to be at least the storage capacity of the old instance.
You can increase the capacity based on future business growth.
Encryption Type
Keep the default Not Encrypted, or select an option based on your security and compliance requirements.
If the old instance is not encrypted, keep the new instance unencrypted to avoid unnecessary complexity.
After you complete the configuration, click Buy Now to create the instance.
Step 1.3: Create a mount target for the new file system
In the File System List, find and click the ID of the new file system that you just created.
Go to the file system details page. In the navigation pane on the left, choose Mount Targets > Add Mount Target.
Parameter
Configuration Guide (for this migration)
Description
VPC Network
Must be the same VPC as the old instance's mount target.
This is a prerequisite for the migration ECS instance to access both the old and new file systems.
vSwitch
Select any vSwitch in the VPC.
We recommend selecting a vSwitch with sufficient IP address resources.
Permission Group
Select the Default VPC permission group.
The default rule allows access from all IP addresses within the same VPC. This is ideal for migration scenarios.
After the mount target is created, copy and record the new mount target address.
Stage 2: Migrate data using rsync
Using rsync to migrate data consumes the read bandwidth of the old instance. This may affect existing services on the old instance. We strongly recommend performing the migration during off-peak hours. If you have a large amount of data, a full migration may take a long time. You can migrate the data in batches by subdirectory.
In this stage, you will use an ECS instance as a transit node to synchronize data from the old instance to the new instance with the rsync tool. We recommend that you purchase a new pay-as-you-go ECS instance for the migration. Release the instance after the task is complete to avoid resource contention with your existing services.
Step 2.1: Prepare and mount the migration ECS instance
Log on to the ECS Management Console. Create a temporary pay-as-you-go ECS instance in the same region, zone, and VPC as the NAS instance.
Log on to the ECS instance. Create local directories to mount the old and new file systems:
sudo mkdir -p /mnt/nas_old
sudo mkdir -p /mnt/nas_new
Mount the old and new instances. Go to the details page of the target file system, choose Mount Targets, and copy the full mount target address from the mount target list.
# Mount the old instance (replace <old_mount_target_address> with your actual address)
sudo mount -t nfs -o vers=3,noacl,nolock,proto=tcp,rsize=1048576,wsize=1048576,hard,timeo=600,retrans=2,noresvport <old_mount_target_address>:/share /mnt/nas_old

# Mount the new instance (replace <new_mount_target_address> with your actual address)
sudo mount -t nfs -o vers=3,noacl,nolock,proto=tcp,rsize=1048576,wsize=1048576,hard,timeo=600,retrans=2,noresvport <new_mount_target_address>:/share /mnt/nas_new
Run the
df -hcommand to confirm that both file systems are mounted.
Step 2.2: Install tools and synchronize data
Install the rsync and tmux tools:
sudo yum install -y rsync tmuxrsync is the core data synchronization tool.
tmux is a terminal multiplexer. We strongly recommend running long rsync commands in tmux to prevent the migration task from being interrupted by an unexpected Secure Shell (SSH) disconnection.
Start a tmux session:
tmuxPerform a full data synchronization. This process may take a long time, so please be patient.
# Note: The source path /mnt/nas_old/ must end with a forward slash (/).
sudo rsync -avP /mnt/nas_old/ /mnt/nas_new/
If you have many small files or a large amount of data, see Parallel rsync commands to significantly improve synchronization efficiency.
Perform the final incremental synchronization.
During off-peak hours, stop all applications that read from or write to the old NAS instance.
On the migration ECS instance, run the incremental synchronization command.
WarningThe --delete option deletes data from the destination file system that has been deleted from the source file system. Use this option with caution to avoid accidentally deleting data from the destination file system.
# The --delete parameter ensures that the destination directory is identical to the source directory.
sudo rsync -avP --delete /mnt/nas_old/ /mnt/nas_new/
Perform a data consistency check.
Before the service switchover, you must confirm that the data on the old and new instances is identical.
echo "Checking data consistency. This process will not modify any data..."
sudo rsync -rvn --delete /mnt/nas_old/ /mnt/nas_new/
Expected result: If the data is identical, the command output does not list any file names between the header and footer statistics. If any file names appear, it indicates that there are differences. You must roll back or re-synchronize before the switchover.
Stage 3: Service switchover and verification
After the data is fully synchronized, repeat the following steps on all relevant application servers.
Step 3.1: Manually switch the mount target
Stop your business applications, such as Nginx and Tomcat.
Unmount the old mount target. This example uses the local mount directory
/var/www/html/uploadson the application server:sudo umount /var/www/html/uploadsMount the new file system to the same local directory:
sudo mount -t nfs -o vers=3,noacl,nolock,proto=tcp,rsize=1048576,wsize=1048576,hard,timeo=600,retrans=2,noresvport <new_mount_target_address>:/share /var/www/html/uploadsRun
df -hto confirm that the new file system is mounted.Restart the application and perform a quick functional test, such as uploading and downloading files.
Step 3.2: Configure fstab for automatic mounting
After the manual switchover is successful, configure fstab for persistent automatic mounting.
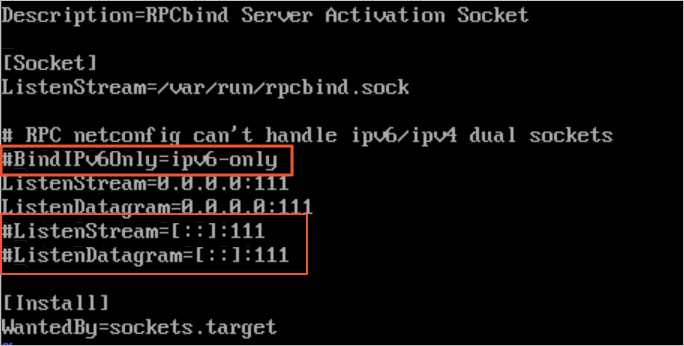
Run the following command to open the
rpcbind.socketconfiguration file:sudo vi /etc/systemd/system/sockets.target.wants/rpcbind.socketComment out the IPv6-related rpcbind parameter as shown in the following figure. Otherwise, the NFS rpcbind service will fail to start automatically.
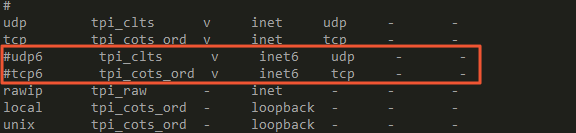
If you are configuring automatic mounting on a CentOS 6.x system, perform these additional steps:
Run the
chkconfig netfs oncommand to ensure that the netfs service starts on boot.Edit the /etc/netconfig configuration file and comment out the inet6-related content as shown in the following figure.
Save and exit the file.
Back up the current fstab configuration.
sudo cp /etc/fstab /etc/fstab.bak.$(date +%Y%m%d)Edit the
/etc/fstabfile. Comment out the old mount target information and add a new line:<file-system-id.region.extreme.nas.aliyuncs.com>:/share </mnt> nfs vers=3,nolock,noacl,proto=tcp,noresvport,_netdev 0 0<file-system-id.region.nas.aliyuncs.com>: Replace this with the actual NAS mount target address. (Example:
00a*****-****.cn-hangzhou.extreme.nas.aliyuncs.com.)</mnt>: Replace this with the local mount path. (Example:
/mnt).
Verify that the system can mount based on the new fstab configuration.
sudo mount -aRun the
df -hcommand to check if the mount was successful.
Step 3.3: Start and verify the service
Restart your application.
Perform comprehensive functional regression testing to ensure that data reads and writes work correctly.
Monitor the service for a period of time, such as one hour, to confirm that there are no issues.
Stage 4: Resource cleanup
Perform this stage only after the service switchover is complete and the service has been running stably for at least one week. Deleting old resources too early may result in data loss if an unexpected issue occurs.
Step 4.1: Delete the old mount target
In the Apsara File Storage NAS console, find the old file system instance and go to its Mount Targets page.
Find the target mount target. In the Actions column, click
 > Delete and confirm the action.
Step 4.2: Delete the old file system instance
This operation is irreversible. It permanently deletes the file system and all data in it. Before deleting, confirm again that your service no longer needs this instance.
After you confirm that all mount targets are deleted, return to the File System List page.
Find the old target instance. In the Actions column, click
> Delete.
Step 4.3: Release the migration ECS instance
Log on to the ECS Management Console and find the temporary ECS instance used for migration.
In the Actions column, choose
> Instance Status > Stop.Wait for the instance status to become Stopped. Then, in the Actions column, choose
> Instance Status > Release and follow the instructions to release the instance.
Learn more
Notes for Kubernetes environments
If your service mounts NAS through Kubernetes (K8s), the switchover steps are as follows:
Modify the existing dynamic or static volume YAML configuration file. Replace the old mount target with the new one.
Generate a new pod with the modified configuration file. Confirm that it successfully mounts the new file system and can read and write data correctly.
Evict all pods that use the legacy file system.
Emergency rollback plan
If you find any issues during verification in Stage 3, perform a rollback immediately:
Stop the application.
On the application server, unmount the new mount target.
Restore the old
/etc/fstabconfiguration.Remount the old file system (
sudo mount -a) and confirm withdf -h.Restart the application and confirm that it has recovered.