Create a general-purpose NAS NFS file system and mount it to an ECS instance (CentOS 7.9) using the one-click mount feature in the NAS console.
Prerequisites
-
You have activated the NAS service.
Activate the service from the NAS product page.
-
An ECS instance (CentOS 7.9) is available in the China (Hangzhou) region. Create an ECS instance.
Step 1: Create an NFS file system
-
Log on to the NAS console.
-
At the bottom of the Overview page, click Create General-purpose NAS File System.
-
On the general-purpose NAS (Pay-as-you-go) page, configure the following required parameters. Use defaults for other parameters.
All parameters are described in Parameters for creating a file system.
Parameter
Description
Region
From the drop-down list, select China (Hangzhou).
Zone
Select China (Hangzhou) Zone F. The zone must match the zone of your ECS instance.
Protocol type
Select NFS.
Mount target type
Select VPC.
VPC
Select the VPC where the ECS instance resides.
vSwitch
Select a vSwitch in the selected VPC.
-
Click Buy Now and complete the purchase.
Note-
A default VPC permission group is generated for each Alibaba Cloud account, allowing any IP address in the same VPC to access the file system through the mount target. To customize access rules, Create a permission group and its rules.
-
General-purpose NAS file systems automatically create a mount target with the default VPC permission group. Extreme NAS file systems require you to manually Add a mount target.
-
Step 2: Mount from the console
-
In the left-side navigation pane, choose .
-
In the top navigation bar, select the resource group and region where your file system resides.

-
Find the file system you created and click Mount in the Mount column.
NoteOn first use, grant NAS the required permissions by authorizing the service-linked role in the dialog box. Service-linked roles for NAS.
-
In the Mount panel, configure the mount settings.
-
Select a mount target and click Next.
-
Select the target ECS instance and click Next.
The ECS instance must be in the same VPC as the file system.
Note-
If the ECS instance is not listed, refresh the page.
-
Only one ECS instance can be selected at a time. Mount the same NFS file system on multiple ECS instances in batches.
-
-
Configure the mount settings.
Parameter
Description
Mount path
Local path on the ECS instance for mounting the file system.
Automatic mount
Automatic Mount at Startup is selected by default. The file system remounts automatically after ECS instance restarts.
Protocol type
Select the protocol for mounting the file system.
-
General-purpose NAS supports NFSv3 and NFSv4.0. Select NFSv3 for better performance unless multiple ECS instances edit the same file simultaneously.
-
Extreme NAS supports NFSv3 only.
NAS directory
Target directory on the NAS file system.
The NAS root directory (/) or any subdirectory (such as /abc).
NoteIf the directory does not exist, select Confirm New Directory to create it. Configure the UID, GID, and POSIX permissions, or leave defaults.
Mount parameters
Use the recommended defaults. Mount parameters.
-
-
-
Click Complete.
Mounting takes 1-2 minutes. Mount Successful confirms the file system is mounted.
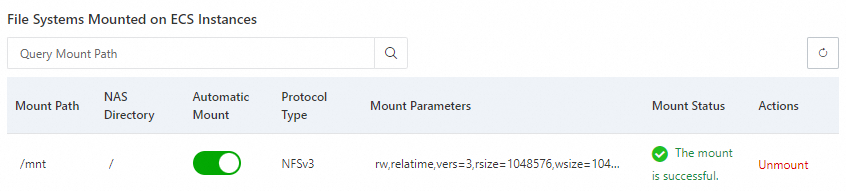
If the status shows Mount Failed, use the Automatic script to check for NFS mount failures on Linux to diagnose the issue.
After mounting, connect to the ECS instance and run
mount -lordf -hto verify mount parameters and file system capacity.
Step 3: Use the file system
After mounting, the file system works like a local directory.
-
Connect to the ECS instance and run these commands to access the NAS file system.
mkdir /mnt/dir1 mkdir /mnt/dir2 touch /mnt/file1 echo 'some file content' > /mnt/file2 ls /mnt -
Output similar to the following confirms successful access.

Related documentation
-
Mount a file system on an ECS instance using CLI mount commands.
-
Mount a file system on a container using container services.