This topic describes how to mount a Network File System (NFS) file system on a Linux Elastic Compute Service (ECS) instance. You can mount an NFS file system on multiple ECS instances so that the ECS instances can share access to the file system.
Prerequisites
A Linux ECS instance is created. For more information, see Create an ECS instance.
An NFS file system is created in the same virtual private cloud (VPC) and region as the ECS instance. The mount target of the file system is obtained. For more information, see Create a file system.
Step 1: Install an NFS client
Before you mount an NFS file system on a Linux ECS instance, you must install an NFS client. You need to install the NFS client on each Linux ECS instance only once. You do no need to install the NFS client the next time you mount a file system on the ECS instance.
Connect to the ECS instance. For more information, see Connect to an ECS instance.
Install an NFS client.
Operating system
Installation command
Alibaba Cloud Linux
sudo yum install nfs-utilsCentOS
Redhat
Ubuntu
Run the following installation commands in sequence:
sudo apt-get updatesudo apt-get install nfs-common
Debian
Optional. Increase the maximum number of concurrent NFS requests that can be sent from an NFS client.
Run the following commands to set the maximum number of concurrent NFS requests to 128: For more information, see How do I modify the number of concurrent NFS requests?
if (lsmod | grep sunrpc); then
(modinfo sunrpc | grep tcp_max_slot_table_entries) && sysctl -w sunrpc.tcp_max_slot_table_entries=128
(modinfo sunrpc | grep tcp_slot_table_entries) && sysctl -w sunrpc.tcp_slot_table_entries=128
fi
(modinfo sunrpc | grep tcp_max_slot_table_entries) && echo "options sunrpc tcp_max_slot_table_entries=128" >> /etc/modprobe.d/sunrpc.conf
(modinfo sunrpc | grep tcp_slot_table_entries) && echo "options sunrpc tcp_slot_table_entries=128" >> /etc/modprobe.d/sunrpc.conf
Step 2: Mount the NFS file system
NFS file systems can be manually or automatically mounted on Linux ECS instances. Manual mounting is suitable for temporary mounting. If you manually mount a NAS file system on an ECS instance, you must remount the file system every time the ECS instance is started or restarted. Automatic mounting is suitable for persistent mounting. If you enable automatic mounting for a NAS file system, you do not need to remount the file system every time the ECS instance is started or restarted. To prevent the mount information from being lost after the ECS instance is restarted, we recommend that you enable automatic mounting for a NAS file system after you manually mount the file system.
Manually mount the NFS file system
Use the mount target of an NFS file system to mount the file system on a Linux ECS instance.
To ensure optimal access performance, we recommend that you mount a file system by using NFSv3.
NFSv4.0 supports file locks, including range locks. If you need to modify a file on multiple Linux ECS instances at the same time, we recommend that you mount a file system by using NFSv4.0.
The NAS console allows you to mount a file system on an ECS instance in a few clicks. We recommend that you mount file systems by using the NAS console. For more information, see Mount an NFS file system in the NAS console.
Mount the NFS file system.
To mount a General-purpose NAS file system, run one of the following commands.
Mount a file system by using NFSv3
sudo mount -t nfs -o vers=3,nolock,proto=tcp,rsize=1048576,wsize=1048576,hard,timeo=600,retrans=2,noresvport file-system-id.region.nas.aliyuncs.com:/ /mntMount a file system by using NFSv4
sudo mount -t nfs -o vers=4,minorversion=0,rsize=1048576,wsize=1048576,hard,timeo=600,retrans=2,noresvport file-system-id.region.nas.aliyuncs.com:/ /mntTo mount an Extreme NAS file system, run the following command:
sudo mount -t nfs -o vers=3,nolock,noacl,proto=tcp,rsize=1048576,wsize=1048576,hard,timeo=600,retrans=2,noresvport file-system-id.region.extreme.nas.aliyuncs.com:/share /mnt
The following table describes the parameters that you can configure in the mount command.
Parameter
Description
General-purpose NAS file systems: file-system-id.region.nas.aliyuncs.com:/ /mnt
Extreme NAS: file-system-id.region.extreme.nas.aliyuncs.com:/share /mnt
The format is <Domain name of a mount target>:<Name of a shared directory> <Path of a mount directory>. Replace the domain name of a mount target, the name of a shared directory, and the path of a mount directory with the actual values.
Domain name of a mount target: To view the domain name, perform the following steps: Log on to the NAS console. On the File System List page, find the file system that you want to manage and click Manage in the Actions column. On the Mount Targets tab, view the domain name of the mount target. For more information, see Manage mount targets.
Name of a shared directory:
General-purpose NAS file systems: Enter the root directory / or a subdirectory, for example, /share. If you specify a subdirectory, make sure that the subdirectory exists in the NAS file system.
Extreme NAS file systems: The shared directory must start with /share. Example: /share and /share/subdir. If you specify a subdirectory, make sure that the subdirectory exists in the NAS file system.
Path of a mount directory: a subdirectory of the Linux ECS instance, for example, /mnt. Make sure that the subdirectory exists.
NoteWe recommend that you specify an empty directory. After a NAS file system is mounted on an ECS instance, the data of the NAS file system is displayed in the mount directory of the ECS instance. If the mount directory is not empty, the local data on the ECS instance is temporarily invisible.
vers
The protocol version of the file system.
vers=3: uses NFSv3 to mount the file system.
vers=4: uses NFSv4 to mount the file system.
minorversionspecifies the minor version number of the protocol. NAS file systems support NFSv4.0. If you use NFSv4 to mount a NAS file system, you must set the minor version number to 0.
NoteGeneral-purpose NAS file systems support both NFSv3 and NFSv4.0.
Extreme NAS file systems support only NFSv3.
rsize
The size of data blocks that the client can read from the file system.
Recommended value: 1048576.
wsize
The size of data blocks that the client can write to the file system.
Recommended value: 1048576.
hard
If this parameter is not enabled, when File Storage NAS is unavailable, the client may immediately return an error without retrying, which may cause inconsistency or loss of data.
We recommend that you enable this parameter.
timeo
The period of time for which the NFS client waits before the client retries to send a request. Unit: deciseconds (tenths of a second).
Recommended value: 600 (60 seconds).
retrans
The number of times that the NFS client retries to send a request.
Recommended value: 2.
noresvport
Specifies that a new TCP port is used to ensure network continuity between the file system and the ECS instance when the network recovers from a failure.
We recommend that you enable this parameter.
NoteIf you need to modify the timeo parameter, we recommend that you specify 150 or a greater value. The timeo parameter is measured in deciseconds (tenths of a second). For example, the value 150 indicates 15 seconds.
To prevent performance degradation, we recommend that you set both the rsize and wsize parameters to 1048576.
The rsize, wsize, hard, timeo, retrans, and noresvport parameters are optional. Separate multiple parameters with commas (,).
ImportantTo prevent data inconsistency, we recommend that you do not use the soft mount option. If you specify the soft mount option, make sure that you understand the potential risks.
We recommend that you do not set any other mount options that are different from the defaults. If you change the read or write buffer sizes or disable attribute caching, the performance may be reduced.
Verify the mount result.
Command
mount -lSample command output
If a command output that is similar to the following example appears, the mount is successful.

After the file system is mounted, run the
df -hcommand to view the storage capacity of the file system.
If the file system fails to be mounted, troubleshoot the issue. For more information, see FAQ about troubleshooting of mount failures.
After the NAS file system is mounted, read data from and write data to the NAS file system on the Linux ECS instance.
Access the file system the same way you access a local directory. The following figure shows an example.

(Optional) Automatically mount the NFS file system
Configure the /etc/fstab file of a Linux ECS instance to automatically mount an NFS file system when the ECS instance is restarted.
Before you enable automatic mounting, make sure that the preceding manual mounting is successful. This prevents startup failures of the ECS instance.
To mount an Extreme NAS file system, run the following command:
To mount a General-purpose NAS file system, skip this step and go to Step 2.
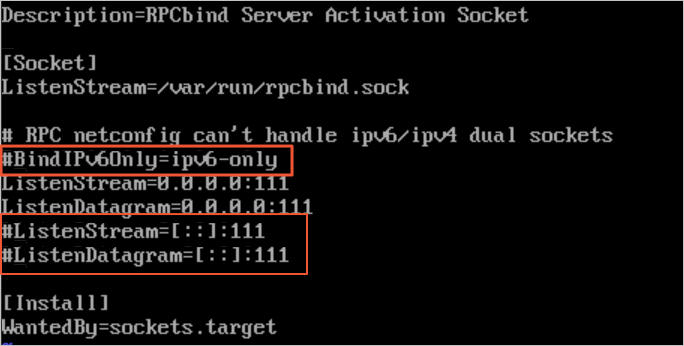
vi /etc/systemd/system/sockets.target.wants/rpcbind.socketOpen the /etc/systemd/system/sockets.target.wants/rpcbind.socket configuration file, and comment out the rpcbind parameters that are related to IPv6, as shown in the following figure. Otherwise, the rpcbind service fails to run at startup.
If you want to enable automatic mounting for CentOS 6.x, perform the following steps:
Run the
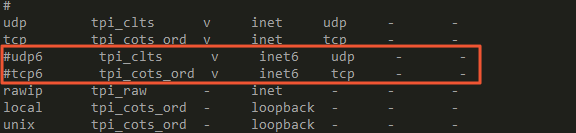
chkconfg netfs oncommand to enable the netfs service at startup.Open the /etc/netconfig configuration file and comment out inet6-related information, as shown in the following figure.
Open the /etc/fstab configuration file to add mounting configurations.
Replace the following variables with the actual values:
Replace <file-system-id.region.nas.aliyuncs.com> with the domain name of the mount target. For example, the domain name of a mount target for a General-purpose NAS file system is
237*******-*****.cn-hangzhou.nas.aliyuncs.comand the domain name of a mount target for an Extreme NAS file system is00a*****-****.cn-hangzhou.extreme.nas.aliyuncs.com.Replace </mnt> with the mount directory, such as
/mnt.
General-purpose NAS file system
To use NFSv3 to mount the file system, run the following command:
file-system-id.region.nas.aliyuncs.com:/ /mnt nfs vers=3,nolock,proto=tcp,rsize=1048576,wsize=1048576,hard,timeo=600,retrans=2,_netdev,noresvport 0 0To use NFSv4 to mount the file system, run the following command:
file-system-id.region.nas.aliyuncs.com:/ /mnt nfs vers=4,minorversion=0,rsize=1048576,wsize=1048576,hard,timeo=600,retrans=2,_netdev,noresvport 0 0
Extreme NAS file system
file-system-id.region.extreme.nas.aliyuncs.com:/share /mnt nfs vers=3,nolock,noacl,proto=tcp,noresvport,_netdev 0 0For more information, see Mount parameters. The following table describes the parameters that are not included in the preceding table.
Parameter
Description
_netdev
Prevents automatic mounting before the network is connected.
0 (the first value after noresvport)
Specifies whether to back up a file system by running the dump command. A non-zero value indicates that the file system is backed up. For a NAS file system, the default value is 0.
0 (the second value after noresvport)
The order in which the fsck command checks file systems at startup. For a NAS file system, the default value is 0, which indicates that the fsck command is not run at startup.
Run the following command to open the
/etc/rc.localfile at startup:[ ! -f /etc/rc.local ] && echo '#!/bin/bash' > /etc/rc.local; echo "for ((i=1; i<=10; i++)); do if ping -c 1 -W 3 aliyuncs.com; then break; else sleep 1; fi; done" >> /etc/rc.local; echo "sleep 3; mount -a -t nfs" >> /etc/rc.local; chmod +x /etc/rc.localRun the
rebootcommand to restart the ECS instance.ImportantIf you restart the ECS instance, services are interrupted. We recommend that you perform the operation during off-peak hours.
Verify that automatic mounting is enabled.
Run the
df -hcommand to check the mounted NAS file system within one minute after the ECS instance restarts.
FAQ
How do I resolve the latency in creating files in an NFS file system?
How do I resolve the latency in writing data to an NFS file system?
What can I do if I do not have the permissions to access an NFS file system?
What do I do if data is not synchronized when I mount an NFS file system on multiple ECS instances?