In File Storage NAS (NAS), permission groups function as a stateful firewall, controlling network access to your file systems. Custom permission groups can be created with specific rules to grant varying levels of access to designated IP addresses or CIDR blocks.
Background information
By default, each Alibaba Cloud account is provided with a default permission group. This group allows unrestricted read/write access from any IP address within the VPC. It does not impose any user-based restrictions on Linux systems.
The default permission group is only effective within a VPC and cannot be accessed from the public internet. It cannot be modified or deleted.
If the default permission group's open access policy does not meet your security requirements, a custom permission group can be created. This allows for fine-grained access control by adding rules for specific IP addresses or CIDR blocks.
Limits
Each Alibaba Cloud account can create up to 20 permission groups per region.
Each permission group supports up to 300 rules.
Permission groups can be created only for resources within a VPC.
Procedure
For enhanced data security, add rules only for the specific IP addresses or CIDR blocks that require access.
Log on to the NAS console.
Create a permission group.
In the left-side navigation pane, choose .
In the top navigation bar, select a region.
On the Permission Group page, click the General-purpose NAS or Extreme NAS tab. Then, click Create Permission Group.
In the Create Permission Group dialog box, configure the required parameters.
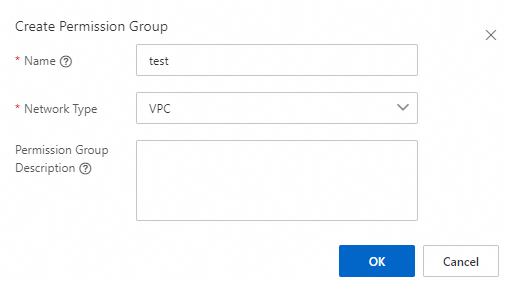
The following table describes the required parameters.
Parameter
Description
Name
The name of the permission group. Limits:
The name must start with a letter.
The name can contain letters, digits, underscores (_), and hyphens (-).
The name cannot contain Chinese characters.
The name cannot be the same as that of an existing permission group.
Network Type
Only VPC is supported.
NoteAs of November 21, 2022, you cannot create classic network permission groups for General-purpose NAS file systems. Classic network permission groups that were created before November 21, 2022 can still be used.
Add rules to the permission group.
Find the permission group that you created and click Manage Rules in the Actions column. On the page that appears, click Create Rule. In the Create Rule dialog box, configure the parameters described in the following table.
Parameter
Description
Authorization Type
The type of the IP addresses or CIDR blocks that you want to authorize. Valid values: IPv4 access address and IPv6 access address.
NoteOnly Extreme NAS file systems support IPv6.
Authorized Address
The IP address or CIDR block to which the rule applies.
Read/Write Permissions
Specifies whether to allow read-only or read and write access from the authorization object to the file system. Valid values: Read-only and Read/Write.
User Permissions
Controls the mapping of client-side Linux user identities. This setting does not apply to Server Message Block (SMB) file systems.
No Anonymity (no_squash): The client's root user retains root privileges on the file system.
Root User Anonymity (root_squash): Maps the client's root user (UID 0) to the anonymous
nfsnobodyuser.General Anonymity (all_squash): Maps all client users to the anonymous
nfsnobodyuser.
This mapping to the
nfsnobodyuser, which has minimal privileges, is a security measure to protect the file system.Priority
The priority of the rule. If multiple rules are applied to an authorization object, the rule that has the highest priority takes effect. Valid values: 1 to 100. The value 1 indicates the highest priority.
NoteIf rules with the same priority have overlapping CIDR blocks but different permissions, the rule that was created first takes precedence. Do not specify overlapping CIDR blocks in a rule.
Click OK.
Next steps
The following table describes the management operations available on the Permission Group page.
Operation | Description |
View permission groups and their details | View the permission groups that are created in a region and the details of each permission group. The details include the network type, number of rules, and number of associated file systems. |
Modify a permission group | Find the permission group and click Edit in the Actions column to modify the description of the permission group. |
Delete a permission group | Find the permission group and click Delete in the Actions column to delete the permission group. |
View a list of rules | Find the permission group and click Manage Rules in the Actions column to view a list of rules in the permission group. |
Modify a rule | Find the permission group and click Manage Rules in the Actions column. On the page that appears, find the rule and click Edit in the Actions column. In the Edit Rule dialog box, modify the following parameters: Authorized Address, Read/Write Permissions, User Permissions, and Priority. |
Delete a rule | Find the permission group and click Manage Rules in the Actions column. On the page that appears, find the rule, and click Delete in the Actions column to delete the rule. |
References
The encryption-in-transit feature can be used to protect data transmitted between your Elastic Compute Service (ECS) instances and NAS file systems against interception or tampering. For more information, see Encryption in transit for NFS file systems or Encryption in transit for SMB file systems.