Use the one-click mount feature in the NAS console to create a General-purpose NFS (Network File System) file system and mount it on a Linux ECS instance (CentOS 7.9). After the mount is complete, you can read and write data between your ECS instance and the file system.
Prerequisites
Before you begin, ensure that you have:
An Alibaba Cloud account with NAS activated. When you first visit the NAS product page, follow the on-screen instructions to activate the serviceNAS product page
An ECS instance running CentOS 7.9 in the Singapore region. See Create an ECS instance
Step 1: Create an NFS file system
Log on to the NAS console.
On the Overview page, find the File System Selection Guide section and click Create below General-purpose NAS.
On the General-purpose NAS (Pay-as-you-go) page, configure the parameters listed below. Leave all other parameters at their default values. For a full parameter reference, see Create a file system.General-purpose NAS (Pay-as-you-go) page
Parameter Value Region Singapore Zone The zone where your ECS instance resides Storage Class Capacity Protocol Type NFS Network Type VPC VPC The VPC where your ECS instance resides vSwitch A vSwitch in the same VPC Click Buy Now and complete the purchase.
By default, each Alibaba Cloud account includes a "VPC default permission group (all allowed)" that grants all IP addresses in the VPC access to the file system through its mount target. To restrict access, see Manage permission groups.
A mount target is automatically created for General-purpose NAS file systems with the "VPC default permission group (all allowed)" attached. For Extreme NAS file systems, create the mount target manually. See Create a mount target.
Step 2: Mount the file system
In the left navigation pane, choose File System > File System List.
In the top navigation bar, select the resource group and region where your file system resides.

Locate the file system you created and click Mount in the Actions column.
The first time you use the one-click mount feature, NAS prompts you to authorize access to your ECS resources by granting the AliyunServiceRoleForNasEcsHandler service-linked role. Follow the on-screen prompts to complete the authorization. See Service-linked roles of NAS.
In the Mount panel, complete the mount settings:
Select a mount target, then click Next.
Select the ECS instance to mount the file system on, then click Next. The ECS instance must be in the same VPC as the file system. If they are in different VPCs, the connection may fail. > Note: If your ECS instance does not appear in the list, refresh the page and try again. Only one ECS instance can be selected at a time. To mount the file system on multiple ECS instances, see Mount an NFS file system on multiple ECS instances at a time.
Configure the mount settings:
Parameter
Description
Mount Path
The local directory on your ECS instance where the file system will be mounted
Automatic Mount
Automatic Mount at Startup is selected by default, so the file system remounts automatically when the ECS instance restarts
Protocol Type
General-purpose NAS supports NFSv3 and NFSv4. NFSv3 is recommended for better performance, unless you need multiple ECS instances to edit the same file simultaneously. Extreme NAS supports NFSv3 only.
NAS Directory
The directory of the NAS file system to mount. Enter
/for the root directory, or a subdirectory such as/abc. If the directory does not exist, select Confirm New Directory to create it. Optionally, set the UID, GID, and POSIX permissions for the new directory.Mount Parameters
Use the default mount parameters. For the full parameter list, see Mount an NFS file system on a Linux ECS instance.
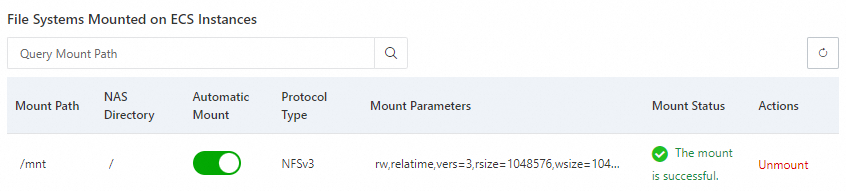
Click Complete. The mount operation takes 1–2 minutes. When the status changes to mount successful, the NAS file system is ready to use on the ECS instance. If the mount fails, use the built-in troubleshooting tool. See Fix mount issues.
Verify the mount
After the mount completes, connect to your ECS instance and run the following command to confirm the file system is mounted:
mount -lTo check the file system capacity, run:
df -hStep 3: Use the file system
The mounted file system works like a local directory on your ECS instance. Run the following commands to create directories and files:
mkdir /mnt/dir1
mkdir /mnt/dir2
touch /mnt/file1
echo 'some file content' > /mnt/file2
ls /mnt
If the output lists dir1, dir2, file1, and file2, the General-purpose Capacity NFS file system is working correctly.

What's next
To mount a NAS file system using mount commands instead of the console, see Mount a file system on an ECS instance.
To mount a NAS file system on a container, see Mount a file system on a container.