To connect on-premises applications to cloud-hosted microservices through Microservices Engine (MSE), install the Alibaba Cloud Toolkit plug-in in IntelliJ IDEA and set up the required binaries on your local machine.
Prerequisites
Before you begin, make sure that you have:
IntelliJ IDEA installed on your local machine
Network access to the download URLs in this document. If your network blocks external access, download the files from another machine and transfer them manually
Determined which interconnection version to use. Three versions are available:
Interconnection version ARMS agent support Notes 3.0 Yes Latest version 2.0 No — 1.0 No Uses a single directory for all files
Step 1: Install the plug-in in IntelliJ IDEA
Each interconnection version has its own plug-in package. Download the package that matches your version:
| Interconnection version | Plug-in package |
|---|---|
| 3.0 | toolkit-intellij-2021.4.1.zip |
| 2.0 | toolkit-intellij-2021.3.1.zip |
| 1.0 | toolkit-intellij-2020.8.2.zip |
To install the plug-in from disk:
In IntelliJ IDEA, go to File > Settings.
In the left pane, click Plugins.
Click the gear icon and select Install Plugin from Disk....
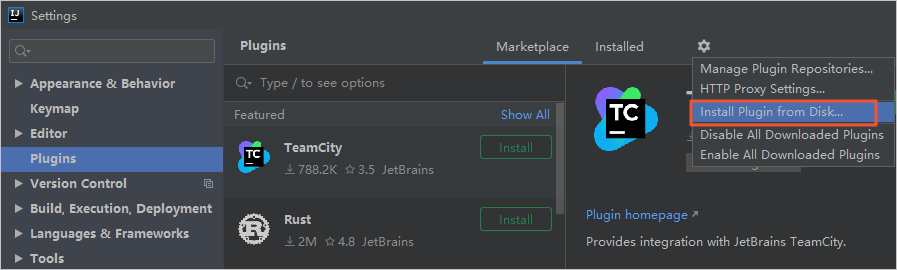
In the Choose Plugin File dialog box, select the downloaded zip file. Do not extract it.
Complete the installation wizard and restart IntelliJ IDEA.
Step 2: Initialize the on-premises environment
Create the required directories and download the binaries for the on-premises channel service. The steps differ by interconnection version and operating system.
Version 3.0
Windows
Create two directories:
   mkdir C:\Users\%USERNAME%\.edas\join_edas_register
   mkdir C:\Users\%USERNAME%\.edas\agent\3.0.0
Download taobao-hsf.sar.zip and extract its contents to
C:\<current user>\.edas\join_edas_register.Download the following files to
C:\<current user>\.edas\agent\3.0.0:File Description edas-nio-proxy.jar NIO proxy connect-agent.jar Connection agent etrans.exe On-premises channel service program ArmsAgent.zip Application Real-Time Monitoring Service (ARMS) agent. Extract to the same directory Verify that
etrans.exeruns:C:\Users\%USERNAME%\.edas\agent\3.0.0\etrans.exe --help
Expected directory structure:
C:\<current user>\.edas\
├── join_edas_register\
│   └── taobao-hsf.sar
└── agent\3.0.0\
    ├── edas-nio-proxy.jar
    ├── connect-agent.jar
    ├── etrans.exe
    └── ArmsAgent\
macOS
Create two directories:
   mkdir -p ~/.edas/join_edas_register
   mkdir -p ~/.edas/agent/3.0.0
Download taobao-hsf.sar.zip and extract its contents to
~/.edas/join_edas_register:curl -o /tmp/taobao-hsf.sar.zip https://edas-bj.oss-cn-beijing.aliyuncs.com/etrans/taobao-hsf.sar.zip unzip /tmp/taobao-hsf.sar.zip -d ~/.edas/join_edas_registerDownload the following files to
~/.edas/agent/3.0.0:curl -o ~/.edas/agent/3.0.0/edas-nio-proxy.jar https://edas-bj.oss-cn-beijing.aliyuncs.com/etrans/3.0.0/edas-nio-proxy.jar curl -o ~/.edas/agent/3.0.0/connect-agent.jar https://edas-bj.oss-cn-beijing.aliyuncs.com/etrans/3.0.0/connect-agent.jar curl -o ~/.edas/agent/3.0.0/etrans https://edas-bj.oss-cn-beijing.aliyuncs.com/etrans/3.0.0/etrans curl -o /tmp/ArmsAgent.zip https://edas-bj.oss-cn-beijing.aliyuncs.com/etrans/3.0.0/ArmsAgent.zip unzip /tmp/ArmsAgent.zip -d ~/.edas/agent/3.0.0Make
etransexecutable and verify:chmod +x ~/.edas/agent/3.0.0/etrans ~/.edas/agent/3.0.0/etrans --help
Expected directory structure:
~/.edas/
├── join_edas_register/
│   └── taobao-hsf.sar
└── agent/3.0.0/
    ├── edas-nio-proxy.jar
    ├── connect-agent.jar
    ├── etrans
    └── ArmsAgent/
Version 2.0
Windows
Create two directories:
   mkdir C:\Users\%USERNAME%\.edas\join_edas_register
   mkdir C:\Users\%USERNAME%\.edas\agent\2.0.0
Download taobao-hsf.sar.zip and extract its contents to
C:\<current user>\.edas\join_edas_register.Download the following files to
C:\<current user>\.edas\agent\2.0.0:File Description edas-nio-proxy.jar NIO proxy connect-agent.jar Connection agent etrans.exe On-premises channel service program Verify that
etrans.exeruns:C:\Users\%USERNAME%\.edas\agent\2.0.0\etrans.exe --help
Expected directory structure:
C:\<current user>\.edas\
├── join_edas_register\
│   └── taobao-hsf.sar
└── agent\2.0.0\
    ├── edas-nio-proxy.jar
    ├── connect-agent.jar
    └── etrans.exe
macOS
Create two directories:
   mkdir -p ~/.edas/join_edas_register
   mkdir -p ~/.edas/agent/2.0.0
Download taobao-hsf.sar.zip and extract its contents to
~/.edas/join_edas_register:curl -o /tmp/taobao-hsf.sar.zip https://edas-bj.oss-cn-beijing.aliyuncs.com/etrans/taobao-hsf.sar.zip unzip /tmp/taobao-hsf.sar.zip -d ~/.edas/join_edas_registerDownload the following files to
~/.edas/agent/2.0.0:curl -o ~/.edas/agent/2.0.0/edas-nio-proxy.jar https://edas-bj.oss-cn-beijing.aliyuncs.com/etrans/2.0.0/edas-nio-proxy.jar curl -o ~/.edas/agent/2.0.0/connect-agent.jar https://edas-bj.oss-cn-beijing.aliyuncs.com/etrans/2.0.0/connect-agent.jar curl -o ~/.edas/agent/2.0.0/etrans https://edas-bj.oss-cn-beijing.aliyuncs.com/etrans/2.0.0/etransMake
etransexecutable and verify:chmod +x ~/.edas/agent/2.0.0/etrans ~/.edas/agent/2.0.0/etrans --help
Expected directory structure:
~/.edas/
├── join_edas_register/
│   └── taobao-hsf.sar
└── agent/2.0.0/
    ├── edas-nio-proxy.jar
    ├── connect-agent.jar
    └── etrans
Version 1.0
Version 1.0 uses a single directory for all files.
Windows
Create the directory:
mkdir C:\Users\%USERNAME%\.edas\join_edas_registerDownload the following files to
C:\<current user>\.edas\join_edas_register:taobao-hsf.sar.zip -- extract its contents to the directory.
etrans.exe -- the on-premises channel service program.
Verify that
etrans.exeruns:C:\Users\%USERNAME%\.edas\join_edas_register\etrans.exe --help
Expected directory structure:
C:\<current user>\.edas\
└── join_edas_register\
    ├── taobao-hsf.sar
    └── etrans.exe
macOS
Create the directory:
mkdir -p ~/.edas/join_edas_registerDownload the following files to
~/.edas/join_edas_register:curl -o /tmp/taobao-hsf.sar.zip https://edas-bj.oss-cn-beijing.aliyuncs.com/etrans/taobao-hsf.sar.zip unzip /tmp/taobao-hsf.sar.zip -d ~/.edas/join_edas_register curl -o ~/.edas/join_edas_register/etrans https://edas-bj.oss-cn-beijing.aliyuncs.com/etrans/1.0.0/etransMake
etransexecutable and verify:chmod +x ~/.edas/join_edas_register/etrans ~/.edas/join_edas_register/etrans --help
Expected directory structure:
~/.edas/
└── join_edas_register/
    ├── taobao-hsf.sar
    └── etrans
Verify the setup
Confirm the environment is ready:
In IntelliJ IDEA, go to File > Settings > Plugins > Installed and verify that Alibaba Cloud Toolkit appears in the list.
Run
etrans --help(macOS) oretrans.exe --help(Windows) and confirm the program prints usage information.
If both checks pass, your on-premises environment is ready for cloud interconnection through MSE.
What to do next
Configure the interconnection between your on-premises and cloud applications. For details, see the MSE documentation on setting up cloud-to-local connectivity.