In a microservices architecture, calls between applications are often random. When you update a Spring Cloud or Dubbo application, this can make it difficult to route specific traffic to the new version. The end-to-end canary release feature of MSE Microservices Governance allows you to implement granular, end-to-end traffic control without modifying your application code. Lanes isolate application versions into separate runtime environments. By setting routing rules for a lane, you can direct requests that match specific criteria to a target application version. This topic describes how to configure an MSE cloud-native gateway to implement an end-to-end canary release.
Implementation process

Limitations
The end-to-end canary release feature uses the tag-based routing capability of MSE Microservices Governance, which is distinct from the gateway's own tag-based routing. To avoid conflicts, do not apply separate canary or tag-based routing rules to applications managed by this feature.
For limitations of the end-to-end canary release feature for Java applications, see Java frameworks supported by MSE Microservices Governance.
To use the latest end-to-end canary release capabilities, your MSE cloud-native gateway must be version 2.0.6 or later. For instructions on how to upgrade your gateway, see Upgrade an MSE cloud-native gateway.
Example scenario
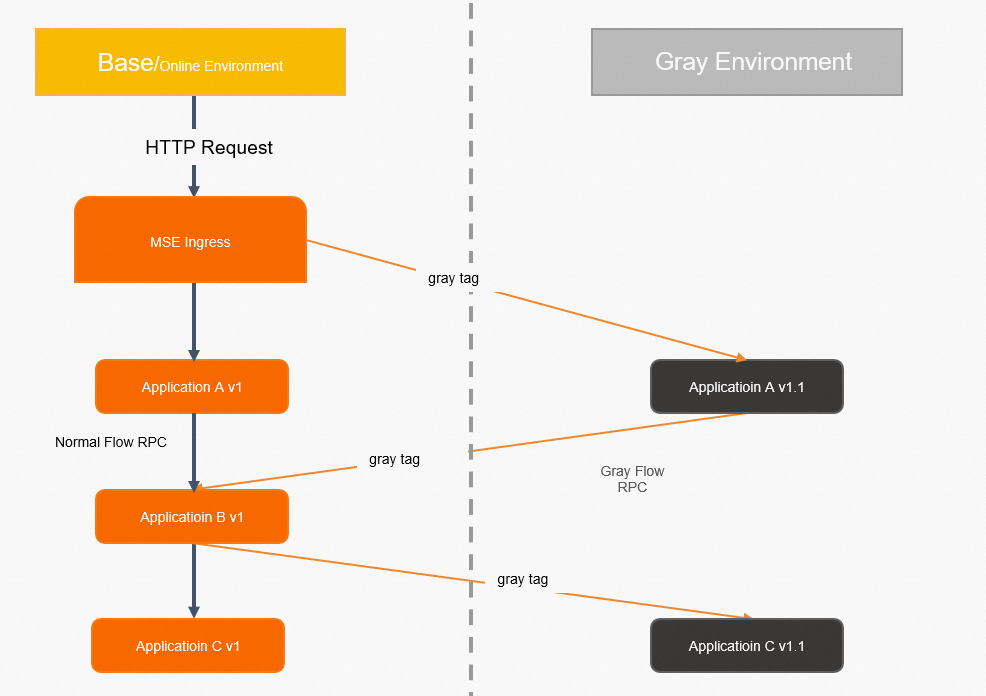
This topic uses an order placement scenario in an e-commerce architecture to demonstrate end-to-end traffic control from an MSE cloud-native gateway to backend microservices. Assume the application architecture consists of an MSE cloud-native gateway and a backend microservice architecture built with Spring Cloud. The backend call chain involves three services: a transaction center (A), a product center (B), and an inventory center (C). Clients can access the backend services, which use an MSE Nacos service registry for service discovery.
After an order is placed, the MSE cloud-native gateway routes incoming traffic to the transaction center (A). The transaction center (A) then calls the product center (B), and the product center (B) calls the downstream inventory center (C). The complete call chain is: Client > MSE cloud-native gateway > A > B > C.
As your business evolves, new features require you to release new versions of Application A and Application C simultaneously. Before the new versions go live, you must validate both applications through a canary release. After you confirm that the new versions are stable, you can proceed with the official release.
The end-to-end canary release capabilities of the MSE cloud-native gateway and MSE Microservices Governance let you build a complete canary release pipeline from the gateway to multiple backend services. This ensures that requests with specific characteristics are consistently routed to the corresponding canary environment, allowing you to validate multiple services at the same time. In addition, if a target canary version of an application is not available, traffic automatically fails over to the base environment.
Key concepts
MSE cloud-native gateway: A next-generation gateway that is compatible with the Kubernetes Ingress standard. It supports multiple service discovery methods, including Container Service for Kubernetes (ACK) and MSE Nacos, and offers various authentication methods to secure your services.
Lane: An isolated environment defined for a group of specific application versions, such as all "canary" versions. Only traffic that matches the routing rules is directed to the tagged applications within the corresponding lane. An application can belong to multiple lanes, and a lane can contain multiple applications, forming a many-to-many relationship.
Lane group: A collection of lanes. Lane groups are primarily used to separate environments for teams or scenarios.
Base environment: The environment for untagged applications. It serves as the fallback or production environment for all other environments.
Prerequisites
Create a Kubernetes cluster
For more information, see Create an ACK dedicated cluster (discontinued) or Create an ACK managed cluster.
Enable MSE microservices governance
Make sure that your MSE Java agent is version 3.2.3 or later. Otherwise, your business operations may be affected.
Activate the Professional Edition on the activation page of MSE Microservices Governance.
Connect your ACK microservice applications to the MSE Governance Center as described in Connect ACK microservice applications to the MSE Governance Center.
Create an MSE cloud-native gateway
For more information, see Create an MSE cloud-native gateway.
Associate a service source with the cloud-native gateway
For more information, see Add a service source.
For the end-to-end canary release feature, MSE cloud-native gateways currently support only Container Service for Kubernetes (ACK) clusters and MSE Nacos instances as service sources.
The MSE cloud-native gateway and the ACK cluster or MSE Nacos instance must be in the same virtual private cloud (VPC).
Step 1: Set up the base environment
Step 1: Deploy the base applications
Log on to the ACK console.
In the left-side navigation pane, click Clusters. Then, click the name of the cluster that you want to manage.
In the left-side navigation pane, choose .
In the upper part of the page, select the namespace of the cluster, and click Create from YAML.
Deploy the base applications.
MSE Nacos
Copy the following YAML content to deploy the base versions of applications A, B, and C.
NoteReplace
nacos server addressin the code with the internal domain name of your MSE Nacos instance. Remove the curly braces{}.Container Service (ACK)
Copy the following YAML content to deploy Nacos to simulate a self-managed service registry.
Copy the following YAML content to deploy the base versions of applications A, B, and C.
Copy the following YAML content to create a Service for the entrypoint application A.
Step 2: Expose Application A
New service
If you have not added Application A to the cloud-native gateway, follow these steps to expose it.
Log on to the MSE console. Go to Cloud-native Gateway > Gateways and click the name of your gateway instance. In the navigation pane on the left, choose Routes. On the page that appears, select the Services tab and click Add Service. For more information, see Add a service.
If your service source is an ACK cluster:
Service Source: Select Container Service.
Namespace: Select default.
Services: Select sc-a.
If your service source is an MSE Nacos instance:
Service Source: Select MSE Nacos.
Namespace: Select public.
Services: Select sc-A.
On the Routes page, select the Routes tab. Click Add Route to create a route for the sc-a/sc-A service and expose it. For more information, see Create a route.
Parameter
Description
Path
Select the match type Prefix and set the path value to /a.
Route Target
Select Single Service.
Backend service
Select sc-A.
Existing service
If Application A is already an online service in your gateway, follow these steps to expose it.
Log on to the MSE console. Go to Cloud-native Gateway > Gateways and select your gateway instance. In the navigation pane on the left, choose Routes. On the page that appears, select the Routes tab. Edit an existing route to expose the service.
Parameter | Description |
Path | Select the match type Prefix and set the path value to /a. |
Route Target | Select Single Service. |
Backend service | Select sc-A. |
Step 3: Test the base environment traffic
-
Log on to the MSE console. In the top navigation bar, select a region.
-
In the left-side navigation pane, choose Cloud-native Gateway > Gateways. On the Gateways page, click the ID of the gateway.
-
In the left-side navigation pane, click Overview.
On the Endpoint tab, find the SLB Ingress IP Address in the Gateway Ingress section.
Run the curl command to test the traffic of the base environment. The result shows that the traffic passes through the base versions of applications A, B, and C.
# Test command
curl x.x.1.1/a
# Test result
A[10.0.3.178][config=base] -> B[10.0.3.195] -> C[10.0.3.201]
The absence of a version suffix for applications B and C in the output indicates that requests are routed to their base versions.
Step 2: Set up the canary environment
If a new feature requires releasing new versions of Application A and C simultaneously, you can use an end-to-end canary release to validate them.
Step 1: Deploy the canary applications
Log on to the ACK console.
In the left-side navigation pane, click Clusters. Then, click the name of the cluster that you want to manage.
In the left-side navigation pane, choose .
In the upper part of the page, select the namespace of the cluster, and click Create from YAML.
Copy the following YAML content to deploy the canary versions of applications A and C.
MSE Nacos
NoteReplace
{nacos server address}in the code with the internal domain name of your MSE Nacos instance. Do not include the curly braces{}.Container Service (ACK)
Step 2: Create a lane group
Log on to the MSE console, and select a region in the top navigation bar.
In the left-side navigation pane, choose .
If no lane group exists in the selected microservice namespace, click Create Lane Groups and Lanes. If a lane group already exists, click + Create Lane Group.
In the Create Lane Group panel, configure the following parameters and click OK.
Parameter
Description
Name of Lane Group
Enter a name for the lane group.
Entry Type
Select MSE Cloud-native Gateway.
Gateway
Select the target cloud-native gateway.
Lane Group Application
Select spring-cloud-a, spring-cloud-b, and spring-cloud-c.
After the lane group is created, you can view it in the Lane Group section of the Full link Grayscale page. To modify the lane group information, click the edit icon (
 ) and update the settings.
Step 3: Create a lane
When you use the end-to-end canary release feature, you need to add a special
tagto your canary applications to distinguish them from other nodes. In a container environment, add thealicloud.service.tag: ${tag}label underspec.template.metadata.labels. In an ECS environment, add the Java startup parameter-Dalicloud.service.tag=${tag}.When using a cloud-native gateway as the ingress for an end-to-end canary release, MSE supports two canary release modes for lanes.
Canary release by content: We recommend this canary mode when the request content can be used for canary identification. If this is not possible, we also strongly recommend that you modify your system to add such canary identifiers to achieve better canary release results. For example, this helps maintain consistency for a user's requests.
Canary release by ratio: This degraded canary mode is used when request content cannot be used for canary identification and legacy systems cannot be modified. This mode has a drawback: it may route requests from the same source to different lanes, which causes inconsistent behavior for canary requests.
The canary release mode must be consistent across all lanes within a lane group. You can set the canary release mode only when you create the first lane in a lane group.
At the bottom of the Full link Grayscale page, if no lane exists in the selected namespace, click Click to create the first shunt Lane. If a lane already exists, click + Create swim lanes.
In the Create swim lanes panel, configure the lane settings and click OK.
By content
Parameter
Description
Add Node Tag
Add a tag to your canary application nodes to distinguish them from base nodes.
Enter lane information
Lane Name: Enter a name for the lane.
Lane Tag: The destination tag for traffic that matches the rules in this lane.
Confirm Matching Relationship: Check whether the number of application nodes with this tag meets your expectations.
Lane Status: Select Enable.
Add Canary Release Rule
Set the rule for routing traffic into this lane.
Canary Release Mode: Select Canary Release by Content.
Canary Release Condition: Select Meet All Conditions.
The condition in this example is configured as follows:
Parameter Type: Header.
Parameter: canary.
Condition: ==.
Value: gray.
Canary routing modes
Canary release condition
Effect
Meet All Conditions
Traffic is routed to the corresponding lane only if all specified conditions are met.
Meet Any Condition
Traffic is routed to the corresponding lane if any one of the specified conditions is met.
Condition types
Condition
Description
Configuration example
Request example
==
Exact match. The condition is met only if the value in the traffic exactly matches the specified value.
For example, the request matching condition for the lane mse (lane tag: gray, lane application list:
spring-cloud-a,spring-cloud-c) is Condition: AND header: [name] == xiaoming. This means that when the value of thenamerequest header is exactly equal toxiaoming, traffic is routed to this lane. The current status of the lane is Enabled.A GET request is sent to the path
/awith the headername=xiaoming. The responseAgray[192.168.0.22][config=base] -> B[192.168.0.9] -> Cgray[192.168.0.17]confirms that the traffic was routed through the canary versions of services A and C.!=
Not equal match. The condition is met if the value in the traffic does not match the specified value.
For example, if the request matching condition for the mse lane is set to
header: [name] != xiaoming, traffic is matched to this lane when the value of the name field in the request header is not equal toxiaoming.For example, if you send a GET request to the path
/awith the header set toname=xiaoming1, the response shows that the traffic is routed through the canary link:Agray[10.0.10.58][config=base] -> B[10.0.10.206] -> Cgray[10.0.10.8]. This indicates that the traffic matches the canary rule when the value ofnameis not equal to the condition value.in
Inclusion match. The condition is met if the value in the traffic is present in the specified list.
For example, the request matching condition for the mse lane is set to
header: [name] in [xiaoming,xiaohong]. This means that if the value of the name header in a request is xiaoming or xiaohong, the traffic is routed to the grayscale applications spring-cloud-a and spring-cloud-c that correspond to this lane.A GET request is sent to the path
/awith the headernameset toxiaohong. The responseAgray[10.0.10.58][config=base] -> B[10.0.10.206] -> Cgray[10.0.10.8]confirms the traffic was routed to the canary lane because the value was in the list.Percentage
Percentage match. The condition is met if hash(get(key)) % 100 < value is true.
A rule is configured to route 10% of requests to the lane tagged gray, based on the hash of the Header parameter name. This lane includes
spring-cloud-aandspring-cloud-c.A GET request is sent to the path
/awith the headername=111. The responseAgray[10.0.10.58][config=base] -> B[10.0.10.206] -> Cgray[10.0.10.8]indicates that this request's hash value fell within the 10% range and was routed to the canary lane.Regex
Regular expression match. The condition is met if the value in the traffic matches the specified regular expression.
A rule is configured to match requests where the Header parameter name matches a regex for a 32-character alphanumeric string. The lane tagged gray includes
spring-cloud-a,spring-cloud-c.A GET request is sent to the path
/awith the header name set to1234567890abcdef1234567890ABCDEF. The responseAgray[10.0.10.58][config=base] -> B[10.0.10.206] -> Cgray[10.0.10.8]confirms that the traffic was routed to the canary lane because the value matched the regex.By ratio
NoteTo create a lane for canary release by ratio, the ack-onepilot version must be 3.0.18 or later and the agent version must be 3.2.3 or later.
Parameter
Description
Add Node Tag
Add a tag to your canary application nodes to distinguish them from base nodes.
Enter lane information
Lane Name: Enter a name for the lane.
Lane Tag: The destination tag for traffic that matches the rules in this lane.
Confirm Matching Relationship: Check whether the number of application nodes with this tag meets your expectations.
Lane Status: Select Enable.
Configure Routing and Canary Release Rules
Set the rule for routing traffic into this lane.
Canary Release Mode: Select Routing by Percentage.
Traffic Percentage: 30%.
NoteYou can also set different traffic ratios for each base route of the gateway. When you enable this feature, make sure that the sum of all traffic ratios configured for that base route across all lane groups does not exceed 100%.
After you create the lane, you can view its details in the Traffic Allocation section of the Full link Grayscale page and perform the following actions:
In the Actions column, click Enable to activate the lane. Traffic is then routed according to the lane's rules. Matching traffic is prioritized to the application version with the corresponding lane tag. If no such version is found, traffic is routed to the untagged base version.
In the Actions column, click Close to deactivate the lane. Subsequent traffic is routed to the untagged base version.
Click the view icon (
 ) to view the traffic ratio for the lane.
Click the status icon (
 ) to set the status of applications within the lane.
Step 4: Test the canary traffic
By content
Use the curl command to test the canary traffic. The result shows that the traffic passes through the canary environments of A and C. Since a canary version of application B (tagged 'gray') does not exist, traffic is automatically routed to its base version.
# Test command
curl -H "canary: gray" x.x.x.x/a
# Test result
Agray[10.0.3.177][config=base] -> B[10.0.3.195] -> Cgray[10.0.3.180]
By ratio
You can run the following Python script to test the traffic distribution for routing by ratio. You must install the requests package and replace x.x.x.x with the ingress IP address of your cloud-native gateway.
The result shows that approximately 30% of the traffic is routed to the canary environment.
(Optional) Step 3: Observability
If an application issue occurs, you can use MSE's observability features to view monitoring data and quickly diagnose the problem.
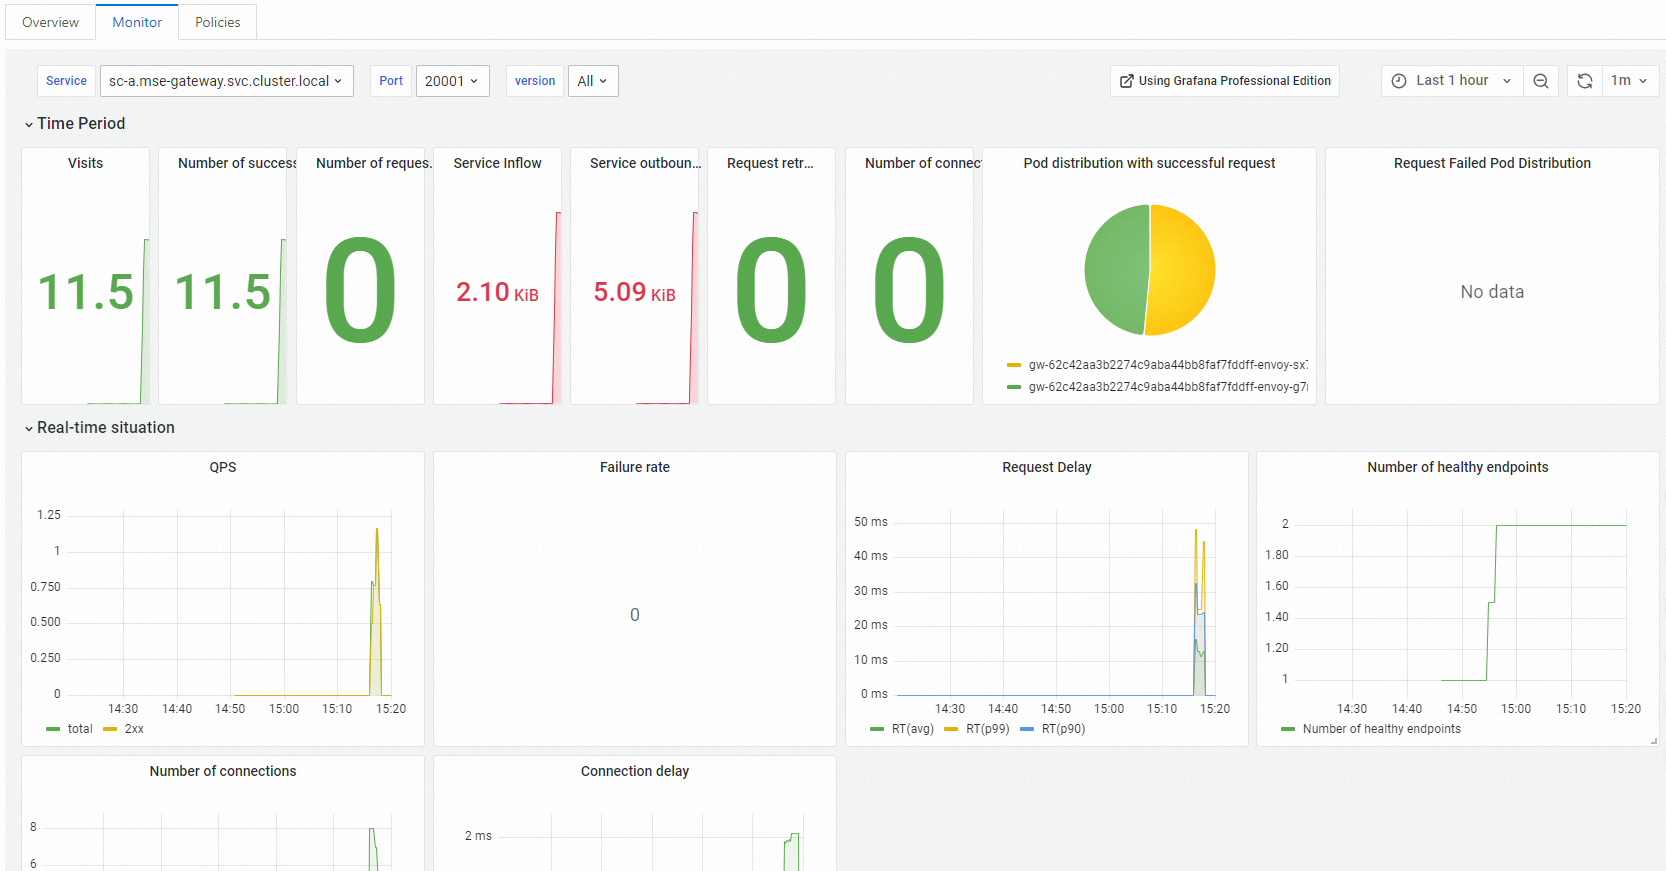
Cloud-native gateway observability
On the Routes page of the MSE cloud-native gateway console, select the Services tab. Click the target service and view its traffic metrics in the Monitor area.
MSE microservices governance observability
On the Full link Grayscale page of MSE Microservices Governance, click the target application. In the Application QPS Monitoring area, you can view the traffic for the base (untagged) and canary versions of the corresponding lane.
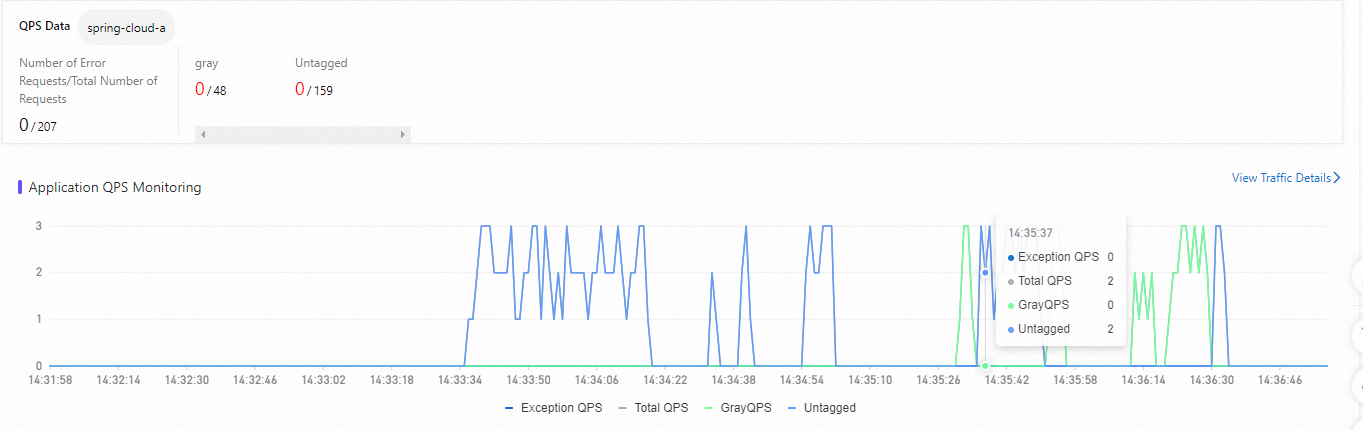
Total QPS: The total queries per second (QPS) for the application.
Abnormal QPS: The number of failed requests per second for the application.
GrayQPS: The QPS for the 'gray' version of the application.
ARMS observability
If your application is also connected to Application Real-Time Monitoring Service (ARMS), you can observe the business metrics of your canary environment on the ARMS end-to-end canary release dashboard. This allows you to monitor performance and decide whether to roll back or proceed with the release.
On this page, the end-to-end canary release tab displays a table that compares key metrics for each application in the online and canary environments, including requests per second, error rate, and average response time. When you select an application, the overview section shows its instance count, request volume, exception count, error rate, and response time metrics, helping you determine if the canary traffic is performing as expected.