A cloud-native gateway unifies traffic gateways and microservice gateways into a single layer, which reduces network hops and operational overhead while providing built-in traffic governance and observability.
This tutorial walks you through three tasks:
Create a route that forwards requests to a service registered in an MSE Nacos registry.
Verify the route works.
Add a throttling policy to protect backend services from traffic surges.
Prerequisites
Before you begin, make sure the following resources are ready:
A cloud-native gateway. For more information, see Create an MSE cloud-native gateway
An MSE Nacos engine. For more information, see Create a Nacos engine
A service registered with MSE Nacos. For more information, see Register Spring Cloud applications with MSE Nacos registries
Cloud-native gateways cannot associate with on-premises services registered in MSE Nacos or ZooKeeper registries.
Step 1: Create a route
Log on to the MSE console. In the top navigation bar, select a region.
In the left-side navigation pane, choose Cloud-native Gateway > Gateways. Click the name of your gateway.
In the left-side navigation pane, click Routes, then click Add Route.
Configure the route with the following settings:
Parameter Value Routing Rule Name springcloud-demoDomain name * (wildcard) Path type Prefix Path value /Route Point Single Service 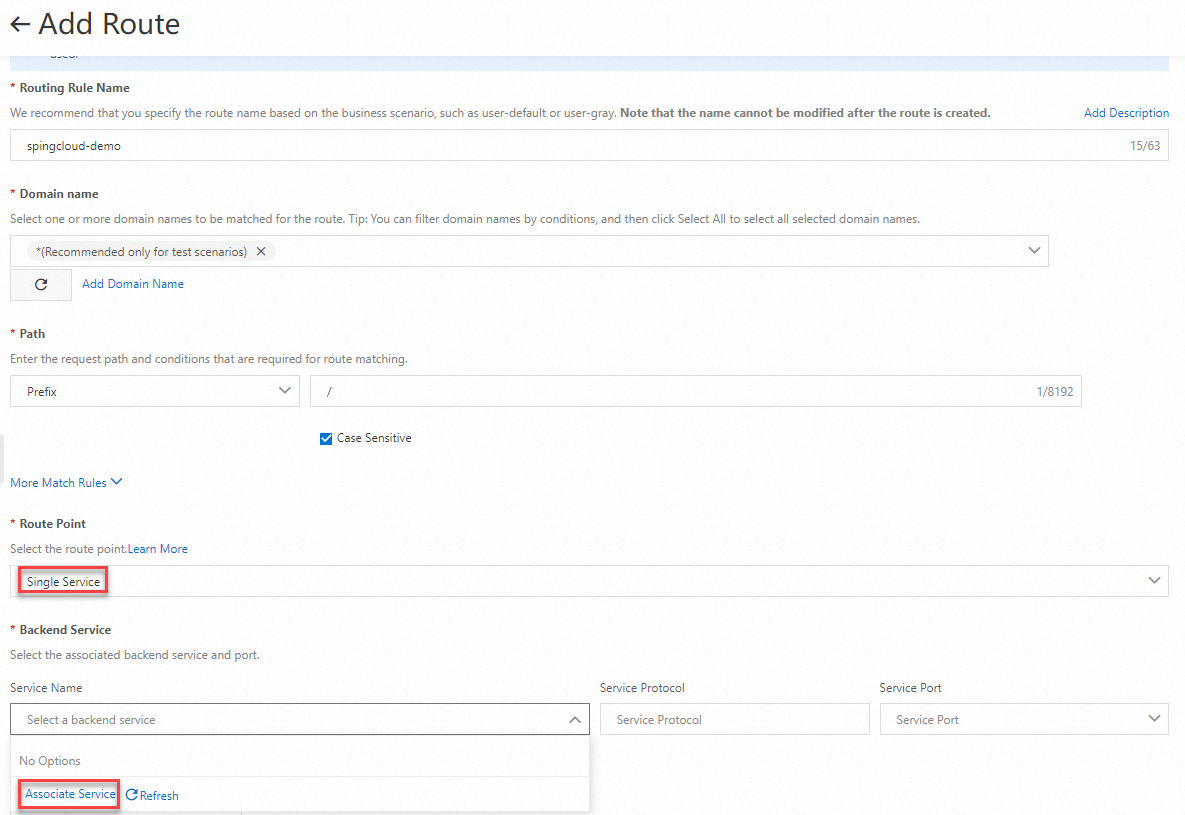
In the Service Name drop-down list, click Associate Service. In the Associate Service panel, configure the parameters for your environment and click OK.
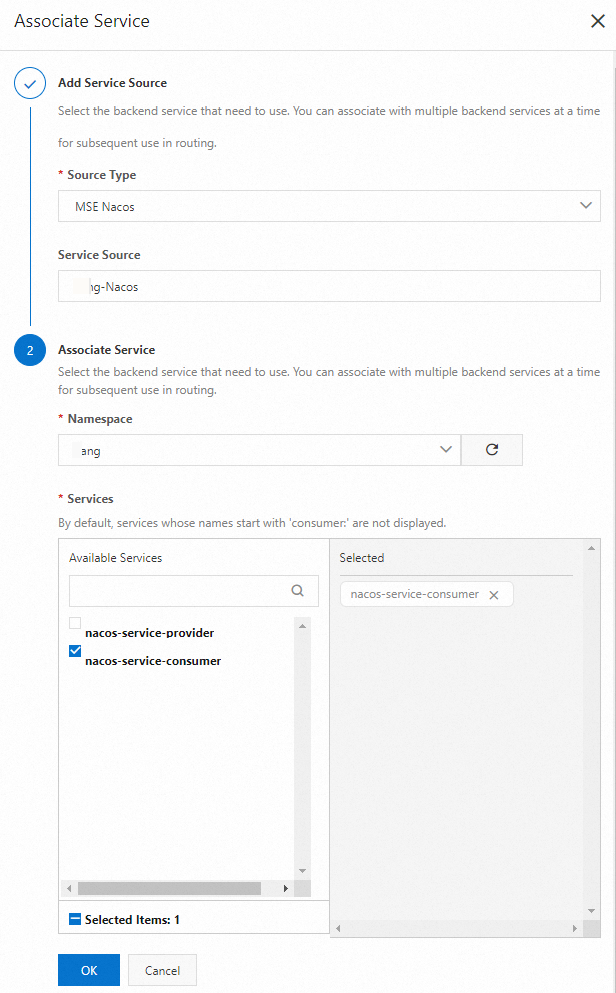
Select
nacos-service-consumerfrom the Service Name drop-down list, then click Save and Advertise.
The route is now active and forwards all incoming requests to the specified Nacos service.
Step 2: Verify the route
Before adding any routing policy, confirm that the gateway correctly forwards traffic to the backend service.
Log on to the MSE console. In the top navigation bar, select a region.
In the left-side navigation pane, choose Cloud-native Gateway > Gateways. Click the name of your gateway.
On the Overview page, click the Gateway Ingress tab. Note the ingress IP address.
 Note
NoteThe ingress IP address belongs to a Server Load Balancer (SLB) instance associated with the gateway. To use a self-managed SLB instance instead, see Manage SLB instances that are specified as Ingresses.
Send a test request:
curl -I http://<gateway-ingress-ip>/echo-rest/helloReplace
<gateway-ingress-ip>with the ingress IP address from the previous step. To test your own backend service, replace/echo-rest/hellowith its path.Expected response:
HTTP/1.1 200 OK
Content-Type: text/plain;charset=UTF-8
Content-Length: 5
Date: Thu, 29 Aug 2024 08:21:47 GMT
req-cost-time: 9
req-arrive-time: 1724919707979
resp-start-time: 1724919707988
x-envoy-upstream-service-time: 8
server: istio-envoy
An
HTTP/1.1 200 OKresponse confirms the route is working.
Step 3: Add a throttling policy
In high-concurrency scenarios, unthrottled traffic can overload backend services, causing slow responses or outages. A throttling policy monitors the queries per second (QPS) of a route and blocks traffic that exceeds the threshold.
For a full list of routing policies, see Routing policies.
Configure the throttling rule
Log on to the MSE console. In the top navigation bar, select a region.
In the left-side navigation pane, choose Cloud-native Gateway > Gateways. Click the name of your gateway.
Click Routes. Find the route you created and click Policies in the Actions column.
In the Policies section, click the Throttling tab, then click Flow control rules.
On the Throttling Rules tab, configure the following parameters:
Parameter Description Example Overall QPS Threshold Maximum requests per second allowed for this route. 1Web Fallback Behavior Action when the threshold is exceeded. Options: Returns the specified content or Jump to the specified page. Returns the specified content HTTP status code Status code returned when a request is throttled. Default: 429.429Returned Content-Type Format of the response body. Options: Plain text or JSON. Plain text HTTP Text Custom message returned to throttled requests. springcloud-demo flow limitWhether to open Toggle to enable or disable the rule. 
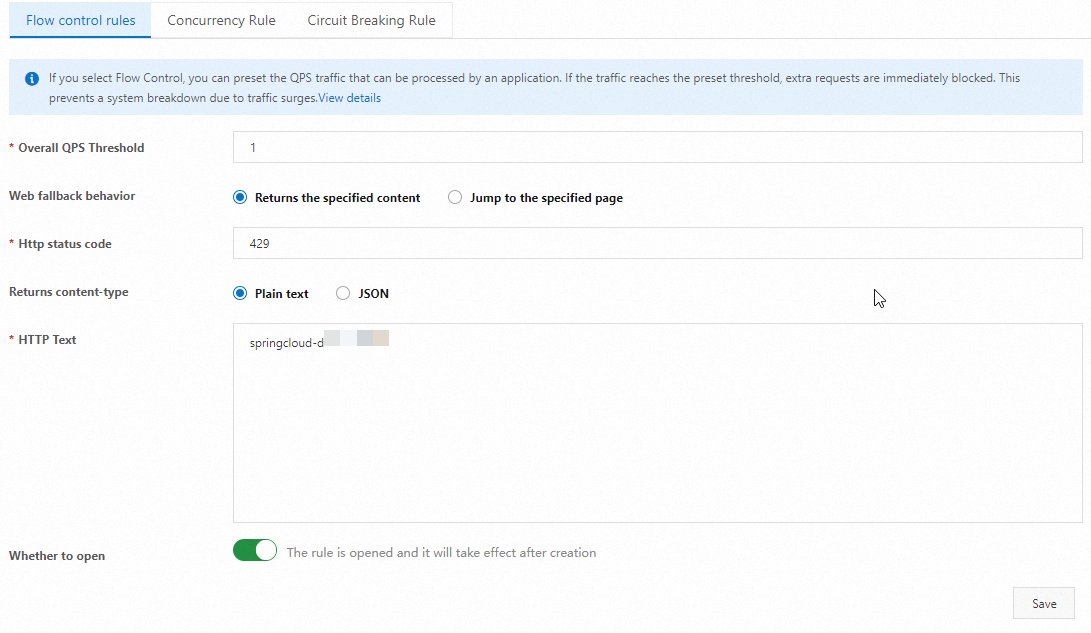
Click New to create the rule, or click Save to update an existing rule. In the confirmation dialog, click OK.
Verify the throttling policy
Send rapid consecutive requests to trigger the throttling threshold. Use the script for your operating system:
Linux / macOS
#!/bin/bash

URL="http://<gateway-ingress-ip>/echo-rest/hello"

while true; do
    curl -i -s $URL
done
Windows
@echo off

set "localUrl=http://<gateway-ingress-ip>/echo-rest/hello"

:loop
curl -i -s %localUrl%

goto loop
Replace <gateway-ingress-ip> with the ingress IP address of your gateway.
Once QPS exceeds the threshold, the gateway returns 429 Too Many Requests:
HTTP/1.1 429 Too Many Requests
content-type: text/plain; charset=UTF-8
content-length: 26
date: Thu, 29 Aug 2024 08:54:46 GMT
server: istio-envoy

springcloud-demo flow limit
Requests within the threshold continue to return 200 OK:
HTTP/1.1 200 OK
Content-Type: text/plain;charset=UTF-8
Content-Length: 5
Date: Thu, 29 Aug 2024 08:54:46 GMT
req-cost-time: 8
req-arrive-time: 1724921686961
resp-start-time: 1724921686970
x-envoy-upstream-service-time: 7
server: istio-envoy
The mixed output confirms throttling is working. Requests that exceed the QPS threshold return 429, while those within the limit return 200.
What to do next
Explore additional routing policies such as header rewriting, CORS, and retries.
If you run into issues, see FAQ about cloud-native gateways or use the AI diagnostics tool for automated troubleshooting.