This topic describes how to view the progress of a task that is initiated to add or remove shards and how to check whether the task is blocked by exceptions.
Background information
If you initiate a task to add shards to a sharded cluster instance or remove shards from the instance, the task may still be in progress for a long time after the task is submitted. The following steps describe how to troubleshoot this issue.
Before you initiate such a task, you must familiarize yourself with the following items:
The deployment modes of ApsaraDB for MongoDB replica set instances and sharded cluster instances, and the differences between the replica set and shard cluster architectures. For more information, see Replica set instances and Sharded cluster instances.
The basic working principle of the ApsaraDB for MongoDB balancer. For more information, see Manage the ApsaraDB for MongoDB balancer.
The data distribution mode of ApsaraDB for MongoDB instances. The instance data is distributed across chunks.
The common O&M commands of ApsaraDB for MongoDB sharded cluster instances, such as
sh.status().The basic usage of visualization tools, such as mongo shell and mongosh.
Check the task progress
Step 1: Check whether the balancer is enabled
For a task initiated to add or remove shard nodes, the data chunks are migrated only after the balancer is enabled. If the balancer is disabled, the following issues occur:
When shards are being added, the data chunks cannot be migrated to the new shards. As a result, the new shards cannot handle business traffic.
When shards are being removed, the data of the shards that you want to remove cannot be migrated. In this case, the task for removing the shards is blocked.
You must enable the balancer to ensure that data chunks can be migrated as expected. For more information, see Manage the ApsaraDB for MongoDB balancer.
You can use one of the following methods to confirm whether the balancer is enabled:
Method 1: Run the
sh.status()commandThe following example shows an output returned for the sh.status() command with the balancer enabled:
...
  autosplit:
        Currently enabled: yes
  balancer:
        Currently enabled:  yes
        Currently running:  yes
                Balancer active window is set between 08:30 and 11:30 server local time
...
If
“Currently enabled: no”is displayed in the output, the balancer is disabled.Method 2: Run the
sh.getBalancerState()commandIf
trueis returned for the command, the balancer is enabled.If
falseis returned for the command, the balancer is disabled.
Step 2: Check whether the time window of the balancer spans a short duration
The balancer manages the speed of migrating data chunks. The balancer migrates data chunks only within a specified time window. If data chunks are not completely migrated within the specified time window, the data migration task continues within the next time window until the migration is completed. If the time window spans a short duration, the progress of the task for adding or removing shards is delayed. For more information about how to modify the time window of the balancer, see Manage the ApsaraDB for MongoDB balancer.
You can use one of the following methods to check the time window of the balancer:
Method 1: Run the
sh.status()commandThe following example shows an output returned for the command. In this example, the time window of the balancer is from 08:30 to 11:30 (local time) and is three hours in total.
...
  autosplit:
        Currently enabled: yes
  balancer:
        Currently enabled:  yes
        Currently running:  yes
                Balancer active window is set between 08:30 and 11:30 server local time
...
Method 2: Run the
sh.getBalancerWindow()commandThe following example shows an output returned for the command. If an instance has a large number of sharded collections, this method can be used to display the time window more intuitively.
{ "start" : "08:30", "stop" : "11:30" }
Step 3: Obtain the information required to estimate the progress of a task
Methods available for versions earlier than MongoDB 6.0
The following operations are available for the following versions:
Instances that run versions earlier than MongoDB 6.0.
Instances running MongoDB 6.0 whose revision versions are earlier than MongoDB 7.0.1 (benchmark version: 6.0.3). For information about how to view the minor version of an instance, see Release notes for the minor versions of ApsaraDB for MongoDB.
Before you evaluate a task, you must obtain the operational results of the balancer and the chunk information of a sharded collection to be migrated. The operational results of the balancer include statistics on the number of chunks that are migrated and chunks that fail to be migrated.
You can use one of the following methods to obtain the preceding information:
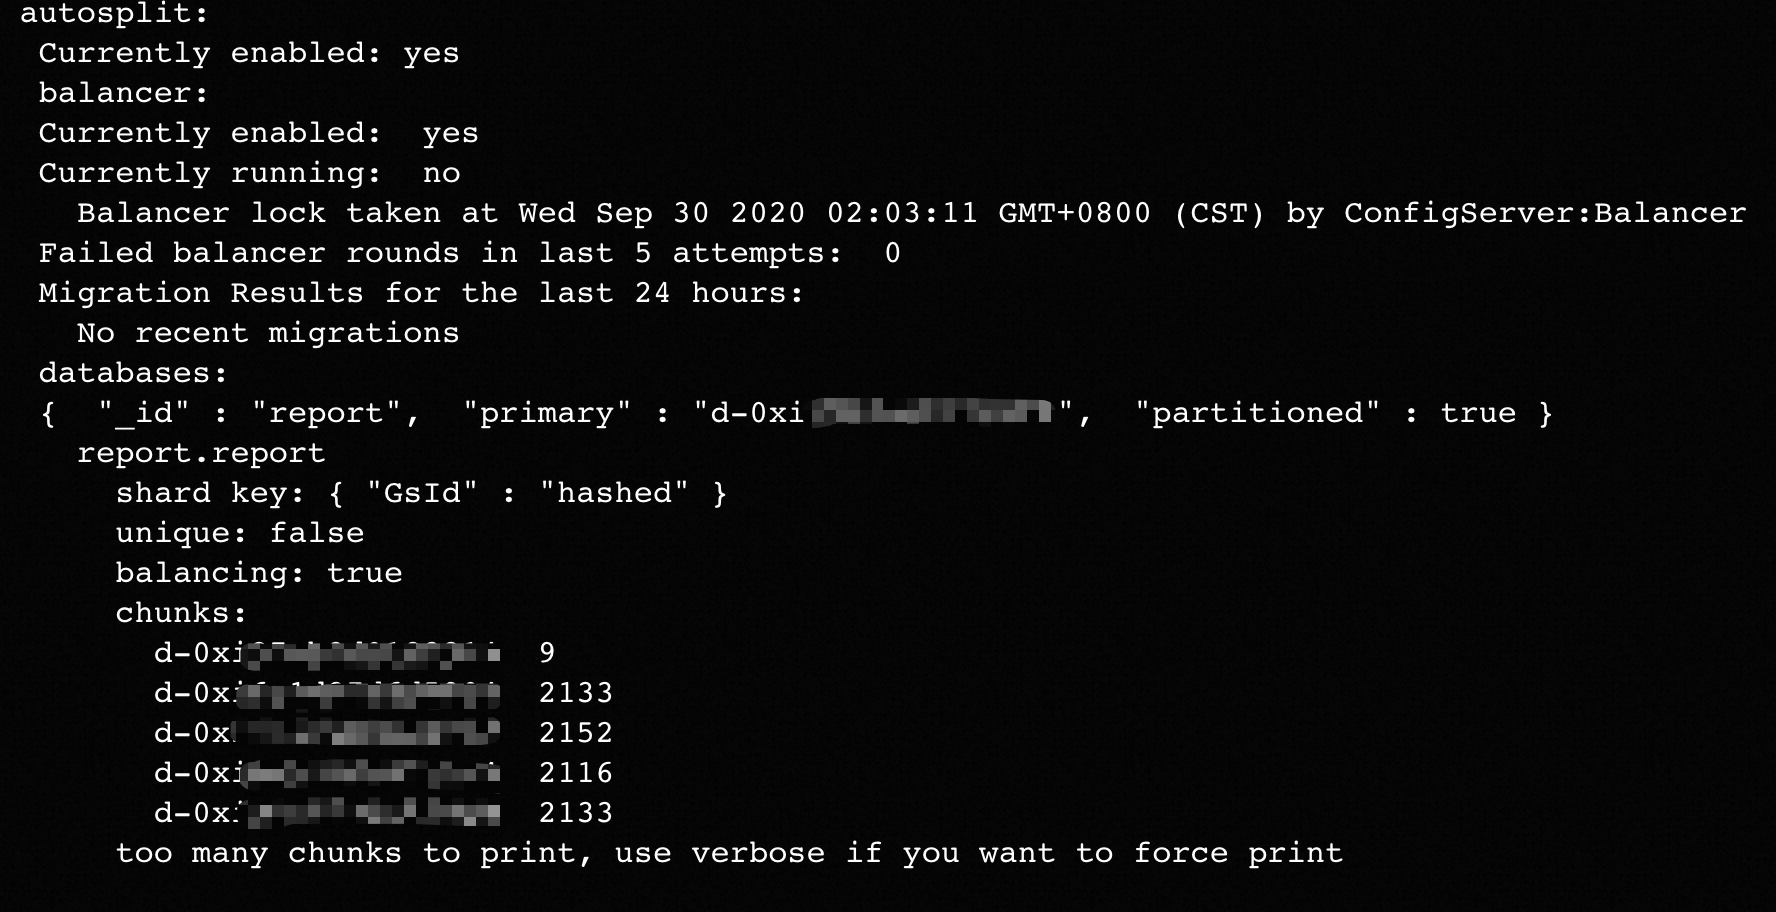
Method 1: View the output returned for the
sh.status()commandIn the output returned for the
sh.status()command, you must focus on the recent operational results of the balancer and the chunk information of a sharded table to be migrated. The following example shows the recent operational results of the balancer:... balancer: Collections with active migrations: <db>.<collection> started at Wed Sep 27 2023 10:25:21 GMT+0800 (CST) Failed balancer rounds in last 5 attempts: 0 Migration Results for the last 24 hours: 300 : Success databases: ...The following example shows the chunk information of a sharded collection to be migrated:
...
databases:
...
    {  "_id" : "<db>",  "primary" : "d-xxxxxxxxxxxxxxx3",  "partitioned" : true,  "version" : {  "uuid" : UUID("3409a337-c370-4425-ad72-8b8c6b0abd52"),  "lastMod" : 1 } }
          <db>.<collection>
                        shard key: { "<shard_key>" : "hashed" }
                        unique: false
                        balancing: true
                        chunks:
                                d-xxxxxxxxxxxxxxx1      13630
                                d-xxxxxxxxxxxxxxx2      13629
                                d-xxxxxxxxxxxxxxx3      13652
                                d-xxxxxxxxxxxxxxx4      13630
                                d-xxxxxxxxxxxxxxx5      3719
                        too many chunks to print, use verbose if you want to force print
...
In the preceding example, d-xxxxxxxxxxxxxxx5 indicates a shard that is added. You can also run the
getShardDistributioncommand on the database where a partitioned table is located to obtain information about the distribution of data chunks. Sample code:use <db> db.<collection>.getShardDistribution()Method 2: Directly read related information from the config database
Query the statistics on chunks and then aggregate them by shard. Sample code:
db.getSiblingDB("config").chunks.aggregate([{$group: {_id: "$shard", count: {$sum: 1}}}])Query the chunks on a specified shard and then aggregate them by namespace. Sample code:
db.getSiblingDB("config").chunks.aggregate([{$match: {shard: "d-xxxxxxxxxxxxxx"}},{$group: {_id: "$ns", count: {$sum: 1}}}])Query the number of chunks that are migrated to a specified shard within the previous day. Sample code:
// Specify the details.to field as the shard whose chunks you want to migrate.
// Specify the time field as a time range of the ISODate type.
db.getSiblingDB("config").changelog.find({"what" : "moveChunk.commit", "details.to" : "d-xxxxxxxxxxxxx","time" : {"$gte": ISODate("2023-09-26T00:00:00")}}).count()
Methods available for versions later than MongoDB 6.0
The following operations are available for the following versions:
Instances that run versions later than MongoDB 6.0.
Instances running MongoDB 6.0 whose revision versions are MongoDB 7.0.1 (benchmark version: 6.0.3) and later. For information about how to view the minor version of an instance, see Release notes for the minor versions of ApsaraDB for MongoDB.
Before you evaluate a task, you must focus on the data distribution among shards. You can still use the output returned by the sh.status() command as a reference. However, after you obtain the output, you must pay more attention to the data distribution on each shard instead of the uneven number of chunks on each shard.
Obtain the data distribution and uniformity of a sharded collection.
We recommend that you run the
getShardDistributioncommand to obtain the data distribution on a sharded collection and focus on the data uniformity, as shown in the following figure.
You can also run the following command to obtain more detailed distribution, including the number and total size of documents and that of orphaned documents:
db.getSiblingDB("admin").aggregate( [{ $shardedDataDistribution: { } },{ $match: { "ns": "<db>.<collection>" } }] ).pretty()The following example shows an output for the preceding command. The output indicates that data is significantly uneven among shards.
{
        "ns" : "<db>.<collection>",
        "shards" : [
                {
                        "shardName" : "d-xxxxxxxxxxxxxxx1",
                        "numOrphanedDocs" : 0,
                        "numOwnedDocuments" : 504298920,
                        "ownedSizeBytes" : NumberLong("833101815840"),
                        "orphanedSizeBytes" : 0
                },
                {
                        "shardName" : "d-xxxxxxxxxxxxxxx2",
                        "numOrphanedDocs" : 0,
                        "numOwnedDocuments" : 250283901,
                        "ownedSizeBytes" : NumberLong("409714745937"),
                        "orphanedSizeBytes" : 0
                },
                {
                        "shardName" : "d-xxxxxxxxxxxxxxx3",
                        "numOrphanedDocs" : 0,
                        "numOwnedDocuments" : 109098088,
                        "ownedSizeBytes" : NumberLong("178157177704"),
                        "orphanedSizeBytes" : 0
                },
                {
                        "shardName" : "d-xxxxxxxxxxxxxxx4",
                        "numOrphanedDocs" : 0,
                        "numOwnedDocuments" : 382018055,
                        "ownedSizeBytes" : NumberLong("630329790750"),
                        "orphanedSizeBytes" : 0
                }
          ]
}
The output also indicates the following items: 1. The instance on which you run the preceding command contains four shards. 2. The data volume of a sharded collection named
<db>.<collection>in the instance is about 2051303530231 bytes (833101815840 + 409714745937 + 178157177704 + 630329790750 ), which is equivalent to 1910.4 GB.View the amount of data that was successfully migrated within the previous day.
Run the following command:
pipeline = [
    { '$match': {
        'what': 'moveChunk.commit',
    } },
    { '$group': {
        '_id': {
            'date': { '$dateToString': { 'format': '%Y-%m-%d', 'date': '$time'} },
         },
        'chunks_moved': { '$sum': 1 },
        'docs_moved': { '$sum': '$details.counts.cloned' },
        'bytes_moved': { '$sum': '$details.counts.clonedBytes' },
    } },
    { '$sort': { '_id.date': -1} },
]
db.getSiblingDB("config").changelog.aggregate(pipeline)
The following figure shows the output returned for the preceding command.

The output indicates that 183117965820 bytes are successfully migrated on
2024-09-21, which is equivalent to 170.5 GB.
Step 4: Estimate the progress and completion time of the task
Methods available for versions earlier than MongoDB 6.0
The following operations are available for the following versions:
Instances that run versions earlier than MongoDB 6.0.
Instances running MongoDB 6.0 whose revision versions are earlier than MongoDB 7.0.1 (benchmark version: 6.0.3). For information about how to view the minor version of an instance, see Release notes for the minor versions of ApsaraDB for MongoDB.
After you obtain the number of chunks that are migrated from a sharded collection and the distribution of data in the current sharded collection, you can estimate the overall progress and expected completion time of the task.
Assume that you want to add shards. Before shards are added, the total number of chunks remains unchanged. In addition, the number of shards remains unchanged, which indicates that no tasks are initiated to add or remove shards. When shards are being added, the business workload remains constant, and parameters related to the balancer are set to their default values. The first example described in methods available for versions earlier than MongoDB 6.0 in Step 3 is used. The example indicates the following items:
Five shards are added.
300 chunks are migrated within a time window of the balancer.
58,260 chunks are contained in a sharded collection named
<db>.<collection>. The number of chunks is calculated based on the following formula: 13,630 + 13,629 + 13,652 + 13,630 + 3,719 = 58,260.
The following values can be calculated based on the preceding results:
When chunks are evenly distributed across shards, the number of chunks in each shard is 11,652 (58,260/5 = 11,652).
Based on the current migration speed, it takes another 26.4 days to complete the migration. The number of days is calculated based on the following formula: (11,652 - 3,719)/300 ≈ 26.4.
The process of the task for adding shards is 32% (3,719/11,652 = 32%).
In actual scenarios, the total number of chunks increases as data is continuously written to the instance and as chunk splitting occurs. The preceding assumptions are ideal conditions. The actual time required to complete a task may be longer.
Methods available for versions later than MongoDB 6.0
The following operations are available for the following versions:
Instances that run versions later than MongoDB 6.0.
Instances running MongoDB 6.0 whose revision versions are MongoDB 7.0.1 (benchmark version: 6.0.3) and later. For information about how to view the minor version of an instance, see Release notes for the minor versions of ApsaraDB for MongoDB.
Assume that only one collection in a sharded cluster instance needs to be balanced. The first example described in methods available for versions later than MongoDB 6.0 in Step 3 is used. The example indicates the following items:
Four shards are added.
183117965820 bytes are successfully migrated on
2024-09-21, which is equivalent to 170.5 GB.The data volume of a sharded collection named
<db>.<collection>is about 2051303530231 bytes (833101815840 + 409714745937 + 178157177704 + 630329790750), which is equivalent to 1910.4 GB.
The following values can be calculated based on the preceding results:
When data balance is reached among shards, the data volume of each shard is about 512825882557.75 bytes, which is equivalent to 477.6 GB.
In order to achieve data balance among shards, you must migrate a total of 875559682949 bytes among the shards, which is equivalent to 815.4 GB. Specific data migration from each shard:
The amount of data to be migrated from Shard 1 is 320275933282.25 bytes (833101815840 - 512825882557.75).
The amount of data to be migrated from Shard 2 is 103111136620.75 bytes (409714745937 - 512825882557.75).
The amount of data to be migrated from Shard 3 is 334668704853.75 bytes (178157177704 - 512825882557.75).
The amount of data to be migrated from Shard 4 is 117503908192.25 bytes (630329790750 - 512825882557.75).
(320275933282.25 + 103111136620.75 + 334668704853.75 + 117503908192.25 = 875559682949)
It takes about 4.8 days (815.4 GB/170.5 GB per day) to reach data balance at the current migration rate.
Step 5: Check whether the task is blocked when shards are being removed
If the task initiated to remove shards is blocked, the output returned for the sh.status() command does not contain a message indicating the successful migration of chunks in a previous period, and some chunks are not migrated from shards to be removed. In this case, the task is not completed, and the O&M operations performed on your instance in the ApsaraDB for MongoDB console are affected.
The following example shows an output returned for the sh.status() command.
The preceding issue may be caused by jumbo chunks. This inhibits the progress of removing shards. You can use the following command to confirm whether jumbo chunks exist.
db.getSiblingDB("config").chunks.aggregate([{$match: {shard: "d-xxxxxxxxxxxxxx", jumbo:true}},{$group: {_id: "$ns", count: {$sum: 1}}}])In most cases, the occurrence of jumbo chunks can be attributed to factors such as an inappropriate or a poorly chosen shard key design, which may include the presence of hotkeys. You can use one of the following methods to troubleshoot the jumbo chunk issue on your client:
If the major engine version of your instance is MongoDB 4.4, you can run the refineCollectionShardKey command to optimize the design of shard keys. To address issues related to jumbo chunks, you can add a suffix to the original shard key to increase the cardinality of the key.
If the major engine version of your instance is MongoDB 5.0 or later, you can run the reshardCollection command to reshard a specified sharded collection based on a new shard key. For more information, see Reshard a Collection.
If you are sure that some data can be deleted, you can delete data from corresponding jumbo chunks. This reduces the size of jumbo chunks. After some data is deleted, jumbo chunks shrink to a normal chunk size and then are moved out by the balancer.
You can increase the value of the
chunkSizeparameter to change conditions of determining jumbo chunks. We recommend that you perform operations based on suggestions from Alibaba Cloud technical support.
If the preceding methods do not work, we recommend that you submit a ticket to contact technical support.
Accelerate the progress of a task initiated to add or remove shards
If you want to expedite the overall process of adding or removing shards, you can use one of the following methods:
Increase the time window of the balancer. However, chunk migrations can introduce additional load on your service, which can impact the performance of your business operations. Therefore, we recommend that you evaluate risks before you modify the time window. For more information about how to modify the time window, see Manage the ApsaraDB for MongoDB balancer.
Adjust the value of the setParameter.chunkMigrationConcurrency parameter for a sharded cluster instance to modify the number of concurrent chunks to be migrated. For more information about how to use the parameter, see Sharded cluster instance (parameters available only for shard).
Perform
moveChunkoperations during off-peak hours. For more information, see sh.moveChunk(). Sample code:sh.moveChunk("<db>.<collection>", {"<shard_key>": <value>}, "d-xxxxxxxxxxxxx") // example: sh.moveChunk("records.people", { zipcode: "53187" }, "shard0019")Submit a ticket to contact technical support to modify related kernel parameters.