This topic describes how to use the Scan multi-code recognition SDK with custom baseline cp_change_28238 or baseline 10.2.3.5 and later. You can integrate the multi-code recognition SDK into an iOS client based on an existing project using CocoaPods.
Prerequisites
You have connected your project to mPaaS. For more information, see Based on an existing project using CocoaPods.
Add SDK
Use the cocoapods-mPaaS plugin to add the multi-code recognition SDK. The procedure is as follows:
In the
Podfilefile, change mPaaS_baseline tocp_change_28238or baseline 10.2.3.5 or later.Use
mPaaS_pod "mPaaS_ScanCode"to add the Scan component dependency.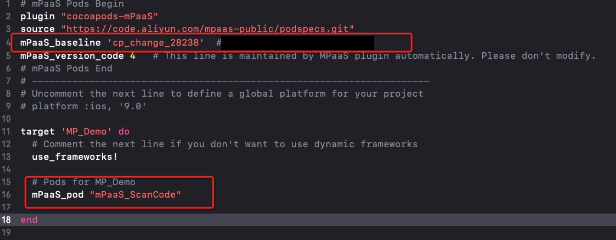
Click here to learn how to use CocoaPods. Then, run
pod installorpod updatein the command line as required to complete the integration.
Use SDK
Open the default scan page
This section uses the official Scan demo to describe how to use the Scan multi-code recognition SDK with the default UI in custom baseline cp_change_28238 or baseline 10.2.3.5 and later.
Open the default scan page and process the scan results.
 #import <TBScanSDK/TBScanSDK.h>

 @interface MPScanDemoVC()

 @property(nonatomic, strong) TBScanViewController *scanVC;

 @end

- (void)defaultScan {

   // Specifies whether to show the album entry.
   [MPScanCodeAdapterInterface sharedInstance].shoulShowAlbum = NO;

   TBScanViewController *vc = [[MPScanCodeAdapterInterface sharedInstance] createDefaultScanPageWithallback:^(id  _Nonnull result, BOOL keepAlive) {
       // Process the scan result.
       UIAlertView *alert = [[UIAlertView alloc] initWithTitle:@"" message:result[@"resp_result"] delegate:self cancelButtonTitle:@"OK" otherButtonTitles:nil, nil];
        alert.tag = 1999;
        [alert show];
    }];

     // Set the scan type.
     vc.scanType =  ScanType_Default_Code;

    [self.navigationController pushViewController:vc animated:YES];
    self.scanVC =  vc;
}
For multi-code recognition, enable continuous scanning.
- (void)alertView:(UIAlertView *)alertView clickedButtonAtIndex:(NSInteger)buttonIndex {
    // Continue scanning.
    [self.scanVC resumeCaptureSession];
}
How to use the custom UI
This section uses the official Scan demo to describe how to use the Scan multi-code recognition SDK with a custom UI.
Create a custom ViewController that inherits from TBScanViewController
#import <UIKit/UIKit.h>

NS_ASSUME_NONNULL_BEGIN

@interface MPScanCodeViewController : TBScanViewController<TBScanViewControllerDelegate>

@end

NS_ASSUME_NONNULL_END
Initialize the custom scan ViewController
// Custom scan entry point
- (void)customScanAction
{
    MPScanCodeViewController *vc = [[MPScanCodeViewController alloc] initWithConfig:@{}];
    [self.navigationController pushViewController:vc animated:YES];
}
@implementation MPScanCodeViewController
- (instancetype)initWithConfig:(NSDictionary *)config
{
if (self = [super initWithConfig:config])
{
self.delegate = self;
self.scanType = ScanType_All_Code;
}
return self;
}Only use the -(instancetype)initWithConfig:(NSDictionary *)config; method to initialize the custom scan ViewController.
Customize the scan box
- (void)buildContainerView:(UIView*)containerView
{
    // Custom scan box view
    UIView* bg = [[UIView alloc] initWithFrame:containerView.bounds];
    [containerView addSubview:bg];
    CGRect rect = [MPScanCodeViewController constructScanAnimationRect];
    UIView* view = [[UIView alloc] initWithFrame:rect];
    view.backgroundColor = [UIColor orangeColor];
    view.alpha = 0.5;
    [bg addSubview:view];
}
Handle scan results
Users handle it according to their own business scenarios.
#pragma mark TBScanViewControllerDelegate

-(void)didFind:(NSArray<TBScanResult*>*)resultArray
{
    TBScanResult *result = resultArray.firstObject;
    NSString* content = result.data;
    if (result.resultType == TBScanResultTypeQRCode) {
        content = [NSString stringWithFormat:@"qrcode:%@, hiddenData:%@, TBScanQRCodeResultType:%@", result.data, result.hiddenData, [result.extData objectForKey:TBScanResultTypeQRCode]];
        NSLog(@"subType is %@, ScanType_QRCode is %@", @(result.subType), @(ScanType_QRCode));
    } else if (result.resultType == TBScanResultTypeVLGen3Code) {
        content = [NSString stringWithFormat:@"gen3:%@", result.data];
        NSLog(@"subType is %@, ScanType_GEN3 is %@", @(result.subType), @(ScanType_GEN3));
    } else if (result.resultType == TBScanResultTypeGoodsBarcode) {
        content = [NSString stringWithFormat:@"barcode:%@", result.data];
        NSLog(@"subType is %@, EAN13 is %@", @(result.subType), @(EAN13));
    } else if (result.resultType == TBScanResultTypeDataMatrixCode) {
        content = [NSString stringWithFormat:@"dm:%@", result.data];
        NSLog(@"subType is %@, ScanType_DATAMATRIX is %@", @(result.subType), @(ScanType_DATAMATRIX));
    } else if (result.resultType == TBScanResultTypeExpressCode) {
        content = [NSString stringWithFormat:@"express:%@", result.data];
        NSLog(@"subType is %@, ScanType_FASTMAIL is %@", @(result.subType), @(ScanType_FASTMAIL));
    }
    dispatch_async(dispatch_get_main_queue(), ^{
        UIAlertView *alert = [[UIAlertView alloc] initWithTitle:@"" message:content delegate:self cancelButtonTitle:@"OK" otherButtonTitles:nil, nil];
        alert.tag = 9999;
        [alert show];
    });
}