This article will guide you through hardening your iOS Apps using MSA.
Usage note
Before using mPaaS MSA, please read the following instructions and ensure that your project meets the relevant requirements; otherwise, hardening may fail or the hardening effect may be compromised.
It is recommended that the code to be hardened is written in C or C++. iOS hardening has better and more stable support for C and C++. In addition, it partially supports Objective-C and does not support Swift.
Hardening will bring performance losses and increase theoretical stability risks. It is recommended to only harden the core code that needs to be protected, and extract the C and C++ code that needs to be protected into a separate Framework, and then harden it. Hardening of the entire source code App is not supported.
Currently supports X86/M1 machines. You can select About This Mac from the Apple menu in the corner of the screen to view overview information about your Mac, including processor information. If it shows Intel processor, it means your Mac is an X86 architecture.
Currently supports Xcode 14.1/14.2/15.0.1. Since iOS hardening processes the compiler and requires adaptation of specific Xcode, you need to use a specific version of Xcode when using iOS hardening.
ImportantStarting April 29, 2024, Apps uploaded to App Store Connect must be built using Xcode 15 for iOS 17, iPadOS 17, Apple tvOS 17, or watchOS 10.
Please make sure that the App project's workspace is set to New Build System. The check path is Xcode > File > Project Settings > Build System.
Procedure
Configure environment files. Generate the
MSAConfig.jsonfile according to the following method, and put it in the$HOMEdirectory. Open the command line on the Mac machine and enterecho $HOMEto get the$HOMEdirectory. When using it, replace it with the real value. The fields are as follows:{ "appId": "application appId", "workspaceId": "application workspaceId", "tenantId": "application tenantId", "accessKeyId": "Ant Cloud account accessKeyId", "accessKeySecret": "Ant Cloud account accessKeySecret", "license": "blank", "domain":"xxx" }NoteThe values for the domain are ap-southeast-1 and cn-hongkong, which correspond to the Singapore and Hong Kong, China environments, respectively.
For how to obtain field values, please refer to How to obtain iOS hardening configuration file information.
Install the hardening tool.
Download the hardening tool, unzip it and go to the directory tools> xcode.
Notexcodeplugin-x86_64-5.9.0.zip is suitable for Xcode 15.0.1 + Mac X86.
xcodeplugin-arm64-5.9.0.zip is suitable for Xcode 15.0.1 + Mac M1.
xcodeplugin-x86_64-5.7.2 is suitable for Xcode 14.1/14.2 + Mac X86 version, operating system recommendation: 13.2.1.
xcodeplugin-arm64-5.7.2 is suitable for Xcode 14.1/14.2 + Mac M1 version, operating system recommendation: 13.2.1.

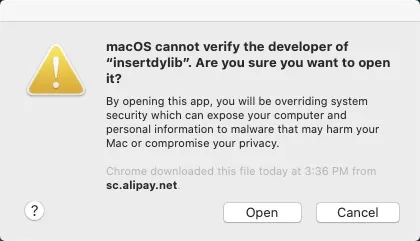
Open the insertdylib file. In the Confirm dialog box, click Open.
Run the following command:
sh ./tools/xcode/install.shNoteAfter you run the command, the system automatically finds and replaces compilers in the
/Applications/Xcode.app/directory. If you need to restore replaced compilers, you can run thesh ./tools/xcode/uninstall.shcommand.
Open the Framework project by using Xcode, and then run the
Build/Archivecommand. A dynamic library is not supported for now.ImportantThe project path name cannot contain space characters or Chinese characters. Otherwise, an error may occur in the compilation process.
After processing, use the following command to verify the hardening. If the hardening is successful, the output will not be empty.
nm ./BinaryPath | grep obfuscator
Next step
After hardening, please be sure to check whether the functions of the key components are normal. If the function of the installation package is abnormal after hardening, Please submit a ticket to contact mPaaS technical support.