小程序新容器仅在 10.2.3 基线版本中提供,且仅支持 mPaaS 原生 AAR 的接入方式。更多信息,请参考 原生 AAR 接入方式简介。
前置条件
将小程序新容器接入 Android 之前,请确保您已经开通 mPaaS,并使用原生 AAR 的接入方式完成 mPaaS 接入。详情请参考 将 mPaaS 添加到您的项目中。
接入步骤
小程序新容器接入步骤概述如下:
选择基线。
下文将对各步骤操作进行详细说明。
选择基线
添加 10.2.3 基线。
单击 mPaaS > 原生 AAR 接入,在弹出的接入面板中,单击接入/升级基线下的 开始配置,添加 10.2.3 基线。
添加小程序组件。
在工程中通过 组件管理(AAR) 安装 Mriver 小程序(Mriver Tiny App)组件。
初始化配置
初始化 mPaaS
通过 mPaaS 框架初始化(推荐使用该方式)
在
Application中添加初始化代码。public class MyApplication extends Application { @Override public void onCreate() { super.onCreate(); // mPaaS 初始化 MP.init(this); } }详情请参考:初始化 mPaaS。
在
AndroidManifest.xml中添加 meta 配置。<meta-data android:name="mpaas.init.param" android:value="com.xxx.xxx.MriverInitImpl" />添加
com.xxx.xxx.MriverInitImpl,实现MPInitParamManifest。import android.content.Context; import com.mpaas.core.MPInitParam; import com.mpaas.mriver.api.init.MriverInitParam; public class MriverInitImpl implements com.mpaas.MPInitParamManifest { @Override public MPInitParam initParam(Context context) { MriverInitParam mriverInitParam = MriverInitParam.getDefault(); mriverInitParam.setMriverInitCallback(new MriverInitParam.MriverInitCallback() { @Override public void onInit() { if (com.alibaba.ariver.kernel.common.utils.ProcessUtils.isMainProcess()) { // 小程序相关配置,比如自定义jsapi,titlebar等 } } @Override public void onError(Exception e) { } }); return MPInitParam.obtain().addComponentInitParam(mriverInitParam); } }
通过 MPInit 初始化 mPaaS
初始化 mPaaS,在 Application中添加以下代码。
public class MyApplication extends Application implements MPInitParam.MPCallback {
    @Override
    public void onCreate() {
        super.onCreate();
        // mPaaS 初始化
        MriverInitParam mriverInitParam = MriverInitParam.getDefault();
        mriverInitParam.setMriverInitCallback(new MriverInitCallback() {
            @Override
            public void onInit() {
                if (com.alibaba.ariver.kernel.common.utils.ProcessUtils.isMainProcess()) {
                    // 小程序相关配置,比如自定义jsapi,titlebar等

                }
            }

            @Override
            public void onError(Exception e) {

            }
        });
        MP.init(this, MPInitParam.obtain().setCallback(this).addComponentInitParam(mriverInitParam));
    }

    @Override
    public void onInit() {
        // init success
    }
}
小程序验签配置
小程序容器提供包签名验证功能,默认 debug 包关闭,release 包开启,可以通过 API 控制。
// 关闭签名
MriverResource.disableVerify();

// 开启签名,其中xx为后台配置的私钥对应的公钥
MriverResource.enableVerify(MriverResource.VERIFY_TYPE_YES,"xx");在上线前,建议开启验签。有关小程序包验签配置的具体操作可参考 配置小程序包。
配置小程序包请求时间间隔
mPaaS 支持配置小程序包的请求时间间隔,可以通过 API 控制。
Mriver.setConfig("h5_nbmngconfig", "{\"config\":{\"al\":\"3\",\"pr\":{\"4\":\"86400\","
    + "\"common\":\"864000\"},\"ur\":\"1800\",\"fpr\":{\"common\":\"3888000\"}},"
    + "\"switch\":\"yes\"}");
其中 \"ur\":\"1800\"为设置全局更新间隔的值,1800为默认值,代表间隔时长,单位为秒,您可修改此值来设置您的全局小程序包请求间隔,范围为 0 ~ 86400 秒(即 0 ~ 24 小时,0 代表无请求间隔限制)。
其他参数请勿随意修改。
使用 mPaaS 内核
小程序基于 mPaaS 内核的同层渲染能力可以提升内嵌 WebView、地图、视频等组件的体验,mPaaS 内核的接入和申请参考 接入 mPaaS 内核。
发布小程序
启动小程序之前,您需要先通过 mPaaS 控制台发布该小程序,步骤如下。
进入小程序后台。登录 mPaaS 控制台,进入目标应用后,从左侧导航栏进入 小程序> 小程序发布页面。
配置虚拟域名。如果是第一次配置虚拟域名,请先在 小程序> 小程序发布> 配置管理中配置虚拟域名。虚拟域名可以为任意域名,建议使用您的企业域名,如
example.com。创建小程序。进入 mPaaS 控制台,完成以下操作:
单击左侧导航栏的 小程序> 小程序发布。
在打开的小程序包列表页,单击 新建。
在 新建小程序 窗口,填写小程序的 ID 和小程序名称,单击 确定。其中,小程序 ID 为任意 16 位数字,例如 2018080616290001。
在小程序 App 列表下,找到新增的小程序,单击 添加。
在基本信息栏,完成以下配置:
版本:填写小程序包的版本号,例如
1.0.0.0。客户端范围:选择小程序 App 对应的 Android 客户端最低版本和最高版本。在这个范围内的客户端 App 可以启动对应的小程序,否则无法启动。这里最低版本可以填写
0.0.0,最高版本可以不填,代表客户端所有版本都可以启动这个小程序。说明此处务必填写 Android 的客户端版本,而非小程序版本。
图标:单击 选择文件上传小程序包的图标。第一次创建小程序时必须上传图标。示例图标如下:

文件:上传小程序包资源文件,文件格式为
.zip。我们准备了一个 mPaaS 示例小程序(点此下载),可以直接上传。说明在上传前,需将此示例小程序的
.zip文件名以及压缩包内的文件夹名均修改为小程序的 16 位数字 ID。
在配置信息栏,完成以下配置:
主入口 URL:必填,小程序的首页。主入口 URL 格式为:
/index.html#xxx/xxx/xxx/xxx,其中#后方的xxx/xxx/xxx/xxx是小程序的app.json中的pages中的第一个值。如下图所示,mPaaS 示例小程序的主入口为:/index.html#page/tabBar/component/index。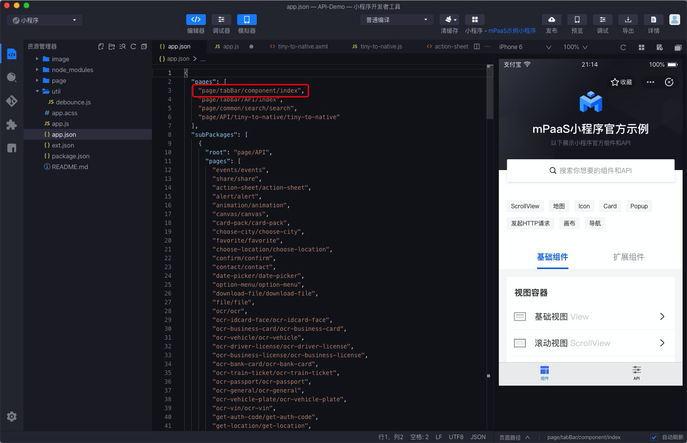
其他配置保持默认即可。
勾选 已确认以上信息准确,提交后不再修改。
单击 提交。
发布小程序。进入 mPaaS 控制台,完成以下步骤:
单击左侧导航栏的 小程序> 小程序发布> 小程序正式包管理。
在打开的小程序包列表页中,选择您要发布的小程序包与版本,单击 创建发布。
在创建发布任务栏,完成以下配置:
发布类型:选择 正式 发布类型。
发布描述:选填。
单击 确定 完成发布创建。
启动小程序
完成上述步骤之后,在 Android 工程中,通过如下代码,启动示例小程序:
Mriver.startApp("2018080616290001");上方代码中的 2018080616290001为小程序 ID,此处仅为本文示例,操作中请填写您的小程序 ID。