To send requests through the Simple Message Queue (formerly MNS) SDK for Java, configure an endpoint and access credentials. SMQ supports long-term AccessKey pairs and temporary Security Token Service (STS) credentials.
Configure an endpoint
Set a public or internal endpoint of SMQ in the aliyun-mns.properties file. By default, the SDK reads this file from ${user.home}/.aliyun-mns.properties.
| Operating system | File path |
|---|---|
| Linux / macOS | ~/.aliyun-mns.properties |
| Windows | %USERPROFILE%\.aliyun-mns.properties |
Add the following line to the file:
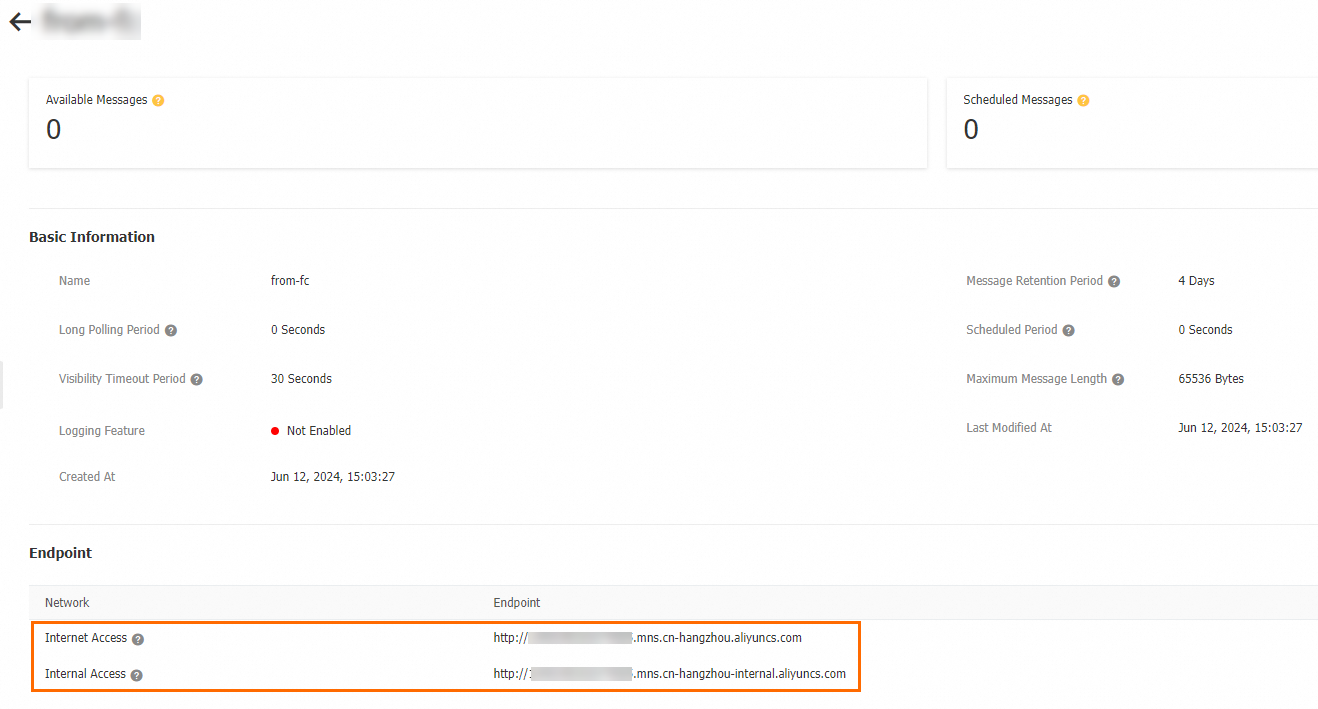
mns.accountendpoint=http://120228xxxxxxx.mns.cn-xxxxxx.aliyuncs.comTo find your endpoint, open the SMQ console and go to the Queue Details or Topic Details page. The endpoint is listed in the Endpoint section.
Configure access credentials
SMQ supports two credential types:
| Credential type | When to use | Security level |
|---|---|---|
| Long-term access credentials (AccessKey pair) | Applications that need persistent access to SMQ | Standard. Rotate every three months. |
| Temporary access credentials (STS) | Short-lived access, cross-account authorization, or ECS-based workloads | High. Credentials expire automatically. |
Temporary access credentials are preferred for production environments. They expire after a set period and support fine-grained access control, reducing the risk of credential leaks.
Configure long-term access credentials
Use an AccessKey pair from a Resource Access Management (RAM) user for persistent access.
Prerequisites
Create an AccessKey pair for a RAM user. For details, see Create an AccessKey pair for a RAM user.
Rotate AccessKey pairs used longer than three months. Disable and delete any AccessKey pairs that are no longer in use.
Step 1: Set environment variables
Store the AccessKey pair in environment variables rather than embedding credentials in source code.
macOS
Open the terminal and run:
nano ~/.bash_profileAdd the following lines to the end of the file:
   export ALIBABA_CLOUD_ACCESS_KEY_ID=LTA****
   export ALIBABA_CLOUD_ACCESS_KEY_SECRET=moiEs****
Press
Ctrl+X, pressYto save, and pressEnterto close.Apply the changes:
source ~/.bash_profileVerify the configuration: Expected output:
   echo $ALIBABA_CLOUD_ACCESS_KEY_ID
   echo $ALIBABA_CLOUD_ACCESS_KEY_SECRET
LTA**** moiEs****
Linux
Open the terminal and run:
sudo vim /etc/profileAdd the following lines to the end of the file:
export ALIBABA_CLOUD_ACCESS_KEY_ID=LTA**** export ALIBABA_CLOUD_ACCESS_KEY_SECRET=moiEs****Press
Esc, type:wq, and pressEnterto save and close.Apply the changes:
source /etc/profileVerify the configuration: Expected output:
echo $ALIBABA_CLOUD_ACCESS_KEY_ID echo $ALIBABA_CLOUD_ACCESS_KEY_SECRETLTA**** moiEs****
Windows
GUI
The following steps use Windows 10 as an example.
Right-click This PC and select Properties. Click Advanced system settings. In the System Properties dialog box, click Environment Variables on the Advanced tab. Click New in the User variables or System variables section.
Add the following variables:
Variable Example ALIBABA_CLOUD_ACCESS_KEY_ID LTA**** ALIBABA_CLOUD_ACCESS_KEY_SECRET moiEs**** Verify the configuration: Expected output:
echo %ALIBABA_CLOUD_ACCESS_KEY_ID% echo %ALIBABA_CLOUD_ACCESS_KEY_SECRET%LTA**** moiEs****
CMD
Open the command-line interface.
Set the environment variables:
set ALIBABA_CLOUD_ACCESS_KEY_ID=LTA**** set ALIBABA_CLOUD_ACCESS_KEY_SECRET=moiEs****Persist the variables:
setx ALIBABA_CLOUD_ACCESS_KEY_ID "%ALIBABA_CLOUD_ACCESS_KEY_ID%" setx ALIBABA_CLOUD_ACCESS_KEY_SECRET "%ALIBABA_CLOUD_ACCESS_KEY_SECRET%"Verify the configuration: Expected output:
echo %ALIBABA_CLOUD_ACCESS_KEY_ID% echo %ALIBABA_CLOUD_ACCESS_KEY_SECRET%LTA**** moiEs****
PowerShell
Press Win+X and select the appropriate PowerShell option based on the scope you need.
Current session only (select Windows PowerShell):
$env:ALIBABA_CLOUD_ACCESS_KEY_ID = "LTA****"
$env:ALIBABA_CLOUD_ACCESS_KEY_SECRET = "moiEs****"All new sessions for the current user (select Windows PowerShell):
[System.Environment]::SetEnvironmentVariable('ALIBABA_CLOUD_ACCESS_KEY_ID', 'LTA****', [System.EnvironmentVariableTarget]::User)
[System.Environment]::SetEnvironmentVariable('ALIBABA_CLOUD_ACCESS_KEY_SECRET', 'moiEs****', [System.EnvironmentVariableTarget]::User)All users (select Windows PowerShell (Administrator)):
[System.Environment]::SetEnvironmentVariable('ALIBABA_CLOUD_ACCESS_KEY_ID', 'LTA****', [System.EnvironmentVariableTarget]::Machine)
[System.Environment]::SetEnvironmentVariable('ALIBABA_CLOUD_ACCESS_KEY_SECRET', 'moiEs****', [System.EnvironmentVariableTarget]::Machine)Verify the configuration:
Get-ChildItem env:ALIBABA_CLOUD_ACCESS_KEY_ID
Get-ChildItem env:ALIBABA_CLOUD_ACCESS_KEY_SECRETExpected output:
   LTA****
moiEs****Step 2: Load credentials in Java
Retrieve the AccessKey pair from the environment variables:
// Load access credentials from environment variables.
CloudAccount account = new CloudAccount(ServiceSettings.getMNSAccountEndpoint());Do not embed access credentials directly in source code. Leaked credentials can expose your resources to unauthorized access. Use environment variables instead.
Configure temporary access credentials
For short-lived or security-sensitive access, use one of the following methods:
| Method | Use case |
|---|---|
| STS temporary credentials | Grant time-limited access without exposing your RAM user's AccessKey pair |
| RAM role | Authorize a RAM user (same or different Alibaba Cloud account) to assume a role with specific permissions |
| ECS instance RAM role | Access SMQ from an Elastic Compute Service (ECS) instance using auto-rotating credentials |
Configure STS temporary credentials
Create a RAM user. For details, see Create a RAM user.
Attach the
AliyunSTSAssumeRoleAccesspolicy to the RAM user. For details, see Grant permissions to a RAM user.Call the AssumeRole API operation to get temporary credentials (AccessKey ID, AccessKey secret, and security token).
Store the temporary credentials as environment variables, then load them in your Java code.
Set environment variables
macOS
Open the terminal and run:
nano ~/.bash_profileAdd the temporary credentials to the end of the file:
export MNS_ACCESS_KEY_ID=LTA**** export MNS_ACCESS_KEY_SECRET=moiEs**** export MNS_SESSION_TOKEN=CAES****Press
Ctrl+X, pressYto save, and pressEnterto close.Apply the changes:
source ~/.bash_profileVerify the configuration: Expected output:
echo $MNS_ACCESS_KEY_ID echo $MNS_ACCESS_KEY_SECRET echo $MNS_SESSION_TOKENLTA**** moiEs**** CAES****
Linux
Open the terminal and run:
sudo vim /etc/profileAdd the temporary credentials to the end of the file:
export MNS_ACCESS_KEY_ID=LTA**** export MNS_ACCESS_KEY_SECRET=moiEs**** export MNS_SESSION_TOKEN=CAES****Press
Esc, type:wq, and pressEnterto save and close.Apply the changes:
source /etc/profileVerify the configuration: Expected output:
echo $MNS_ACCESS_KEY_ID echo $MNS_ACCESS_KEY_SECRET echo $MNS_SESSION_TOKENLTA**** moiEs**** CAES****
Windows
GUI
The following steps use Windows 10 as an example.
Right-click This PC and select Properties. Click Advanced system settings. In the System Properties dialog box, click Environment Variables on the Advanced tab. Click New in the User variables or System variables section.
Add the following variables:
Variable Example MNS_ACCESS_KEY_ID LTA**** MNS_ACCESS_KEY_SECRET moiEs**** MNS_SESSION_TOKEN CAES**** Verify the configuration: Expected output:
echo %MNS_ACCESS_KEY_ID% echo %MNS_ACCESS_KEY_SECRET% echo %MNS_SESSION_TOKEN%LTA**** moiEs**** CAES****
CMD
Open the command-line interface.
Set the environment variables:
set MNS_ACCESS_KEY_ID=LTA**** set MNS_ACCESS_KEY_SECRET=moiEs**** set MNS_SESSION_TOKEN=CAES****Persist the variables:
setx MNS_ACCESS_KEY_ID "%MNS_ACCESS_KEY_ID%" setx MNS_ACCESS_KEY_SECRET "%MNS_ACCESS_KEY_SECRET%" setx MNS_SESSION_TOKEN "%MNS_SESSION_TOKEN%"Verify the configuration: Expected output:
echo %MNS_ACCESS_KEY_ID% echo %MNS_ACCESS_KEY_SECRET% echo %MNS_SESSION_TOKEN%LTA**** moiEs**** CAES****
PowerShell
Press Win+X and select the appropriate PowerShell option based on the scope you need.
Current session only (select Windows PowerShell):
$env:MNS_ACCESS_KEY_ID = "LTA****"
$env:MNS_ACCESS_KEY_SECRET = "moiEs****"
$env:MNS_SESSION_TOKEN = "CAES****"All new sessions for the current user (select Windows PowerShell):
[System.Environment]::SetEnvironmentVariable('MNS_ACCESS_KEY_ID', 'LTA****', [System.EnvironmentVariableTarget]::User)
[System.Environment]::SetEnvironmentVariable('MNS_ACCESS_KEY_SECRET', 'moiEs****', [System.EnvironmentVariableTarget]::User)
[System.Environment]::SetEnvironmentVariable('MNS_SESSION_TOKEN', 'CAES****', [System.EnvironmentVariableTarget]::User)All users (select Windows PowerShell (Administrator)):
[System.Environment]::SetEnvironmentVariable('MNS_ACCESS_KEY_ID', 'LTA****', [System.EnvironmentVariableTarget]::Machine)
[System.Environment]::SetEnvironmentVariable('MNS_ACCESS_KEY_SECRET', 'moiEs****', [System.EnvironmentVariableTarget]::Machine)
[System.Environment]::SetEnvironmentVariable('MNS_SESSION_TOKEN', 'CAES****', [System.EnvironmentVariableTarget]::Machine)Verify the configuration:
Get-ChildItem env:MNS_ACCESS_KEY_ID
Get-ChildItem env:MNS_ACCESS_KEY_SECRET
Get-ChildItem env:MNS_SESSION_TOKENExpected output:
   LTA****
   moiEs****
CAES****Load credentials in Java
// Load STS temporary credentials from environment variables.
String accessKeyId = System.getenv("MNS_ACCESS_KEY_ID");
String accessKeySecret = System.getenv("MNS_ACCESS_KEY_SECRET");
String sessionToken = System.getenv("MNS_SESSION_TOKEN");

AlibabaCloudCredentials credentials = new BasicSessionCredentials(accessKeyId, accessKeySecret, sessionToken);
AlibabaCloudCredentialsProvider provider = new StaticCredentialsProvider(credentials);Do not embed access credentials directly in source code. Leaked credentials can expose your resources to unauthorized access. Use environment variables instead.
Configure a RAM role
Use a RAM role to authorize a RAM user (from the same or a different Alibaba Cloud account) to access SMQ with specific permissions.
Prerequisites
Get the AccessKey pair of a RAM user. For details, see Create an AccessKey pair for a RAM user.
ImportantRotate AccessKey pairs used longer than three months. Disable and delete any AccessKey pairs that are no longer in use.
Get the Alibaba Cloud Resource Name (ARN) of the RAM role. The ARN follows this format:
acs:ram::$accountID:role/$roleName. For details, see View the information about a RAM role.
Set environment variables
macOS
Open the terminal and run:
nano ~/.bash_profileAdd the AccessKey pair and role ARN to the end of the file:
   export MNS_ACCESS_KEY_ID=LTAI****
   export MNS_ACCESS_KEY_SECRET=IrVTNZNy****
   export MNS_STS_ROLE_ARN=acs:ram::17464958********:role/mnsststest
Press
Ctrl+X, pressYto save, and pressEnterto close.Apply the changes:
source ~/.bash_profileVerify the configuration: Expected output:
   echo $MNS_ACCESS_KEY_ID
   echo $MNS_ACCESS_KEY_SECRET
   echo $MNS_STS_ROLE_ARN
LTAI**** IrVTNZNy**** acs:ram::17464958********:role/mnsststest
Linux
Open the terminal and run:
sudo vim /etc/profileAdd the AccessKey pair and role ARN to the end of the file:
export MNS_ACCESS_KEY_ID=LTAI**** export MNS_ACCESS_KEY_SECRET=IrVTNZNy**** export MNS_STS_ROLE_ARN=acs:ram::17464958********:role/mnsststestPress
Esc, type:wq, and pressEnterto save and close.Apply the changes:
source /etc/profileVerify the configuration: Expected output:
echo $MNS_ACCESS_KEY_ID echo $MNS_ACCESS_KEY_SECRET echo $MNS_STS_ROLE_ARNLTAI**** IrVTNZNy**** acs:ram::17464958********:role/mnsststest
Windows
GUI
The following steps use Windows 10 as an example.
Right-click This PC and select Properties. Click Advanced system settings. In the System Properties dialog box, click Environment Variables on the Advanced tab. Click New in the User variables or System variables section.
Add the following variables:
Variable Example MNS_ACCESS_KEY_ID LTAI**** MNS_ACCESS_KEY_SECRET IrVTNZNy**** MNS_STS_ROLE_ARN acs:ram::17464958********:role/mnsststest Verify the configuration: Expected output:
echo %MNS_ACCESS_KEY_ID% echo %MNS_ACCESS_KEY_SECRET% echo %MNS_STS_ROLE_ARN%LTAI**** IrVTNZNy**** acs:ram::17464958********:role/mnsststest
CMD
Open the command-line interface.
Set the environment variables:
set MNS_ACCESS_KEY_ID=LTAI**** set MNS_ACCESS_KEY_SECRET=IrVTNZNy**** set MNS_STS_ROLE_ARN=acs:ram::17464958********:role/mnsststestPersist the variables:
setx MNS_ACCESS_KEY_ID "%MNS_ACCESS_KEY_ID%" setx MNS_ACCESS_KEY_SECRET "%MNS_ACCESS_KEY_SECRET%" setx MNS_STS_ROLE_ARN "%MNS_STS_ROLE_ARN%"Verify the configuration: Expected output:
echo %MNS_ACCESS_KEY_ID% echo %MNS_ACCESS_KEY_SECRET% echo %MNS_STS_ROLE_ARN%LTAI**** IrVTNZNy**** acs:ram::17464958********:role/mnsststest
PowerShell
Press Win+X and select the appropriate PowerShell option based on the scope you need.
Current session only (select Windows PowerShell):
$env:MNS_ACCESS_KEY_ID = "LTAI****"
$env:MNS_ACCESS_KEY_SECRET = "IrVTNZNy****"
$env:MNS_STS_ROLE_ARN = "acs:ram::17464958********:role/mnsststest"All new sessions for the current user (select Windows PowerShell):
[System.Environment]::SetEnvironmentVariable('MNS_ACCESS_KEY_ID', 'LTAI****', [System.EnvironmentVariableTarget]::User)
[System.Environment]::SetEnvironmentVariable('MNS_ACCESS_KEY_SECRET', 'IrVTNZNy****', [System.EnvironmentVariableTarget]::User)
[System.Environment]::SetEnvironmentVariable('MNS_STS_ROLE_ARN', 'acs:ram::17464958********:role/mnsststest', [System.EnvironmentVariableTarget]::User)All users (select Windows PowerShell (Administrator)):
[System.Environment]::SetEnvironmentVariable('MNS_ACCESS_KEY_ID', 'LTAI****', [System.EnvironmentVariableTarget]::Machine)
[System.Environment]::SetEnvironmentVariable('MNS_ACCESS_KEY_SECRET', 'IrVTNZNy****', [System.EnvironmentVariableTarget]::Machine)
[System.Environment]::SetEnvironmentVariable('MNS_STS_ROLE_ARN', 'acs:ram::17464958********:role/mnsststest', [System.EnvironmentVariableTarget]::Machine)Verify the configuration:
Get-ChildItem env:MNS_ACCESS_KEY_ID
Get-ChildItem env:MNS_ACCESS_KEY_SECRET
Get-ChildItem env:MNS_STS_ROLE_ARNExpected output:
   LTAI****
   IrVTNZNy****
acs:ram::17464958********:role/mnsststestLoad credentials in Java
// Specify the region for STS role assumption (example: China (Hangzhou)).
String region = "cn-hangzhou";

// Load the RAM user's AccessKey pair from environment variables.
String accessKeyId = System.getenv("MNS_ACCESS_KEY_ID");
String accessKeySecret = System.getenv("MNS_ACCESS_KEY_SECRET");

// Load the RAM role ARN from environment variables.
String roleArn = System.getenv("MNS_STS_ROLE_ARN");

// Create a credentials provider using the AccessKey pair and role ARN.
STSAssumeRoleSessionCredentialsProvider credentialsProvider = CredentialsProviderFactory
        .newSTSAssumeRoleSessionCredentialsProvider(
                region,
                accessKeyId,
                accessKeySecret,
                roleArn
);Do not embed access credentials directly in source code. Leaked credentials can expose your resources to unauthorized access. Use environment variables instead.
Configure an ECS instance RAM role
To access SMQ from an ECS instance, assign a RAM role to the instance and let the SDK retrieve auto-rotating temporary credentials through the instance metadata URL.
Assign a RAM role to the ECS instance. For details, see Grant ECS access to other Alibaba Cloud services by using instance RAM roles.
Create a credentials provider using the RAM role name:
   // Load credentials through the RAM role attached to the ECS instance.
   // Replace "ecs-ram-role" with your actual role name.
   CredentialsProvider provider = new InstanceProfileCredentialsProvider("ecs-ram-role");
No environment variable configuration is needed. The SDK automatically retrieves and refreshes temporary credentials from the ECS instance metadata service.