As a base unit of the system architecture, cloud-native gateways integrate traditional traffic gateways with microservice gateways. The integration significantly reduces network overheads and O&M costs and provides various traffic governance methods and systematic observability capabilities. This topic describes how to configure routing policies and alerts by associating a cloud-native gateway with a service source in Microservices Engine (MSE) Nacos registries.
Prerequisites
A cloud-native gateway is created. For more information, see Create an MSE cloud-native gateway.
An MSE Nacos engine is created. For more information, see Create a Nacos engine.
A service is registered with MSE Nacos registries. For more information, see Register Spring Cloud applications with MSE Nacos registries.
You cannot associate cloud-native gateways with on-premises services that are registered with MSE Nacos or ZooKeeper registries.
Create a route
Log on to the MSE console. In the top navigation bar, select a region.
In the left-side navigation pane, choose Cloud-native Gateway > Gateways. On the Gateways page, click the name of the gateway.
In the left-side navigation pane, click the Routes tab. On the Routes tab, click Add Route.
On the Add Route page, enter
springcloud-demoin the Routing Rule Name field and select * from the Domain name drop-down list. In the Path section, select Prefix from the drop-down list and enter / in the field. Set the Route Point parameter to Single Service, and click Associate Service in the Service Name drop-down list.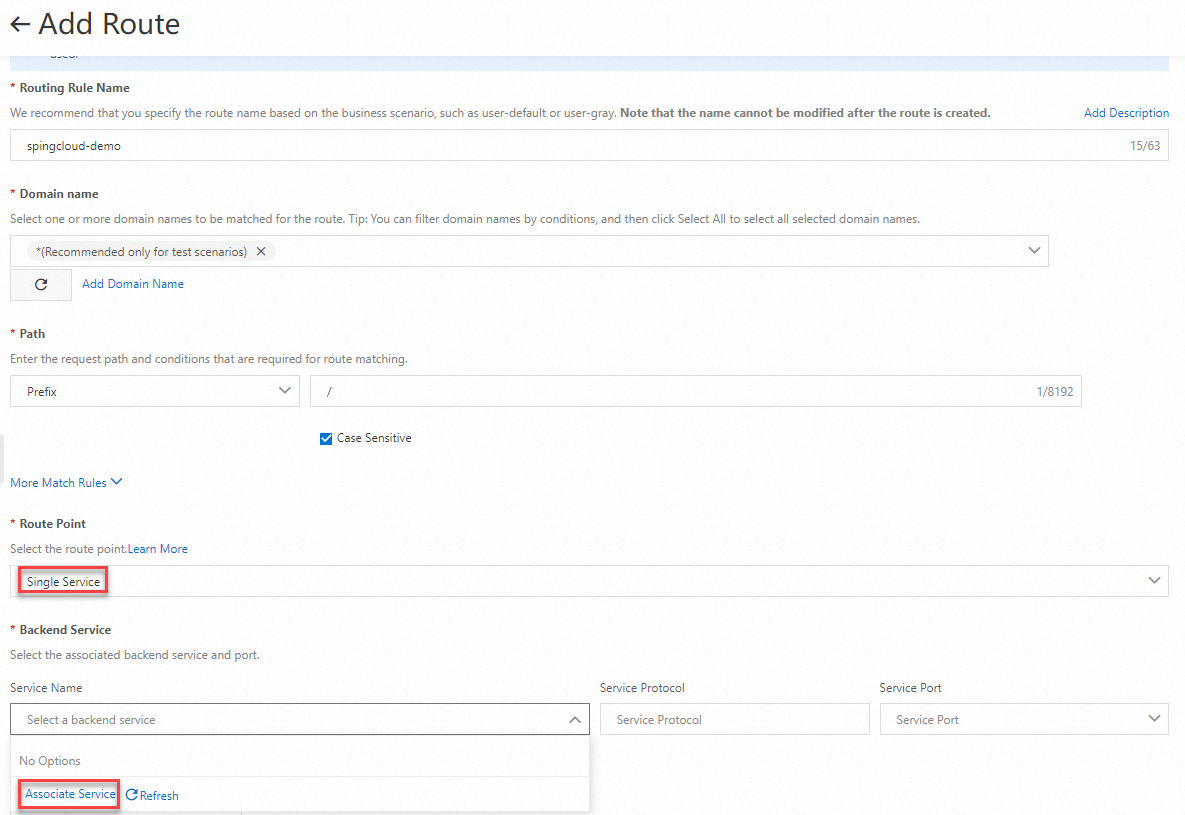
In the Associate Service panel, configure the parameters based on your business requirements and click OK.
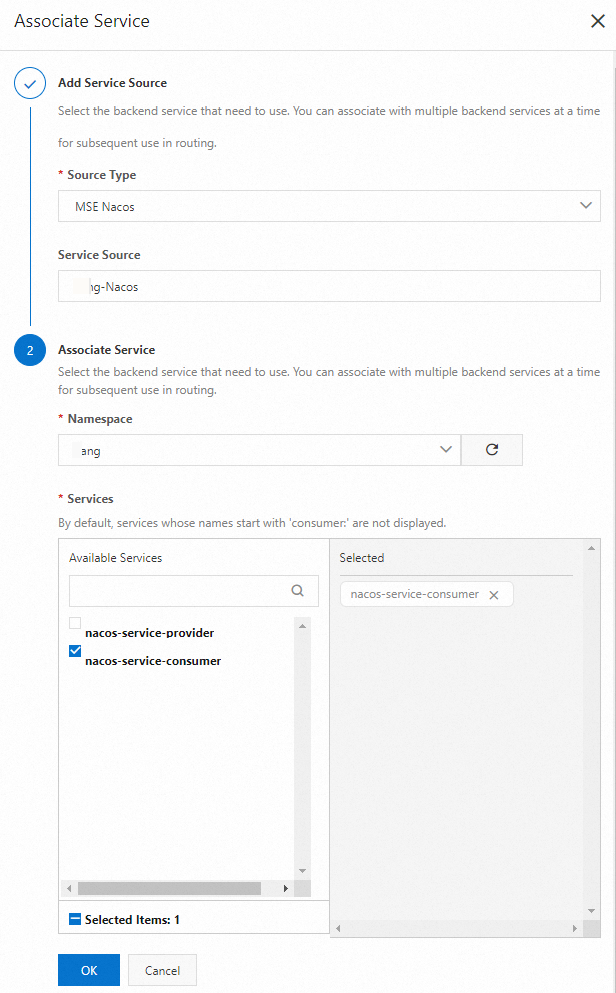
Select
nacos-service-consumerfrom the Service Name drop-down list and click Save and Advertise.
Configure a routing policy
No routing policy is configured
Log on to the MSE console.
In the top navigation bar, select a region.
In the left-side navigation pane, choose Cloud-native Gateway > Gateways. On the Gateways page, click the name of the gateway.
On the Gateway Ingress tab of the Overview page, view the ingress IP address of the gateway.
 Note
NoteThe ingress IP address of a cloud-native gateway is the IP address of an SLB instance that is associated with the gateway. You can replace the SLB instance with a self-managed SLB instance. For more information, see Manage SLB instances that are specified as Ingresses.
Run the following command to send a testing request:
curl -I http://8.136.104.xx/echo-rest/helloNoteThe preceding command contains the Demo service of the Nacos service source. You can replace the URL with the URL of your backend service.
The following result is returned:
HTTP/1.1 200 OK
Content-Type: text/plain;charset=UTF-8
Content-Length: 5
Date: Thu, 29 Aug 2024 08:21:47 GMT
req-cost-time: 9
req-arrive-time: 1724919707979
resp-start-time: 1724919707988
x-envoy-upstream-service-time: 8
server: istio-envoy
A throttling policy is configured
In high-concurrency access scenarios, if no proper throttling policy is configured for your application, the backend service may become overloaded due to excessive requests. This adversely affects service response speed or even causes the service to crash. Throttling ensures that the number of requests is within a range that the system can handle. You can configure throttling policies for cloud-native gateways. For more information about routing policies, see Routing policies.
Log on to the MSE console. In the top navigation bar, select a region.
In the left-side navigation pane, choose Cloud-native Gateway > Gateways. On the Gateways page, click the name of the gateway.
In the left-side navigation pane, click Routes.
Find the routing rule that you want to modify and click Policies in the Actions column.
In the Policies section of the page that appears, click the Throttling tab.
Throttling policies are used to monitor the queries per second (QPS) of a route. If the QPS reaches the specified threshold, traffic is immediately blocked. This prevents a breakdown of backend services due to traffic surges and ensures the high availability of the backend services.
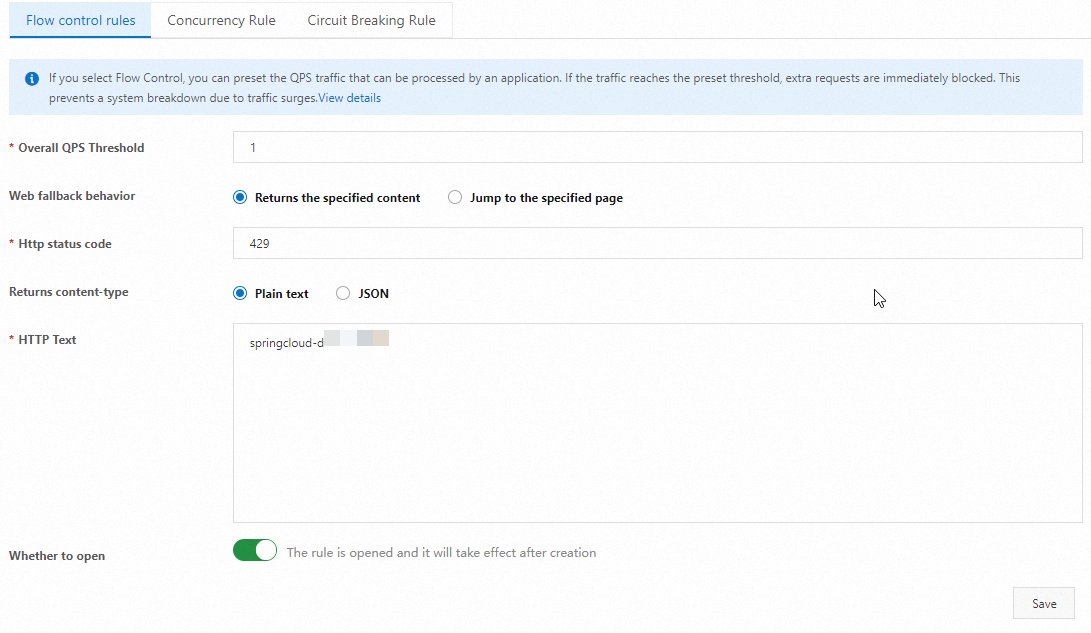
On the Throttling tab, click Flow control rules.
On the Throttling Rules tab, configure the following parameters.
Parameter
Description
Example
Overall QPS Threshold
Enter a value for Overall QPS Threshold.
1
Web Fallback Behavior
Select Returns the specified content or Jump to the specified page for Web Fallback Behavior.
Returns the specified content
HTTP status code
Enter the HTTP status code. The default value is 429.
429
Returned Content-Type
Select Plain text or JSON for Returned Content-Type.
Plain text
HTTP Text
Enter the returned text.
springcloud-demo flow limit
Whether to open
If you turn on this switch, the configured throttling policy takes effect.

Click New or Save to create or update the rule. In the message that appears, click OK.
Execute the following scripts to send testing requests:
Windows
@echo off

set "localUrl= http://8.136.104.xxx/echo-rest/hello"

:loop
curl -i -s %localUrl%

goto loop
Linux
#!/bin/bash

URL="http://8.136.104.xxx/echo-rest/hello"

while true; do
    curl -i -s $URL
done
The following result is returned. After you enable the throttling policy, the HTTP status code 429 is returned.
helloHTTP/1.1 429 Too Many Requests
content-type: text/plain; charset=UTF-8
content-length: 26
date: Thu, 29 Aug 2024 08:54:46 GMT
server: istio-envoy

springcloud-demo flow limit HTTP/1.1 200 OK
Content-Type: text/plain;charset=UTF-8
Content-Length: 5
Date: Thu, 29 Aug 2024 08:54:46 GMT
req-cost-time: 8
req-arrive-time: 1724921686961
resp-start-time: 1724921686970
x-envoy-upstream-service-time: 7
server: istio-envoy
References
You can refer to FAQ about cloud-native gateways or use the AI diagnostics tool of cloud-native gateways for troubleshooting. For information about how to use the AI diagnostics tool, see AI diagnostics of cloud-native gateways.