Background information
In actual business scenarios, an ApsaraMQ for MQTT broker needs to collect and analyze data related to client status changes and push messages based on the status of clients. ApsaraMQ for MQTT allows you to obtain the status of clients by using asynchronous status notifications. When an ApsaraMQ for MQTT client goes online or offline, a notification is generated on the ApsaraMQ for MQTT broker. You can use the following methods to obtain such notifications:
Connect to the ApsaraMQ for MQTT broker by using a cloud SDK. For more information, see Obtain the status of an ApsaraMQ for MQTT client.
Create a client status notification rule. After you create a client status notification rule, client status notifications are sent to ApsaraMQ for RocketMQ. You can subscribe to messages in ApsaraMQ for RocketMQ to obtain the status of clients.
In this topic, a client status notification rule is created to obtain the status of clients.

Network access
ApsaraMQ for MQTT provides Public Endpoint and VPC Endpoint.
Public Endpoint is an IP address that is used to access ApsaraMQ for MQTT over the Internet. In most cases, public endpoints are used in the IoT and mobile Internet scenarios.
VPC Endpoint is an IP address that is used to access ApsaraMQ for MQTT in a private virtual cloud (VPC). In most cases, VPC endpoints are used by cloud applications to connect to ApsaraMQ for MQTT.
Important If you want to use an endpoint to connect a client to ApsaraMQ for MQTT, use the domain name instead of the IP address because the IP address dynamically changes. The ApsaraMQ for MQTT technical team is not liable for faults and direct or indirect losses in the following scenarios:
You use an IP address to access your client to ApsaraMQ for MQTT. After the technical team of ApsaraMQ for MQTT updates the domain name resolution, the original IP address becomes invalid.
A firewall policy on IP addresses is set in the network in which your client is running. After the technical team of ApsaraMQ for MQTT updates the domain name resolution, new IP addresses are blocked due to the firewall policy.
Prerequisites
The integrated development environment (IDE) is installed. For more information, see IDE. You can use IntelliJ IDEA or Eclipse. In the example, IntelliJ IDEA is used.
Java 8 or 11 is installed. For more information, see Java Downloads.
An ApsaraMQ for MQTT instance is created, and a topic and a group are created on the instance. For more information, see Create resources.
An ApsaraMQ for RocketMQ instance is created, and a topic and a group are created on the instance. For more information, see Step 2: Create resources.
Important You can use the client status notification rules of ApsaraMQ for MQTT to send client status notifications only to ApsaraMQ for RocketMQ 4.x instances.
You cannot use the client status notification rules of ApsaraMQ for MQTT across regions. When you create a client status notification rule, make sure that all ApsaraMQ for MQTT and ApsaraMQ for RocketMQ resources reside in the same region.
1. Create a client status notification rule
Log on to the ApsaraMQ for MQTT console. In the left-side navigation pane, click Instances.
In the top navigation bar, select the region where the instance that you want to manage resides. On the Instances page, click the instance name to go to the Instance Details page.
In the left-side navigation pane, click Rules. In the upper-left corner of the Rules page, click Create Rule.
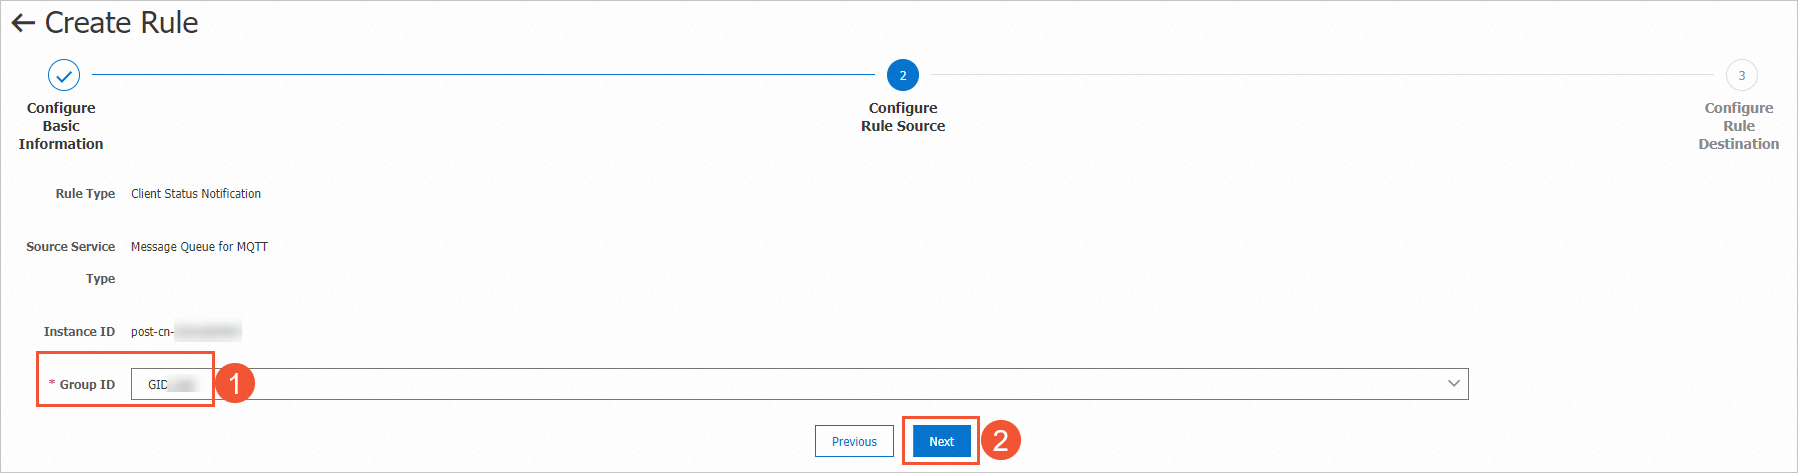
In the Create Rule wizard, perform the following steps:
In the Configure Basic Information step, enter a rule ID and select Client Status Notification for the Rule Type parameter.

In the Configure Rule Source step, select a created group on the ApsaraMQ for MQTT instance.
In the Configure Rule Destination step, select a created ApsaraMQ for RocketMQ instance and a created topic on the instance.

2. Prepare the test code
You must use code to change the client status and process client status notifications. In this topic, sample code in Java is provided.
2.1 Download the sample code
Download the mqtt-java-demo demo project and decompress the demo project package to a folder on your on-premises machine.
In the decompressed demo project, find the lmq-java-demo folder, import the folder to IntelliJ IDEA, and then confirm whether the following dependencies are included in the pom.xml file:
<dependencies>
    <dependency>
        <groupId>org.bouncycastle</groupId>
        <artifactId>bcprov-jdk15on</artifactId>
        <version>1.70</version>
    </dependency>
    <dependency>
        <groupId>commons-codec</groupId>
        <artifactId>commons-codec</artifactId>
        <version>1.10</version>
    </dependency>
    <dependency>
        <groupId>org.eclipse.paho</groupId>
        <artifactId>org.eclipse.paho.client.mqttv3</artifactId>
        <version>1.2.2</version>
    </dependency>
    <dependency>
        <groupId>org.apache.httpcomponents</groupId>
        <artifactId>httpclient</artifactId>
        <version>4.5.2</version>
    </dependency>
    <dependency>
        <groupId>com.alibaba</groupId>
        <artifactId>fastjson</artifactId>
        <version>1.2.83</version>
    </dependency>
    <dependency>
        <groupId>com.aliyun.openservices</groupId>
        <artifactId>ons-client</artifactId>
        <version>1.8.5.Final</version>
    </dependency>
    <dependency>
        <groupId>com.aliyun</groupId>
        <artifactId>aliyun-java-sdk-onsmqtt</artifactId>
        <version>1.0.3</version>
    </dependency>
    <dependency>
        <groupId>com.aliyun</groupId>
        <artifactId>aliyun-java-sdk-core</artifactId>
        <version>4.5.0</version>
    </dependency>
</dependencies>
Configure access credentials.
Obtain an AccessKey pair. For information about how to obtain an AccessKey pair, see Create an AccessKey pair.
Configure the environment variables. The environment variable name of the AccessKey ID that is used to access ApsaraMQ for MQTT is MQTT_AK_ENV, and the environment variable name of the AccessKey secret that is used to access ApsaraMQ for MQTT is MQTT_SK_ENV. For information about how to configure environment variables, see Configure an access credential.
2.2 Configure the code for changing client status
In the MQ4IoTSendMessageToMQ4IoTUseSignatureMode.java class, configure parameters related to ApsaraMQ for MQTT resources based on the comments in the code.
During a test, you need to simulate only status change. Therefore, you can delete the code related to message sending. Sample code:
Sample code for client status change
import com.aliyun.openservices.lmq.example.util.ConnectionOptionWrapper;
import java.util.concurrent.ExecutorService;
import java.util.concurrent.LinkedBlockingQueue;
import java.util.concurrent.ThreadPoolExecutor;
import java.util.concurrent.TimeUnit;
import org.eclipse.paho.client.mqttv3.IMqttDeliveryToken;
import org.eclipse.paho.client.mqttv3.MqttCallbackExtended;
import org.eclipse.paho.client.mqttv3.MqttClient;
import org.eclipse.paho.client.mqttv3.MqttMessage;
import org.eclipse.paho.client.mqttv3.persist.MemoryPersistence;

public class MQ4IoTSendMessageToMQ4IoTUseSignatureMode {
    public static void main(String[] args) throws Exception {
        /**
         * The ID of the ApsaraMQ for MQTT instance. You can obtain the ID in the ApsaraMQ for MQTT console after you purchase the instance.
         */
        String instanceId = "XXXXX";
        /**
         * The endpoint of the ApsaraMQ for MQTT instance. You can obtain the endpoint in the ApsaraMQ for MQTT console after you purchase and configure the instance. You must use the assigned domain name instead of the IP address to connect to the instance. Otherwise, an exception may occur on the client object.
         */
        String endPoint = "XXXXX.mqtt.aliyuncs.com";
        /**
         * The AccessKey ID, which can be obtained in the Resource Access Management (RAM) console.
         * The AccessKey pair of an Alibaba Cloud account has permissions on all API operations. To prevent security risks, we recommend that you use a RAM user to call API operations or perform routine O&M.
         * We strongly recommend that you do not save an AccessKey pair in the project code. Otherwise, the AccessKey pair may be leaked and all resources in your account may be exposed to potential security risks.
         * In this example, the AccessKey ID and AccessKey secret are stored in environment variables. Before you run the sample code, make sure that the MQTT_AK_ENV and MQTT_SK_ENV environment variables are configured.
         * Example: export MQTT_AK_ENV=<access_key_id>
         *      export MQTT_SK_ENV=<access_key_secret>
         * Replace <access_key_id> with your AccessKey ID and <access_key_secret> with your AccessKey secret.
         */
        String accessKey = System.getenv("MQTT_AK_ENV");
        /**
         * The AccessKey secret, which can be obtained in the RAM console. This parameter is required only if you use the signature authentication mode.
         */
        String secretKey = System.getenv("MQTT_SK_ENV");
        /**
         * The globally unique ID that the system assigns to the ApsaraMQ for MQTT client. The client ID must vary based on the TCP connection. If multiple TCP connections use the same client ID, exceptions occur and the connections are unexpectedly closed.
         * The value of the clientId parameter is in the GroupID@@@DeviceId format. GroupID specifies the ID of the group that you created in the ApsaraMQ for MQTT console and DeviceId specifies the custom ID of the device. The value of the clientId parameter can be up to 64 characters in length.
         */
        String clientId = "GID_XXXXX@@@XXXXX";

        ConnectionOptionWrapper connectionOptionWrapper = new ConnectionOptionWrapper(instanceId, accessKey, secretKey, clientId);
        final MemoryPersistence memoryPersistence = new MemoryPersistence();
        /**
         * The protocol and port that are used by the ApsaraMQ for MQTT client object must match. For more information, see https://www.alibabacloud.com/help/doc-detail/44866.htm?spm=a2c4g.11186623.6.552.25302386RcuYFB.
         If Secure Sockets Layer (SSL) encryption is used, specify ssl://endpoint:8883 as the protocol and port.
         */
        final MqttClient mqttClient = new MqttClient("tcp://" + endPoint + ":1883", clientId, memoryPersistence);
        /**
         * The timeout period during which the ApsaraMQ for MQTT client waits for a response. The timeout period prevents the ApsaraMQ for MQTT client from waiting for a response for an indefinite period of time.
         */
        mqttClient.setTimeToWait(5000);
        final ExecutorService executorService = new ThreadPoolExecutor(1, 1, 0, TimeUnit.MILLISECONDS,
            new LinkedBlockingQueue<Runnable>());
        mqttClient.setCallback(new MqttCallbackExtended() {
            @Override
            public void connectComplete(boolean reconnect, String serverURI) {
                System.out.println("connect success");
            }

            @Override
            public void connectionLost(Throwable throwable) {
                throwable.printStackTrace();
            }

            @Override
            public void messageArrived(String s, MqttMessage mqttMessage) throws Exception {
                System.out.println("receive msg from topic " + s + " , body is " + new String(mqttMessage.getPayload()));
            }

            @Override
            public void deliveryComplete(IMqttDeliveryToken iMqttDeliveryToken) {
                System.out.println("send msg succeed topic is : " + iMqttDeliveryToken.getTopics()[0]);
            }
        });
        mqttClient.connect(connectionOptionWrapper.getMqttConnectOptions());
        Thread.sleep(Long.MAX_VALUE);
    }
}
2.3 Configure the code for processing client status notifications
After client status notifications are sent to ApsaraMQ for RocketMQ, you can subscribe to the corresponding messages and then process the notifications based on your business requirements.
In the MQTTClientStatusNoticeProcessDemo.java class, configure parameters related to ApsaraMQ for RocketMQ resources based on the comments in the code.
Sample code for processing client status notifications
import com.alibaba.fastjson.JSON;
import com.alibaba.fastjson.JSONObject;
import com.aliyun.openservices.ons.api.Action;
import com.aliyun.openservices.ons.api.ConsumeContext;
import com.aliyun.openservices.ons.api.Consumer;
import com.aliyun.openservices.ons.api.Message;
import com.aliyun.openservices.ons.api.MessageListener;
import com.aliyun.openservices.ons.api.ONSFactory;
import com.aliyun.openservices.ons.api.PropertyKeyConst;
import java.util.Map;
import java.util.Properties;
import java.util.Set;

public class MQTTClientStatusNoticeProcessDemo {
    public static void main(String[] args) {
        /**
         * Initialize an ApsaraMQ for RocketMQ client as a receiver. In most business scenarios, the receiver is deployed in a backend application.
         */
        Properties properties = new Properties();
        /**
         * The group ID that you created in the ApsaraMQ for RocketMQ console.
         */
        properties.setProperty(PropertyKeyConst.GROUP_ID, "GID_XXXX");
        /**
         * The AccessKey ID that you created in the Alibaba Cloud RAM console for identity authentication.
         * The AccessKey pair of an Alibaba Cloud account has permissions on all API operations. To prevent security risks, we recommend that you use a RAM user to call API operations or perform routine O&M.
         * We strongly recommend that you do not save an AccessKey pair in the project code. Otherwise, the AccessKey pair may be leaked and all resources in your account may be exposed to potential security risks.
         * In this example, the AccessKey ID and AccessKey secret are stored in environment variables.
         */
        properties.put(PropertyKeyConst.AccessKey, System.getenv("MQTT_AK_ENV"));
        /**
         * The AccessKey secret that you created in the Alibaba Cloud RAM console for identity authentication. This parameter is required only if you use the signature authentication mode.
         */
        properties.put(PropertyKeyConst.SecretKey, System.getenv("MQTT_SK_ENV"));
        /**
         * The TCP endpoint that is used to access the ApsaraMQ for RocketMQ instance. You can obtain the TCP endpoint on the Instance Details page in the ApsaraMQ for RocketMQ console.
         */
        properties.put(PropertyKeyConst.NAMESRV_ADDR, "XXXX");
        /**
         * The ApsaraMQ for RocketMQ topic that you want to use to process the client status notifications from ApsaraMQ for MQTT.
         */
        final String parentTopic = "GID_XXXX_MQTT";
        /**
         * The client status data. In a production environment, we recommend that you use an external persistent storage system, such as a database or Redis system, to store status data and prevent the loss of status data upon application restart. In this example, the status data is stored on an on-premises machine.
         */
        MqttClientStatusStore mqttClientStatusStore = new MemoryHashMapStoreImpl();
        Consumer consumer = ONSFactory.createConsumer(properties);
        /**
         * In this example, only data related to whether the client is online is processed. Therefore, you need to only take note of connect and tcpclean events.
         */
        consumer.subscribe(parentTopic, "connect||tcpclean", new MqttClientStatusNoticeListener(mqttClientStatusStore));
        consumer.start();
        String clientId = "GID_XXXXX@@@XXXXX";
        while (true) {
            System.out.println("ClientStatus :" + checkClientOnline(clientId, mqttClientStatusStore));
            try {
                Thread.sleep(1000);
            } catch (InterruptedException e) {
                e.printStackTrace();
            }
        }
    }

    /**
     * The logic that is used to process client status notifications.
     * During an actual deployment process, applications that process status notifications may be deployed on multiple machines. Therefore, the status data of clients can be maintained in external shared storage such as a database or Redis system.
     * If a state machine repeatedly receives messages, perform idempotence on messages to prevent errors that may occur.
     */
    static class MqttClientStatusNoticeListener implements MessageListener {
        private MqttClientStatusStore mqttClientStatusStore;

        public MqttClientStatusNoticeListener(
            MqttClientStatusStore mqttClientStatusStore) {
            this.mqttClientStatusStore = mqttClientStatusStore;
        }

        @Override
        public Action consume(Message message, ConsumeContext context) {
            try {
                JSONObject msgBody = JSON.parseObject(new String(message.getBody()));
                System.out.println(msgBody);
                String eventType = msgBody.getString("eventType");
                String clientId = msgBody.getString("clientId");
                String channelId = msgBody.getString("channelId");
                ClientStatusEvent event = new ClientStatusEvent();
                event.setChannelId(channelId);
                event.setClientIp(msgBody.getString("clientIp"));
                event.setEventType(eventType);
                event.setTime(msgBody.getLong("time"));
                /**
                 * Store new events first.
                 */
                mqttClientStatusStore.addEvent(clientId, channelId, eventType, event);
                /**
                 * Read the event list of the current channel.
                 */
                Set<ClientStatusEvent> events = mqttClientStatusStore.getEvent(clientId, channelId);
                if (events == null || events.isEmpty()) {
                    return Action.CommitMessage;
                }
                /**
                 * If all online and offline events in the list are received and the current channel is closed, you can clear the data of the channel.
                 */
                boolean findOnlineEvent = false;
                boolean findOfflineEvent = false;
                for (ClientStatusEvent clientStatusEvent : events) {
                    if (clientStatusEvent.isOnlineEvent()) {
                        findOnlineEvent = true;
                    } else {
                        findOfflineEvent = true;
                    }
                }
                if (findOnlineEvent && findOfflineEvent) {
                    mqttClientStatusStore.deleteEvent(clientId, channelId);
                }
                return Action.CommitMessage;
            } catch (Throwable e) {
                e.printStackTrace();
            }
            return Action.ReconsumeLater;
        }
    }

    /**
     * Check whether an ApsaraMQ for MQTT client has an active TCP connection based on the channel table.
     * 1. If the channel table is empty, the ApsaraMQ for MQTT client is offline.
     * 2. If the channel table is not empty, check whether only online events are received in a connection. If yes, an active connection exists and the ApsaraMQ for MQTT client is online.
     * If offline events are received in all channels, the ApsaraMQ for MQTT client is offline.
     *
     * @param clientId
     * @param mqttClientStatusStore
     * @return
     */
    public static boolean checkClientOnline(String clientId,
        MqttClientStatusStore mqttClientStatusStore) {
        Map<String, Set<ClientStatusEvent>> channelMap = mqttClientStatusStore.getEventsByClientId(clientId);
        if (channelMap == null) {
            return false;
        }
        for (Set<ClientStatusEvent> events : channelMap.values()) {
            boolean findOnlineEvent = false;
            boolean findOfflineEvent = false;
            for (ClientStatusEvent event : events) {
                if (event.isOnlineEvent()) {
                    findOnlineEvent = true;
                } else {
                    findOfflineEvent = true;
                }
            }
            if (findOnlineEvent & !findOfflineEvent) {
                return true;
            }
        }
        return false;
    }
}
3. Verify the result
Execute the main function in the MQ4IoTSendMessageToMQ4IoTUseSignatureMode.java class to simulate a client going online and use one of the following methods to check the client status and the sending status of a message:
Note You can stop the execution of the main function to simulate a client going offline.
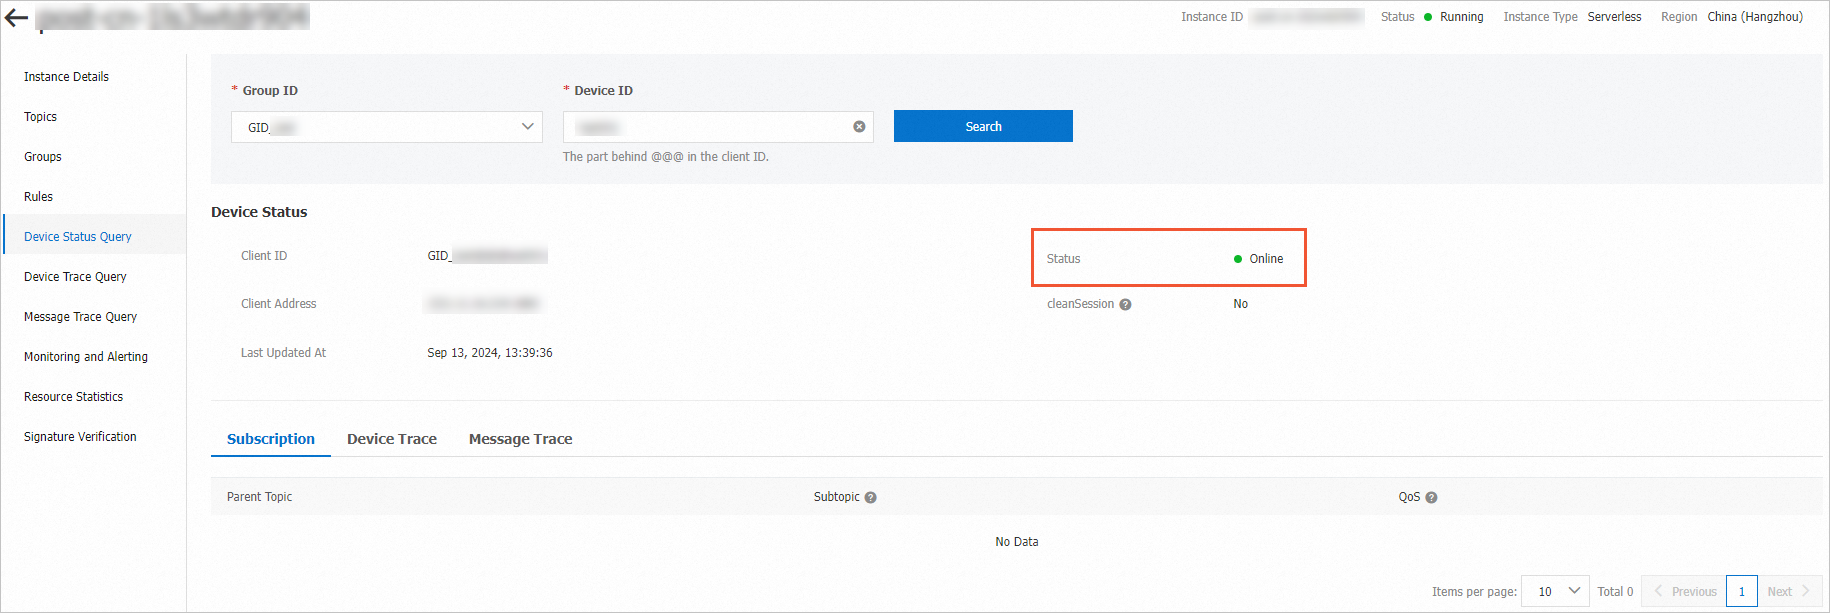
Check the client status. Go to the instance details page in the ApsaraMQ for MQTT console and click Device Status Query in the left-side navigation pane. On the Device Status Query page, check whether the client is online by using the device ID.
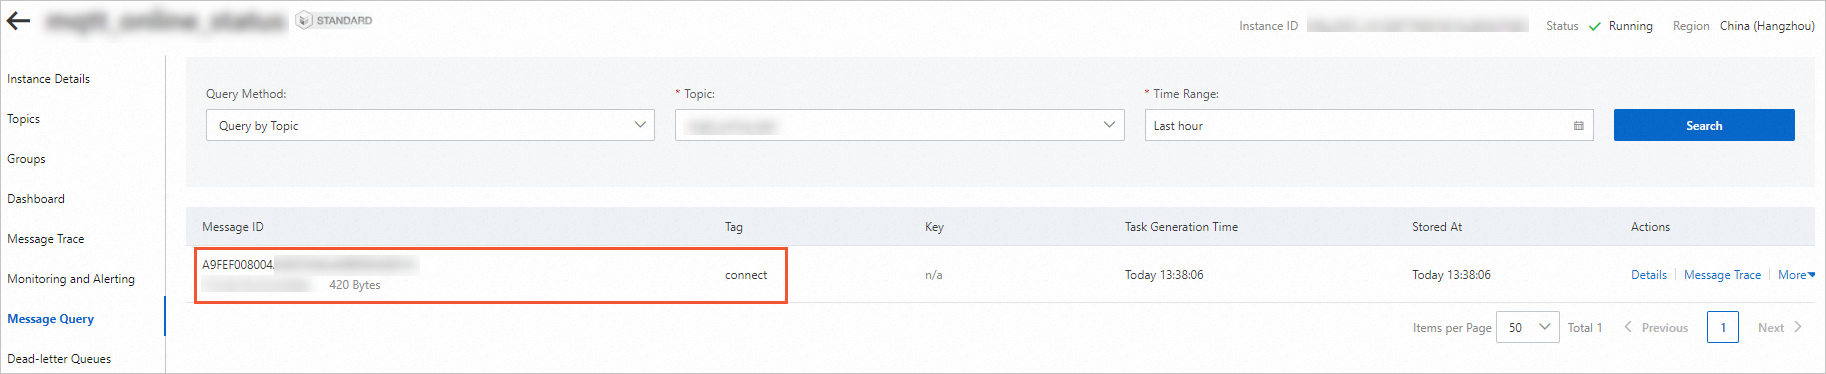
Check whether the message is sent. Go to the instance details page in the ApsaraMQ for RocketMQ console and click Message Query in the left-side navigation pane. On the Message Query page, check whether the message is sent based on the topic.
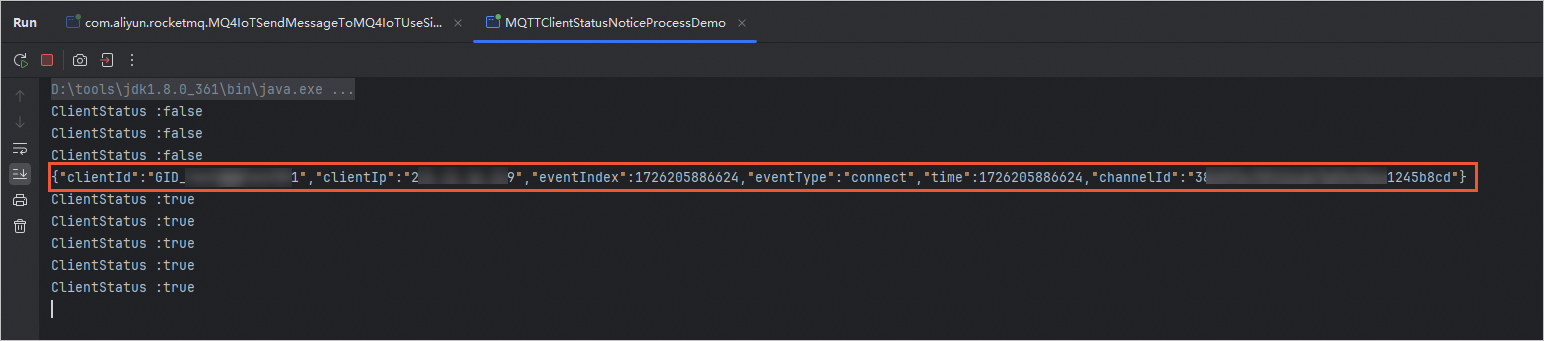
Execute the main function in the MQTTClientStatusNoticeProcessDemo.java class. If the message is received, the value of ClientStatus changes from false to true, as shown in the following figure.