Data outbound rules forward messages from ApsaraMQ for MQTT to ApsaraMQ for RocketMQ. This lets backend applications consume MQTT messages with RocketMQ-native features such as ordered messages and transactional messages.
Currently, ApsaraMQ for MQTT supports data exchange only with ApsaraMQ for RocketMQ. This tutorial walks through two tasks: creating a data outbound rule in the console, and running a Java sample that publishes messages through MQTT over the Internet and consumes them from RocketMQ.
How it works
The data export flow has three stages:
MQTT client publishes a message. A device or application connects to ApsaraMQ for MQTT and publishes a message to an MQTT topic (for example,
sensor/temperature).Data outbound rule forwards the message. ApsaraMQ for MQTT matches the message against configured data outbound rules and forwards it to the mapped ApsaraMQ for RocketMQ topic.
RocketMQ consumer receives the message. A backend application subscribes to the RocketMQ topic and processes the forwarded message using RocketMQ features such as message tracing and retry.

Limitations
Data outbound rules support only ApsaraMQ for RocketMQ 4.x instances as the destination.
Cross-region forwarding is not supported. The MQTT instance and the RocketMQ instance must be in the same region.
Network access
ApsaraMQ for MQTT provides two types of endpoints:
| Endpoint type | Use case |
|---|---|
| Public Endpoint | Access over the Internet. Typically used for IoT and mobile devices. |
| VPC Endpoint | Access within a virtual private cloud (VPC). Typically used for cloud applications. |
Always use the domain name, not the resolved IP address, to connect clients. IP addresses change dynamically during domain name resolution updates. ApsaraMQ for MQTT is not liable for faults and direct or indirect losses caused by using hardcoded IP addresses or firewall rules based on IP addresses.
Prerequisites
Before you begin, make sure that you have:
IntelliJ IDEA or Eclipse installed
Java 8 or 11 installed
An ApsaraMQ for MQTT instance with a topic and a group created. See Create resources
An ApsaraMQ for RocketMQ 4.x instance with a topic and a group created. See Step 2: Create resources
An AccessKey pair for authentication. See Create an AccessKey pair
Step 1: Create a data outbound rule
Log on to the ApsaraMQ for MQTT console. In the left-side navigation pane, click Instances.
In the top navigation bar, select the region of your instance. Click the instance name to open the Instance Details page.
In the left-side navigation pane, click Rules. In the upper-left corner, click Create Rule.
Complete the Create Rule wizard:
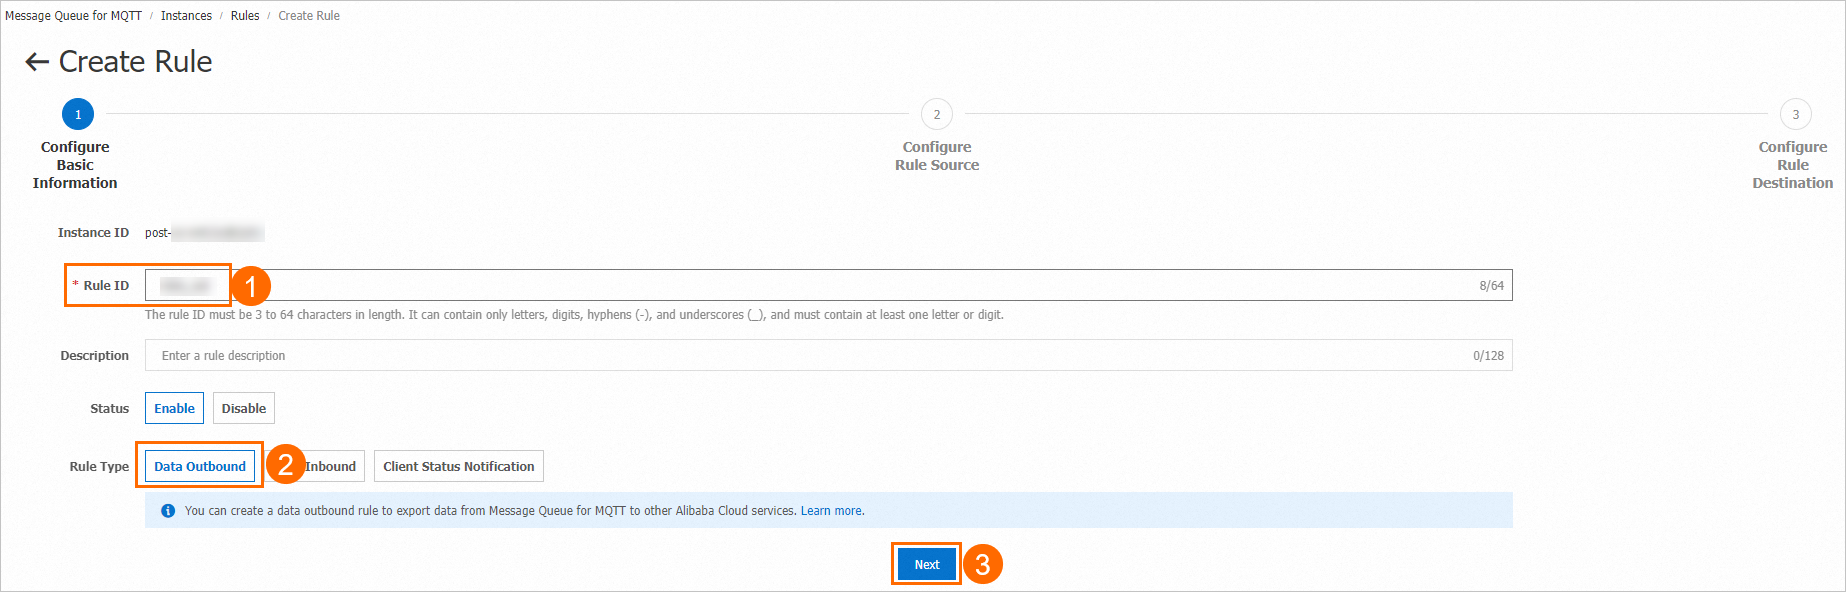
Configure Basic Information: Enter a rule ID and set Rule Type to Data Outbound.
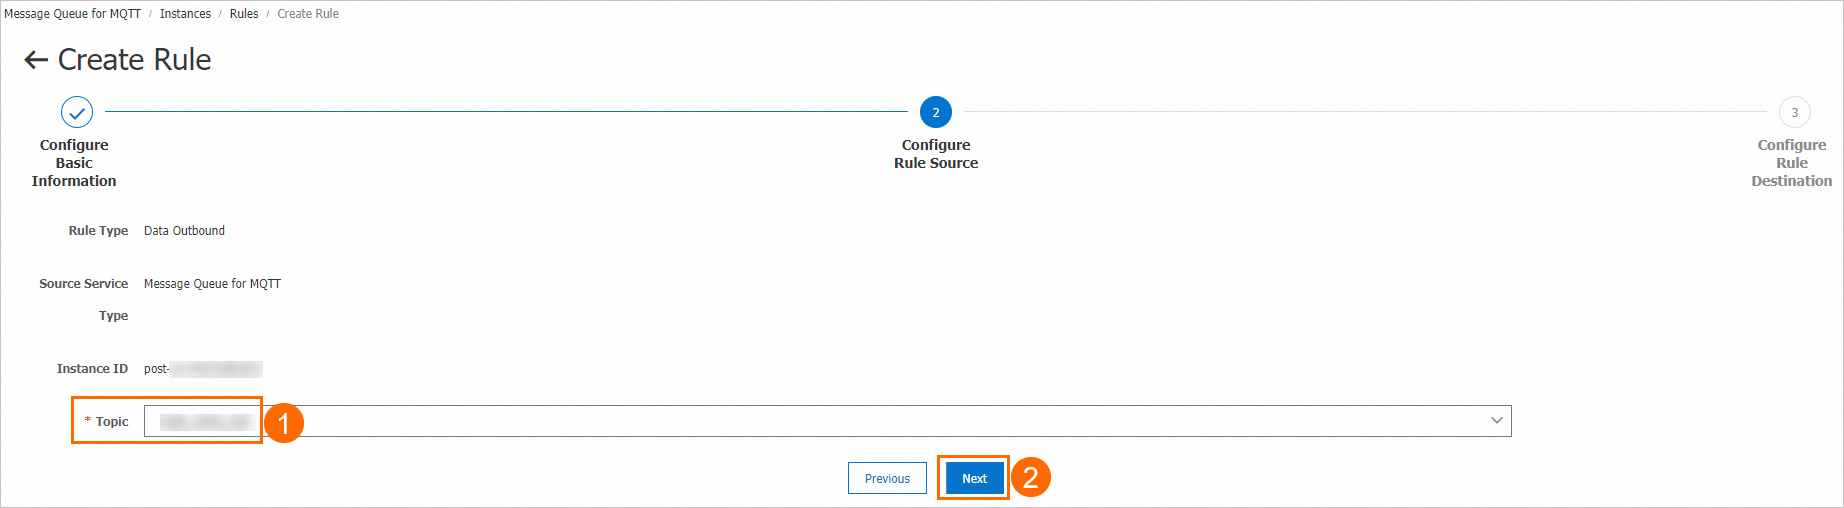
Configure Rule Source: Select a topic on your ApsaraMQ for MQTT instance.
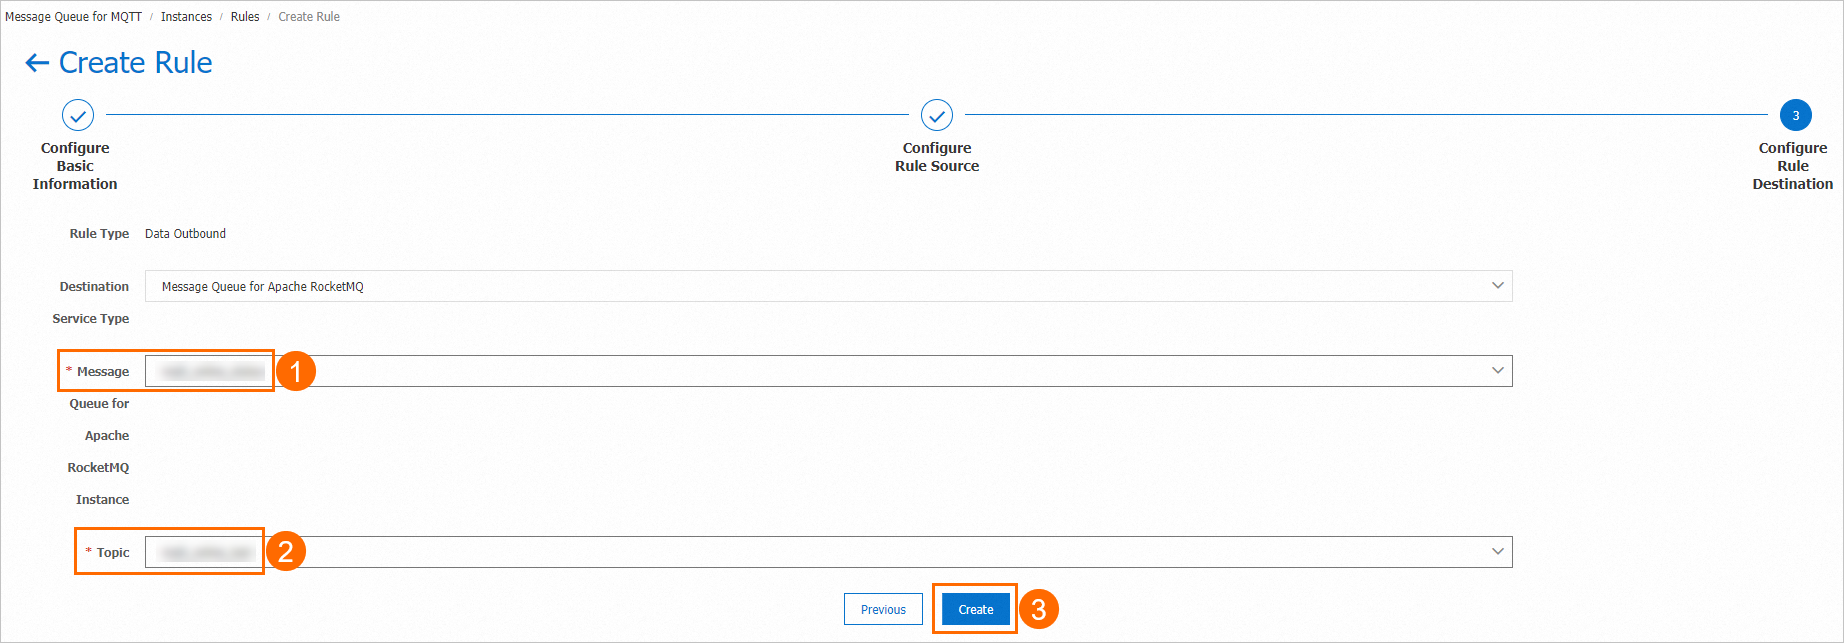
Configure Rule Destination: Select your ApsaraMQ for RocketMQ instance and a topic on that instance.
Step 2: Set up the sample project
Download the sample code
Clone or download the mqtt-java-demo project.
Open the
lmq-java-demofolder in IntelliJ IDEA.Verify that your
pom.xmlincludes the following dependencies:
<dependencies>
    <dependency>
        <groupId>org.bouncycastle</groupId>
        <artifactId>bcprov-jdk15on</artifactId>
        <version>1.70</version>
    </dependency>
    <dependency>
        <groupId>commons-codec</groupId>
        <artifactId>commons-codec</artifactId>
        <version>1.10</version>
    </dependency>
    <dependency>
        <groupId>org.eclipse.paho</groupId>
        <artifactId>org.eclipse.paho.client.mqttv3</artifactId>
        <version>1.2.2</version>
    </dependency>
    <dependency>
        <groupId>org.apache.httpcomponents</groupId>
        <artifactId>httpclient</artifactId>
        <version>4.5.2</version>
    </dependency>
    <dependency>
        <groupId>com.alibaba</groupId>
        <artifactId>fastjson</artifactId>
        <version>1.2.83</version>
    </dependency>
    <dependency>
        <groupId>com.aliyun.openservices</groupId>
        <artifactId>ons-client</artifactId>
        <version>1.8.5.Final</version>
    </dependency>
    <dependency>
        <groupId>com.aliyun</groupId>
        <artifactId>aliyun-java-sdk-onsmqtt</artifactId>
        <version>1.0.3</version>
    </dependency>
    <dependency>
        <groupId>com.aliyun</groupId>
        <artifactId>aliyun-java-sdk-core</artifactId>
        <version>4.5.0</version>
    </dependency>
</dependencies>
Configure access credentials
Get an AccessKey pair. For details, see Create an AccessKey pair.
Set the following environment variables. For details, see Configure an access credential.
Variable Description MQTT_AK_ENVAccessKey ID MQTT_SK_ENVAccessKey secret
Do not hardcode AccessKey pairs in source code. Store them in environment variables to avoid accidental exposure.
Step 3: Run the sample code
The MQ4IoTSendMessageToRocketMQ.java class demonstrates the full data flow: it sends messages through ApsaraMQ for MQTT and consumes them through ApsaraMQ for RocketMQ. Before running the sample, replace the placeholder values with your resource information.
Replace the following placeholders:
| Placeholder | Description | Where to find it |
|---|---|---|
GID-XXXXX | RocketMQ group ID | ApsaraMQ for RocketMQ console |
http://xxxxx.XXXXX.mq-internet.aliyuncs.com | RocketMQ TCP endpoint | Instance Details page in the ApsaraMQ for RocketMQ console |
XXXXX (parentTopic) | RocketMQ topic name | ApsaraMQ for RocketMQ console |
XXXXX (instanceId) | MQTT instance ID | Instance Details page in the ApsaraMQ for MQTT console |
XXXXXX.mqtt.aliyuncs.com | MQTT endpoint | Instance Details page in the ApsaraMQ for MQTT console |
GID_XXXX@@@XXXXX | MQTT client ID (format: GroupID@@@DeviceID) | Generate using your MQTT group ID and a unique device ID |
Client ID requirements:
Format:
GroupID@@@DeviceID. The group ID is the one created in the ApsaraMQ for MQTT console. The device ID is a custom identifier.Maximum length: 64 characters.
Each TCP connection must use a unique client ID. Duplicate client IDs cause connection exceptions and unexpected disconnections.
Step 4: Verify the result
After running the MQ4IoTSendMessageToRocketMQ class, verify end-to-end message delivery using either method below.
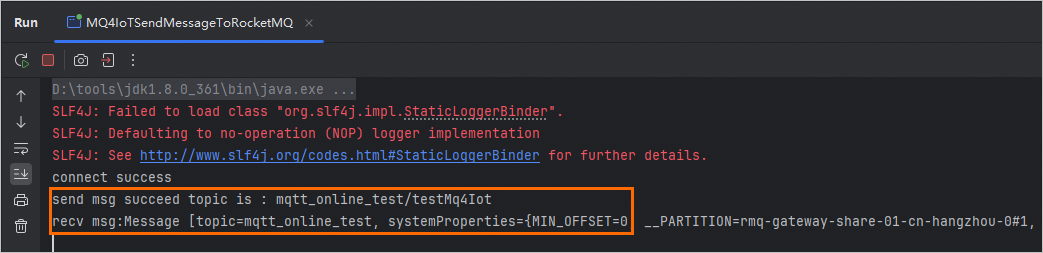
Check the code output
If the console output shows messages similar to the following, the MQTT client sent the messages and the RocketMQ consumer received them:
Check the console
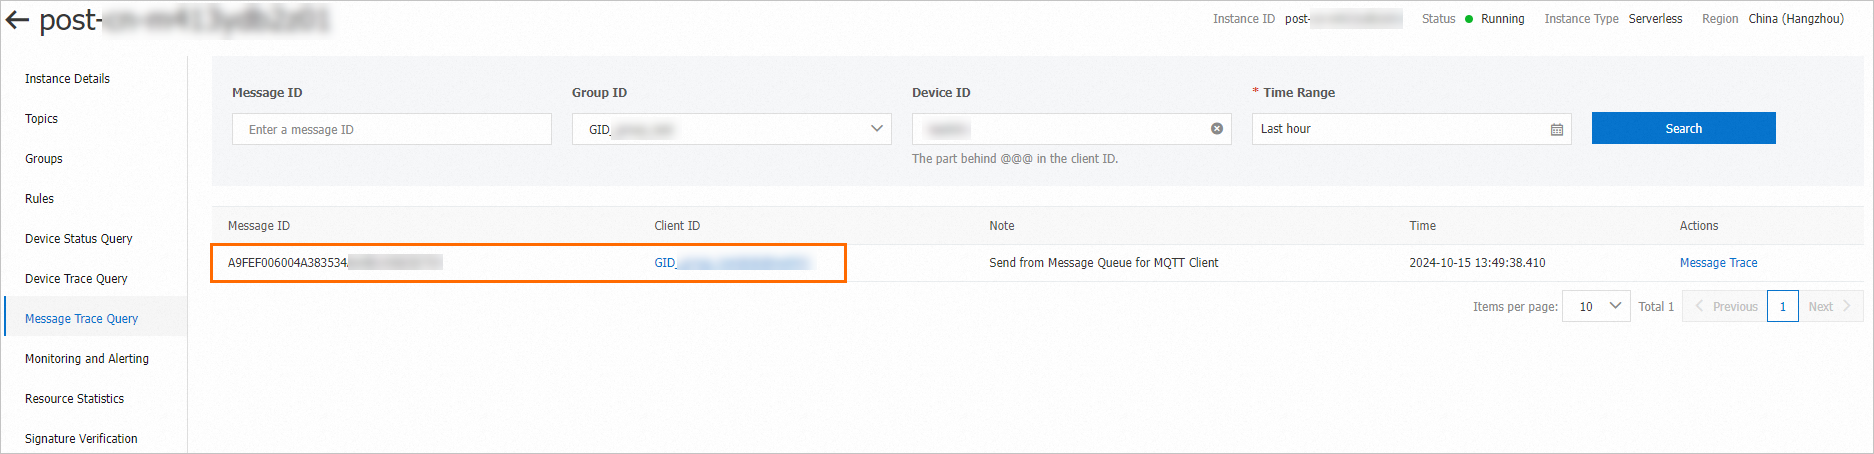
Verify that messages were sent:
Go to the Instance Details page in the ApsaraMQ for MQTT console.
In the left-side navigation pane, click Message Trace Query.
Search by group ID and device ID to confirm the messages were published.
Verify that messages were consumed:
Go to the Instance Details page in the ApsaraMQ for RocketMQ console.
In the left-side navigation pane, click Message Query.
Search by topic to confirm the messages were forwarded to RocketMQ.
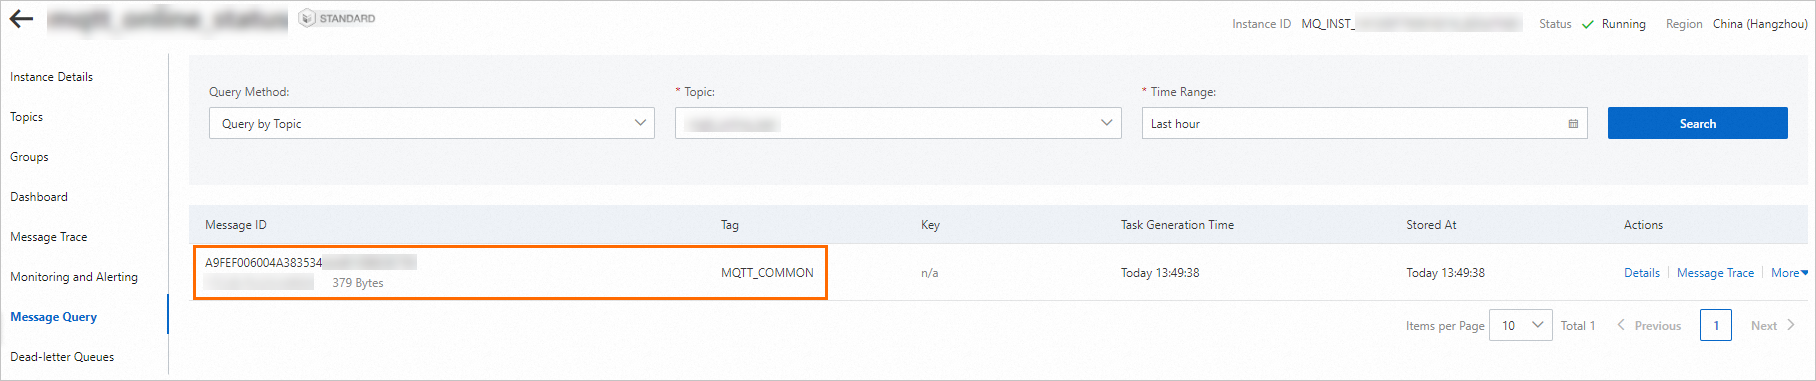
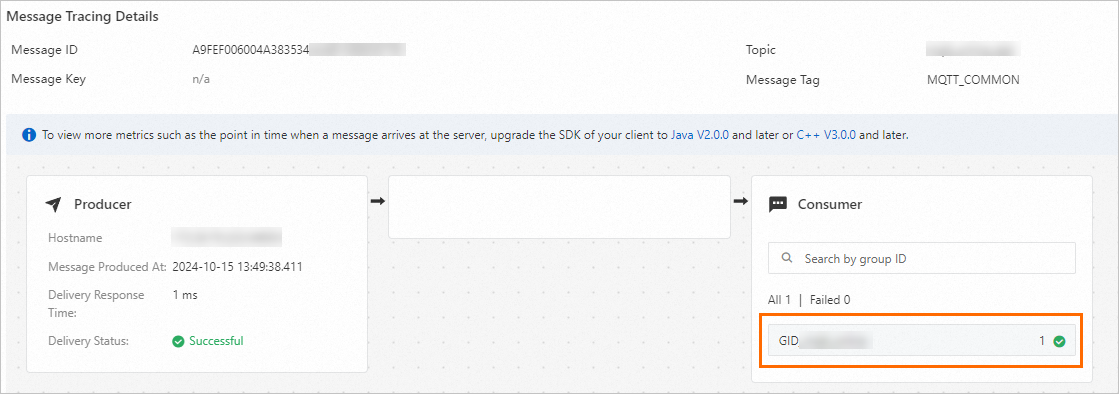
Click Message Trace in the Actions column to verify the message was consumed.