MaxCompute supports third-party packages in Python user-defined functions (UDFs). Depending on the package type, the upload and registration process differs. This topic covers three scenarios: NumPy packages (Python 3), packages that require compilation, and packages that depend on dynamic-link libraries (DLLs).
Prerequisites
Before you begin, ensure that you have:
-
Python installed (Python 3 recommended)
-
The MaxCompute client installed and configured — see Install and configure the MaxCompute client
-
pip, setuptools, and wheel installed, if your package requires compilation:
pip install setuptools pip install wheel -
PROJ 6 installed, if your package depends on GDAL 3.0 or later
-
Docker installed, if you plan to compile on Windows — see Docker documentation
Choose a scenario
| Scenario | Use when |
|---|---|
| Reference NumPy packages in Python 3 UDFs | You need NumPy in Python 3. NumPy is pre-installed in Python 2, so no upload is needed for Python 2. |
| Reference packages that require compilation | Your package is a TAR.GZ file from PyPI or a source code package from GitHub that contains a setup.py file in its root directory. |
| Reference packages that depend on DLLs | Your package depends on DLLs, such as GDAL 3.0.4. |
Reference NumPy packages in Python 3 UDFs
Use this path when: You are using Python 3 and need the NumPy library. NumPy is pre-installed in Python 2, so no manual upload is needed for Python 2.
-
Go to the NumPy page on PyPI and, in the Download files section, download the package whose name ends with
cp37-cp37m-manylinux1_x86_64.whl. This example uses NumPy 1.19.2. Packages with other suffixes may fail at runtime. To use a different version, click Release history in the Navigation section to browse historical releases.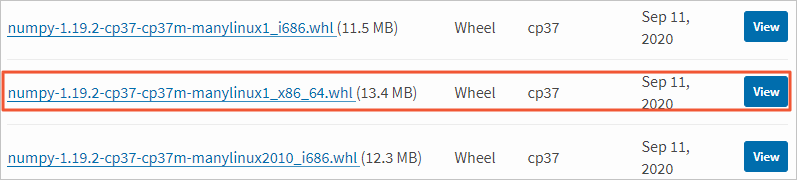
-
Rename the downloaded file to change its extension from
.whlto.zip. Example:numpy-1.19.2-cp37-cp37m-manylinux1_x86_64.zip -
Upload the
.zippackage to your MaxCompute project using the MaxCompute client. For details, see Resource operations.ADD ARCHIVE D:\Downloads\numpy-1.19.2-cp37-cp37m-manylinux1_x86_64.zip -f; -
Write a Python UDF script and save it as a
.pyfile. This example saves the file asimport_numpy.py.from odps.udf import annotate @annotate("->string") class TryImport(object): # The class name is TryImport. def __init__(self): import sys sys.path.insert(0, 'work/numpy-1.19.2-cp37-cp37m-manylinux1_x86_64.zip') # Update the filename after work/ to match your package name. def evaluate(self): import numpy return "import succeed" -
Upload the script to your MaxCompute project as a resource.
ADD PY D:\Desktop\import_numpy.py -f; -
Create a UDF using the uploaded script and NumPy package. For details, see Function operations. This example names the UDF
numpy. Include the NumPy.zipfile in the resource list.CREATE FUNCTION numpy AS 'import_numpy.TryImport' USING 'doc_test_dev/resources/import_numpy.py,numpy-1.19.2-cp37-cp37m-manylinux1_x86_64.zip'; -
Call the UDF in SQL statements. Python 3 must be enabled before you run the SQL. For details, see Python 3 UDFs.
Reference packages that require compilation
Use this path when: Your package is a TAR.GZ file from PyPI or a source code package from GitHub that contains a setup.py file in its root directory. You must compile setup.py to generate a wheel package in a MaxCompute-compatible environment, then upload it and create a UDF.
Third-party packages run in a Linux environment. Compile on Linux to avoid compatibility issues. If you are on Windows, use Docker.
Compile on Linux
Before compiling, verify that your environment meets these requirements:
Python compatibility: Run the following command to check the ABI tag:
python -c "import wheel.pep425tags; print(wheel.pep425tags.get_abi_tag())"-
If
cp27morcp37mis returned, the Python version is compatible. -
If
cp27muorcp37muis returned, run./configure --enable-unicode=ucs2to switch the encoding format to UCS-2.
GNU Compiler Collection (GCC) compatibility: Use GCC 4.9.2 or earlier. Later versions may produce .so files that are incompatible with MaxCompute.
Once your environment is ready:
-
Decompress the package and navigate to the directory containing
setup.py. Example: after decompressingGDAL-3.2.0.zip, thesetup.pyfile is inD:\Downloads\GDAL-3.2.0.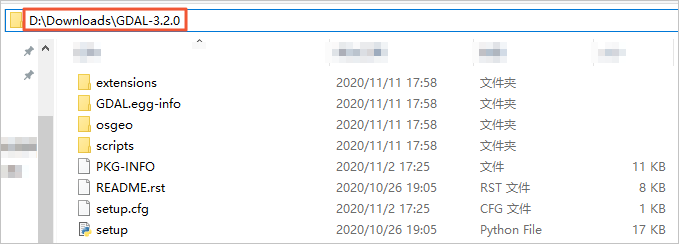
cd D:\Downloads\GDAL-3.2.0 -
Check whether
bdist_wheelis available:python setup.py --help-command-
If
bdist_wheelappears in the output, proceed to the next step. -
If
bdist_wheelis not listed, opensetup.py, changefrom distutils.core import setuptofrom setuptools import setup, then proceed.
-
-
Compile
setup.pyto generate the wheel package:python setup.py bdist_wheelThe wheel package is saved in the
distfolder.
After generating the wheel package, change its extension from .whl to .zip, then upload it as a resource and create a UDF. Follow the same steps as in Reference NumPy packages in Python 3 UDFs.
Compile on Windows using Docker
On Windows, compile inside a Docker container from the quay.io/pypa/manylinux2010_x86_64 image. Python binaries for the required versions are at:
-
Python 2:
/opt/python/cp27-cp27m/bin/python -
Python 3:
/opt/python/cp37-cp37m/bin/python3
Run python setup.py bdist_wheel inside the container to generate the wheel package, then change its extension from .whl to .zip and follow the upload and UDF creation steps in Reference NumPy packages in Python 3 UDFs.
Reference packages that depend on DLLs
Use this path when: Your package depends on DLLs. This example uses GDAL 3.0.4, which depends on libgdal and numpy. Compilation happens inside a Docker container from the quay.io/pypa/manylinux2010_x86_64 image. Make sure Docker is installed before proceeding — see Docker documentation.
Step 1: Check dependencies
Go to the GDAL page on PyPI and review the Dependencies section.

GDAL 3.0.4 requires libgdal and numpy. You will compile libgdal from source and obtain numpy separately.
Step 2: Get the NumPy package
Use one of the following methods:
-
Go to the NumPy page on PyPI and, in the Download files section, download the package ending with
cp37-cp37m-manylinux1_x86_64.whl. For Python 2, click Release history in the Navigation section, select version 1.16.6 or earlier, and download the package ending withcp27-cp27m-manylinux1_x86_64.whl. -
Run the following command inside the container to download NumPy directly:
/opt/python/cp37-cp37m/bin/pip download numpy -d ./
Step 3: Compile the .so library files
-
Download the GDAL 3.0.4 source code and decompress it to your machine.
-
Pull the Docker image and start the container:
docker pull quay.io/pypa/manylinux2010_x86_64 docker run -it quay.io/pypa/manylinux1_x86_64 /bin/bash -
Copy the GDAL source code into the container. Replace
<CONTAINER ID>with the actual container ID (see docker ps for how to get it):docker cp ./gdal-3.0.4 <CONTAINER ID>:/opt/source/ -
Compile the GDAL source code inside the container. For full build instructions, see BuildingOnUnix.
# Specify the PROJ 6 installation directory in the configure step.
./configure --prefix=/path/to/install/prefix --with-proj=/path/to/install/proj6/prefix
make
make install
export PATH=/path/to/install/prefix/bin:$PATH
export LD_LIBRARY_PATH=/path/to/install/prefix/lib:$LD_LIBRARY_PATH
export GDAL_DATA=/path/to/install/prefix/share/gdal
# Verify the build.
gdalinfo --version
If you encounter errors during compilation:
-
configure: error: PROJ 6 symbols not found— install PROJ 6 to support GDAL 3.0 or later. -
fatal error: zlib.h: No such file or directory— runyum install zlib-develand retry.
-
-
Copy two
.solibrary files (not symbolic links) from the container to your machine:-
libgdal.sofrom thelibfolder in the GDAL installation directory -
libproj.sofrom thelibfolder in the PROJ 6 installation directory
-
Step 4: Generate the GDAL wheel package
Run the following commands inside the container. For more context, see BuildingOnUnix.
# Install NumPy if required.
/opt/python/cp37-cp37m/bin/pip install numpy
# Switch to the GDAL Python bindings directory.
cd swig/python
# Generate the wheel package. Output: dist/GDAL-3.0.4-cp37-cp37m-linux_x86_64.whl
/opt/python/cp37-cp37m/bin/python setup.py bdist_wheel
Step 5: Upload resources and create the UDF
-
Change the file extension of the wheel package from
.whlto.zip. -
Upload resources to your MaxCompute project:
-
Upload
libgdal.soandlibproj.soas file resources. -
Upload
numpy-1.19.2-cp37-cp37m-manylinux1_x86_64.zipandGDAL-3.0.4-cp37-cp37m-linux_x86_64.zipas archive resources.
-
-
Create a UDF and add all four files to the resource list:
libgdal.so,libproj.so,numpy-1.19.2-cp37-cp37m-manylinux1_x86_64.zip, andGDAL-3.0.4-cp37-cp37m-linux_x86_64.zip. For upload and UDF creation steps, see Reference NumPy packages in Python 3 UDFs. The following sample Python 3 UDF code imports GDAL:# coding: utf-8 from odps.udf import annotate from odps.distcache import get_cache_file def include_file(file_name): import os, sys so_file = get_cache_file(file_name, 'b') with open(so_file.name, 'rb') as fp: content = fp.read() so = open(file_name, "wb") so.write(content) so.flush() so.close() @annotate("->string") class TryImport(object): def __init__(self): import sys include_file('libgdal.so.26') include_file('libproj.so.15') sys.path.insert(0, 'work/GDAL-3.0.4-cp37-cp37m-linux_x86_64.zip') # Update the filename after work/ to match your compiled GDAL package. sys.path.insert(0, 'work/numpy-1.19.2-cp37-cp37m-manylinux1_x86_64.zip') # Update the filename after work/ to match your NumPy package. def evaluate(self): from osgeo import gdal from osgeo import ogr from osgeo import osr from osgeo import gdal_array from osgeo import gdalconst return "import succeed"If you get an error saying
libgdal.so.26orlibproj.so.15cannot be found, update the filenames ininclude_file()calls to match the actual versioned.sofilenames on your system (for example, changelibgdal.sotolibgdal.so.26). For Python 2, theget_cache_fileparameter differs. See Reference resources in the "Develop a UDF in Python 2" topic.
What's next
-
Python 3 UDFs — enable Python 3 and learn about the runtime environment
-
Resource operations — manage resources in MaxCompute
-
Function operations — create and manage UDFs