MaxCompute introduces external projects to provide real-time access to metadata and data by mapping to a Data Lake Formation (DLF) catalog. This feature delegates permission management to DLF, enabling metadata access and read/write operations on data stored in DLF-managed Object Storage Service (OSS). By mapping an entire data lake at the catalog level, it facilitates Paimon-based cross-engine collaboration. Paimon_DLF external projects are currently available by invitation only.
Usage notes
Table format: Only Paimon tables stored in DLF-managed OSS are supported.
Write restrictions:
INSERT INTOandINSERT OVERWRITEare not supported for Dynamic Bucket tables or Cross Partition tables.Query restrictions:
SHOW TABLESdoes not support a Cross Partition table that has a fixed bucket and whose primary key does not include a partition key.External projects: Schema evolution and partition operations are not supported.
Other limitations:
Resource and function operations are not supported.
You cannot use an external project as a data source for Data Integration in DataWorks.
Procedure
Step 1: Configure permissions
Grant permissions to a RAM user
If you are a RAM user, ensure that the following permission policies are attached. For instructions on adding permissions, see Grant permissions to a RAM user.
AliyunRAMFullAccess: If the RAM user does not have this permission, an Alibaba Cloud account must grant it.
AliyunMaxComputeFullAccess: Required to create an external data source and an external project.
AliyunDLFReadOnlyAccess: Required to create an external project. This policy is necessary because creating a Paimon_DLF external project requires List permission on the DLF catalog.
Authorize and activate DLF
Authorize access to cloud resources
Before using Data Lake Formation (DLF) for the first time, you must authorize it to access the required cloud resources.
Log on to the Data Lake Formation (DLF) console and select a region in the upper-left corner.
To the right of Permissions to access cloud resources are granted., click Authorize.
Activate Data Lake Formation
Select a region. MaxCompute and DLF must be in the same region. Before using DLF, you must activate the service to ensure its availability in the target region.
Click Activate to the right of DLF is activated..
Grant permissions to MaxCompute account
To allow MaxCompute to access data in a Paimon_DLF external project, you must grant the necessary data permissions in DLF to the MaxCompute access account.
MaxCompute accesses DLF using the task executor's identity. This identity is passed to DLF, which then checks it against its permission policies. To enable this process, you must first create and authorize a service-linked role for MaxCompute. Follow these steps:
Log in to the RAM console.
In the left navigation bar, select .
On the Roles page, click Create Role.
In the upper-right corner of the Create Role page, click Create Service Linked Role.
On the Create Service Linked Role page, select
AliyunServiceRoleForMaxComputeLakehousefor Select Service and click Create Service Linked Role.If a message indicates that the role already exists, it has already been authorized. You can ignore the message.
Permissions
Control plane permissions: These permissions are checked during operations in the MaxCompute console, primarily when you create a MaxCompute external project and bind a DLF catalog.
These permissions are managed by RAM. An Alibaba Cloud account must log on to the RAM console to configure them. For details, see Grant permissions to a RAM user.
Data plane permissions: These permissions are checked when you read from or write to Paimon tables after logging into the external project. This typically occurs during the creation, maintenance, or use of schemas, tables, and other resources within the bound DLF catalog, usually executed via SQL in MaxCompute.
These permissions are managed by DLF. An Alibaba Cloud account must log on to the DLF console to configure them. For details, see Grant permissions to a RAM user.
Step 2: Create a Paimon_DLF external data source
Log on to the MaxCompute console, and select a region in the upper-left corner.
In the navigation pane on the left, choose .
On the External Data Source page, click Create External Data Source.
In the Create External Data Source dialog box, configure the following parameters.
Parameter
Required
Description
External Data Source Type
Yes
Select Paimon_DLF.
External Data Source Name
Yes
A custom name. Naming conventions:
Must start with a letter and can contain only lowercase letters, underscores (_), and digits.
Cannot exceed 128 characters.
For example,
paimon_dlf.Description
No
Enter a description as needed.
Region
Yes
The current region is selected by default.
Authentication and authorization
Yes
Defaults to Alibaba Cloud RAM role.
Service-linked Role
Yes
Generated by default.
Endpoint
Yes
The automatically generated endpoint for the China (Hangzhou) region is:
cn-hangzhou-intranet.dlf.aliyuncs.com.Foreign Server Supplemental Properties
No
Additional properties for the external data source. After you specify them, tasks that use this external data source can access the source system according to the defined behaviors.
NoteSupported parameters will be detailed in future documentation as product capabilities evolve.
Click OK to create the external data source.
On the External Data Source page, find the data source that you want to manage and click Details in the Actions column to view its details.
Step 3: Create an external project
Log on to the MaxCompute console, and select a region in the upper-left corner.
In the navigation pane on the left, choose .
On the External Project tab, click Create Project.
In the Create Project dialog box, configure the project information as prompted and click OK.
Parameter
Required
Description
Project Type
Yes
Defaults to external project.
Region
Yes
The current region is selected by default and cannot be changed.
Project Name (Globally Unique)
Yes
Must start with a letter and contain letters, digits, and underscores (_). The name must be 3 to 28 characters in length.
MaxCompute Foreign Server Type
No
Defaults to Paimon_DLF.
MaxCompute Foreign Server
No
Use Existing: A list of previously created external data sources appears.
Create Foreign Server: Create and use a new external data source.
MaxCompute Foreign Server Name
Yes
Use Existing: Select the name of a previously created external data source from the drop-down list.
Create External Data Source: The name of the new external data source is used.
Data Catalog
Yes
A DLF data catalog.
Billing Method
Yes
Subscription or Pay-as-you-go.
Default Quota
Yes
Select an existing Quota.
Description
No
A custom project description.
Step 4: Use SQL to access data
Deleting an external project does not delete the underlying data because the project is only a mapping to the data source.
However, unlike with standard external tables, running a DROP TABLE or DROP SCHEMA command in an external project sends the request to the peer service. This permanently deletes the corresponding table or database. Use DROP operations with caution.
Select a connection tool to log on to the external project.
The following example demonstrates the procedure using a DataStudio SQL node in a DataWorks workspace.
Log on to the DataWorks console and select a region in the upper-left corner.
In the left-side navigation pane, choose Workspace.
On the Workspaces page, click Create Workspace or click the name of an existing target workspace.
On the Workspace Details page, click Computing Resource in the left-side navigation pane.
On the Computing Resource page, click Associate Computing Resources and select MaxCompute.
Configure the Basic Information on the Associate MaxCompute Computing Resource page.
For the MaxCompute project, select the external project.
List the schemas in the external project.
-- Enable schema syntax for the session.
SET odps.namespace.schema=true;
SHOW schemas;

-- Sample output:
ID = 20250919****am4qb
default
system


OK
List the tables in a schema within the external project.
If you need to access tables from a production external project in the current environment, you need to add
use externao_project_pro;before all SQL statements.-- schema_name is the schema name returned by SHOW SCHEMAS in the external project. SET odps.namespace.schema=true; USE schema <schema_name>; SHOW tables; -- Sample output: ID = 20250919****am4qb acs:ram::<uid>:root emp OKCreate a new schema in the external project.
-- In this example, schema_name is schema_demo_test.
CREATE schema <schema_name>;
Use the new schema.
USE schema <schema_name>;Create a table and insert data into the schema.
If you are logged in as a RAM user, this operation requires permissions on the DLF catalog. For authorization instructions, see Manage data permissions.
Command format:
-- Create a table.
CREATE TABLE [IF NOT EXISTS] <table_name>
(
  <col_name> <data_type>,
  ...
)
[COMMENT <table_comment>]
[PARTITIONED BY (<col_name> <data_type>, ...)]
;

-- Insert data.
INSERT {INTO|OVERWRITE} TABLE <table_name> [PARTITION (<pt_spec>)] [(<col_name> [,<col_name> ...)]]
<select_statement>
FROM <from_statement>
Example:
NoteWhen writing data to Paimon tables, values for low-precision TIMESTAMP types are truncated. For example, values for types with a precision of 0-3 are truncated to 3 fractional digits, those with 4-6 are truncated to 6, and those with 7-9 are truncated to 9.
CREATE TABLE schema_table(id int,name string);

INSERT INTO schema_table VALUES (101,'Zhang San'),(102,'Li Si');

-- Query the schema_table table.
SELECT * FROM schema_table;

-- Sample output:
+------------+------------+
| id         | name       |
+------------+------------+
| 101        | Zhang San  |
| 102        | Li Si      |
+------------+------------+
Switch to the existing
defaultschema.use schema default; SHOW tables; -- Sample output: ID = 20250919*******yg5 acs:ram::<uid>:root emp acs:ram::<uid>:root emp_detail acs:ram::<uid>:root test_table OK -- Read from the table. SELECT * FROM test_table; -- Sample output: +------------+------------+ | id | name | +------------+------------+ | 101 | Zhang San | | 102 | Li Si | +------------+------------+ -- Write to the table and verify the write operation. INSERT INTO test_table VALUES (103,'Wang Wu'); SELECT * FROM test_table; -- Sample output: +------------+------------+ | id | name | +------------+------------+ | 101 | Zhang San | | 102 | Li Si | | 103 | Wang Wu | +------------+------------+
Paimon table property passthrough
To configure Paimon-specific options when creating a Paimon table in an external project, add the corresponding parameters to the TBLPROPERTIES clause. Apache Paimon includes specific core configuration options.
Configuration method: Add parameters prefixed with mcfed. to the TBLPROPERTIES list. The parameter names must be consistent with the native parameters of open-source Paimon.
Example
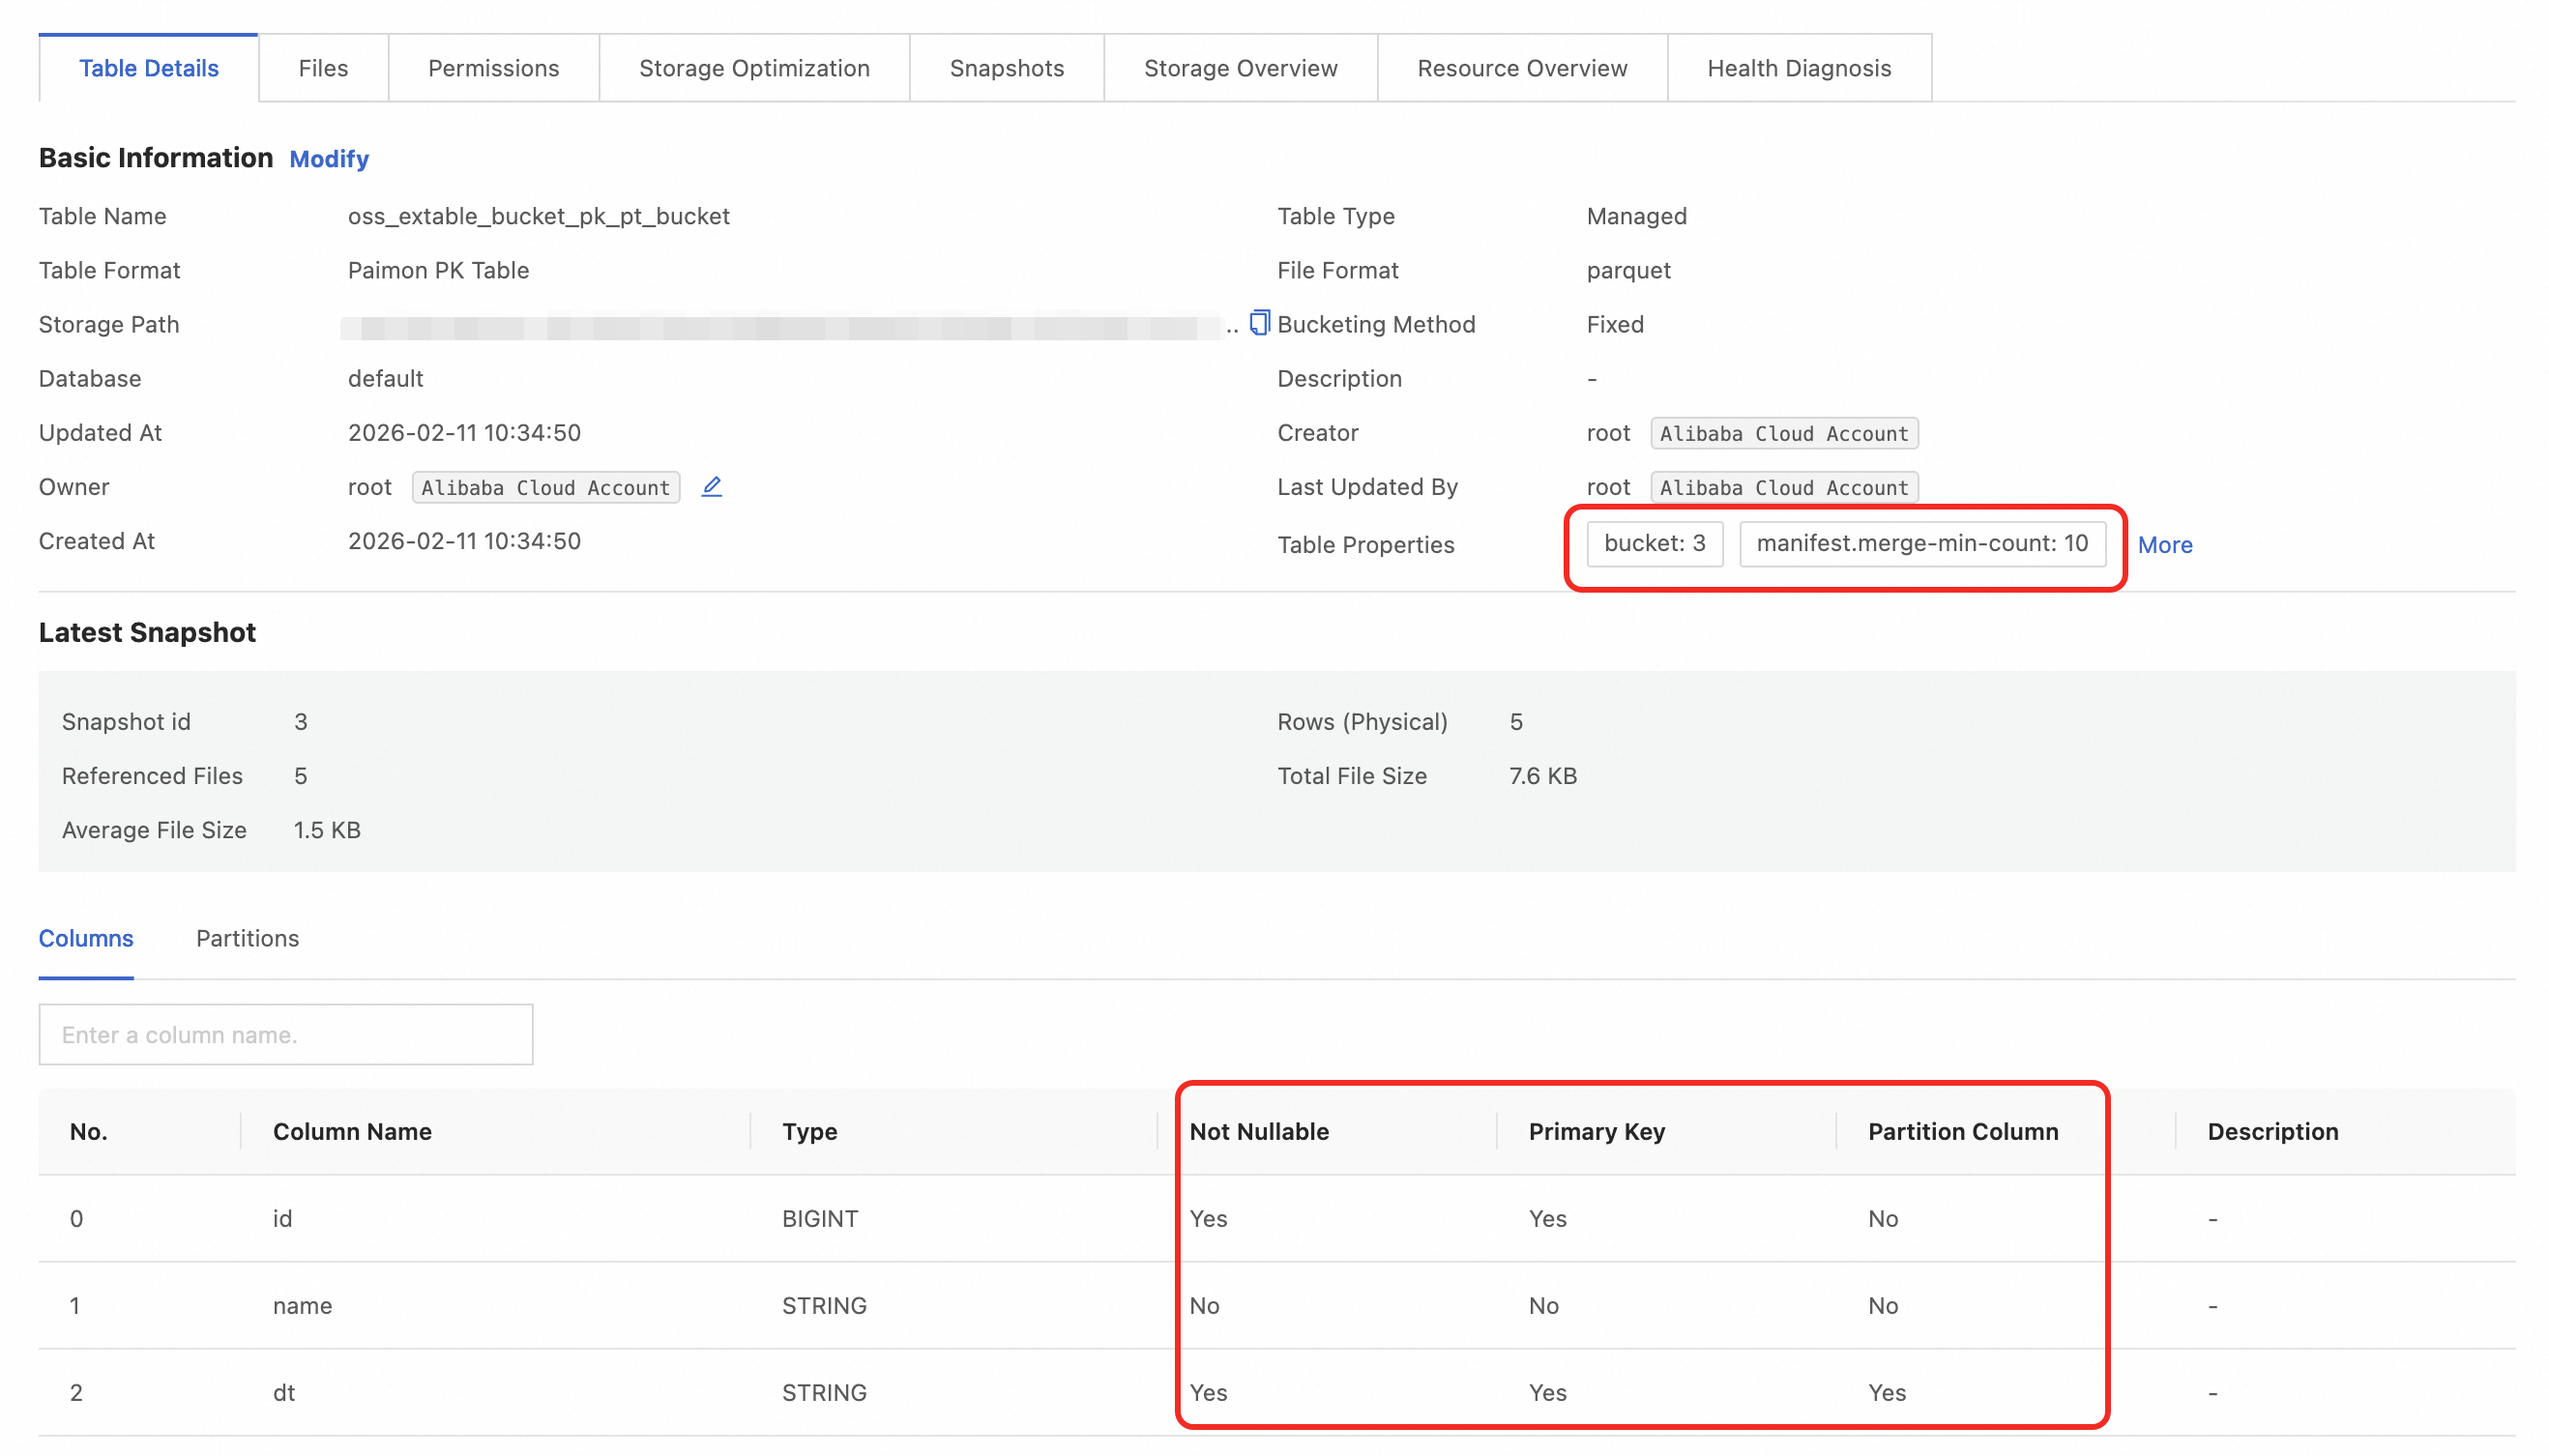
Set the bucket count to a value greater than 0, and specify a primary key that includes 'id' and the partition key column for a Paimon external table.
Create the table and configure external table parameters
-- Enter the external project. If you are already in it, you can skip this command.
use <your external project>;

-- Enable schema syntax for the session.
SET odps.namespace.schema=true;

-- Select the schema to use.
use schema <your schema>;

CREATE TABLE oss_extable_bucket_pk_pt_bucket
(
    id BIGINT,
    name STRING,
    dt STRING
)tblproperties (
    'mcfed.bucket'='3', -- number of buckets
    'mcfed.bucket-key'='id', -- bucket key, can be omitted if a primary key is present
    "mcfed.primary-key"="dt,id", -- primary key
    "mcfed.partition"="dt" -- partition field
    );
Insert data into the external table
INSERT INTO oss_extable_bucket_pk_pt_bucket PARTITION (dt='2025-06-18')
  VALUES (1, 'Alice'),(2, 'Bob');
INSERT INTO oss_extable_bucket_pk_pt_bucket PARTITION (dt='2025-06-19')
  VALUES (3, 'Charlie'),(4, 'David'),(5, 'Eva');
Query the external table
SELECT * FROM oss_extable_bucket_pk_pt_bucket;

-- Sample output:
+------------+---------+------------+
| id         | name    | dt         |
+------------+---------+------------+
| 1          | Alice   | 2025-06-18 |
| 2          | Bob     | 2025-06-18 |
| 4          | David   | 2025-06-19 |
| 3          | Charlie | 2025-06-19 |
| 5          | Eva     | 2025-06-19 |
+------------+---------+------------+
Log on to the Data Lake Formation (DLF) console and select a region in the upper-left corner.
View the details of the table generated in the catalog:
FAQ
Error when creating an external project
Problem: When creating an external project, the error message "You are not authorized to perform this action" is displayed.
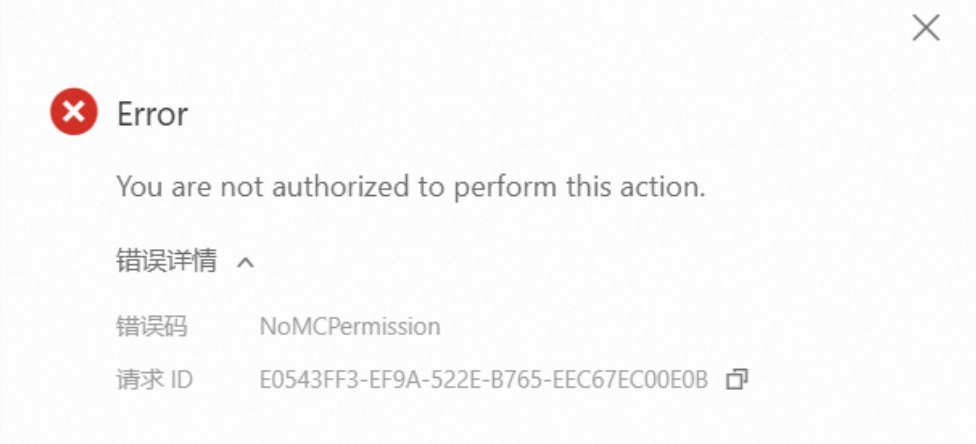
Solution:
If you are a RAM user, first make sure that you have the
AliyunMaxComputeFullAccesspermission. For more information, see Step 1.Because this process involves selecting a DLF catalog, confirm that you have the necessary DLF permissions. For details, see Step 1.
SHOW TABLES error in default schema
Problem: When running SHOW TABLES in the default schema of an external project, the error "Forbidden:User acs: ram: :<uid>:user/** doesn't have privilege LIST on DATABASE default" is displayed.
Solution:
Log on to the Data Lake Formation (DLF) console and select a region in the upper-left corner.
In the navigation pane on the left, select System & Security
On the tab, refresh the page to verify that the current RAM user is listed.
If the user is listed, grant permissions to the RAM user under .
"invalid database operations on two-tier" error
Problem: Running SHOW SCHEMAS in an external project results in the error "invalid database operations on two-tier".
Solution:
First, confirm that the current project is an external project.
If you are using a DataWorks SQL node, click Debug Configuration on the right and check if the associated computing resource is an external project.
If you are using DataWorks SQL Lab, click Data Source in the upper-right corner and check if the associated data source is an external project.
If you are using MaxCompute SQL Lab, click Run Configuration on the right and check if the selected computing resource is an external project.
If you use odpscmd, check whether the value of the
project_nameparameter in the odps_config.ini file is an external project.
After confirming you are using an external project, execute the following SQL statements together.
-- Enable schema syntax for the session.
SET odps.namespace.schema=true;
SHOW schemas;
SHOW SCHEMAS returns only default
Problem: Running SHOW SCHEMAS in an external project returns only default.
Solution:
First, confirm that the current project is an external project.
If you are using a DataWorks SQL node, click Debug Configuration on the right and check if the associated computing resource is an external project.
If you are using DataWorks SQL Lab, click Data Source in the upper-right corner and check if the associated data source is an external project.
If you are using MaxCompute SQL Lab, click Run Configuration on the right and check if the selected computing resource is an external project.
If you are using odpscmd, check the value of the
project_nameparameter in the odps_config.ini file.
After confirming it is an external project, log on to the Data Lake Formation (DLF) console to verify that the catalog bound to the external project contains other databases.
If the
SHOW SCHEMASresult still does not show the expected databases after you complete steps 1 and 2, submit a ticket.
"You should use dynamic bucket (bucket = -1) mode in cross partition update" error
Problem: Running SHOW TABLES in an external project results in the error: ODPS-0110005: com.aliyun.odps.meta.exception.MetaException: com.aliyun.odps.common.table.na.NativeException: common/table/jni/utils/jni_helper.cpp(79): UnretryableException: Common table connector exception - ExceptionType: java.lang.IllegalArgumentException - Message: You should use dynamic bucket (bucket = -1) mode in cross partition update case (Primary key constraint [sending_time, symbol, sequence_number] not include all partition fields [pt]).[pt])
Solution:
MaxCompute currently does not support Cross Partition tables with fixed buckets, which causes an error when SHOW TABLES is executed.
As a temporary workaround, log on to the Data Lake Formation (DLF) console and delete the unsupported Cross Partition table.
"Can't set default schema if odps.namespace.schema is false" error
Problem: Running SHOW TABLES or SHOW SCHEMAS results in the error "FAILED: Can't set default schema if odps.namespace.schema is false."
Solution:
First, check whether you have added the
SET odps.namespace.schema=true;command before your SQL statement to enable schema syntax at the session level.If the error persists after enabling the flag, ensure that you use the correct command order. To read tables from another external project, use the following correct sequence:
USE external_project;
SET odps.namespace.schema=true;
USE schema schema_name;
SHOW tables;
"Failed to connect" error
Problem: Reading a table in a Paimon_DLF external project fails with the error: "Caused by: java.net.ConnectException: Failed to connect to cn-hangzhou-intranet.dlf.aliyuncs.com/xx.xx.xx.xx:80"
The error indicates that the current table read method requires you to add the internal project for the current job to an allowlist. The address is cn-hangzhou-intranet.dlf.aliyuncs.com.
Solution:
Join the MaxCompute developer community DingTalk group by using this link or by searching for the DingTalk group number (11782920), and contact the MaxCompute technical support team to have the URL that returns an error added to the allowlist.
After the address has been added to the allowlist, you must add the following parameters before you read from the table.
set odps.security.outbound.intranetlist=cn-hangzhou-intranet.dlf.aliyuncs.com:80;
set odps.internet.access.list=cn-hangzhou-intranet.dlf.aliyuncs.com:80;
Data type mapping
For more information about MaxCompute data types, see Data types (V1.0) and Data types (V2.0).
|
Paimon data type |
MaxCompute 2.0 data type |
Read/write support |
Description |
|
TINYINT |
TINYINT |
|
8-bit signed integer. |
|
SMALLINT |
SMALLINT |
|
16-bit signed integer. |
|
INT |
INT |
|
32-bit signed integer. |
|
BIGINT |
BIGINT |
|
64-bit signed integer. |
|
BINARY(MAX_LENGTH) |
BINARY |
|
Binary data type. The current maximum length is 8 MB. |
|
FLOAT |
FLOAT |
|
32-bit binary floating-point number. |
|
DOUBLE |
DOUBLE |
|
64-bit binary floating-point number. |
|
DECIMAL(precision,scale) |
DECIMAL(precision,scale) |
|
Exact decimal numeric type. The default is
|
|
VARCHAR(n) |
VARCHAR(n) |
|
Variable-length character type. n specifies the length and ranges from 1 to 65,535. |
|
CHAR(n) |
CHAR(n) |
|
Fixed-length character type. n specifies the length and ranges from 1 to 255. |
|
VARCHAR(MAX_LENGTH) |
STRING |
|
String type. The current maximum length is 8 MB. |
|
DATE |
DATE |
|
Date type. The format is |
|
TIME, TIME(p) |
Not supported |
|
The Paimon TIME data type represents a time without a time zone, consisting of hours, minutes, and seconds, with nanosecond precision. TIME(p) specifies the fractional-second precision from 0 to 9. The default value is 0. No corresponding type exists in MaxCompute. |
|
TIMESTAMP, TIMESTAMP(p) |
TIMESTAMP_NTZ |
|
A timestamp type without a time zone that is accurate to the nanosecond. To read this data type, you must disable the native JNI bridge by running the following command: |
|
TIMESTAMP WITH LOCAL TIME_ZONE(9) |
TIMESTAMP |
|
|
|
TIMESTAMP WITH LOCAL TIME_ZONE(9) |
DATETIME |
|
A timestamp type that is accurate to the nanosecond. The format is |
|
BOOLEAN |
BOOLEAN |
|
A BOOLEAN type. |
|
ARRAY |
ARRAY |
|
A complex type. |
|
MAP |
MAP |
|
A complex type. |
|
ROW |
STRUCT |
|
A complex type. |
|
MULTISET<t> |
Not supported |
|
No corresponding type exists in MaxCompute. |
|
VARBINARY, VARBINARY(n), BYTES |
BINARY |
|
A data type of variable-length binary strings. |