Manage internal tables, external tables, or views in a visualized manner
Project Explorer in MaxCompute Studio provides a visual editor for creating, modifying, viewing, and deleting internal tables, external tables, and views in a MaxCompute project — all without leaving IntelliJ IDEA.
Choose a table or view type
Before opening the editor, decide which object type fits your use case:
| Type | Use when |
|---|---|
| Internal table | Data is stored and managed within MaxCompute. This is the default choice for most workloads. |
| External table | Data lives in an external store (such as OSS) and you want to query it without loading it into MaxCompute. Requires an OSS location and serialization configuration. |
| View | You want a named query that presents data from one or more tables. Views cannot be modified after creation. |
Create an internal table, external table, or view
odps.sql.submit.mode=script (submits statements as scripts) and odps.sql.type.system.odps2=true (enables MaxCompute 2.0 data types).In IntelliJ IDEA, click Project Explorer in the left-side navigation pane. Right-click Tables & Views under the target MaxCompute project and select Create new table.
In the Create New Table/View dialog, configure the object using one of two methods: Method 1 (recommended): Write a SQL DDL script Write your DDL directly in the SQL DDL SCRIPT section and skip all other parameters. For table creation syntax, see the "Create a table" section in Table operations. For view creation syntax, see the "Create or update a view" section in View-related operations. Method 2: Configure parameters Fill in the parameters that apply to your object type. As you configure parameters, the dialog auto-generates the corresponding SQL DDL script. If you then edit the script directly, MaxCompute Studio uses the updated script rather than the parameter values.
Parameters for internal and external tables
Parameter Description Create Table Enter the table name. Select External to create an external table; leave it unselected to create an internal table. Select If not exists to return a success message when you create an internal table or external table that has the same name as an existing table, even if the schema of the existing table is different from that of the new table. However, the metadata of the existing table with the same name remains unchanged. Comment Enter a description for the table. Lifecycle Enter a value to specify the lifecycle of the internal table or external table. Unit: days. Stored as AliOrc Select to store the table in AliORC format. Like Table Create a table with the same schema as an existing table. Data and lifecycle settings are not copied. Equivalent to: create table table_name like model_table;Columns Add non-partition columns. Click the icon on the right side of the Columns tab to add a column. The name, type, NOT NULL, and comment fields are pre-filled — update them to match your schema. Partitions Add partition key columns. Click the icon on the right side of the Partitions tab. The name, type, and comment fields are pre-filled — update them as needed. Indices Configure hash or range indexes for the table. External Table Configure Storage Handler, SERDEPROPERTIES, Location, and Using for an external table. See Create an OSS external table for details. AS SELECT Create a table from an existing table and copy its data. Partition key columns become regular columns in the new table, and the lifecycle is not copied. For example: create table table_name (colname1, colname2) as select col1, col2 from sale_detail;Table Properties Add custom properties to the table. See Properties. SQL DDL SCRIPT Displays the auto-generated script based on your parameter configuration. Edit this section directly to override the parameter values. Parameters for views
Parameter Description Create Table Enter the view name. Select View to create a view. Select If not exists to return a success message when you create a view that has the same name as an existing view, even if the schema of the existing view is different from that of the new view. The existing view remains unchanged. Select Replace if exists to overwrite an existing view with the same name. Comment Enter a description for the view. Columns Add columns to the view. Click the icon on the right side of the Columns tab to add a column. The name field is pre-filled — update it as needed. AS SELECT Define the query that the view represents. Equivalent to: create table view_name (colname1, colname2) as select col1, col2 from sale_detail;SQL DDL SCRIPT Displays the auto-generated script. Edit this section directly to override the parameter values. Click Execute. When SUCCESS appears, click OK.
Right-click Tables & Views under the target project and select Refresh meta to see the new table or view in the list.
Modify an internal table or external table
In IntelliJ IDEA, click Project Explorer in the left-side navigation pane. Right-click the table you want to modify under Tables & Views in the target project and select Open table editor.
In the Modify Table dialog, update the table. You can change the table name, comment, lifecycle, column names, and column comments, and add columns, indexes, or table properties. For parameter descriptions, see the parameter tables in Create an internal table, external table, or view.
Click Execute.
Right-click Tables & Views in the destination MaxCompute project and select Refresh meta to verify the changes appear in the list.
View details of an internal table, external table, or view
Internal and external tables
In the Tables & Views folder of the target project, double-click the table name — or right-click it and select show table detail. The detail panel includes three sections:
Table information: the MaxCompute project, owner, creation time, and last updated time
Table schema: column names, data types, NOT NULL constraints, and default values
Data preview: specify Partitions (required only for partitioned tables) and Preview rows, then click Data Preview to sample table data
Views
In the Tables & Views folder of the target project, double-click the view name — or right-click it and select show table detail — to see the query statement that defines the view.
Clear table data or delete partitions
In the Tables & Views folder of the target project, right-click the table name and select Truncate table/Delete partition to either clear all data from a non-partitioned table or remove a specific partition from a partitioned table.
Delete an internal table, external table, or view
Deleting a table or view is permanent.
In IntelliJ IDEA, click Project Explorer in the left-side navigation pane. In the Tables & Views folder of the target project, right-click the table or view and select Drop table from server.
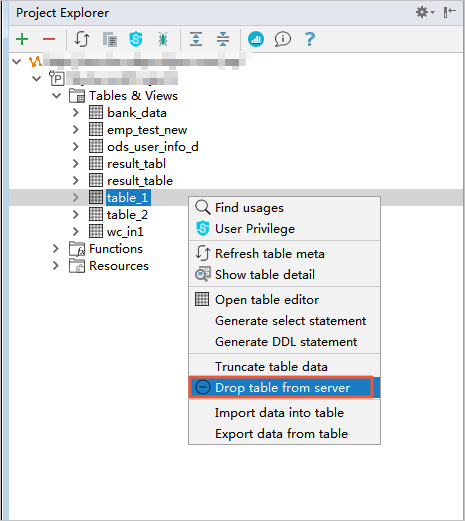
In the Confirmation Required dialog, click OK.
Right-click Tables & Views and select Refresh meta to confirm the object no longer appears in the list.