This topic describes how to migrate a dataset from Google Cloud Platform (GCP) BigQuery to Alibaba Cloud MaxCompute over the internet.
Prerequisites
|
Category |
Platform |
Requirement |
Reference |
|
Environment and data |
Google Cloud Platform |
|
If you do not have the relevant environment and dataset, prepare them by referring to the following topics:
|
|
Alibaba Cloud |
|
If you do not have the relevant environment, prepare it by referring to the following topics:
|
|
|
Account |
Google Cloud Platform |
You have created an IAM user and granted it permissions to access Cloud Storage. |
|
|
Alibaba Cloud |
You have created a RAM user and a RAM role, and granted them the required permissions for bucket access and online migration. |
Create a RAM user and Authorization for accessing external data sources |
|
|
Region |
Google Cloud Platform |
None. |
None |
|
Alibaba Cloud |
The OSS bucket and the MaxCompute project must be in the same region. |
None |
Background
This figure shows the process of migrating a dataset from BigQuery to Alibaba Cloud MaxCompute.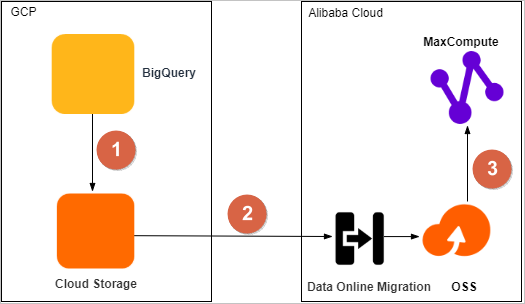
|
Step |
Description |
|
1 |
Export the BigQuery dataset to Cloud Storage. |
|
2 |
Use the Online Migration service of Object Storage Service (OSS) to migrate data from Cloud Storage to OSS. |
|
3 |
Migrate the data from OSS to a MaxCompute project in the same region, and then verify the data integrity. |
Step 1: Export BigQuery dataset to Cloud Storage
Use the bq extract command-line tool to export a BigQuery dataset to Cloud Storage.
-
Log on to the Google Cloud console and create a bucket to store the migration data. For more information, see Create buckets.
After the bucket is created, you can view it on the Browser page of Cloud Storage. Click the bucket to view the list of folders and objects on the Objects tab.
-
Use the bq command-line tool to query the DDL script for each table in the TPC-DS dataset and download them to your local device. For more information, see Get table metadata by using INFORMATION_SCHEMA.
BigQuery does not provide a command like
show create tableto query the DDL scripts for tables. Instead, you can use a built-in user-defined function (UDF) to query the DDL scripts for all tables in a specified dataset. The query returns the DDLCREATE TABLEstatements for thexxx.tpcds_100gb.household_demographicsandxxx.tpcds_100gb.web_salestables. Thehousehold_demographicstable contains fields such ashd_demo_sk INT64,hd_income_band_sk INT64,hd_buy_potential STRING,hd_dep_count INT64, andhd_vehicle_count INT64. Theweb_salestable contains fields such asws_sold_date_sk INT64,ws_sold_time_sk INT64, andws_ship_date_sk INT64. -
Run the
bq extractcommand to export the tables from the BigQuery dataset to the destination bucket in Cloud Storage. For more information about the operation, exported data formats, and compression types, see Export table data.The following code provides a sample export command:
bq extract --destination_format AVRO --compression SNAPPY tpcds_100gb.web_site gs://bucket_name/web_site/web_site-*.avro.snappy; -
View the bucket to check the data export result.
Step 2: Migrate data from Cloud Storage to OSS
Object Storage Service (OSS) allows you to migrate data from Cloud Storage by using the Online Migration service. For more information, see Google Cloud Platform migration tutorial. The Online Migration service is in public preview. To activate it, you must contact customer service.
-
Estimate the total size and file count of the data to be migrated. You can find this information by using the gsutil tool or by checking the storage logs for the source bucket. For more information, see Get bucket information.
-
Optional: If you have not created a bucket, log on to the OSS console and create a bucket to store the migrated data. For more information, see Create a bucket in the console.
After the bucket is created, you can view and manage uploaded files and directories on the Files page of the bucket.
-
Optional: If you have not created a RAM user, create a RAM user and grant the required permissions.
-
Log on to the Resource Access Management (RAM) console and create a RAM user. For more information, see Create a RAM user.
-
Select the logon name of the newly created user and click Add Permissions. Grant the AliyunOSSFullAccess (read and write permissions on buckets) and AliyunMGWFullAccess (online migration permissions) to the new RAM user, click , and then click Close.
-
In the left-side navigation pane, click Overview. On the Overview page, in the Basic Information section, click the Login URL link and log on to the Alibaba Cloud console by using the new RAM user.
-
-
On Google Cloud Platform, prepare credentials for programmatic access to Cloud Storage. For more information, see Using IAM permissions with JSON.
-
Log on to the IAM console and select a user who has permissions to access BigQuery. In the Actions column, click
 > Create key.
 -
In the dialog box that appears, select JSON and click Create. Save the JSON file to your local device and click Done.
-
On the Create service account page, click Select a role and choose to grant the user permissions to access Cloud Storage.
-
-
Create a data address for online migration.
-
Log on to the Alibaba Cloud Data Online Migration console. In the left-side navigation pane, choose Data Online Migration > Data Address.
-
On the Manage data address page, click Create data address, configure the source and destination data address parameters, and then click OK. For more information about the parameters, see Perform the migration.
-
Example source configuration: Set Data type to Google Storage, set Data name to
google_storage_ds, set Bucket togs_tpcds_100gb, and set Prefix to Migrate all data.NoteKey File is the JSON file downloaded in Step 4.
-
Example destination configuration: In the Create data address dialog box, set Data type to OSS, set Data name to
migration_destination_ds, and set Data region to Indonesia (Jakarta). For OSS endpoint, enter the internal endpoint for the region. For AccessKey ID and AccessKey Secret, enter the key information of the RAM user. Select the destination OSS bucket, entertpc_ds_100gb/for OSS prefix, and then click OK.NoteThe Access Key ID and Access Key Secret are the access credentials for a RAM user.
-
-
-
Create a migration job.
-
In the left-side navigation pane, click Migration jobs.
-
On the Migration Tasks page, click Create migration job, configure the parameters, and then click Create. For more information about the parameters, see Perform the migration.
-
On the Task configuration tab, set Task name to a value such as
gs-to-oss-job, select the Source address and Destination address, and configure the Migration type (full migration, incremental migration, or data synchronization) and File overwrite rule (Last-modified time priority, Conditional overwrite, Full overwrite, or Never overwrite). -
Click the Performance tuning tab. In the Data estimation section, enter the data size and file count to be migrated. In the Flow control section, you can set the (Daily) throttling time range and Maximum bandwidth(MB/s). Then, click Create.
NoteThe values for Data size to be migrated and File count to be migrated are the size and number of files that you obtained from the Google Cloud console.
-
-
The migration job starts automatically after it is created. The migration is complete when the Task Status changes to Finished.
-
In the Actions column of the migration job, click Manage to view the migration report and confirm that all data has been successfully migrated.
-
Log on to the OSS console.
-
In the left-side navigation pane, click Buckets. On the Buckets page, click the bucket that you created. On the bucket details page, click Object Management to view the data migration result.
-
Step 3: Migrate data from OSS to MaxCompute
You can use the MaxCompute LOAD command to migrate data from an OSS bucket to a MaxCompute project in the same region.
The LOAD command supports both STS authentication and AccessKey authentication. AccessKey authentication requires your plaintext AccessKey ID and AccessKey Secret. Because STS authentication is more secure by not exposing AccessKey information, this topic uses it as an example.
-
In the DataWorks ad hoc query interface or the MaxCompute client (odpscmd), modify the DDL scripts from the BigQuery tables, adapt the data types for MaxCompute, and create the corresponding MaxCompute tables.
For more information about the ad hoc query feature, see Run SQL statements by using ad hoc queries (optional). The following code provides a sample command:
CREATE OR REPLACE TABLE
`****.tpcds_100gb.web_site`
(
 web_site_sk INT64,
 web_site_id STRING,
 web_rec_start_date STRING,
 web_rec_end_date STRING,
 web_name STRING,
 web_open_date_sk INT64,
 web_close_date_sk INT64,
 web_class STRING,
 web_manager STRING,
 web_mkt_id INT64,
 web_mkt_class STRING,
 web_mkt_desc STRING,
 web_market_manager STRING,
 web_company_id INT64,
 web_company_name STRING,
 web_street_number STRING,
 web_street_name STRING,
 web_street_type STRING,
 web_suite_number STRING,
 web_city STRING,
 web_county STRING,
 web_state STRING,
 web_zip STRING,
 web_country STRING,
 web_gmt_offset FLOAT64,
 web_tax_percentage FLOAT64
)
Modify the INT64 and
FLOAT64 fields to obtain the following DDL script:
CREATE
TABLE IF NOT EXISTS <your_maxcompute_project>.web_site_load
(
web_site_sk BIGINT,
web_site_id STRING,
web_rec_start_date STRING,
web_rec_end_date STRING,
web_name STRING,
web_open_date_sk BIGINT,
web_close_date_sk BIGINT,
web_class STRING,
web_manager STRING,
web_mkt_id BIGINT,
web_mkt_class STRING,
web_mkt_desc STRING,
web_market_manager STRING,
web_company_id BIGINT,
web_company_name STRING,
web_street_number STRING,
web_street_name STRING,`
web_street_type STRING,
web_suite_number STRING,
web_city STRING,
web_county STRING,
web_state STRING,
web_zip STRING,
web_country STRING,
web_gmt_offset DOUBLE,
web_tax_percentage DOUBLE
);
The following table describes the mappings between BigQuery data types and MaxCompute data types.
BigQuery data type
MaxCompute data type
INT64
BIGINT
FLOAT64
DOUBLE
NUMERIC
DECIMAL, DOUBLE
BOOL
BOOLEAN
STRING
STRING
BYTES
VARCHAR
DATE
DATE
DATETIME
DATETIME
TIME
DATETIME
TIMESTAMP
TIMESTAMP
STRUCT
STRUCT
GEOGRAPHY
STRING
-
Optional: If you have not created a RAM role, create a RAM role with permissions to access OSS. For more information, see Authorization for accessing external data sources.
-
Run the
LOADcommand to load data from the OSS bucket into the MaxCompute table. Then, run an SQL command to verify the import. You can load only one table perLOADcommand. If you have multiple tables, you must run the command multiple times. For more information about theLOADcommand, see LOAD.LOAD OVERWRITE TABLE web_site FROM LOCATION 'oss://oss-<your_region_id>-internal.aliyuncs.com/bucket_name/tpc_ds_100gb/web_site/' --The location of the OSS bucket. ROW FORMAT SERDE 'org.apache.hadoop.hive.serde2.avro.AvroSerDe' WITH SERDEPROPERTIES ('odps.properties.rolearn'='<Your_RoleARN>','mcfed.parquet.compression'='SNAPPY') STORED AS AVRO;Run the following command to view and verify the data import result:
SELECT * FROM web_site;Example output: The statement returns 24 records from the
web_sitetable, including fields such asweb_site_sk,web_site_id,web_name,web_manager,web_mkt_class, andweb_company_na. -
Verify that the migrated data in MaxCompute matches the source data in BigQuery by comparing table counts, record counts, and the results of sample queries.