Before you use MaxCompute Studio to develop data in a MaxCompute project on IntelliJ IDEA, you must connect to the MaxCompute project by using MaxCompute Studio. Then, you can view and manage MaxCompute data and resources. This topic describes how to create and modify a connection to a MaxCompute project on MaxCompute Studio.
Prerequisites
You have installed MaxCompute Studio.
For information about MaxCompute Studio configuration, see Configure MaxCompute Studio.
Step 1: Create a MaxCompute Studio project
Start IntelliJ IDEA. In the main menu bar, choose .
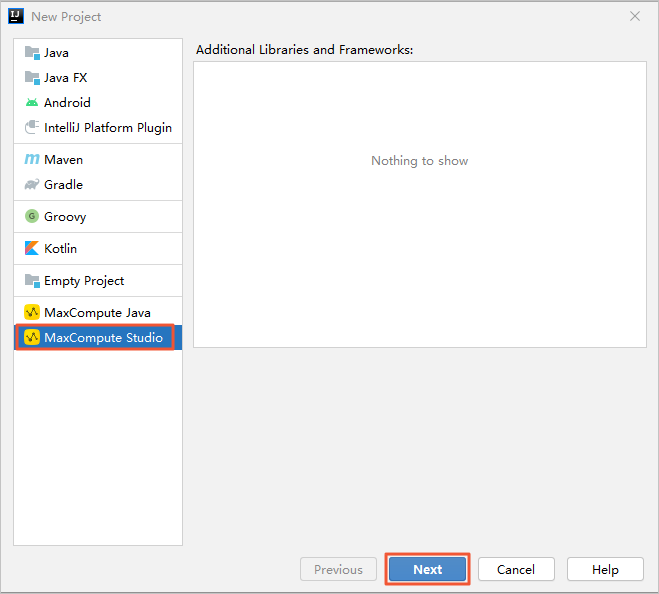
In the left-side navigation pane of the New Project dialog box, click MaxCompute Studio. Then, click Next.
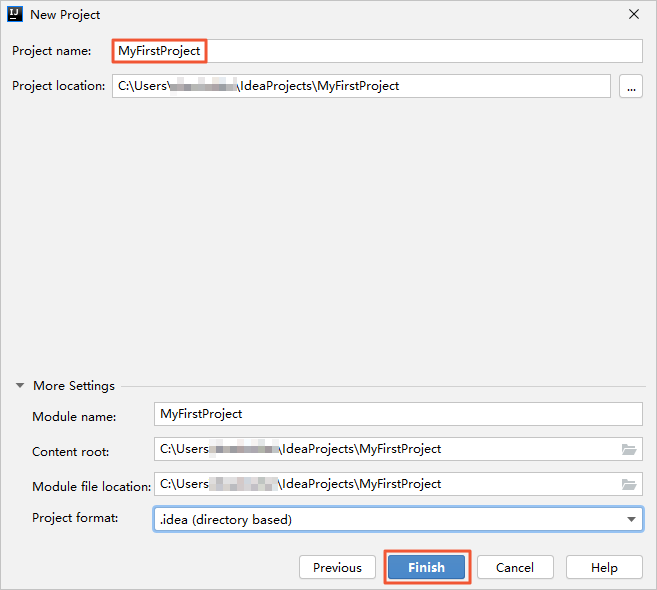
Configure the Project name parameter and click Finish.
 Note
NoteIf a project is open, a dialog box appears and asks whether you want to open the new project in a new window or the current window. In this case, you can click This Window.
Step 2: Connect to a MaxCompute project
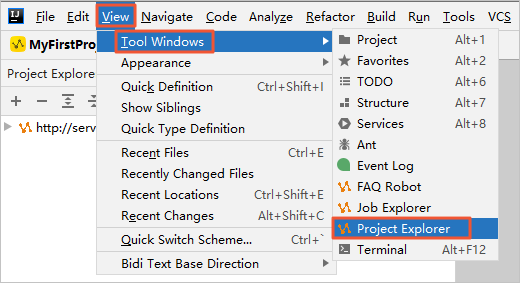
In the main menu bar, choose .
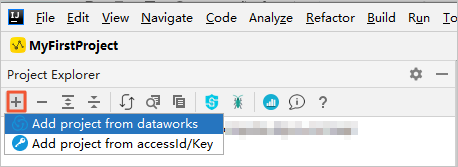
In the upper-left corner of the Project Explorer page, click the plus sign (+) and select Add project from accessId/Key.
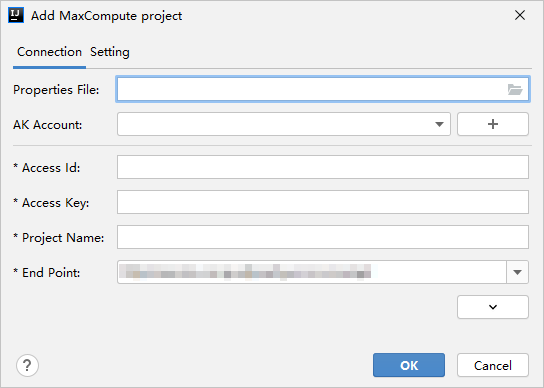
In the Add MaxCompute project dialog box, configure the parameters on the Connection tab.
 Note
NoteIn the lower-left corner of the Connection tab, click the
 icon to view online documentation.
 If a timeout error occurs, click the Setting tab and modify the following parameters:
sync one table timeout(s): the timeout period for table synchronization. Default value: 5. Unit: seconds.
sync one function timeout(s): the timeout period for function synchronization. Default value: 30. Unit: seconds.
Use the configuration file to automatically configure the parameters. The following table describes the parameters.
Parameter
Description
Properties File
The directory in which the configuration file odps_config.ini of the MaxCompute client (odpscmd) is saved. For more information, see Install and configure the MaxCompute client. The configuration file is used to initialize the settings of the Access Id, Access Key, Project Name, and End Point parameters.
AK Account
The Alibaba Cloud account that is used to connect to the MaxCompute project. You can click the plus sign (+) and select an existing account on the Accounts page.
NoteIf no accounts exist, you must click the plus sign (+) and select Aliyun Account By AccessKey to add an account on the Accounts page. You can manually add an account or use the configuration file to automatically add the account. For more information about the parameters on the Accounts page, see Accounts configuration items.
Manually configure the parameters. The following table describes the parameters.
Parameter
Description
Access Id
The AccessKey ID that is used to connect to the MaxCompute project.
Access Key
The AccessKey secret that is used to connect to the MaxCompute project.
Project Name
The name of the MaxCompute project that you want to access.
NoteThis parameter specifies the name of your MaxCompute project instead of the DataWorks workspace to which the MaxCompute project corresponds. To view the name of your MaxCompute project or create a MaxCompute project, perform the following operations: Log on to the MaxCompute console. In the top navigation bar, select a region. In the left-side navigation pane, choose Workspace > Projects.
End Point
The endpoint of the region in which the MaxCompute project resides. If the MaxCompute client is deployed on a machine that does not use the internal network of Alibaba Cloud, such as your on-premises machine, you must use the public endpoint to connect to the MaxCompute project.
Click OK. The Project Explorer page shows information about the MaxCompute project, including the tables, views, user-defined functions (UDFs), and resources.
Step 3: Modify the connection to a MaxCompute project
On the Project Explorer page, right-click the desired MaxCompute project and select Modify project properties.
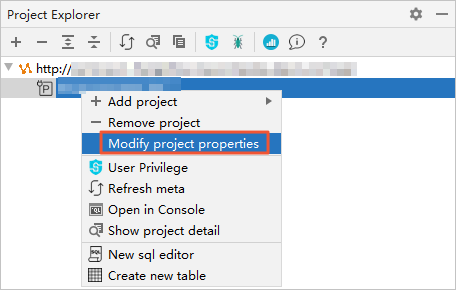
In the Modify MaxCompute project dialog box, modify the configurations of the MaxCompute project.
What to do next
After the MaxCompute project is connected, you can perform the following operations:
Manage and view the data and resources of the project. For more information, see Manage project data.
Develop SQL scripts in MaxCompute Studio. For more information, see Develop SQL programs.
Develop Java programs in MaxCompute Studio. For more information, see Develop Java programs.
Develop Python programs in MaxCompute Studio. For more information, see Develop a Python program.
FAQ
After you configure the parameters on the Connection tab and click OK, the following common errors may be reported:
Error message:
Test connection fail: ODPS-0420111: Project not found - '<project_name>'.orTest connection fail:ODPS-0130013:Authorization exception-Authorization Failed [4002], You don't exist in project <project_name>. Context ID:<context ID>. --->Tips: Pricipal:ALIYUN$<account_name> | RAM$[<account_name>:]<RAM user name>;Possible causes
The MaxCompute project to which you want to connect does not exist or the name of the MaxCompute project is invalid.
The Alibaba Cloud account or RAM user whose AccessKey pair is used is not added to the MaxCompute project.
Solution
Log on to the MaxCompute console. In the top navigation bar, select a region. In the left-side navigation pane, choose Workspace > Projects. On the Projects page, obtain the name of the MaxCompute project. Then, change the value of the Project Name parameter.
If the project owner wants another user to connect to the MaxCompute project for collaborative data development, the project owner must add the user to the project. For more information, see Add an Alibaba Cloud account (project-level) or Add a RAM user (project-level).
Error message:
Test connection fail: connect timed out, the possible reason is that the endpoint '<endpoint>' is wrong, please check your endpointPossible cause: The value of the End Point parameter is invalid. For example, you want to use MaxCompute Studio on your computer to connect to a MaxCompute project over the Internet, but you enter the endpoint of the cloud product interconnection network of Alibaba Cloud.
Solution: Set this parameter to the endpoint that matches the region and network environment of the project to which you want to connect. You can obtain the endpoint from Endpoints.
Error message:
Test connection fail: The specified project or table name is not valid or missing.Possible cause: The value of the End Point parameter that you configure is the endpoint of MaxCompute Tunnel, which is used to access MaxCompute Tunnel rather than MaxCompute.
Solution: Set this parameter to the endpoint that matches the region and network environment of the project to which you want to connect rather than the endpoint of MaxCompute Tunnel. You can obtain the endpoint from Endpoints.