DISCLAIMER
Please note that all content presented on this page is provided by Tuya (HK) Limited. Alibaba Cloud makes no representations and warranties, explicit or implied, as to the authenticity or accuracy of any such content, nor makes any guarantee to the condition, quality, durability, performance, reliability, merchantability or fitness for a particular purpose, or non-infringement of any products and/or services made available by Tuya (HK) Limited.
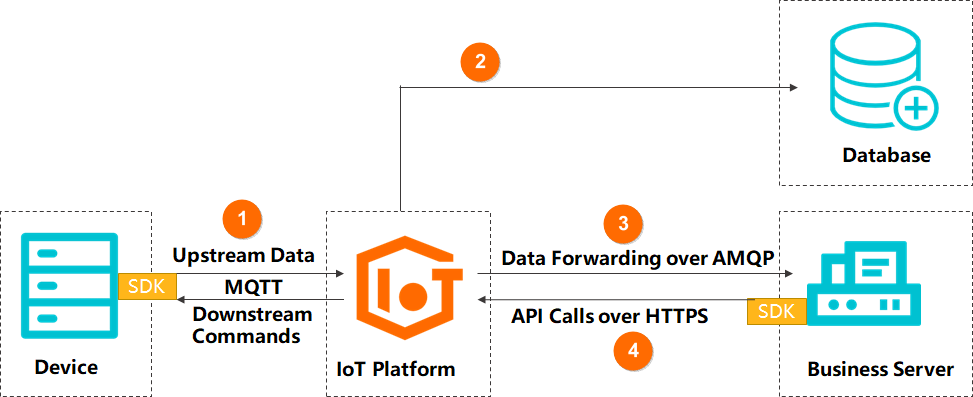
Devices that use the MQTT protocol to access the IoT platform communicate with the platform by publishing messages to and subscribing to topics. Topics are divided into system topics, object model topics, and custom topics, of which custom topics need to be defined by users in the console. This article introduces how devices use custom topics to communicate with the IoT platform for uplink and downlink messages, as well as the communication steps between the IoT platform and the business server.
Reminder: Most functions of Tuya IoT Platform Alibaba Cloud Edition are compatible with the current Alibaba Cloud IoT platform device access and northbound API functions. In order to be compatible with Tuya IoT device ecosystem and Alibaba Cloud IoT device ecosystem, some nouns have been changed, which will not affect the use. The business code can be directly replaced, that is, ProductID=ProductKey, HardwareID=DeviceName.
Wi-Fi Smart Socket Case
In this example, a Wi-Fi smart socket product is used as an example. The device uses the MQTT protocol to access the IoT platform, receives instructions issued by the IoT platform by subscribing to a custom topic, and reports current, voltage, and power data by publishing messages to the custom topic. The IoT platform forwards the received data to the user's business server through AMQP or Kafka. The business server calls the northbound API provided by the IoT platform to publish messages to the custom topic. The device receives instructions through the subscribed topic to control the smart socket.
Tuya IoT platform is ready for use and provides MQTT access protocol.
The device-side and server-side business procedures are managed by the company's own R&D team.
Console operation steps
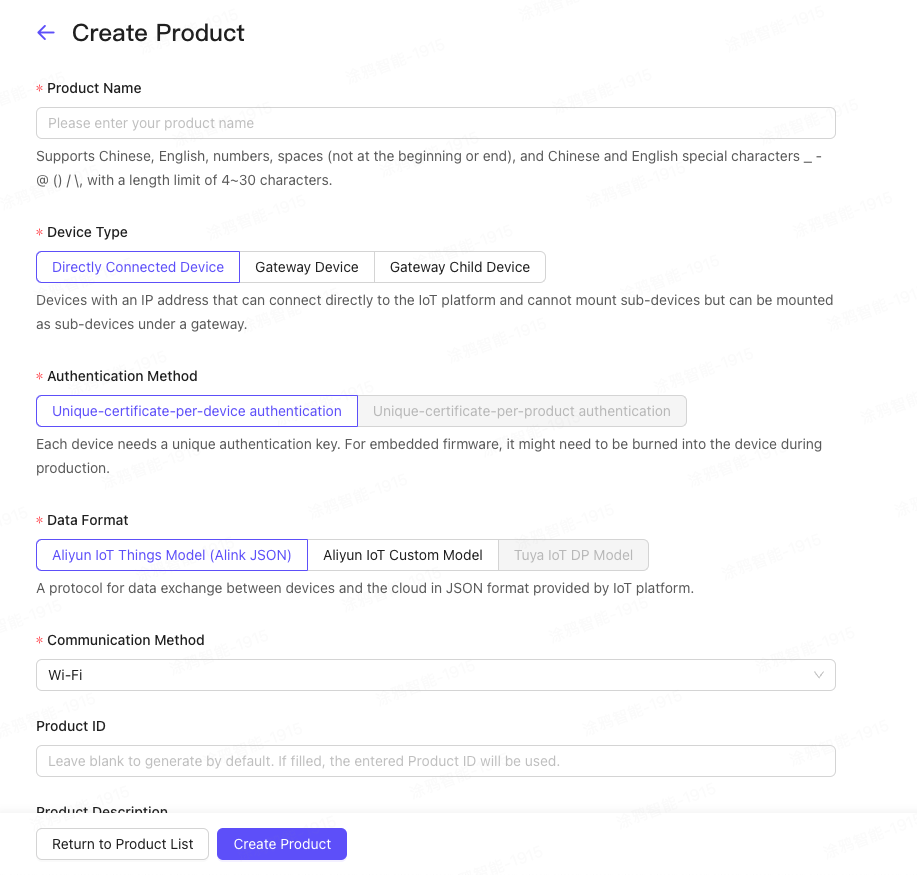
1. Create a product
In the left navigation bar, select Product Development to enter the product list page, click the Create Product button in the upper right corner to enter the Create Product page, enter the product information, and generate a unique product ID, namely ProductID, hereinafter referred to as PID.
Illustrate:
Product ID is the ProductKey in Alibaba Cloud IoT platform. The original business code can be directly used instead.

Enter the product name, select Directly connected device, One device and one password, Alibaba Cloud IoT customization, click the Create Product button below to create the product and generate a unique product ID, i.e. ProductID.
2. Custom product topics
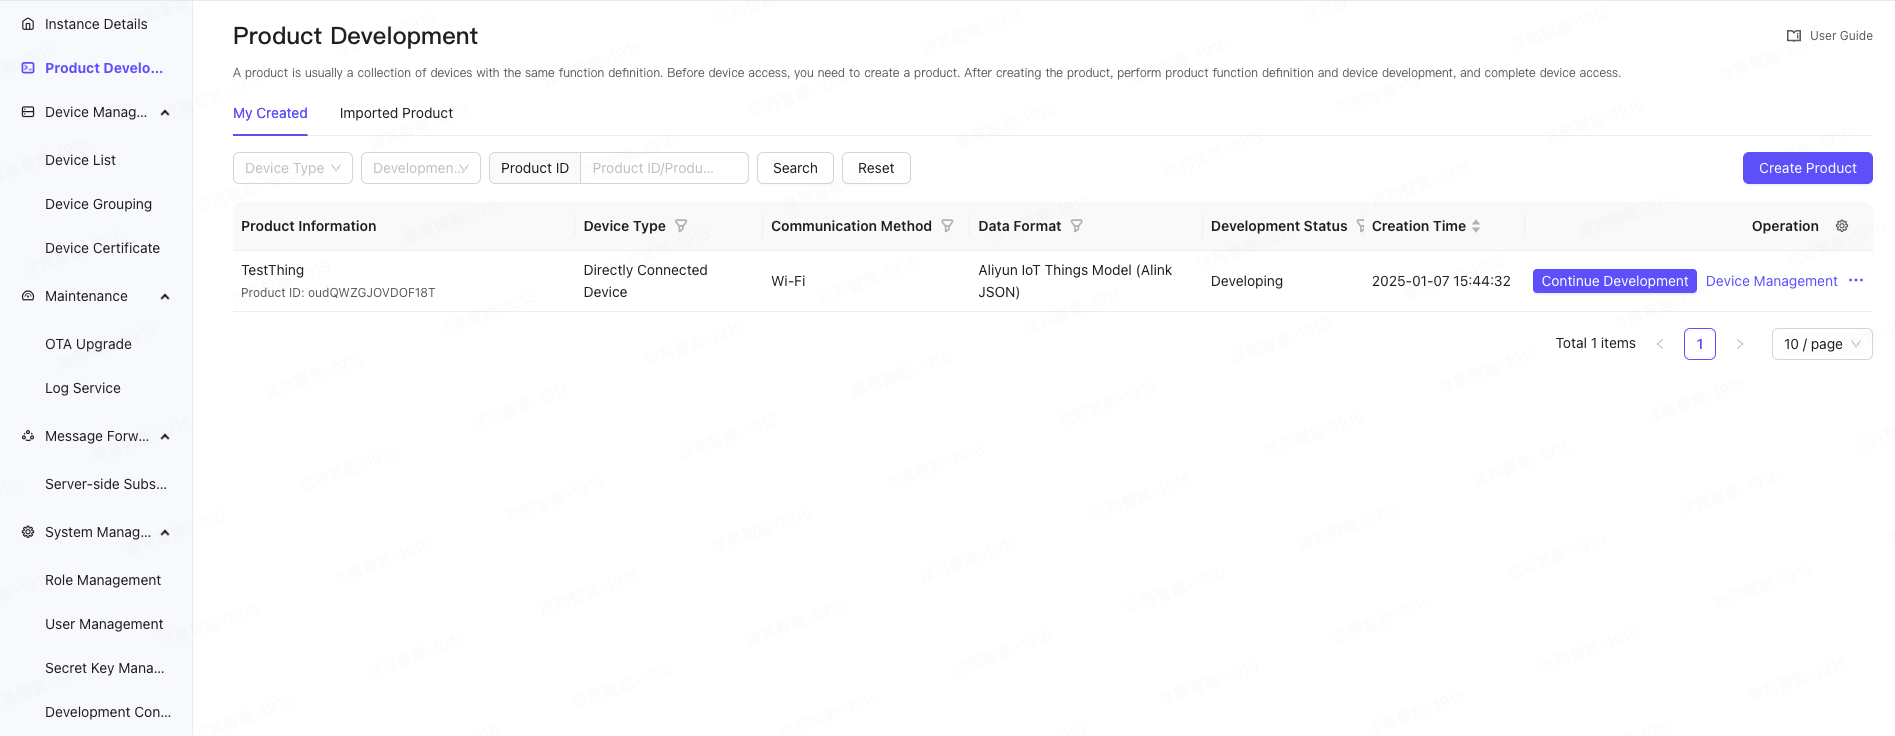
In the left navigation bar, select Product Development, enter the product list page, select the corresponding product, click the Continue Development button on the right, and enter the product details.
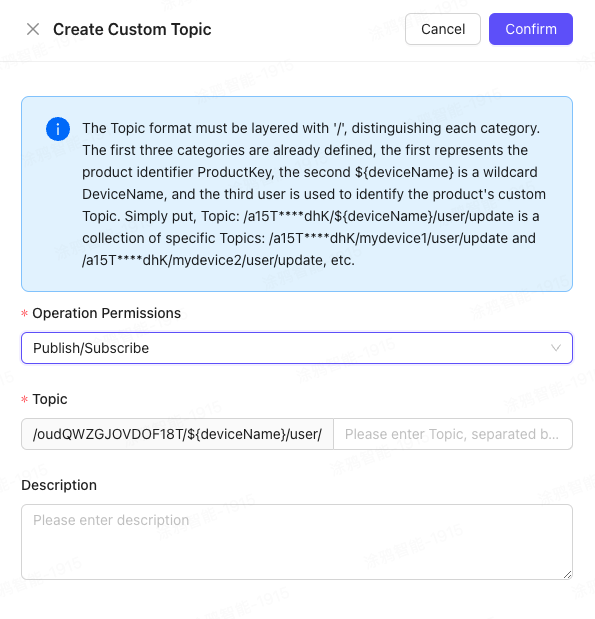
On the Topic Management tab of the product details, click Custom Topic and click the Add Custom Topic button to add a Topic.
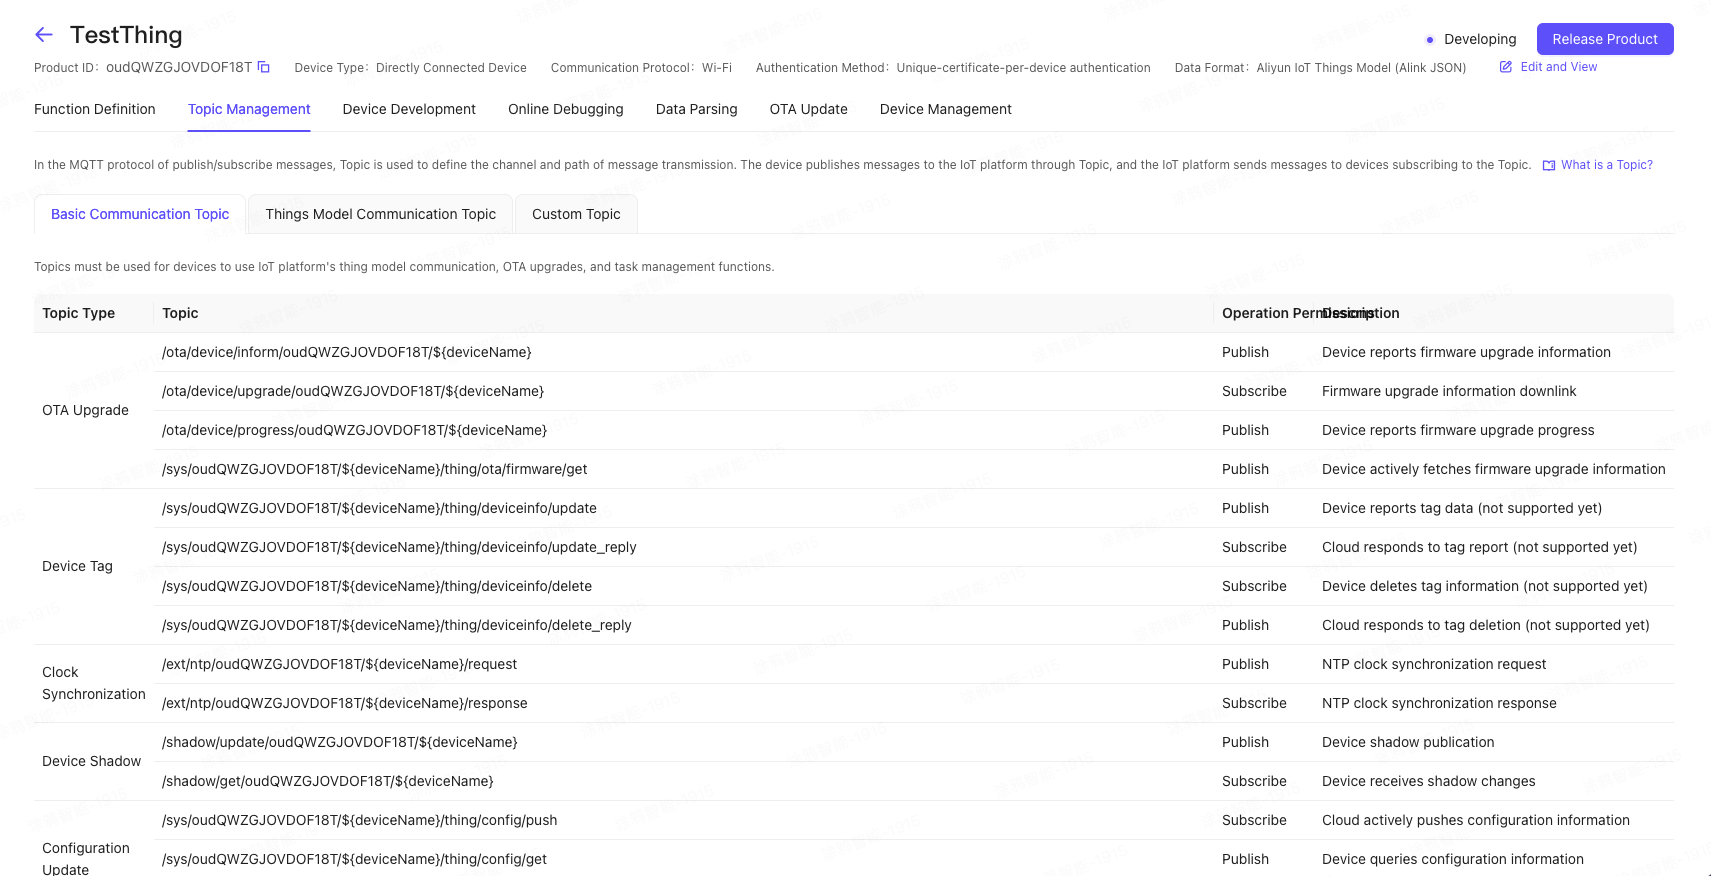
In this example, the following two Topic classes are defined:
Device publish message Topic: /TbSCo****/${deviceName}/user/devmsg, permission is publish. Used by the device to send messages (data) to the IoT platform, the data format can be defined by the user.
Device subscription message topic:/TbSCo****/${deviceName}/user/cloudmsg, with the permission of subscription. When developing on the device side, subscribe to this topic. When the cloud sends a message downward, the message is sent to the device through this topic.
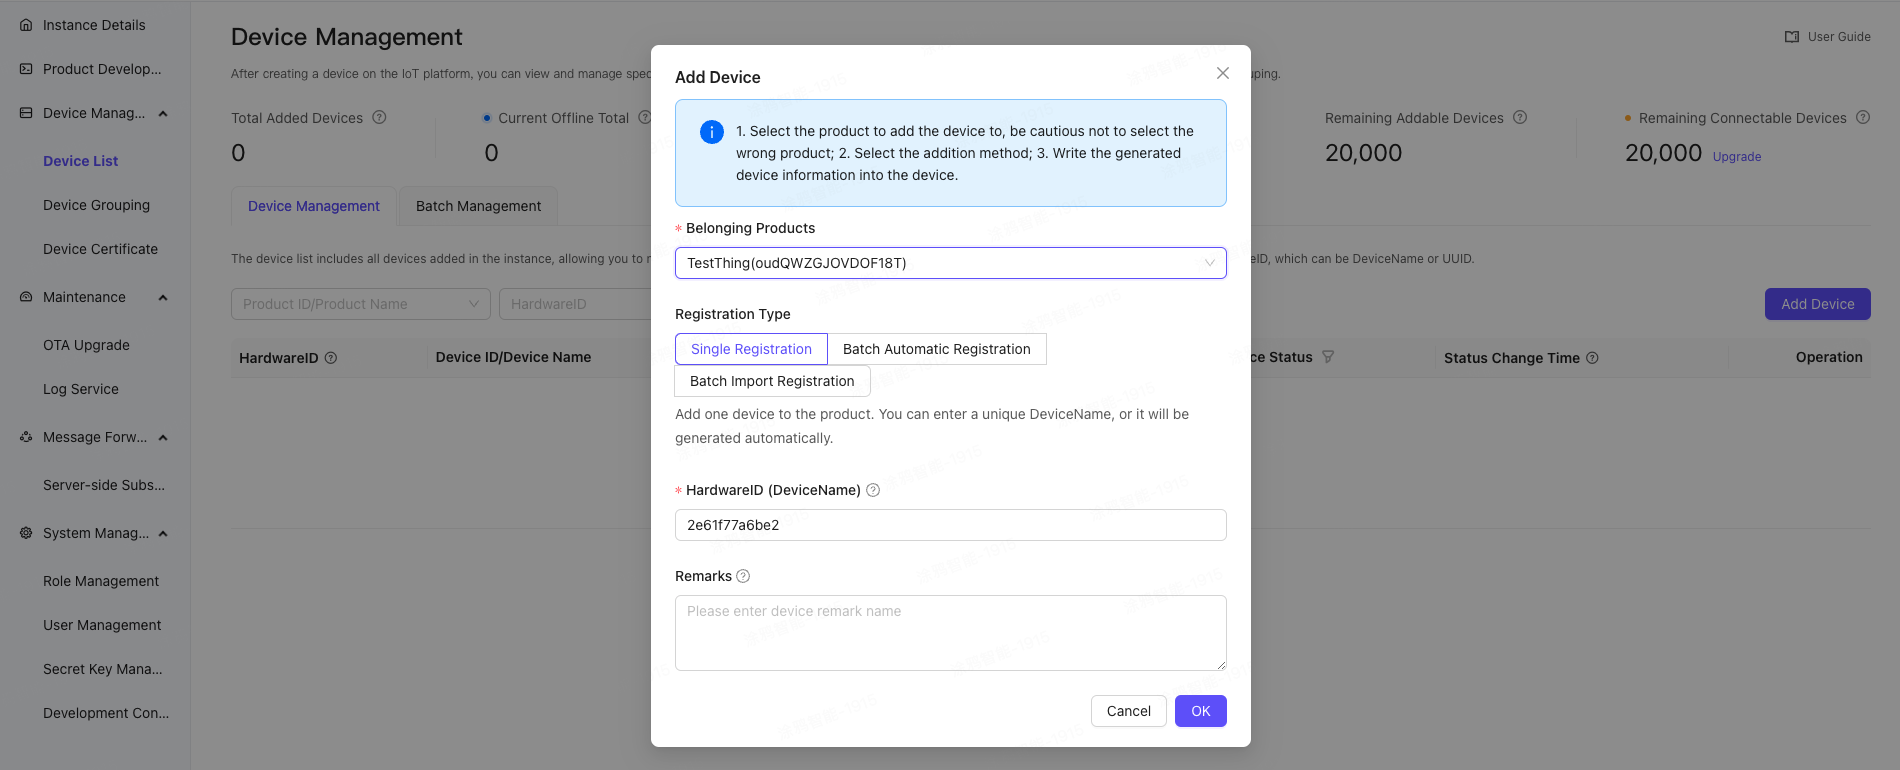
3. Add a device
In the left navigation bar, click Device Management > Device List to enter the Device Management page, and click the Add Device button in the upper right corner.
Select the corresponding product and enter the unique hardware ID (HardwareID) of the device.
HardwareID is the DeviceName in the Alibaba Cloud IoT platform. The original business code can be directly replaced.
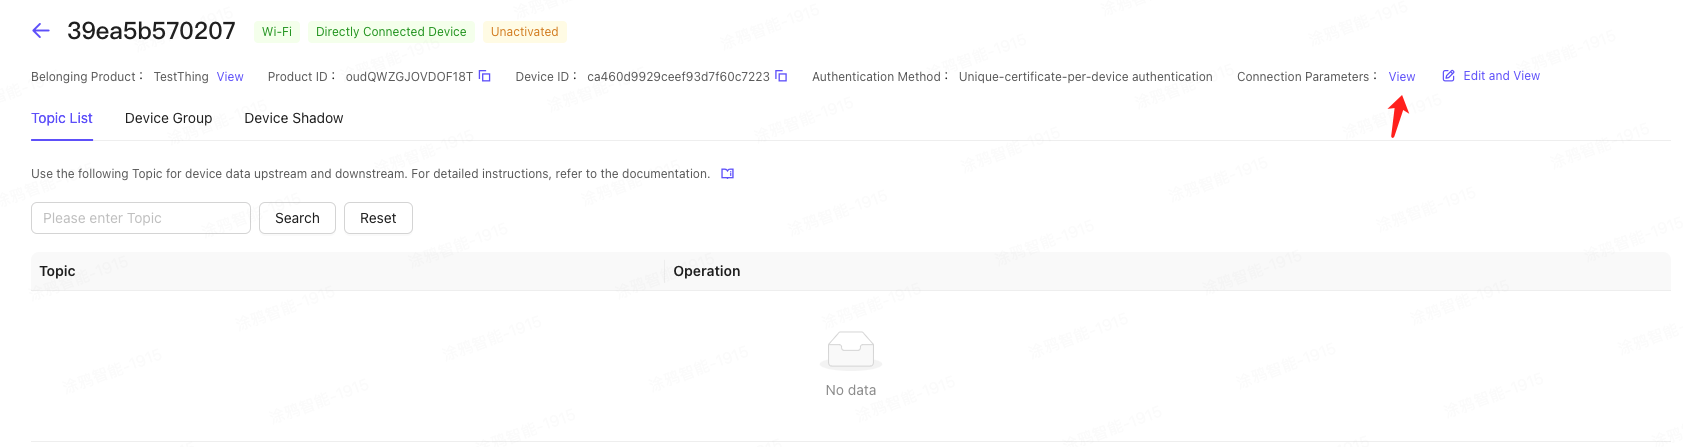
4. Get the device MQTT connection parameters
In the left navigation bar, click Device Management > Device List to enter the device management page. Select the corresponding device and click View to enter the device details.
On the device details page, click Connection Parameters in the upper right corner to view the MQTT connection parameters.
5. Configure server subscription (optional)
If you need to monitor the data reported by the device, the device online status, etc. on your own server, You need to create a vpc peer connection and create a server subscription
Use Postman to simulate a device
1. Introduction to Postman
Postman is a powerful interface testing tool that is familiar to every developer. It is mainly used to test HTTP requests and supports various HTTP request methods, including GET, POST, PUT, DELETE, etc. It can help developers simulate various HTTP requests initiated by users and verify whether the response results meet expectations. As the MQTT protocol is gradually used in various applications, Postman now also supports debugging the MQTT protocol.
Postman download address: https://www.postman.com/downloads/
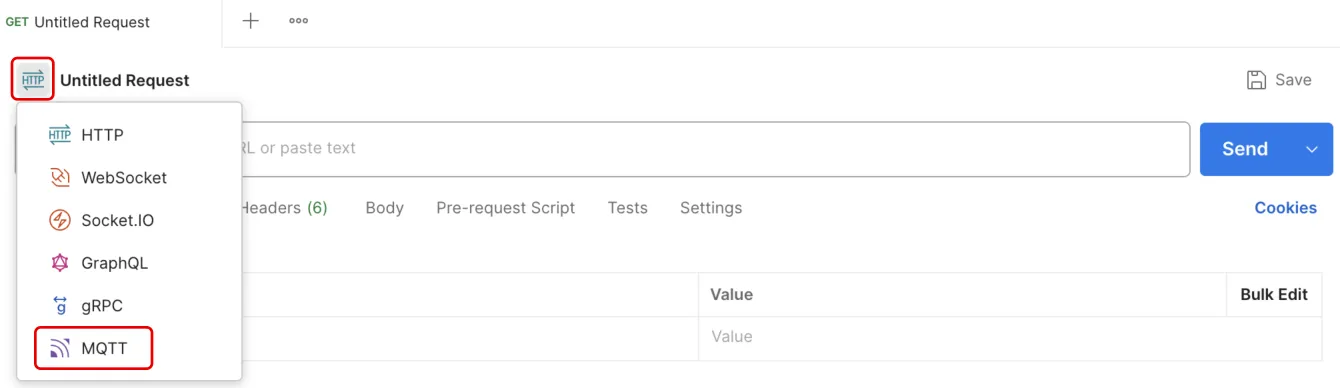
2. Postman MQTT configuration
Postman is mainly used for testing HTTP protocol interfaces. It now also supports debugging of WebSocket, Socket.io, GraphQL, gPRC, and MQTT protocols. When Postman is opened, the default is usually the HTTP protocol debugging page. Click the "protocol icon" in the upper left corner to switch to the MQTT protocol debugging page.
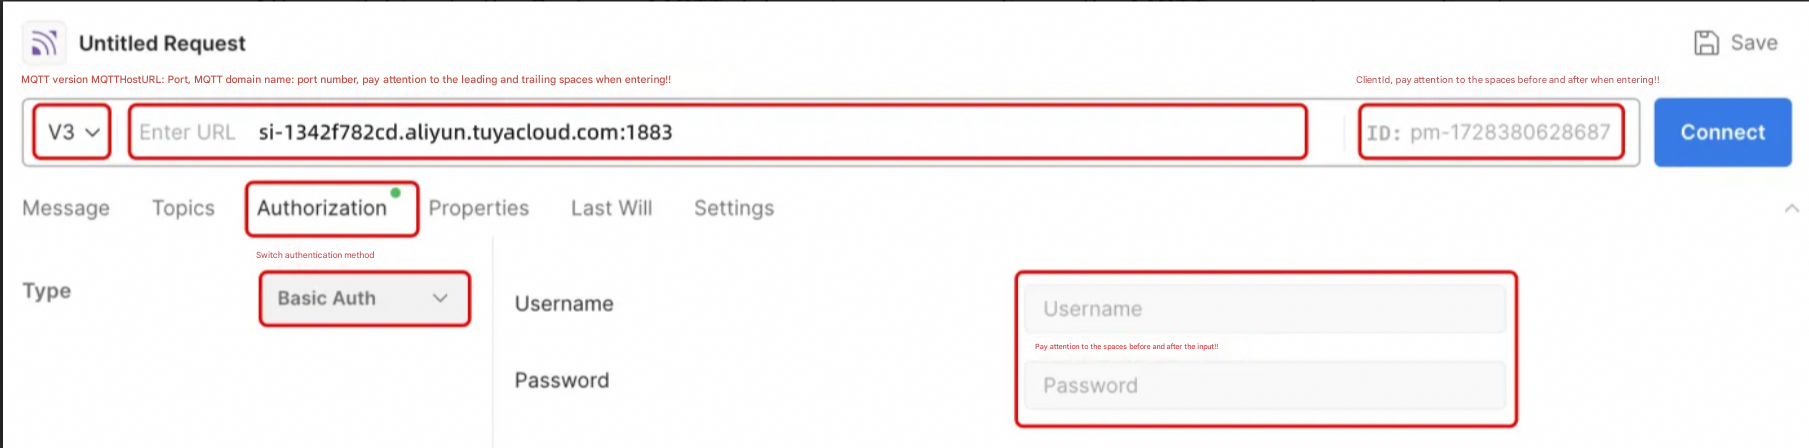
After switching to the Postman MQTT debugging page, configure the MQTT parameters according to the following figure to simulate the device to be connected. Note that there should be no spaces before and after.
3. Simulate device online
According to the introduction of Postman MQTT configuration in the previous step,fill in the obtained MQTT connection parameters into the input box as required and click Connect.
Notice: There should not be extra spaces before and after the parameters. The colon should be in English. If the connection fails, it is mostly due to the spaces before and after the parameters!
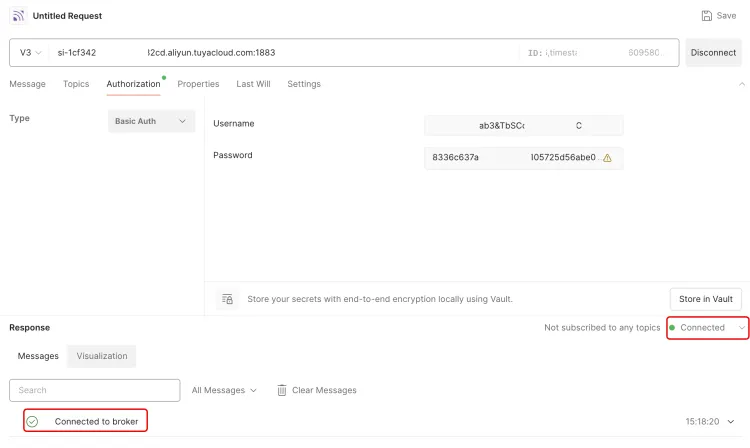
If Connected is displayed as shown in the figure, it means that a device has been simulated using Postman and connected to the IoT platform using the MQTT protocol. Refresh the device details page to see that the device is online and the online time is displayed.

At this point, it means that the device has been connected to the IoT platform using the MQTT protocol and has been successfully launched.
4. Simulate the device to send data to the platform
4.1. Defines the protocol for sending data
The Wi-Fi smart socket reports voltage and current data to the IoT platform at regular intervals. This example does not use the object model to report data, but uses a custom data protocol format to report data. The custom protocol format is as follows:
parameter | Parameter Unit | Number of bytes | Parameter Examples | Parameter Notes |
Voltage | mV | 3byte | 05 CC 60 | Hexadecimal, converted to decimal is 380000 |
Current | mA | 3byte | 02 49 F0 | Hexadecimal, converted to decimal is 150000 |
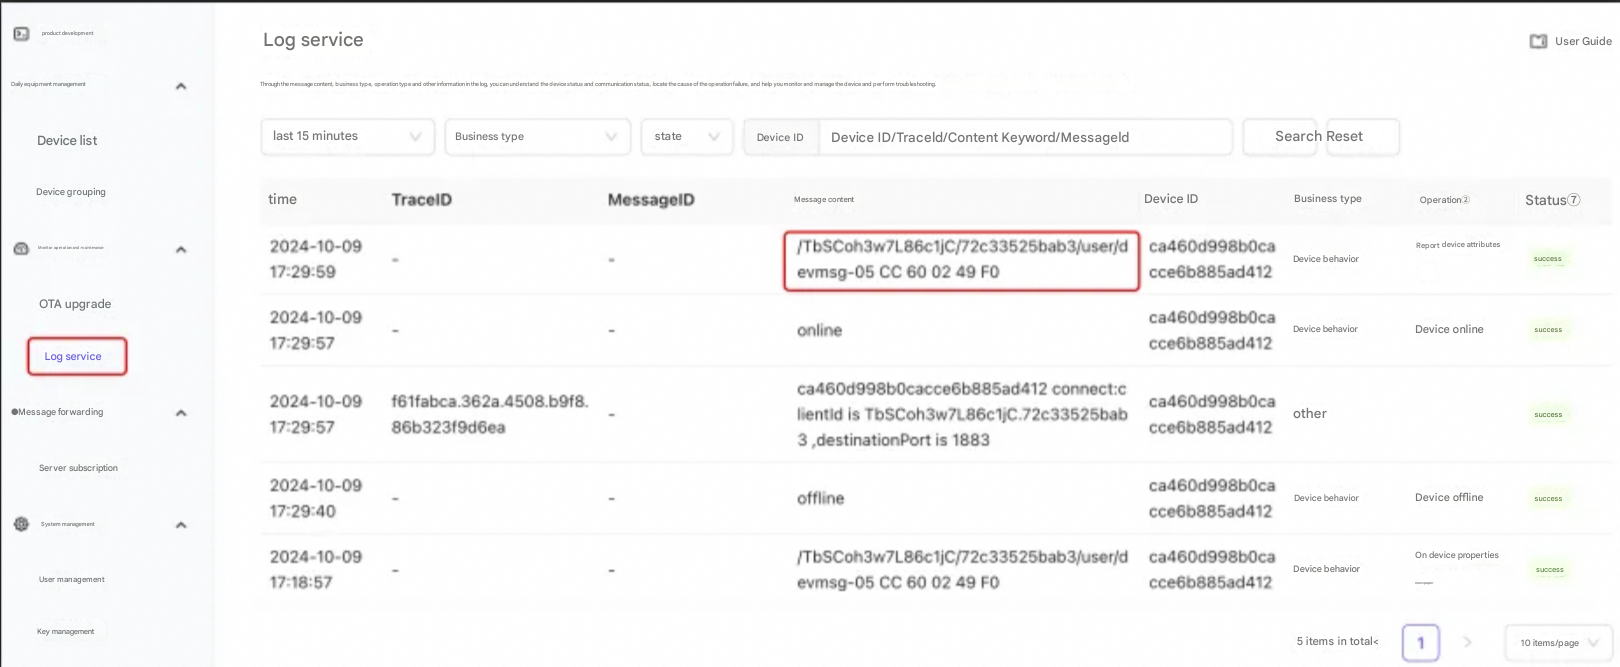
Example: Reporting data 05 CC 60 02 49 F0, the first 3 bytes converted to decimal represent 380000mV, that is, 380V; the last three bytes converted to decimal represent 150000mA, that is, 150A;
4.2. Determine the topic that the device publishes
Send data 05 CC 60 02 49 F0 to the IoT platform through the custom topic /${ProductID}/${HardwareID}/user/devmsg in the custom product topic.
Note: You need to replace ${ProductID} and ${HardwareID} in the Topic with your own ProductID and HardwareID , for example: /TbSCoh3w***86c1jC/72c3****bab3/user/devmsg does not require ${}
4.3. Postman simulates sending data
Prerequisites: According to the configuration in the simulated device online, first put the device online;
Switch to the Message tab of Postman, enter the message to be sent and the Topic to be sent, and click the Send button;
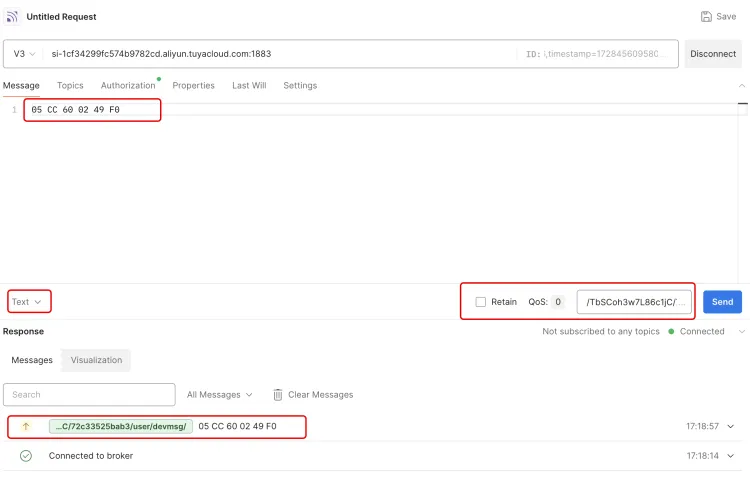
In the left navigation bar, select Log Service and refresh the page. If you can see the data just sent, it means that the data has been reported successfully.
After the device is reported to the IoT platform, developers can continue to use message forwarding > server subscription to forward the data sent to the platform to the developer's business server using Kafka or AMQP to process or use the data.
5. The platform sends instructions to the simulated device
5.1. Define the platform's instruction protocol
The Wi-Fi smart socket needs to control the socket switch according to the platform instructions and query the voltage and current parameters according to the instructions. This example does not use the object model to report data, but uses a custom data protocol format to report data. The custom protocol format is as follows:
Instruction (1 byte) | Command parameter (1 byte) | Parameter Notes |
01 | 00 or 01 | 00 means off, 01 means on |
02 | 00 or 01 or 02 | 00 to query voltage and current, 01 to query voltage, 02 to query current |
Example:
Command 01 01, the first byte 01 indicates the function command to control the switch, and the second byte 01 indicates the parameter is on; that is, 01 01 means turning on the socket switch.
Command 02 00, the first byte 02 indicates the function command to query the parameter, and the second byte 00 indicates the query of voltage and current; that is, 02 00 indicates the query of the voltage and current parameters of the current socket. After receiving the command, the device sends the voltage and current parameters through the Topic
5.2. Determine the topic you need to subscribe to
Subscribe to the topic /${ProductID}/${HardwareID}/user/cloudmsg defined in the custom product topic to receive control instructions sent by the platform to the device.
Note: You need to replace ${ProductID} and ${HardwareID} in the Topic with your own ProductID and HardwareID , for example: /TbSCoh3w***86c1jC/72c3****bab3/user/cloudmsg does not require ${}
5.3. Simulate device subscription topic
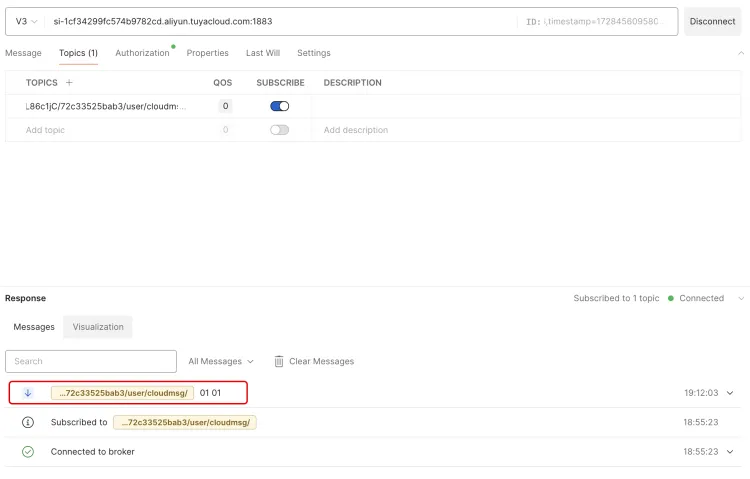
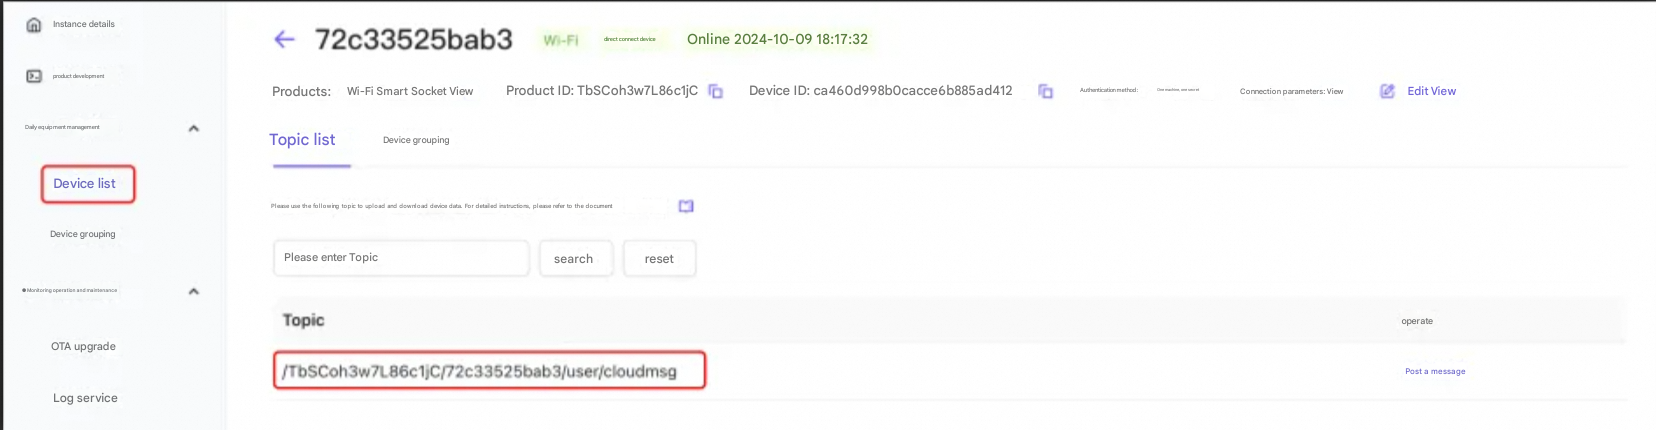
Switch to the Topics tab of Postman, enter the Topic you want to subscribe to, click the SUBSCRIBE switch on the right to start subscribing. If Subscibed appears below, it means that the subscription is successful. You can check it in the Topic list of platform device details.

In the left navigation bar, click Device List to find the corresponding device. Under the Device Details Topic List tab, if the Topic you just subscribed to appears, it means that the Topic subscription is successful. You can send instructions to the device through the Topic.
5.4. The platform sends instructions to the simulated device
After the device successfully subscribes to the Topic, you can find the corresponding Topic under the Topic List tab of the device details, click Publish Message, and enter the command to be sent in the pop-up dialog box: 01 01, which means turning on the smart socket.
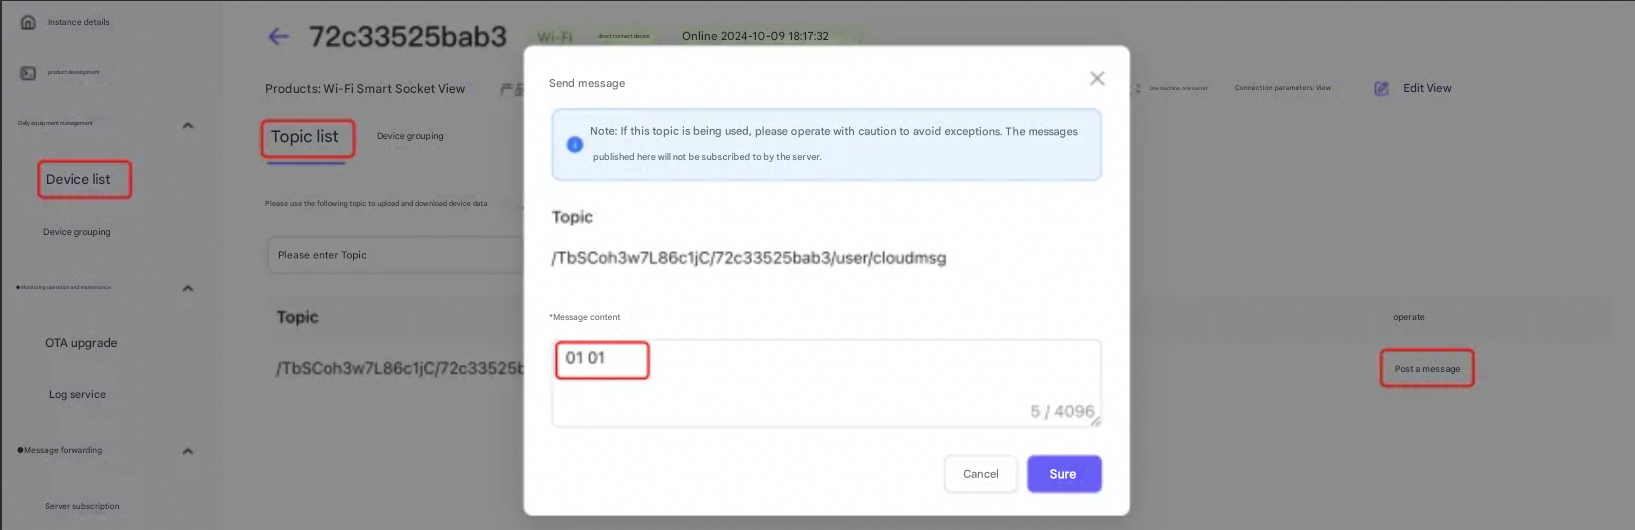
On the Postman page, you can see the sent command message 01 01, indicating that the control command was sent successfully. If it is a real device, you can parse the corresponding command and execute the corresponding logic.