This topic describes how to create a Logtail configuration to collect MySQL query results.
Prerequisites
Logtail V0.16.0 or later is installed on a Linux server, or Logtail V1.0.0.8 or later is installed on a Windows server. For more information, see Install, run, upgrade, and uninstall Logtail.
ImportantEnsure that the server on which Logtail is installed can connect to the MySQL database.
The IP address of the server on which Logtail is installed is added to a whitelist of the MySQL database from which you want to collect MySQL query results.
For example, to configure a whitelist for an ApsaraDB RDS for MySQL instance, see Configure an IP address whitelist.
To collect MySQL query results using CRD-AliyunPipelineConfig, ensure that the Logtail component is installed in the cluster.
For more information, see Install the Logtail component.
Procedure
Simple Log Service console
Log on to the Simple Log Service console.
On the right side of the page that appears, click the Quick Data Import card.
On the Data Import page, select MySQL Query Result - Plug-in.
Select the project and logstore. Then, click Next.
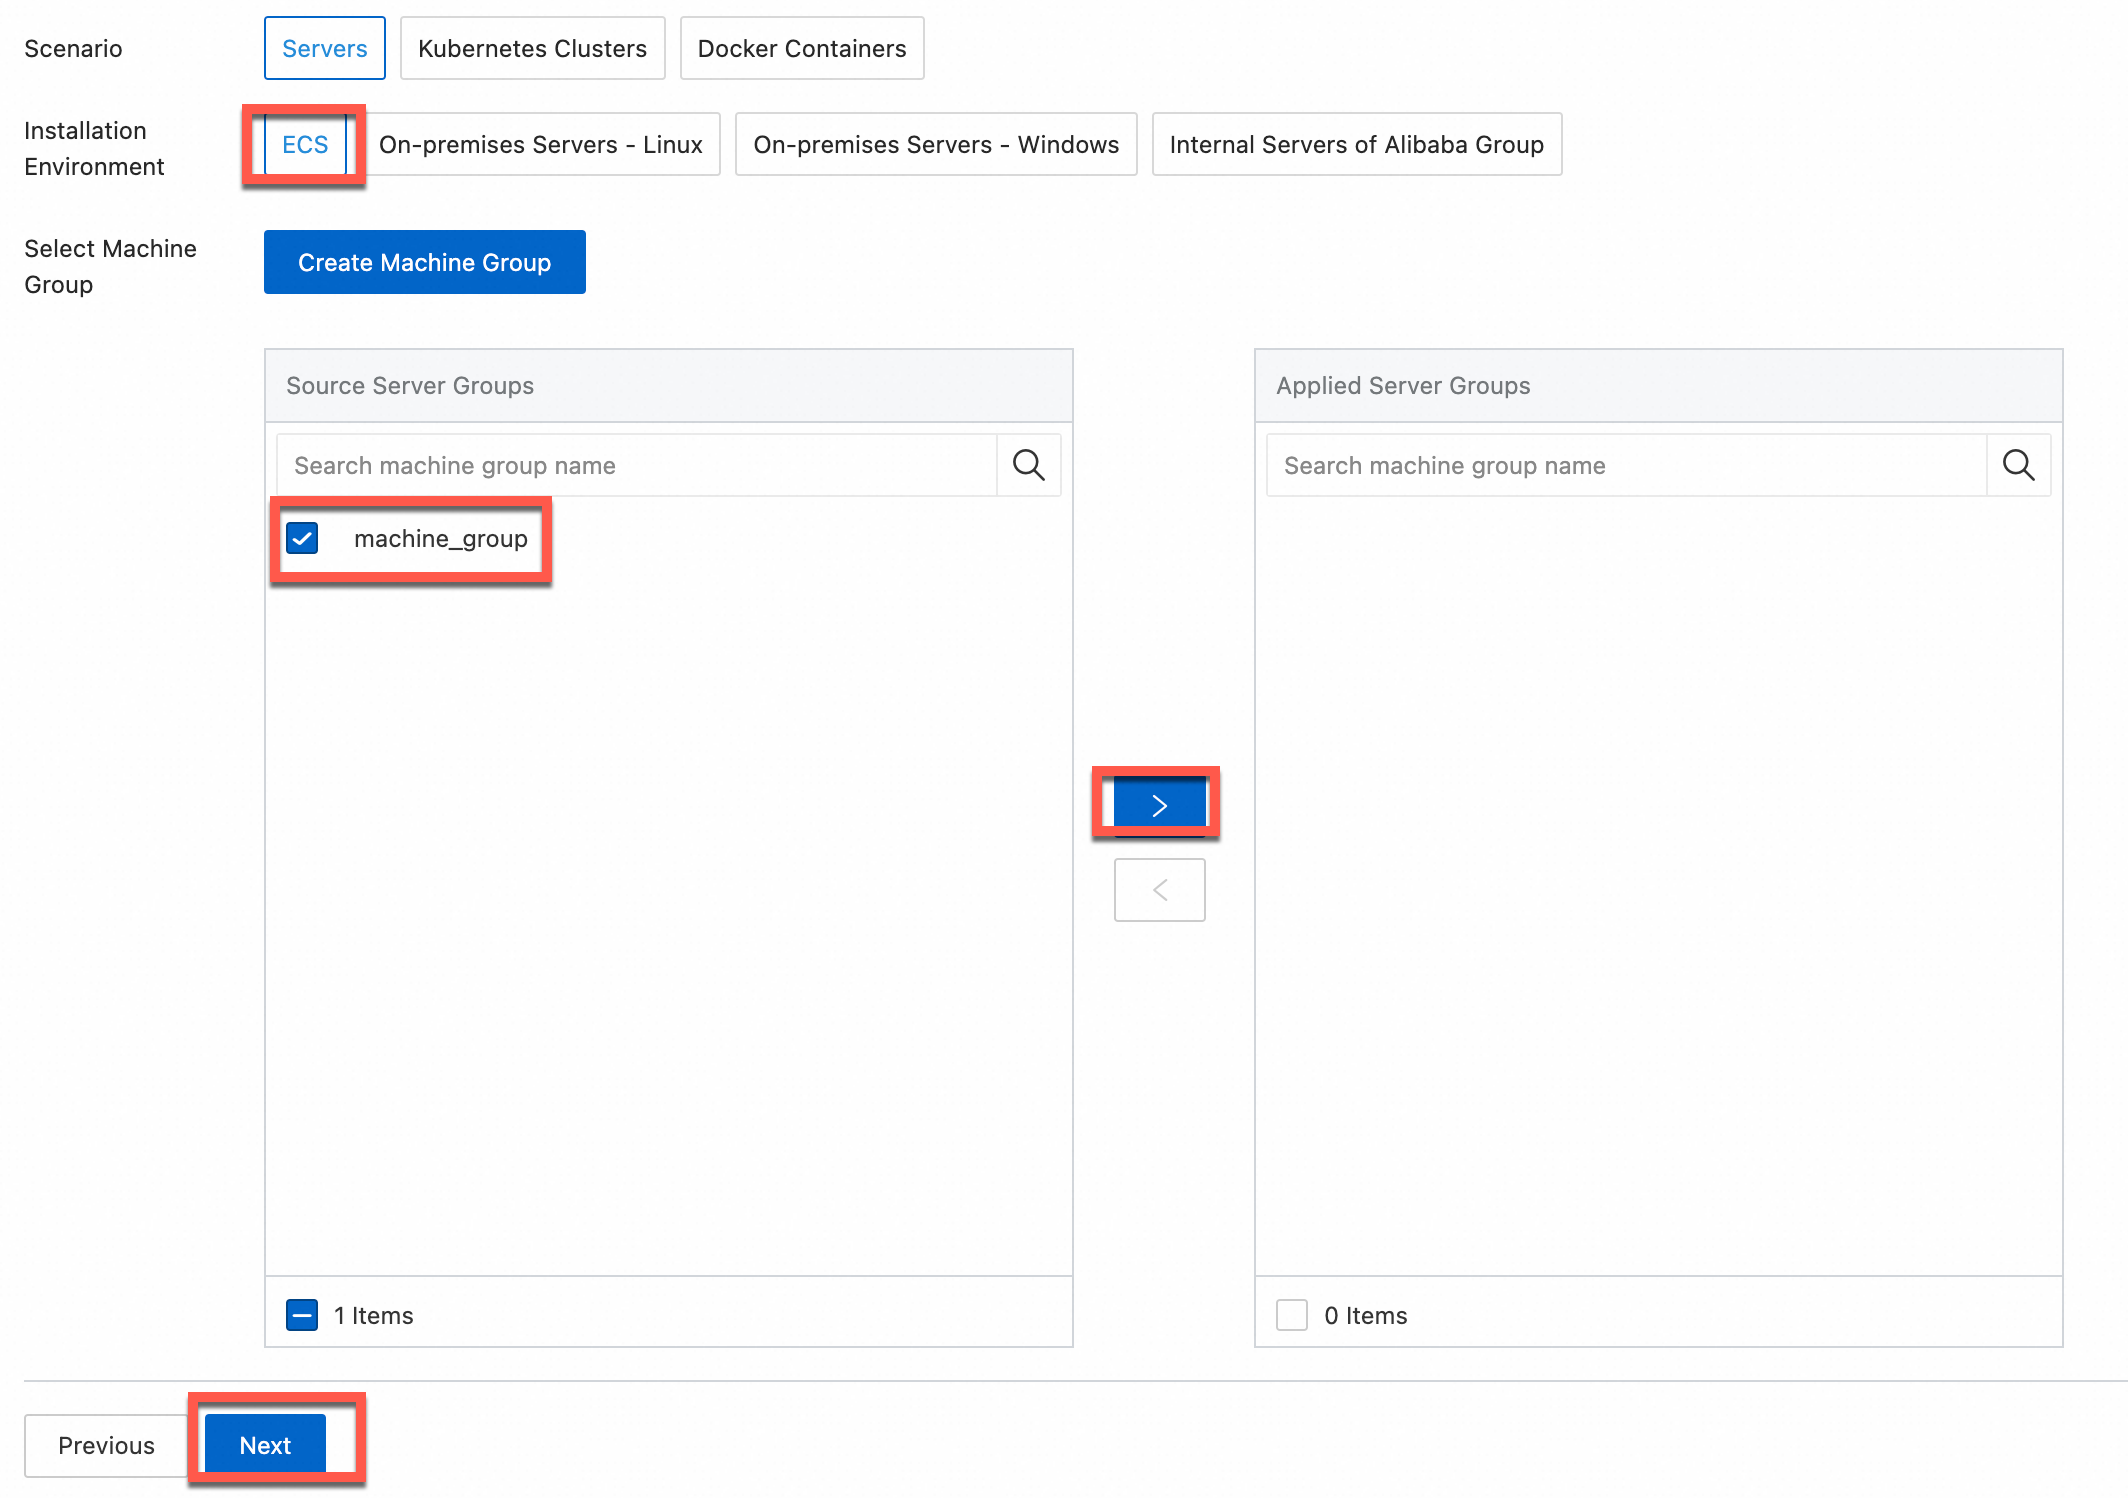
In the Machine Group Configurations step, configure a machine group.
Configure the Scenario and Installation Environment parameters as needed.
ImportantYou must configure the Scenario and Installation Environment parameters regardless of whether a machine group is available. The parameter settings affect subsequent configurations.
Ensure that a machine group is displayed in the Applied Server Groups section, and click Next.
Machine group available
Select a machine group from the Source Machine Group section.
No machine group available
Click Create Machine Group. In the Create Machine Group panel, configure the parameters. You can set the Machine Group Identifier parameter to IP Address or Custom Identifier. For more information, see Create a custom identifier-based machine group or Create an IP address-based machine group.
ImportantIf you apply a machine group immediately after you create the machine group, the heartbeat status of the machine group may be FAIL. This issue occurs because the machine group is not connected to Simple Log Service. To resolve this issue, you can click Automatic Retry. If the issue persists, see What do I do if no heartbeat connections are detected on Logtail?
In the Configure Data Source step, configure the Configuration Name and Plug-in Configuration parameters. Then, click Next.
You can configure the data source using the form or the editor (JSON configurations). For more information, see Extended input configuration: MySQL input plug-in.

Create indexes and preview data, and then click Next. By default, full-text indexing is enabled in Simple Log Service. You can also manually create field indexes for the collected logs or click Automatic Index Generation. Then, Simple Log Service generates field indexes. For more information, see Create indexes.
ImportantTo query all fields in logs, we recommend that you use full-text indexes. To query only specific fields, we recommend that you use field indexes. This helps reduce index traffic. To analyze fields, create field indexes. You must include a SELECT statement in your query statement for analysis.
Click Query Log. You are redirected to the query and analysis page of your logstore.
Wait approximately 1 minute for the indexes to take effect. Then, view the collected logs on the Raw Logs tab. For more information, see Guide to log query and analysis.
CRD-AliyunPipelineConfig
This section describes how to create a collection configuration in an ACK cluster.
Log on to the ACK console. In the navigation pane on the left, click Clusters.
On the Clusters page, find the target cluster. In the Actions column, click More, and then click Manage Cluster.
Create a file named example-k8s-file.yaml.
Parameter description
Sample
apiVersion: telemetry.alibabacloud.com/v1alpha1
# Create a CR from the ClusterAliyunPipelineConfig CRD.
kind: ClusterAliyunPipelineConfig
metadata:
  # The name of the resource. The name must be unique in the current Kubernetes cluster. The name is the same as the name of the Logtail configuration that is created
  name: example-crd-mysql
spec:
  # Specify the project to which logs are collected.
  project:
    name: k8s-log-clusterid
  # Create a Logstore to store logs.
  logstores:
    - name: crd-mysql-test
  # Configure the parameters for the Logtail configuration.
  config:
    # Enter a sample log. You can leave this parameter empty.
    sample: ''
    inputs:
    - Type: service_mysql
      Address: "rm-*.mysql.rds.aliyuncs.com"
      CheckPoint: true
      CheckPointColumn: id
      CheckPointColumnType: int
      CheckPointSavePerPage: true
      CheckPointStart: "0"
      Database: ****
      IntervalMs: 1000
      Limit: true
      MaxSyncSize: 100
      PageSize: 100
      User: ****
      Password: *******
      StateMent: "select * from test where id > ? order by id"
    # Configure the output plug-in.
    flushers:
      # Use the flusher_sls plug-in to send logs to a specific Logstore.
      - Type: flusher_sls
        Logstore: crd-mysql-test
        Endpoint: cn-hangzhou.log.aliyuncs.com
        Region: cn-hangzhou
        TelemetryType: logs
Type
string(required)The type of the data source. Set the value to service_mysql.
Address
string(optional)The MySQL address, for example,
rm-****.mysql.rds.aliyuncs.com.Default value: 127.0.0.1:3306.
Address types:
Internal (virtual private cloud (VPC)): used only for internal access from instances (such as ECS and ACK instances) in the same VPC.
Public endpoint: used when your business is deployed in another VPC or on an on-premises machine and you need to access the instance over the Internet. You must manually apply for a public endpoint in advance. For more information, see Apply for or release a public endpoint.
NoteWe recommend that you use the internal read/write splitting endpoint to connect to RDS instances because connections over the Internet are prone to fluctuations.
User
string(optional)The username of the account that is used to log on to the MySQL database. Default value: root.
Password
string(optional)The password of the account that is used to log on to the MySQL database.
If you have high security requirements, we recommend that you set the username and password to
xxx. After the collection configuration is synchronized to the local server, find the corresponding configuration in the /usr/local/ilogtail/user_log_config.json file on the local server and modify the configuration. For more information, see Collect MySQL query results.ImportantIf you modify this parameter in the Simple Log Service console, the parameter setting in the Logtail configuration on the Logtail server is overwritten after the modification is synchronized to the server.
DataBase
string(optional)The MySQL database name.
DialTimeOutMs
int(optional)The timeout period for connections to the MySQL database. Unit: milliseconds. Default value: 5000.
ReadTimeOutMs
int(optional)The timeout period for reads from the MySQL database. Unit: milliseconds. Default value: 5000.
StateMent
string(optional)The SELECT statement.
If you set CheckPoint to true, the WHERE condition in the Statement must include the CheckPoint column (CheckPointColumn). You can use question marks (?) to indicate replacement characters. If you use a question mark (?) in the SELECT statement, you must also configure the CheckPointColumn parameter.
For example, if you set CheckPointColumn to id, set CheckPointStart to 0, and set StateMent to
SELECT * from ... where id > ?. Each time a query is performed, the system saves the ID of the last data record as the checkpoint. In the next query, the question mark (?) that is specified in the SELECT statement is replaced with the ID that corresponds to the saved checkpoint.Limit
boolean(optional)Specifies whether to use a LIMIT clause to paginate query results. Valid values:
true: uses a LIMIT clause.
false (default): does not use a LIMIT clause.
We recommend that you use a LIMIT clause to paginate query results. If you set Limit to true, the system automatically appends a LIMIT clause to the SELECT statement when the SQL query is performed.
PageSize
int(optional)The number of entries per page. This parameter is required if you set Limit to true.
MaxSyncSize
int(optional)The maximum number of logs that can be synchronized at a time. Default value: 0, which indicates that no limits are imposed.
CheckPoint
boolean(optional)Specifies whether to use checkpoints during data collection. Valid values:
true: uses checkpoints.
false (default): does not use checkpoints.
A checkpoint can be used as the start point of the next data collection. This way, incremental data is collected.
CheckPointColumn
string(optional)The name of the column that stores checkpoints.
This parameter is required if you set CheckPoint to true.
WarningValues in the checkpoint column must be incremental. Otherwise, some data may not be collected. The maximum value in the result of a query operation is used as the input for the next query operation.
CheckPointColumnType
string(optional)This parameter is required if you set CheckPoint to true.
The data type of the CheckPoint column. Valid values: int and time. If you set this parameter to int, the values in the checkpoint column are stored as 64-bit integers. If you set this parameter to time, the values in the checkpoint column can be of the date, time, or datetime type that is supported by MySQL.
CheckPointStart
string(optional)This parameter is required if you set CheckPoint to true.
The initial value of the checkpoint column.
CheckPointSavePerPage
boolean(optional)This parameter is required if you set CheckPoint to true.
Specifies whether to save checkpoints each time query results are paginated.
true (default): saves checkpoints each time query results are paginated.
false: saves checkpoints each time query results are synchronized.
IntervalMs
int(required)The synchronization interval. Unit: milliseconds. Default value: 60000.
Run
kubectl apply -f example-k8s-file.yaml. Logtail starts to collect MySQL data.Log on to the Simple Log Service console. In the Projects section, click the one you want.
Click the
 icon on the right side of the corresponding logstore, and select Search & Analysis to view the query logs.