Implement screen sharing on iOS
Implement screen sharing on iOS to let users share their screen content in real time during video calls or live streams.
Feature overview
Screen sharing lets users broadcast their screen content to other users in a channel during a video call or live stream, enabling real-time visual collaboration.
How it works
iOS does not support screen capture in the main app process. To implement screen sharing, you must add a Broadcast Upload Extension that works with your main app to publish the captured video. When a user starts a screen recording, the system creates this extension. The extension uses Apple's ReplayKit framework to capture the screen and passes the captured stream to your main app for publishing.
Due to Apple's privacy settings, data cannot be shared between different apps or processes. To enable this communication, you must use an App Group and configure the same App Group ID for both your main app and the Broadcast Upload Extension.

Sample project
ARTC provides an open-source sample project for your reference: Implement screen sharing on iOS.
Prerequisites
Make sure you meet the following requirements before you implement screen sharing:
-
Have a valid Alibaba Cloud account and create an ARTC application. For more information, see Create an application. Obtain an App ID and an App Key from the ApsaraVideo Live console.
-
You have integrated the ARTC SDK into your project and implemented basic ARTC features. For more information about SDK integration, see Download and integrate the SDK. For details on implementation, see Implement an audio and video call.
-
Due to system limitations, screen sharing is supported only on iOS 12.0 and later. Make sure your application runs on a compatible device.
Usage notes
-
This feature is resource-intensive. We recommend using an iPhone X or a later model.
-
When a user starts screen sharing on an iOS device, the audio route automatically switches to the earpiece due to system limitations.
Configure your project
(Optional) Create an App Group
Screen sharing might work without a configured App Group in some scenarios, but this approach is unstable. The extension process can fail to access shared data or behave unpredictably.
For reliable data synchronization between your main app and the Broadcast Upload Extension, always use a valid App Group ID registered in the Apple Developer Portal.
To register an App Group, see Registering an App Group.
Create a Broadcast Upload Extension
-
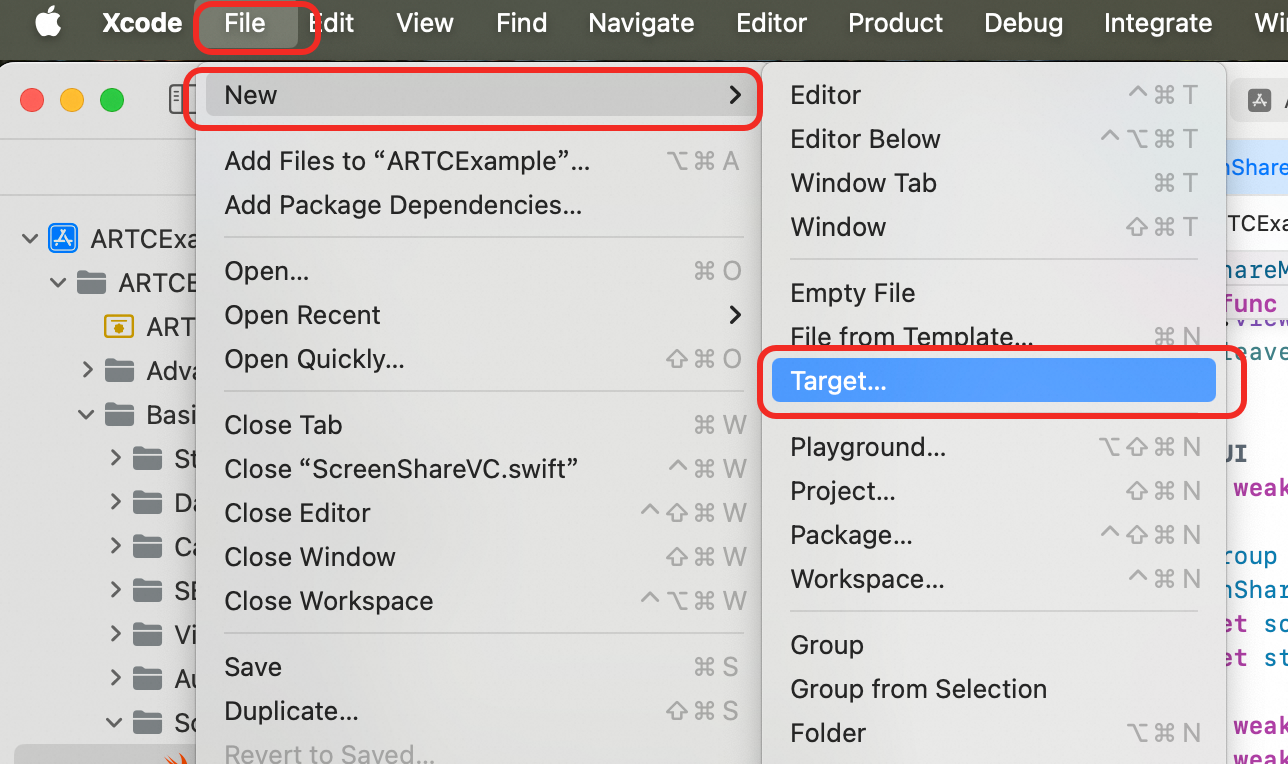
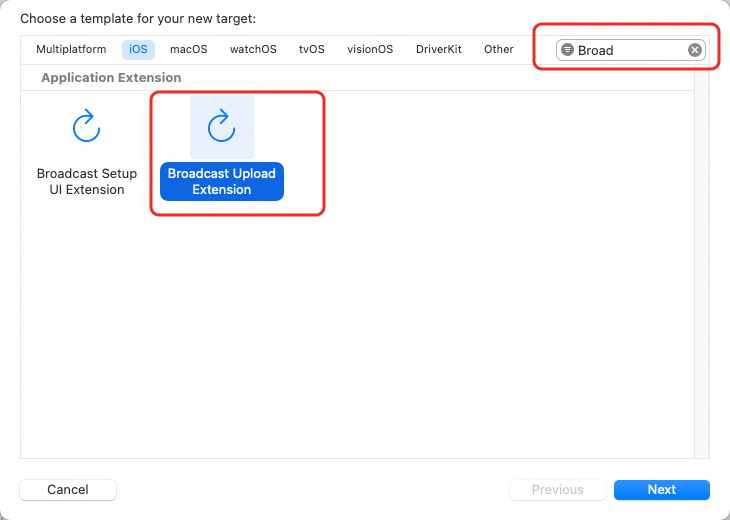
Open your project in Xcode. Go to File > New > Target.... In the window that appears, select the iOS platform, choose Broadcast Upload Extension, and then click Next.
-
In the dialog that appears, configure settings such as the Product Name, select Objective-C as the language, and deselect the Include UI Extension checkbox. Then, click Finish. Xcode automatically creates a folder for the extension containing files such as SampleHandler.
-
Integrate the AliScreenShare.framework:
Automatic integration
-
Open Terminal and install the CocoaPods tool on your Mac. If it is already installed, skip this step.
sudo gem install cocoapods-
Open Terminal, navigate to your project's root directory, and run the following command to create a Podfile.
pod init-
Open and edit the generated Podfile to add the AliScreenShare dependency for the
ScreenShareExtensionBroadcast Upload Extension you created earlier.
# Uncomment the next line to define a global platform for your project platform :ios, '11.0' target 'ARTCExample' do # Pods for ARTCExample pod 'AliVCSDK_ARTC', '~> 7.5.0' end # Add the AliScreenShare library dependency for the ScreenShareExtension broadcast upload extension target 'ScreenShareExtension' do # Pods for ScreenShareExtension pod "AliScreenShare", '7.5.0' end-
In the Terminal window, run the following command to update the CocoaPods dependencies in your project.
pod installAfter the command runs successfully, an .xcworkspace file is generated in your project folder. Double-click this file to open the project in Xcode, which automatically loads the workspace and integrates the CocoaPods dependencies.
Manual integration
Click Download SDK and copy the downloaded AliScreenShare.framework file to your project directory. In the extension target you created, go to General > Frameworks and Libraries, click the plus icon (+), then click Add Files and select the AliScreenShare.framework to import it.
Also add the ReplayKit.framework. Set the embed option for AliScreenShare.framework to Embed & Sign and for ReplayKit.framework to Do Not Embed.
-
-
Configure the same App Group for both your main project Target and the Extension Target. The Broadcast Upload Extension and the main app run in different processes and sandboxed environments. To enable communication between them, you must use Apple's App Group feature. In the project editor, select the Target and go to the Signing & Capabilities tab.
Click the + Capability button and select App Groups from the list to add this capability.
You must configure the same App Group ID for both targets.
-
Select the extension's target, click the General tab, and set the supported iOS version (Minimum Deployments) to 12.0 or later.
-
The main app and the Broadcast Upload Extension must share the same Bundle ID prefix and be signed with the same development certificate.
-
In the newly created Target, Xcode automatically creates a class named "SampleHandler". Replace the contents of its .m file with the following code.
NoteYou must replace the App Group ID (
kAppGroup) in the code with the App Group Identifier you created earlier.
#import "SampleHandler.h"
#import <AliScreenShare/AliScreenShareExt.h>
static NSString * _Nonnull kAppGroup = @"group.com.aliyun.video"; // The App Group for the main screen sharing app and the extension.
@interface SampleHandler() <AliScreenShareExtDelegate>
@property (nonatomic, assign) int32_t frameNum;
@end
@implementation SampleHandler
- (void)broadcastStartedWithSetupInfo:(NSDictionary<NSString *,NSObject *> *)setupInfo {
    // User has requested to start the broadcast. Setup info from the UI extension can be supplied but is optional.
    NSLog(@"SampleHandler SEND broadcastStartedWithSetupInfo");
    [[AliScreenShareExt sharedInstance] setupWithAppGroup:kAppGroup delegate:self];
}
- (void)broadcastPaused {
    // User has requested to pause the broadcast. Samples will stop being delivered.
    NSLog(@"SampleHandler SEND broadcastPaused");
}
- (void)broadcastResumed {
    // User has requested to resume the broadcast. Samples delivery will resume.
    NSLog(@"SampleHandler SEND broadcastResumed");
}
- (void)broadcastFinished {
    // User has requested to finish the broadcast.
    NSLog(@"SampleHandler SEND broadcastFinished");
}
- (void)processSampleBuffer:(CMSampleBufferRef)sampleBuffer withType:(RPSampleBufferType)sampleBufferType {
    @autoreleasepool {
        [[AliScreenShareExt sharedInstance] sendSampleBuffer:sampleBuffer type:sampleBufferType];
    }
}
#pragma mark - AliScreenShareExtDelegate
- (void)finishBroadcastWithError:(AliScreenShareExt *)broadcast error:(NSError *)error
{
  [self finishBroadcastWithError:error];
}
@end
-
Update the
kAppGroupparameter in theARTCExample/BasicUsage/ScreenShare/ScreenShareVC.swiftfile with your App Group ID.class ScreenShareMainVC: UIViewController { override func viewDidDisappear(_ animated: Bool) { super.viewDidDisappear(animated) self.leaveAnddestroyEngine() } // MARK: UI @IBOutlet weak var contentScrollView: UIScrollView! let kAppGroup = "group.com.aliyun.video"; let screenShareModeOptions = ["None", "Only Video", "Only Audio", "All"] private let screenShareModePickerView = UIPickerView() // ... }
Implement the feature

1. Configure camera and screen sharing streams
ARTC supports publishing both a camera stream and a screen sharing stream simultaneously. Configure them based on your use case.
1.1. Publish only the screen sharing stream
To push only the screen stream, call publishLocalVideoStream to stop pushing the camera stream, which the SDK publishes by default:
-
Before joining a channel, call
publishLocalVideoStream(false)to stop publishing the camera stream. -
After joining a channel, call
startScreenShareto start screen recording and push the screen sharing stream.
engine.publishLocalVideoStream(false)1.2. Publish camera and screen streams
If your use case requires publishing both the camera stream and the screen sharing stream:
-
Call
publishLocalVideoStream(true)to start publishing the camera stream. (This is the default behavior and this call is optional.) -
After you join a channel, call
startScreenShareto start screen sharing and push the screen sharing stream.
engine.publishLocalVideoStream(true)2. (Optional) Configure encoder parameters
To customize the encoding properties of the screen sharing stream, call setScreenShareEncoderConfiguration to set the resolution, frame rate, bitrate, GOP, and video orientation.
-
You can call this method both before and after joining a channel. If you only need to set the screen sharing stream encoding properties once per session, we recommend calling it before you join the channel.
-
To update the configuration, you can call this method multiple times.
The following table describes the configuration parameters.
|
Parameter |
Description |
Default |
|
dimensions |
The video resolution. |
0x0. This indicates that the published stream's resolution matches the screen capture resolution. The maximum value is 3840x2160. |
|
frameRate |
The video frame rate. |
5. The maximum value is 30. |
|
bitrate |
The video encoding bitrate, in Kbps. Note: The bitrate must be set within a reasonable range for the specified resolution and frame rate. If the value is outside this range, the SDK automatically adjusts it to a valid value. |
512 |
|
keyFrameInterval |
The keyframe interval (GOP), in milliseconds (ms). |
0. This indicates that the SDK internally controls the keyframe interval. |
|
forceStrictKeyFrameInterval |
Specifies whether to force the encoder to generate keyframes strictly at the set interval. |
false.
|
|
rotationMode |
The rotation of the published stream. |
AliRtcRotationMode_0. You can choose 0, 90, 180, or 270 degrees. |
The following is a code sample:
var screenShareConfig: AliRtcScreenShareEncoderConfiguration = AliRtcScreenShareEncoderConfiguration()
screenShareConfig.dimensions = CGSize(width: Int(720), height: Int(1280))
screenShareConfig.frameRate = 15
screenShareConfig.bitrate = 512
screenShareConfig.keyFrameInterval = 2000
alirtcEngine.setScreenShareEncoderConfiguration(screenShareConfig)
3. Start screen capture
-
Call
startScreenShareto start screen capture, and configure the parameters according to your application scenario:-
kAppGroup: The Broadcast Upload Extension and the main app must use the same App Group.
-
mode: The screen sharing mode. Options include no sharing, video only, system audio only, or both system audio and video.
-
// The main app must use the same App Group as the Extension process.
let kAppGroup = "group.com.aliyun.video";
@IBAction func onStartScreenShareBtnClicked(_ sender: UIButton) {
    guard let alirtcEngine = self.rtcEngine else {return}
    // Configure screen sharing encoder parameters.
    alirtcEngine.setScreenShareEncoderConfiguration(screenShareConfig)
    // Launch the pop-up window.
    startBroadcastPicker()
    // Start screen sharing.
    alirtcEngine.startScreenShare(kAppGroup, mode: screenShareMode)
}-
Enable the Extension process.
Apple requires explicit user action to start screen capture. The startBoardcastPicker method uses RPSystemBroadcastPickerView, which was introduced in iOS 12.0, to display a 'Start Broadcast' pop-up window that prompts the user to start screen recording.
// Create and configure a system broadcast picker view. Apple requires users to explicitly trigger screen sharing.
func startBroadcastPicker() {
    if #available(iOS 12.0, *) {
        let broadcastPickerView = RPSystemBroadcastPickerView(frame: CGRect(x: 0, y: 0, width: 44, height: 44))
        guard let bundlePath = Bundle.main.path(forResource: "ScreenShareExtension", ofType: "appex", inDirectory: "PlugIns") else {
            self.showErrorAlertView("Can not find bundle at path", code: 0, forceShow: false)
            return
        }
        guard let bundle = Bundle(path: bundlePath) else {
            self.showErrorAlertView("Can not find bundle at path", code: 0, forceShow: false)
            return
        }
        broadcastPickerView.preferredExtension = bundle.bundleIdentifier
        // Traverse the subviews to find the button to skip the step of clicking the system view.
        // This solution is not officially recommended by Apple, and may be invalid in future system updates.
        for subView in broadcastPickerView.subviews {
            if let button = subView as? UIButton {
                button.sendActions(for: .allEvents)
            }
        }
    } else {
        self.showErrorAlertView("This feature only supports iOS 12 or above", code: 0, forceShow: false)
        return
    }
}
4. Stop screen sharing
Call stopScreenShare to stop screen sharing in the channel, as follows:
@IBAction func onStopScreenShareBtnClicked(_ sender: UIButton) {
    guard let alirtcEngine = self.rtcEngine else {return}
    if(alirtcEngine.isScreenSharePublished()) {
        alirtcEngine.stopScreenShare()
    }
}
5. (Remote) View the shared screen
ARTC supports simultaneous sending and receiving of both screen and camera streams. When a remote user starts publishing a stream, the onRemoteTrackAvailableNotify callback fires on the local client with the videoTrack state, which you can use to render the remote user's video.
// Store all views
var videoSeatViewMap: [String: SeatView] = [:]
// Render the view based on the callback
func onRemoteTrackAvailableNotify(_ uid: String, audioTrack: AliRtcAudioTrack, videoTrack: AliRtcVideoTrack) {
    "onRemoteTrackAvailableNotify uid: \(uid) audioTrack: \(audioTrack)  videoTrack: \(videoTrack)".printLog()
    // Stream status of the remote user
    DispatchQueue.main.async {
        switch videoTrack {
        case .no:
            // Remove all views for this user
            self.removeSeatView(uid: uid, streamType: .camera)
            self.removeSeatView(uid: uid, streamType: .screen)
        case .camera:
            // Add the camera view
            self.createOrUpdateSeatView(uid: uid, streamType: .camera)
        case .screen:
            // Add the screen sharing view
            self.createOrUpdateSeatView(uid: uid, streamType: .screen)
        case .both:
            // Add both the camera view and the screen sharing view
            self.createOrUpdateSeatView(uid: uid, streamType: .camera)
            self.createOrUpdateSeatView(uid: uid, streamType: .screen)
        @unknown default:
            break
        }
    }
}
// Remove the specified view for the specified user
func removeSeatView(uid: String, streamType: StreamType) {
    let key = "\(uid)_\(streamType)"
    guard let seatView = videoSeatViewMap.removeValue(forKey: key) else { return }
    // 1. Remove from the UI
    seatView.removeFromSuperview()
    // 2. Clean up video resources
    rtcEngine?.setRemoteViewConfig(nil, uid: uid, for: streamType == .camera ? .camera : .screen)
    // 3. Check if other views for this user exist
    let hasOtherViews = videoSeatViewMap.keys.contains { $0.hasPrefix("\(uid)_") }
    if !hasOtherViews {
        // Remove the user container
        if let container = findUserContainer(for: uid) {
            container.removeFromSuperview()
        }
    } else {
        // Re-layout the remaining views
        updateLayoutForUser(uid: uid)
    }
}
// Create or update a video call render view and add it to contentScrollView
func createOrUpdateSeatView(uid: String, streamType: StreamType) ->SeatView {
    let key = "\(uid)_\(streamType)"
    // 1. If a view already exists, return it
    if let existingView = videoSeatViewMap[key] {
        return existingView
    }
    // 2. Create a new view
    let seatView = SeatView(frame: .zero)
    seatView.seatInfo = SeatInfo(uid: uid, streamType: streamType)
    if uid != self.userId {
        // 3. Configure the video canvas
        let canvas = AliVideoCanvas()
        canvas.view = seatView.canvasView
        canvas.renderMode = .fill
        canvas.mirrorMode = streamType == .screen ? .allDisabled : .allEnabled
        canvas.rotationMode = ._0
        rtcEngine?.setRemoteViewConfig(canvas, uid: uid, for: streamType == .camera ? .camera : .screen)
    }
    // 4. Add to the management dictionary
    videoSeatViewMap[key] = seatView
    // 6. Update the layout
    updateLayoutForUser(uid: uid)
    return seatView
}
6. (Optional) Configure audio volume
To share system audio, call setAudioShareAppVolume to control the volume of the screen sharing audio stream.
@IBAction func onShareAudioVolumeSliderChanged(_ sender: UISlider) {
    let volume = Int32(sender.value)
    rtcEngine?.setAudioShareAppVolume(volume)
}