This document explains how to integrate the Alibaba Real-Time Communication (ARTC) software development kit (SDK) into your Mac project. This integration lets you quickly build a simple, real-time audio and video application for scenarios such as interactive streams and video calls.
Feature description
Before you begin, understand the following key concepts:
ARTC SDK: An SDK provided by Alibaba Cloud that helps developers quickly implement real-time audio and video interaction.
Global Realtime Transport Network (GRTN): A globally distributed network engineered for real-time media, ensuring ultra-low latency, high-quality, and secure communication.
Channel: A virtual room that users join to communicate with each other. All users in the same channel can interact in real time.
Host: A user who can publish audio and video streams in a channel and subscribe to streams published by other hosts.
Viewer: A user who can subscribe to audio and video streams in a channel but cannot publish their own.
Basic process for implementing real-time audio and video interaction:

Call
setChannelProfileto set the scenario, and calljoinChannelto join a channel:Video call scenario: All users are hosts and can both publish and subscribe to streams.
Interactive streaming scenario: Roles must be set using
setClientRolebefore joining a channel. For users who will publish streams, set the role to host. If a user only needs to subscribe to streams, set the role to viewer.
After joining the channel, users have different publishing and subscribing behaviors based on their roles:
All users can receive audio and video streams within that channel.
A host can publish audio and video streams in the channel.
If a viewer wants to publish streams, call the
setClientRolemethod to switch the role to host.
Sample project
The Alibaba Cloud ARTC SDK provides an open source sample project for real-time audio and video interaction. You can download the project or view the sample source code.
Prerequisites
Development tools: Xcode 14.0 or later. The latest official version is recommended.
Test device: A Mac device with macOS 10.13 or later.
Network environment: A stable network connection is required.
Application preparation: Obtain the AppID and AppKey for your real-time audio and video application. For more information, see Create an application.
Create a project (Optional)
This section describes how to create a project and add the necessary permissions for audio and video interaction. If you already have a project, you can skip this section.
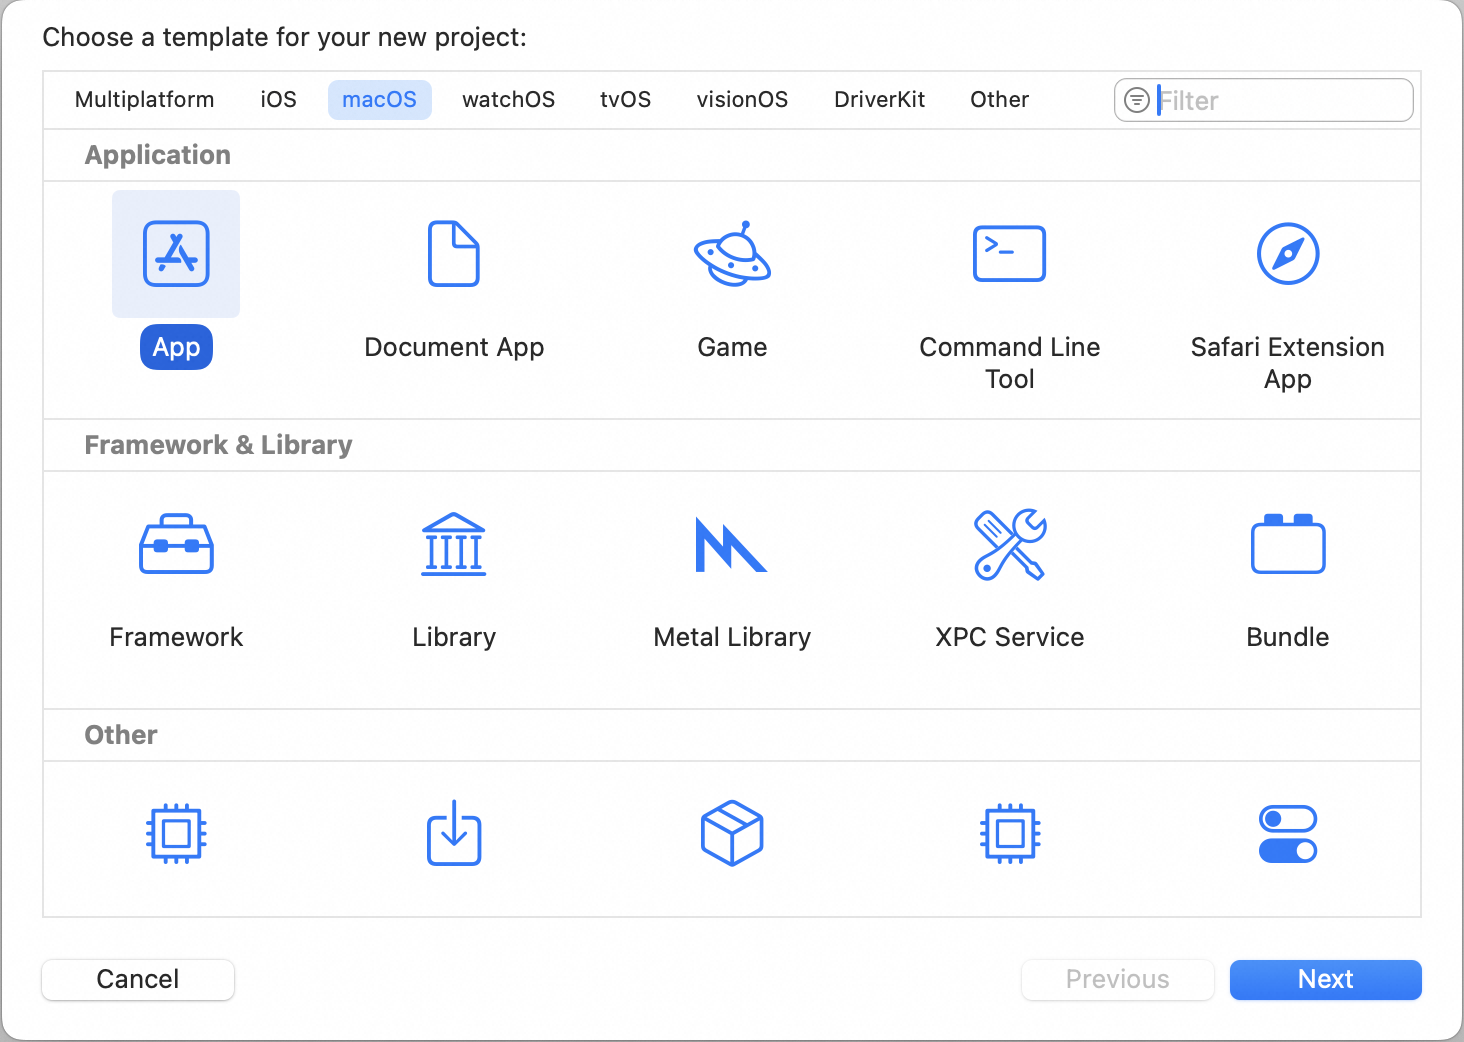
Open Xcode. Choose File → New → Project. Select the App template. In the next step, set Interface to Storyboard and Language to Objective-C or Swift.
Modify the project configuration as needed. This includes the Bundle Identifier, Signing, and Minimum Deployments.
Configure the project
Step 1: Configure permissions
In the project navigator, click the project file. Switch to the Info tab. Add permissions for the camera and microphone.
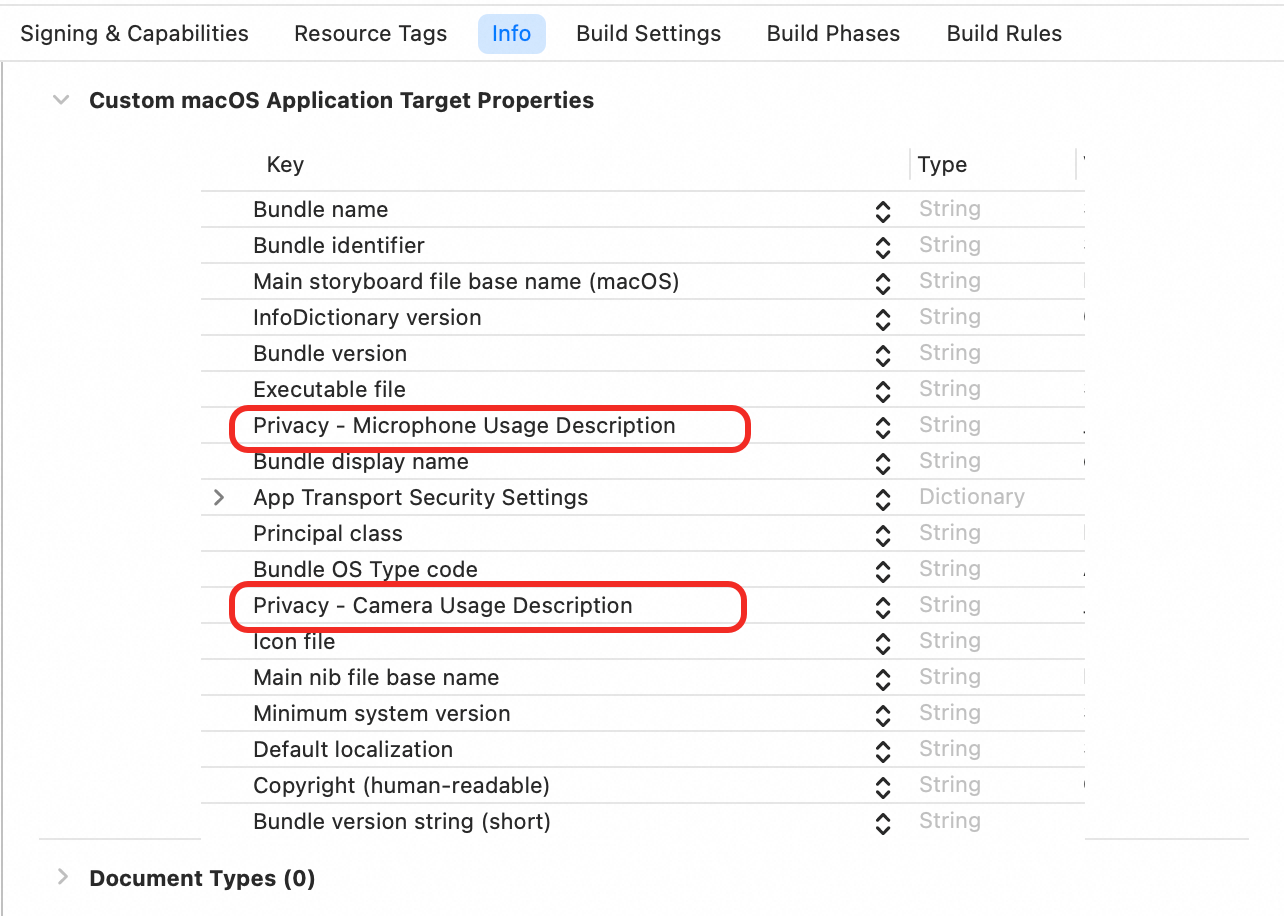
Key | Type | Value |
Privacy - Microphone Usage Description | String | The app needs microphone access for voice chat. |
Privacy - Camera Usage Description | String | The app needs camera access for video chat. |
To publish to the App Store, you must enable sandbox mode. The following image shows the general sandbox settings. The items in the red box are required. The items in the blue box are optional based on your product requirements.
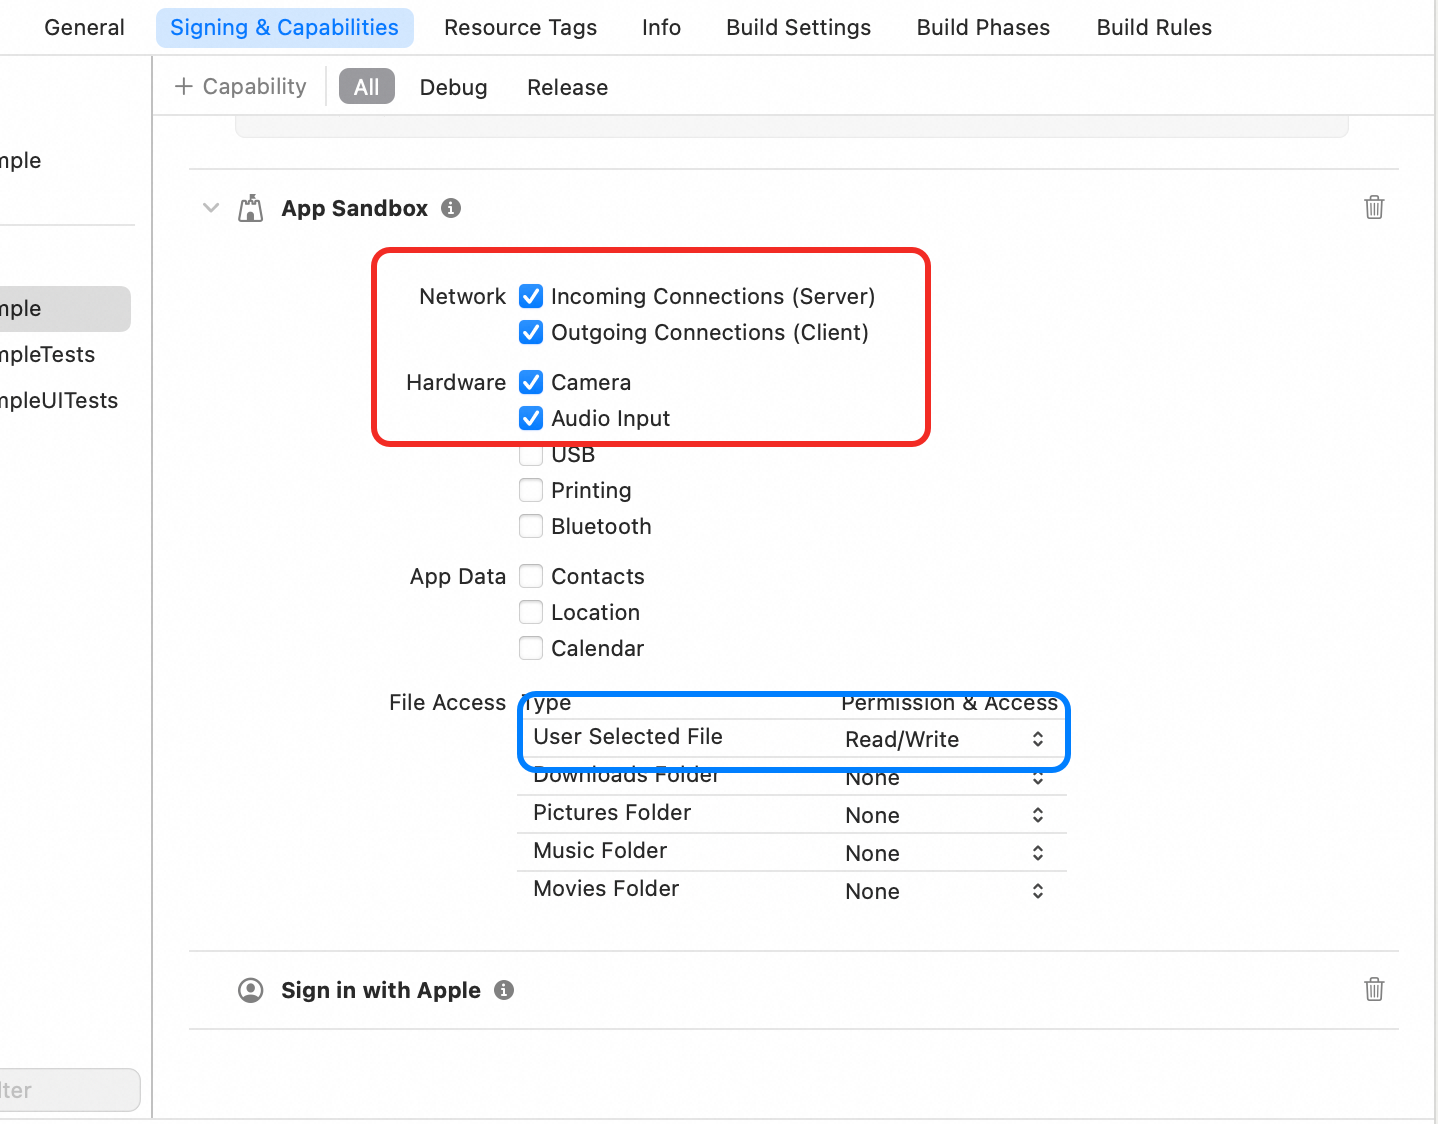
The items in the blue box are optional. For example, if your application does not access local files, set the User Selected File permission to None. If you need features such as musical accompaniment or pushing local files, enable the corresponding options.
Step 2: Import the ARTC SDK
In the SDK download section, obtain and decompress the latest ARTC SDK file.
Copy the files from the SDK package to your project path. If you do not use AAC for audio encoding, you can omit the PluginAAC.framework file.
Open Xcode and add the corresponding dynamic libraries. Make sure that the Embed attribute of the added dynamic libraries is set to Embed & Sign.
Step 3: Create the user interface
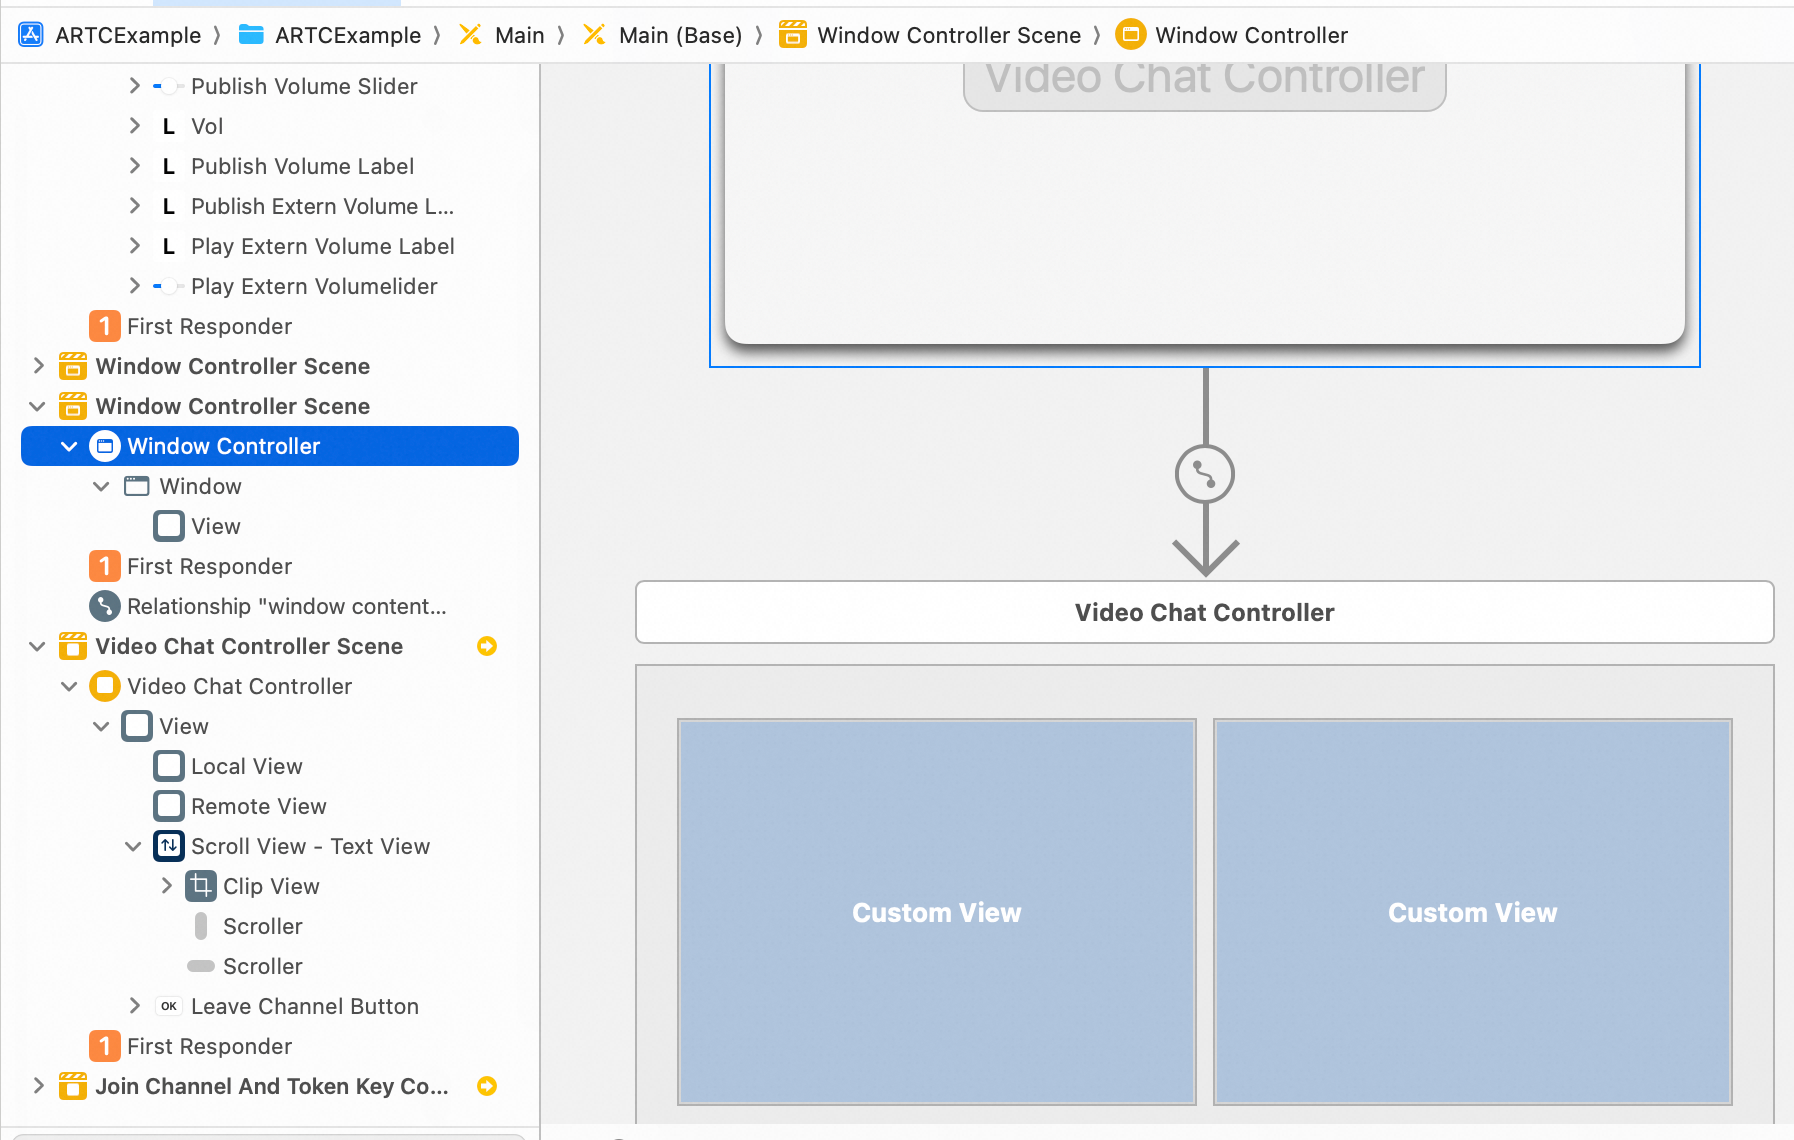
Create a user interface based on your real-time audio and video interaction scenario. For a multi-person video call scenario, you can create a Window Controller view and add a Custom View control to the View of the Video Chat Controller. When a user joins the call, add a call view to this container. When a user leaves the call, remove the call view from this container and refresh the layout.
Implementation steps
This section explains how to use the ARTC SDK to build a basic real-time audio and video application. You can copy the complete code sample into your project to test the functionality. The steps below explain the core API calls.
The following diagram shows the basic workflow for implementing a video call:

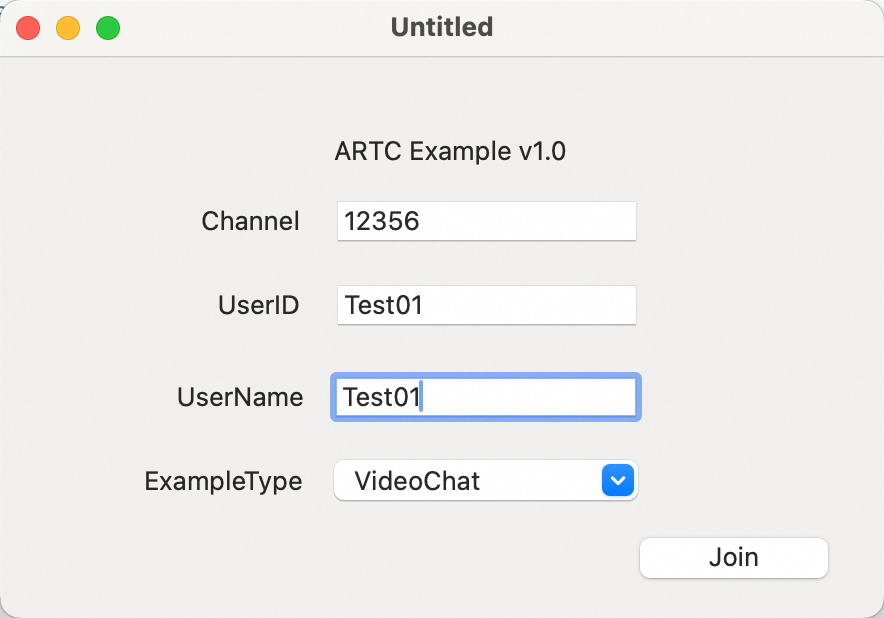
The following is a complete code example that shows the basic procedure for an audio and video call:
1. Request permissions
When an audio or video call starts, the SDK checks if the necessary permissions have been granted. For a better user experience, check for camera and microphone permissions before initiating a call.
#import <AVFoundation/AVFoundation.h>

@implementation PrivacyAuthorizer

+ (void)authorCamera:(void (^ __nullable)(BOOL granted))completion{
    dispatch_block_t workBlock;
    if (@available(macOS 10.14, *)) {
        AVAuthorizationStatus authStatus = [AVCaptureDevice authorizationStatusForMediaType:AVMediaTypeVideo];
        if(authStatus == AVAuthorizationStatusAuthorized) {
            workBlock = ^{
                if (completion) completion(YES);
            };
            // do your logic
        } else if(authStatus == AVAuthorizationStatusDenied || authStatus == AVAuthorizationStatusRestricted){
            workBlock = ^{
                if (completion) completion(NO);
            };
            // denied
        } else if(authStatus == AVAuthorizationStatusNotDetermined){
            // not determined?!
            [AVCaptureDevice requestAccessForMediaType:AVMediaTypeVideo completionHandler:^(BOOL granted) {
                [PrivacyAuthorizer authorCamera:completion];
            }];
            return;
        } else {
            // impossible, unknown authorization status
        }
    }else {
        workBlock = ^{
            if (completion) completion(YES);
        };
    }
    dispatch_async(dispatch_get_main_queue(), workBlock);
}

+ (void)authorMicphone:(void (^ __nullable)(BOOL granted))completion{
    dispatch_block_t workBlock;
    if (@available(macOS 10.14, *)) {
        AVAuthorizationStatus authStatus = [AVCaptureDevice authorizationStatusForMediaType:AVMediaTypeAudio];
        if(authStatus == AVAuthorizationStatusAuthorized) {
            workBlock = ^{
                if (completion) completion(YES);
            };
            // do your logic
        } else if(authStatus == AVAuthorizationStatusDenied || authStatus == AVAuthorizationStatusRestricted){
            workBlock = ^{
                if (completion) completion(NO);
            };
            // denied
        } else if(authStatus == AVAuthorizationStatusNotDetermined){
            // not determined?!
            [AVCaptureDevice requestAccessForMediaType:AVMediaTypeAudio completionHandler:^(BOOL granted) {
                [PrivacyAuthorizer authorMicphone:completion];
            }];
            return;
        } else {
            // impossible, unknown authorization status
        }
    }else {
        workBlock = ^{
            if (completion) completion(YES);
        };
    }
    dispatch_async(dispatch_get_main_queue(), workBlock);
}


- (void)applicationDidFinishLaunching:(NSNotification *)aNotification {
    // Insert code here to initialize your application

    // Check permissions
    [PrivacyAuthorizer authorCamera:^(BOOL granted) {
        if (!granted) {
            NSLog(@"Camera_granted == %hhd",granted);
            dispatch_async(dispatch_get_main_queue(), ^{
                NSAlert *alert = [[NSAlert alloc] init];
                [alert setMessageText:@"Camera permission is not granted. Please enable it in <Security & Privacy>."];
                [alert setAlertStyle:NSAlertStyleInformational];
                [alert beginSheetModalForWindow:[self->loginViewController.view window] completionHandler:^(NSModalResponse returnCode) {
                }];
            });
        }
    }];

    [PrivacyAuthorizer authorMicphone:^(BOOL granted) {
        if (!granted) {
            NSLog(@"Camera_granted == %hhd",granted);
            dispatch_async(dispatch_get_main_queue(), ^{
                NSAlert *alert = [[NSAlert alloc] init];
                [alert setMessageText:@"Microphone permission is not granted. Please enable it in <Security & Privacy>."];
                [alert setAlertStyle:NSAlertStyleInformational];
                [alert beginSheetModalForWindow:[self->loginViewController.view window] completionHandler:^(NSModalResponse returnCode) {

                }];
            });
        }
    }];
}
2. Get an authentication token
Joining an ARTC channel requires an authentication token to verify the user's identity. For more information about how to generate an authentication token, see Token-based authentication. You can generate a token using a single parameter or multiple parameters. Different token generation methods require calls to different joinChannel interfaces of the SDK.
Production and release phase:
Because token generation requires the AppKey, hardcoding it in the client poses a security risk. We strongly recommend that you generate tokens on your business server and send them to the client for online services.
Development and debugging phase:
During development and debugging, if your business server does not yet have token generation logic, you can temporarily generate a token by referring to the token generation logic in the APIExample. The reference code is as follows:
#import <CommonCrypto/CommonDigest.h>
#import <CommonCrypto/CommonHMAC.h>

@implementation AppDefine

+ (NSString *)stringFromBytes:(uint8_t *)bytes length:(int)length {

    NSMutableString *strArray = [NSMutableString string];

    for (int i = 0; i < length; i++) {
        [strArray appendFormat:@"%02x", bytes[i]];
    }

    return [strArray copy];
}

+(NSString*)generateJoinToken:(NSString *)oc_str {

    const char * cstring = [oc_str UTF8String];
    size_t length = [oc_str length] ;
    uint8_t sha256_buffer[CC_SHA256_DIGEST_LENGTH];

    CC_SHA256(cstring, (CC_LONG)length, sha256_buffer);

    return [AppDefine stringFromBytes:sha256_buffer length:CC_SHA256_DIGEST_LENGTH];
}
3. Import the ARTC SDK component
// Import the ARTC module
#import <AliRTCSdk/AliRTCSdk.h>
4. Create and initialize the engine
Create the RTC engine
Call the getInstance[1/2] interface to create the AliRTCEngine engine.
@property (nonatomic, strong, nullable) AliRtcEngine *engine;

// Create the engine and set the callback
_engine = [AliRtcEngine sharedInstance:self extras:nil] ;

...
Initialize the engine
Call
setChannelProfileto set the channel profile toAliRTCInteractiveLive(interactive mode).Based on your business requirements, you can choose interactive mode for interactive entertainment scenarios or communication mode for one-to-one or one-to-many broadcasts. Choosing the correct mode ensures a smooth user experience and efficient use of network resources. You must call setChannelProfile before you call setClientRole.
Mode
Stream ingest
Stream pulling
Introduction
Interactive mode
Role-based restrictions apply. Only users with the streamer role can ingest streams.
Participants can switch roles at any time.
No role-based restrictions. All participants have permission to pull streams.
In interactive mode, events such as a streamer joining or leaving the channel, or starting to ingest a stream, are sent to viewers in real time. This ensures viewers are aware of the streamer's status. Conversely, viewer activities are not reported to the streamer, which prevents disruption to the stream.
In interactive mode, the streamer role is for live interaction, while the viewer role is mainly for receiving content and does not typically participate in the interaction. If your business requirements might change and you are unsure if viewers will need to interact, use interactive mode by default. This mode is flexible and lets you adapt to different interaction needs by adjusting user role permissions.
Communication mode
No role-based restrictions. All participants have permission to ingest streams.
No role-based restrictions. All participants have permission to pull streams.
In communication mode, participants are aware of each other's presence.
This mode does not differentiate user roles, but it is functionally equivalent to the streamer role in interactive mode. The purpose is to simplify operations by letting users achieve the required functionality with fewer API calls.
Call
setClientRoleto set the user role toAliRTCSdkInteractive(streamer) orAliRTCSdkLive(viewer). Note: The streamer role ingests and pulls streams by default. The viewer role has preview and stream ingest disabled by default and only pulls streams.NoteWhen a user switches from the streamer role to the viewer role (also known as "going off-mic"), the system stops ingesting the local audio and video streams. Subscribed audio and video streams are not affected. When a user switches from the viewer role to the streamer role (also known as "going on-mic"), the system ingests the local audio and video streams. Subscribed audio and video streams are not affected.
// Set the channel profile to interactive mode. AliRtcInteractivelive is used for all RTC scenarios.
[_engine setChannelProfile:AliRtcInteractivelive];
// Set the client role. Use AliRtcClientRoleInteractive to both ingest and pull streams. Use AliRtcClientRolelive to only pull streams.
[_engine setClientRole:AliRtcClientRoleInteractive];
Implement common callbacks
When you create the engine, you also set the Delegate object. You must then implement the required callback interfaces. The SDK first attempts to recover from exceptions using its internal retry mechanism. If the SDK cannot resolve an error, it notifies your application through a callback. Your application must handle the errors returned by the following callbacks:
Cause of exception
Callback and parameters
Solution
Description
Authentication failed
The `result` parameter in the `onJoinChannelResult` callback returns `AliRtcErrJoinBadToken`.
If this error occurs, the application must check if the token is correct.
When a user calls an API, if authentication fails, the system returns an authentication failure error message in the API callback.
Authentication token is about to expire
onAuthInfoWillExpire
If this exception occurs, the application must obtain the latest authentication information and then call `refreshAuthInfo` to refresh it.
An authentication expiration error can occur when a user calls an API or during program execution. Therefore, the error is reported through an API callback or a separate error callback.
Authentication token expired
onAuthInfoExpired
If this exception occurs, the application must have the user rejoin the channel.
An authentication expiration error can occur when a user calls an API or during program execution. Therefore, the error is reported through an API callback or a separate error callback.
Network connectivity abnormal
The `onConnectionStatusChange` callback returns `AliRtcConnectionStatusFailed`.
If this exception occurs, the application must have the user rejoin the channel.
The SDK can automatically recover from network disconnections for a certain period. However, if the disconnection time exceeds the preset threshold, a timeout occurs, and the connection is lost. The application should check the network status and guide the user to rejoin the channel.
Kicked offline
onBye
AliRtcOnByeUserReplaced: If this exception occurs, check if the user ID is duplicated.
AliRtcOnByeBeKickedOut: If this exception occurs, it means the user was kicked by the business service. The user needs to rejoin the channel.
AliRtcOnByeChannelTerminated: If this exception occurs, it means the channel was destroyed. The user needs to rejoin the channel.
The RTC service provides a feature for administrators to remove participants.
On-premises device abnormal
onLocalDeviceException
If this exception occurs, the application must check permissions and whether the device hardware is working correctly.
The RTC service supports device detection and diagnostics. When an on-premises device is abnormal, the RTC service notifies the client through a callback. If the SDK cannot resolve the issue, the application must intervene to check if the device is working correctly.
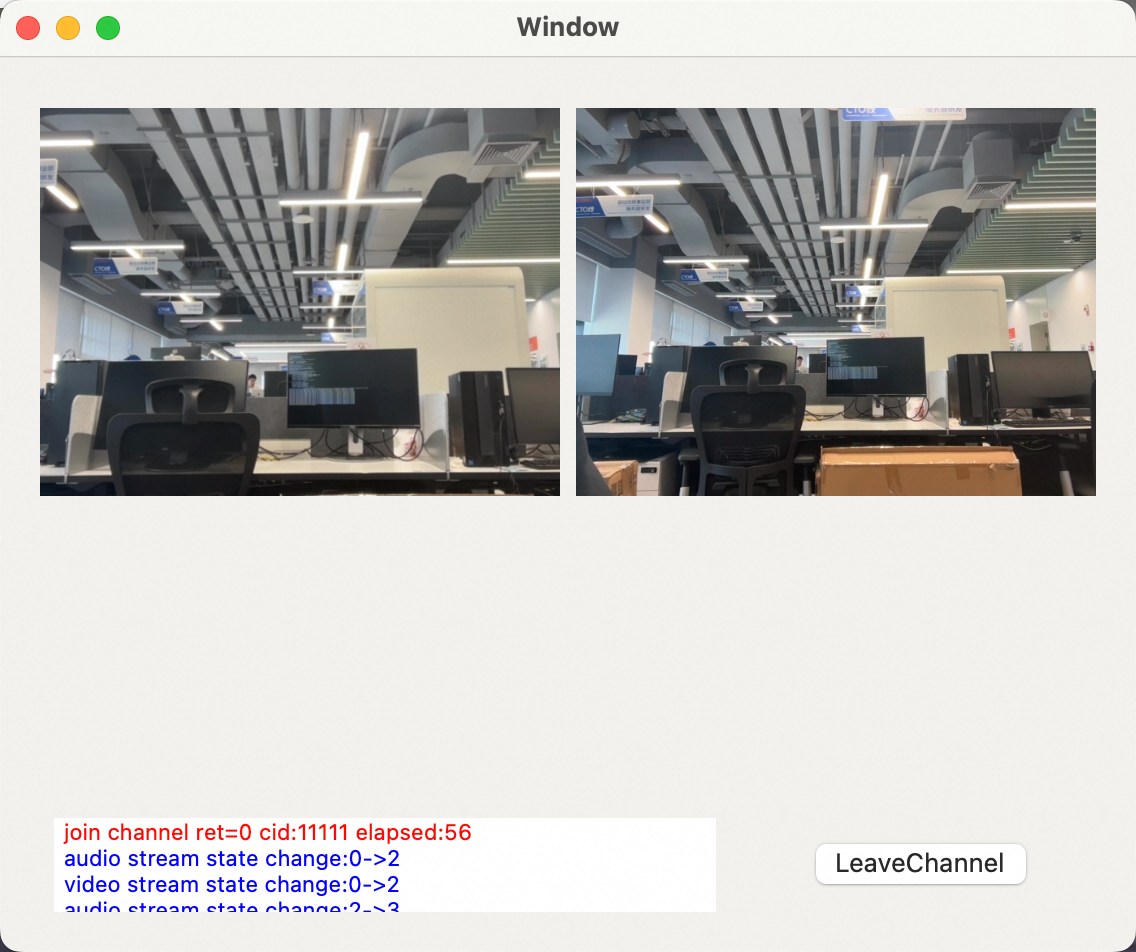
- (void)onJoinChannelResult:(int)result channel:(NSString *_Nonnull)channel elapsed:(int) elapsed {
    dispatch_async(dispatch_get_main_queue(), ^{
        [self statusListBoxAddString:[[NSString alloc]initWithFormat:@"join channel ret=%d cid:%@ elapsed:%d",
                                      result, channel, elapsed ]
                           withColor:[NSColor redColor]];
    });
}

- (void)onLeaveChannelResult:(int)result stats:(AliRtcStats)stats {
    dispatch_async(dispatch_get_main_queue(), ^{
        [self statusListBoxAddString:[[NSString alloc]initWithFormat:@"leave channel ret=%d call duration:%lld", result, stats.call_duration ]
                           withColor:[NSColor redColor]];
    });
}


- (void)onAuthInfoWillExpire {

    dispatch_async(dispatch_get_main_queue(), ^{

    });

}

- (void)onAuthInfoExpired {

    /* token expired! */
    dispatch_async(dispatch_get_main_queue(), ^{

    });

}

- (void)onConnectionStatusChange:(AliRtcConnectionStatus)status
                          reason:(AliRtcConnectionStatusChangeReason)reason {

    dispatch_async(dispatch_get_main_queue(), ^{

    });

}


- (void)onRemoteUserOnLineNotify:(NSString *)uid elapsed:(int)elapsed {

    dispatch_async(dispatch_get_main_queue(), ^{
        [self statusListBoxAddString:[[NSString alloc]initWithFormat:@"uid:%@ online reason:%d",
                                      uid, elapsed]
                           withColor:[NSColor blueColor]];
    });

}

- (void)onRemoteUserOffLineNotify:(NSString *)userID
                    offlineReason:(AliRtcUserOfflineReason)reason{

    /* Delete the corresponding canvas */

    dispatch_async(dispatch_get_main_queue(), ^{
        /*
         This function is recommended to be called on the main thread
         */
        [self->_engine setRemoteViewConfig:nil uid:userID forTrack:AliRtcVideoTrackScreen];
        [self->_engine setRemoteViewConfig:nil uid:userID forTrack:AliRtcVideoTrackCamera];

        [self statusListBoxAddString:[[NSString alloc]initWithFormat:@"uid:%@ offline reason:%ld",
                                      userID, reason]
                           withColor:[NSColor blueColor]];
    });

}

- (void)onLocalDeviceException:(AliRtcLocalDeviceType)deviceType
                 exceptionType:(AliRtcLocalDeviceExceptionType)exceptionType
                       message:(NSString *_Nullable)msg {

    dispatch_async(dispatch_get_main_queue(), ^{
        /* Process on the main thread */

    });

}


- (void)onBye:(int)code {

    dispatch_async(dispatch_get_main_queue(), ^{
        /* Process on the main thread */

    });

}
5. Set audio and video properties
Set audio-related properties
Call
setAudioProfileto set the audio encoding mode and audio scenario./* config audio profile and Scene */ [_engine setAudioProfile:AliRtcEngineHighQualityMode audio_scene:AliRtcSceneMusicMode];Set video-related properties
You can set the resolution, bitrate, frame rate, and other information for the published video stream.
// set video encoder config
AliRtcVideoEncoderConfiguration * videoConfig = [[AliRtcVideoEncoderConfiguration alloc]init];

videoConfig.dimensions = CGSizeMake(1280, 720);
videoConfig.bitrate = 1200;         	// kbps
videoConfig.frameRate = 15;
videoConfig.keyFrameInterval = 2000;	// ms

[_engine setVideoEncoderConfiguration:videoConfig];
6. Set stream ingest and pulling properties
Set the properties for ingesting audio and video streams and for pulling streams from all users by default:
Call
publishLocalAudioStreamto ingest the audio stream.Call
publishLocalVideoStreamto ingest the video stream. For an audio-only call, you can set this to false.
// The SDK publishes the local video stream by default. You do not need to call publishLocalVideoStream(true).
[_engine publishLocalVideoStream:true];
// The SDK publishes the local audio stream by default. For a video call, you do not need to call publishLocalAudioStream(true).
// For a voice-only call, you must call publishLocalVideoStream(false) to stop publishing the video stream.
[_engine publishLocalAudioStream:true];

// Set the default subscription to remote audio and video streams.
[_engine setDefaultSubscribeAllRemoteAudioStreams:true];
[_engine subscribeAllRemoteAudioStreams:true];
[_engine setDefaultSubscribeAllRemoteVideoStreams:true];
[_engine subscribeAllRemoteVideoStreams:true];
Note: The SDK automatically ingests and pulls streams by default. It ingests audio and video streams and subscribes to the audio and video streams of all users in the channel by default. You can call the preceding methods to disable automatic stream ingest and pulling.
7. Start the local preview
Call
setLocalViewConfigto set the local rendering view and the local video display properties.Call the
startPreviewmethod to start the local video preview.
AliVideoCanvas * canvas = [[AliVideoCanvas alloc] init];

canvas.view = _localView ;
canvas.renderMode = AliRtcRenderModeAuto;
canvas.rotation = AliRtcRotationMode_0 ;
[_engine setLocalViewConfig:canvas forTrack:AliRtcVideoTrackCamera];

int ret = [_engine startPreview];
8. Join a channel
Call joinChannel to join a channel. The single-parameter method is recommended. You must call the joinChannel[3/4] interface. After you call joinChannel, you must check both the return value and the result of joining the channel in the onJoinChannelResult callback. If the return value is 0 and the result is 0, you have successfully joined the channel. Otherwise, check whether the provided token is invalid.
uint64_t timestamp = time(NULL) + 24 * 60 * 60;


AliRtcAuthInfo *info = [[AliRtcAuthInfo alloc]init];

info.channelId = self->channelId;
info.userId    = self->userId;
info.appId     = @ARTC_APP_ID;
info.nonce     = @"";
info.timestamp = timestamp;

NSString *token_str = [NSString stringWithFormat:@"%@%@%@%@%@%lld",
                           info.appId,
                           @ARTC_APP_KEY,
                           info.channelId,
                           info.userId,
                           @"",
                           info.timestamp];

info.token = [AppDefine generateJoinToken:token_str];

int ret = [_engine joinChannel:info name:userName onResult:^(NSInteger errCode, NSString * _Nonnull channel, NSInteger elapsed) {

    if( errCode != 0 && ![self->_engine isInCall] ){
        // Handle the error
    } else {

    }

}];
After joining the channel, stream ingest and pulling are performed according to the parameters set before joining.
The SDK automatically ingests and pulls streams by default to reduce the number of API calls the client needs to make.
9. Set the remote view
When a remote user starts or stops ingesting a stream, the onRemoteTrackAvailableNotify callback is triggered. In the callback, you can set or remove the remote view. The following is the sample code:
- (void)onRemoteTrackAvailableNotify:(NSString *)uid
                          audioTrack:(AliRtcAudioTrack)audioTrack
                          videoTrack:(AliRtcVideoTrack)videoTrack {

    dispatch_async(dispatch_get_main_queue(), ^{

        if ( videoTrack == AliRtcVideoTrackCamera ) {

            [self->_engine setRemoteViewConfig:nil uid:uid forTrack:AliRtcVideoTrackScreen];
            AliVideoCanvas * remoteCanvas = [[AliVideoCanvas alloc] init];
            remoteCanvas.view = self->_remoteView ;
            remoteCanvas.rotation = AliRtcRotationMode_0 ;
            remoteCanvas.renderMode = AliRtcRenderModeAuto;
            [self->_engine setRemoteViewConfig:remoteCanvas uid:uid forTrack:AliRtcVideoTrackCamera];
        }

        if ( videoTrack == AliRtcVideoTrackScreen ) {

            [self->_engine setRemoteViewConfig:nil uid:uid forTrack:AliRtcVideoTrackCamera];
            AliVideoCanvas * remoteCanvas = [[AliVideoCanvas alloc] init];

            remoteCanvas.view = self->_remoteView ;
            remoteCanvas.rotation = AliRtcRotationMode_0 ;

            /* For screen sharing, fill mode with black bars is recommended. */
            remoteCanvas.renderMode = AliRtcRenderModeFill ;

            [self->_engine setRemoteViewConfig:remoteCanvas uid:uid forTrack:AliRtcVideoTrackScreen];
        }

        if ( videoTrack == AliRtcVideoTrackNo ) {
            [self->_engine setRemoteViewConfig:nil uid:uid forTrack:AliRtcVideoTrackCamera];
            [self->_engine setRemoteViewConfig:nil uid:uid forTrack:AliRtcVideoTrackScreen];
        }
    });

}
10. Leave the channel and destroy the engine
When the audio and video interaction ends, you must leave the channel and destroy the engine. Follow these steps to end the interaction:
Call
stopPreviewto stop the video preview.Call
leaveChannelto leave the channel.Call
destroyto destroy the engine and release related resources.
[_engine stopPreview];
[_engine leaveChannel] ;
[AliRtcEngine destroy] ;
_engine = nil ;
11. Demonstration