This topic shows you how to quickly produce a live stream using the Media Production Studio console.
Prerequisites
To use the Media Production Studio console, you must meet the following requirements:
-
You have activated Media Production Studio. For more information, see Activate Media Production Studio.
-
You have added the accelerated domain name. For more information, see Add an accelerated domain name.
Background information
If you are new to Media Production Studio, this topic walks you through the entire workflow, from creating a production studio to producing a live stream.
This topic describes how to use Media Production Studio in the console. To use APIs with Media Production Studio, see General-purpose production studio API call demo.
Media Production Studio workflow
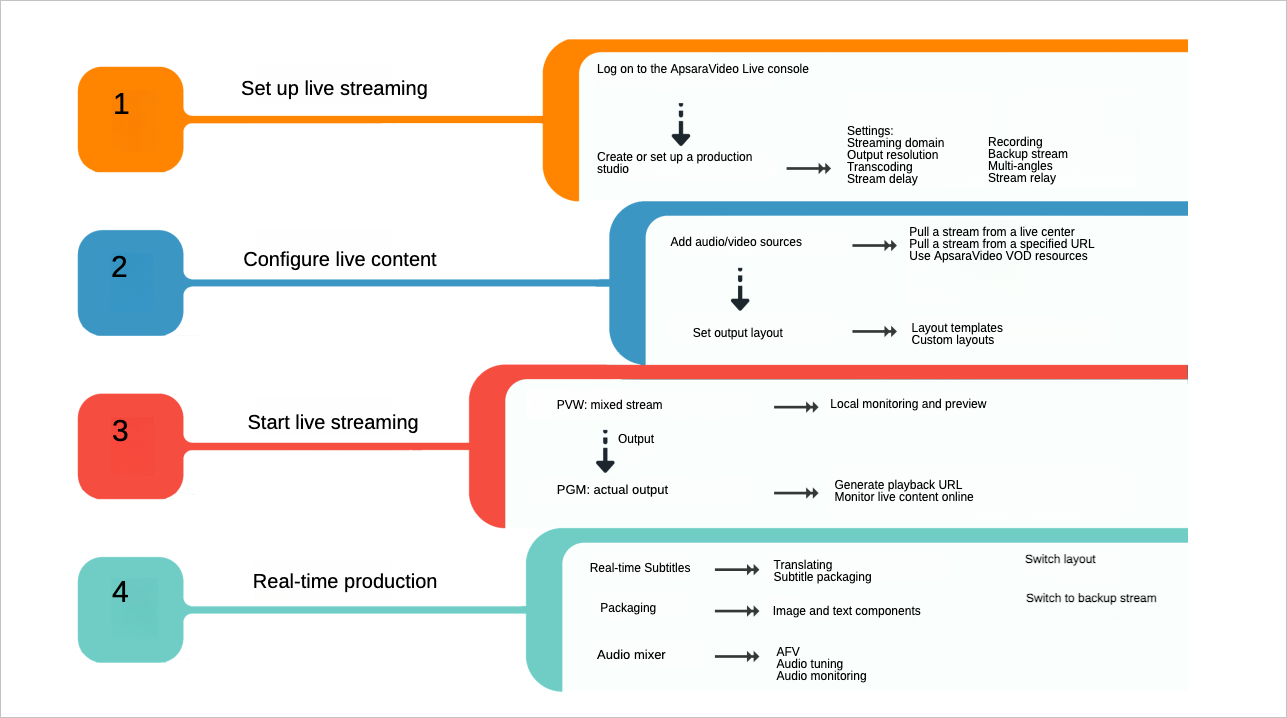
As shown in the preceding figure, a complete Media Production Studio workflow includes the following stages:
-
Live stream settings: Use the Media Production Studio console to configure the playback domain, output resolution, transcoding, and recording.
-
Live stream configuration: Add video sources and configure the output layout for the added sources.
-
Start live stream: Preview the mixed stream in the PVW window and push the final output to PGM for broadcast.
-
Real-time production: During the broadcast, use features such as live subtitles, graphic overlays, and the audio mixer to adjust the content and effects.
Procedure
-
Open a production studio.
Log on to the ApsaraVideo Live console, choose Production Studios, and then click Open in the Actions column.
-
Configure the production studio.
When you create a production studio instance and open it for the first time, the Studio Settings panel appears automatically. You can also click Live Stream Settings in the upper-right corner of the page to open the panel. For more information, see Configure a Media Production Studio instance. In the Studio Settings dialog box, enter a name, select a Live Center and domain, set the Output Configuration (for example, Ultra HD 1080p 1920x1080), select the required Export Profile options (such as Fluent, SD, HD, and Ultra HD), enable or disable recording and specify a storage location, and then click OK.
NoteEach account can create a maximum of 50 Media Production Studio instances at the same time. If you need to increase the Media Production Studio instance quota, you can submit a ticket. For more information about how to submit a ticket, see Contact Us.
-
Add video sources.
Click + Add Media File to open the Add Resource panel. You can add live streams or ApsaraVideo VOD videos. For more information, see Add video sources.
-
Configure the output layout.
-
Click Add Layout and select a layout type for the video output. For more information, see Create a custom layout.
-
After adding a layout, click the desired layout. The selection is highlighted in green.
-
-
Start production.
Click Start. The PVW area then displays the mixed stream from your video sources.
ImportantBilling starts after you click Start Live Streaming. Closing the web page does not stop the live stream or PGM output. The production studio continues to run and incur charges. To stop the service, you must click Stop.
NoteThe PVW (Preview) area lets operators debug and adjust the video feed. Viewers cannot see this stream. After previewing, click Synchronize to PGM to push the feed to the live audience.
-
Synchronize to PGM.
Click Synchronize to PGM to broadcast the final output to your audience.
During the broadcast, you can use the features in the following table to edit and adjust the live content and effects.
Feature
Description
Adjust the program volume. For more information, see Audio mixer.
In the production studio interface, use the volume sliders to adjust the program volume.
Configure subtitle styles and translation. For more information, see Use components.
Click the Live Subtitles button on the right to open the Edit Component dialog box. In the dialog box, select a Translation Language (such as Chinese, English, Russian, or Spanish), set the Subtitle Delay (for example, 160 ms) and Subtitle Position (Top/Middle/Bottom of the screen). Select Show Source Language to display both the original and translated subtitles. Click OK.
Add overlays such as watermarks, logos, banner text, and live subtitles to the stream. For more information, see Set up graphic components.
To add an image, open the Add Component dialog box and click + Upload Image. Configure the image's Name, Scale ratio, Size, and Position, and then click OK. To add text, click the + Text button to open the Add Component dialog box. Configure the text parameters, such as Name, Font, Size, and Color, and set the Display Mode and Position. Enter the text in the preview area and click OK.
Change the video stream layout. You can create a maximum of 20 layouts. For more information, see Switch layouts.
The layout preset area in the middle of the production studio interface offers various templates, including single screen, split screen (such as 2-left-3-right split and 1-left split), and picture-in-picture. Click a template to switch the current layout.
If a stream issue occurs, you can switch to a standby video to ensure a smooth broadcast. For more information, see Switch to a standby video.
In the upper-right corner of the production studio interface, click Switch to standby video. In the confirmation message that appears, click OK to switch the PGM feed to the standby video.