In this topic, you will quickly master the core features of Qoder CN IDE, including user interface customization, code editing, running and debugging, and other basic operations—along with intelligent coding powered by the Qoder CN coding assistant.
Open a workspace
You can use Qoder CN IDE to quickly edit single files or open a workspace—a folder containing multiple files. First, create a folder and open it in Qoder CN IDE. You will use this folder throughout this tutorial.
-
Open Qoder CN IDE. When you start Qoder CN IDE for the first time, the welcome page appears and provides several getting-started options.
-
From the menu bar, select to open your folder.
-
Select New Folder. Create a new folder named lingma demo. Then, select Select Folder (Open on macOS).
-
In the workspace trust dialog box, click Yes, I Trust the Authors.
NoteBecause you created this folder on your own computer, you can trust the code in it.
User interface navigation
The main parts of the Qoder CN IDE user interface are as follows:
-
Toolbar: Located at the top of the interface. It contains buttons for common operations such as creating new projects, opening files, and saving files.
-
File browser: Typically located on the left. It displays files and folders in the current project and lets you navigate and manage project files.
-
Editor window: This is the main area for writing code. It typically occupies most of the interface and supports features such as syntax highlighting and syntax checking.
-
Terminal window: Typically located at the bottom. It lets you run commands and view outputs and error messages.
-
Left sidebar: It can contain different panels, such as the Source Control panel, which displays Git status.
-
Right sidebar: Displays the session interface of the Qoder CN coding assistant. For more information about its features, see Qoder CN intelligent coding assistant.
-
Status bar: Located at the bottom of the interface. It displays the status of the current file, Git information, spell check, and more.
These tools help you write, debug, and manage code efficiently.
Switch views in the activity bar
Use the Activity Bar to switch between different views.
View and edit files using the editor
-
Click Explorer
 in the Activity Bar on the left. Then click the New File...
  button to create a new file in the workspace.
 -
Enter a file name, such as
main.py. Press Enter to create it. -
Add more files to the workspace. You can open multiple editors and arrange them as needed to view file content.
Terminal and command line
-
Open the terminal. From the menu bar, click View, then select Terminal. Alternatively, press the keyboard shortcut
Ctrl+`to open the terminal quickly. -
Enter a command to create a file.
echo "Hello lingma" > demo.txtThe default working folder is the root directory of the current workspace. The Explorer view automatically detects and displays new files.
-
Manage multiple terminals. Click the drop-down arrow
 in the upper-right corner of the terminal. From the menu that appears, select a different shell environment.
Command palette
-
Open the Command Palette using the keyboard shortcut
⇧⌘P(macOS),Ctrl+Shift+P(Windows), or select . In Qoder CN IDE, many commands are accessible through the Command Palette. Installed extensions also add new commands to the Command Palette. -
The Command Palette supports different search operations:
-
After the
>symbol, you can start typing to filter the command list. For example, type "move editor" to find commands that move the editor to a new window.
-
Remove the
>symbol to search for files. You can also use the keyboard shortcut⌘P(macOS) orCtrl+P(Windows) to quickly open and search for files.
NoteQoder CN IDE uses fuzzy matching to find files or commands. For example, entering "odks" returns the "Open Default Keyboard Shortcuts" command.
-
Settings and customization
In Qoder CN IDE, customize features by configuring settings. Use the Settings editor to modify settings. For advanced customization, directly edit the settings.json file.
-
Access settings. In the upper-right corner of Qoder CN IDE, click the user icon
 or use the keyboard shortcut
 ⌘⇧,(macOS) orCtrlShift,(Windows). Then select Personal Settings. -
Qoder CN IDE disables auto-save by default. Enable it from the Files: Auto Save drop-down menu.
Qoder CN IDE automatically applies setting changes. All subsequent code file edits are saved automatically.
-
Settings are divided into user-level and workspace-level. Switch between them using the Tab key. User settings apply to all your workspaces. Workspace settings apply only to the current workspace. If a setting exists in both workspace and user settings, the workspace setting overrides the user setting.
Programming practice
Qoder CN IDE natively supports JavaScript, TypeScript, HTML, CSS, and more. Add Python support using extension packs. Edit code based on the previously created main.py file.
Use source control
Qoder CN IDE integrates Source Control Management (SCM) and supports Git out of the box. Use the built-in Git support to commit your previous changes.
-
On the left, select the Source Control view
 .
. -
Select Initialize Repository to create a new Git repository in your workspace. After initializing the repository, the view displays the changes you made in the workspace.
-
Hover over a file and select the
+next to it to stage individual changes. -
After entering a commit message, such as
Add hello function, click the Commit button to complete the operation.
Install language extensions
Qoder CN IDE has a rich extension ecosystem. Add languages, debuggers, and tools during installation to support specific development workflows.
-
Open the Extensions view
 .
. -
In the search bar, enter the keyword python to search. From the results, install the Python Extension Pack. This enables features such as Python syntax highlighting and IntelliSense.
After the extension is installed, you must log on to your Qoder CN account to obtain code writing suggestions.
ImportantSome plugins are not currently supported for installation. Download and install them from the VS Code Extension Marketplace.
Run and debug programs
Qoder CN IDE provides built-in run and debug capabilities. In this section, use the Python extension installed in the previous step to debug a Python program.
-
First, ensure Python 3 is installed. If a Python interpreter is not installed locally, a notification appears in the lower-left corner of the window. Select Select Interpreter to open the Command Palette. You can then select an existing interpreter or install one.
-
In the
main.pyfile, pressF9on theprintline to set a breakpoint.A red dot appears in the left sidebar of the editor, indicating that a breakpoint is set. The breakpoint feature lets you pause program execution at a specific line of code.
-
Press
F5to select the Python debugger. Execution pauses at the breakpoint.-
Select the Python debugger:
Python Debugger -
Select the debug configuration:
Python File Debug the currently running Python file.
-
-
The program runs to the previously set breakpoint:
NoteWhen execution pauses, hover over variables in the editor to inspect their values. You can also view variable values at any time in the Variables view of the Run and Debug view.
-
Click the button
 on the debug toolbar—or press
 F5—to continue running.
Smart coding
Qoder CN intelligent coding assistant provides capabilities such as intelligent code generation, AI chat, multi-file modification, and programming agents. These features deliver an efficient and smooth coding experience and further improve development efficiency.
Code completion
At the end of the main.py file, enter the function header:
def add(a, b):Qoder CN automatically suggests the rest of the function. Press the Tab key to accept the suggestion:

Quick fix
When calling a method, an error occurs because variables num1 and num2 are undefined. Click the ![]() icon to fix the issue automatically:
icon to fix the issue automatically:

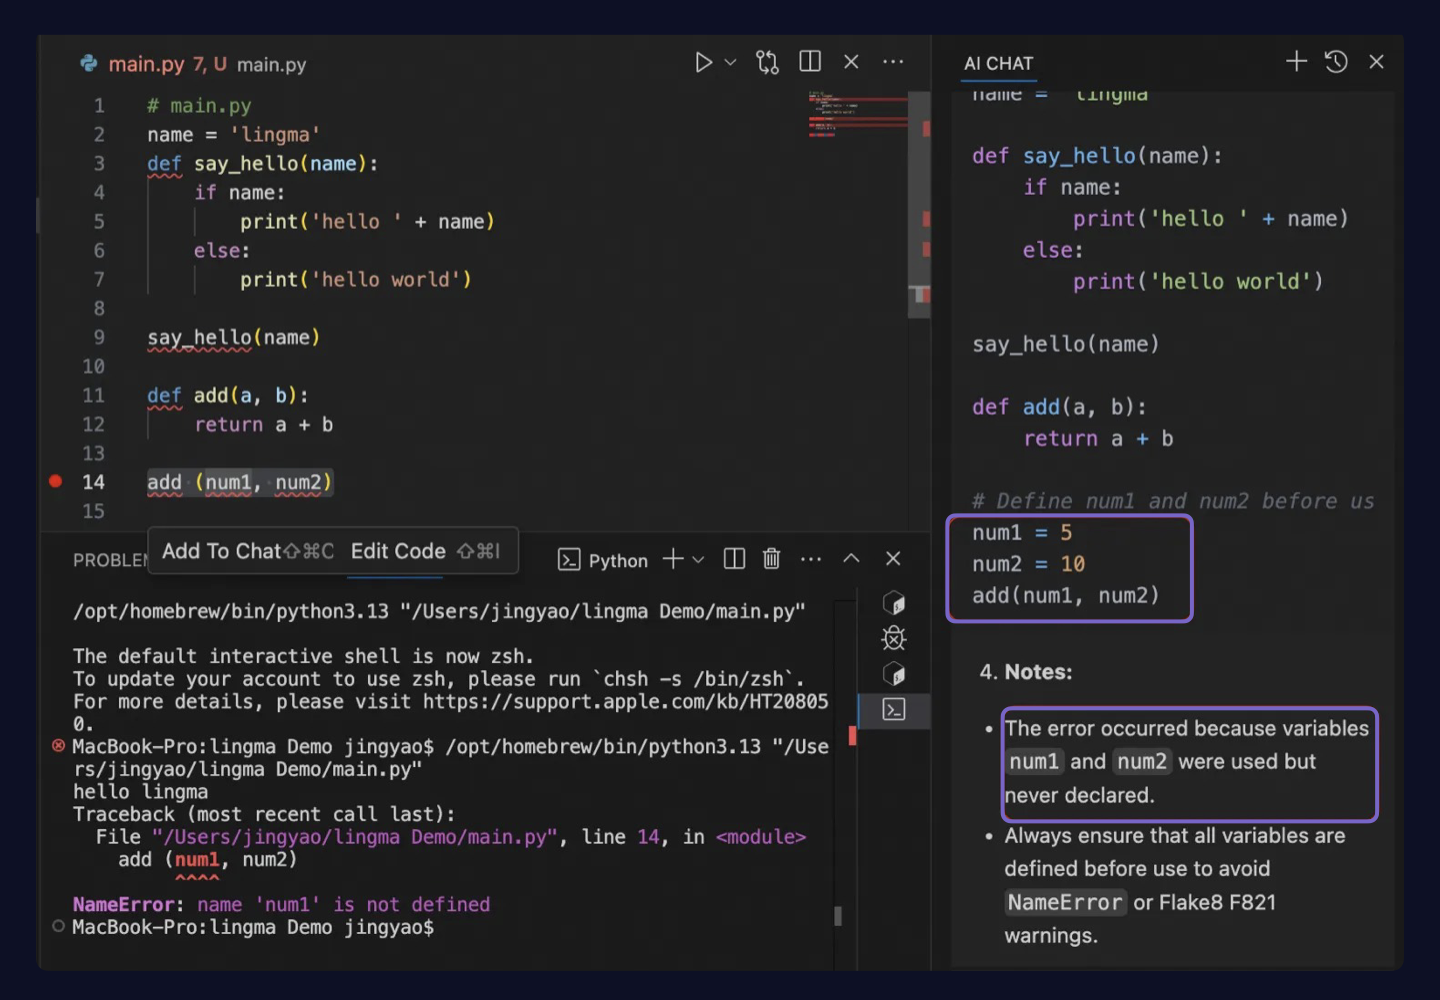
In the example, Qoder CN automatically fixed the issues described above:

For more intelligent coding features, see: User Guide.
Keyboard shortcut operations
Qoder CN IDE comes with a set of default keyboard shortcuts. View the default keyboard shortcuts using one of the following methods:
-
Open the Keyboard Shortcuts editor. In Personal Settings, open .
-
Open using the keyboard shortcut
⌘K→⌘S(macOS) orCtrl+K→Ctrl+S(Windows).
For more information about keyboard shortcut operations, see Qoder CN IDE Keyboard Shortcuts.
Set the Chinese interface
-
Open the Command Palette using the keyboard shortcut
⇧⌘P(macOS),Ctrl+Shift+P(Windows), or select . -
Enter
Configure Display Languageand press Enter. -
Click Chinese (Simplified) (zh-cn), and then click Restart.
-
After restarting, the interface displays in Chinese.