You can create and manage application access points using Terraform. This topic shows how to create an application access point.
Overview
Before your self-managed applications can perform cryptographic operations or retrieve secret values, they must use a client key from an application access point to access a KMS instance.
An application access point is required only when using the KMS instance SDK to access keys or secrets. It is not needed for server-side encryption with other Alibaba Cloud services or for accessing secrets with the main KMS SDK.
You can run the sample code in this topic directly in Terraform Explorer.
Prerequisites
Your root account has full permissions on all your resources. A compromised root account poses significant security risks. We recommend that you use a RAM user and create an AccessKey pair for it. For more information, see Create a RAM user and Create an AccessKey pair.
Grant the RAM user the
AliyunKMSFullAccesspermission to manage Key Management Service (KMS). For more information, see Grant permissions to a RAM user.{ "Version": "1", "Statement": [ { "Effect": "Allow", "Action": [ "kms:*" ], "Resource": [ "*" ], "Condition": {} } ] }Prepare a Terraform runtime environment. You can use one of the following methods:
Use Terraform in Terraform Explorer: Alibaba Cloud provides an online environment for using Terraform without a local installation. This method is ideal for quickly and easily trying out and debugging Terraform at no cost.
Use Terraform to quickly create resources: Alibaba Cloud Cloud Shell has Terraform pre-installed and authentication pre-configured. You can run Terraform commands directly in Cloud Shell. This method provides convenient, low-cost access to Terraform.
Install and configure Terraform on your on-premises machine: This method is suitable for environments with poor network connectivity or for users who need to customize their development setup.
ImportantMake sure that you are using Terraform 0.12.28 or later. To check your Terraform version, run the
terraform --versioncommand.
Resources used
alicloud_kms_network_rule: Creates a network rule.
alicloud_kms_application_access_point: Defines a resource for an application access point.
alicloud_kms_client_key: Defines a resource for a client key.
alicloud_kms_policy: Creates an access control policy.
Procedure
This example shows how to create an application access point in a KMS instance.
Create a working directory and create the following configuration file named
main.tfin it. main.tf is the main Terraform file that defines the resources to be deployed. Before you proceed, make sure that you have created a KMS instance.variable "region" { # The ID of the region. This example uses cn-heyuan, which corresponds to the China (Heyuan) region. default = "cn-heyuan" } provider "alicloud" { region = var.region } variable "instance_name" { default = "tf-kms-vpc-172-16" } variable "instance_type" { default = "ecs.n1.tiny" } # Use a data source to query availability zones. Resources can be created only in specified availability zones. data "alicloud_zones" "default" { available_disk_category = "cloud_efficiency" available_resource_creation = "VSwitch" available_instance_type = var.instance_type } # Create a Virtual Private Cloud (VPC). resource "alicloud_vpc" "vpc" { vpc_name = var.instance_name cidr_block = "192.168.0.0/16" } # Create a VSwitch with the CIDR block 192.168.10.0/24. resource "alicloud_vswitch" "vsw" { vpc_id = alicloud_vpc.vpc.id cidr_block = "192.168.10.0/24" zone_id = data.alicloud_zones.default.zones.0.id vswitch_name = "terraform-example-1" } # Create another VSwitch with the CIDR block 192.168.20.0/24. resource "alicloud_vswitch" "vsw1" { vpc_id = alicloud_vpc.vpc.id cidr_block = "192.168.20.0/24" zone_id = data.alicloud_zones.default.zones.0.id vswitch_name = "terraform-example-2" } # Create a software key management instance and start it with network parameters. resource "alicloud_kms_instance" "default" { # The type of the KMS instance. A value of 3 specifies a software key management instance. product_version = "3" vpc_id = alicloud_vpc.vpc.id # The availability zones of the KMS instance. Use the IDs of the availability zones that you queried. zone_ids = [ "cn-heyuan-a", "cn-heyuan-b", ] # The IDs of the VSwitches. vswitch_ids = [ alicloud_vswitch.vsw.id,alicloud_vswitch.vsw1.id ] # The performance level, and the maximum number of keys, secrets, and VPCs. vpc_num = "1" key_num = "1000" secret_num = "100" spec = "1000" # (Optional) Associate the KMS instance with other VPCs. # If a VPC and the KMS instance belong to different Alibaba Cloud accounts, you must share the VSwitch first. #bind_vpcs { #vpc_id = "vpc-j6cy0l32yz9ttxfy6****" #vswitch_id = "vsw-j6cv7rd1nz8x13ram****" #region_id = "cn-shanghai" #vpc_owner_id = "119285303511****" #} #bind_vpcs { #vpc_id = "vpc-j6cy0l32yz9ttd7g3****" #vswitch_id = "vsw-3h4yrd1nz8x13ram****" #region_id = "cn-shanghai" #vpc_owner_id = "119285303511****" #} } # Save the CA certificate of the KMS instance to a local file. resource "local_file" "ca_certificate_chain_pem" { content = alicloud_kms_instance.default.ca_certificate_chain_pem filename = "ca.pem" }Create the application access point:
# Create a network rule. resource "alicloud_kms_network_rule" "network_rule_example" { # The name of the network rule. network_rule_name = "sample_network_rule" # The description. description = "description_test_module" # The allowed source private IP address ranges. source_private_ip = ["172.16.0.0/12"] } # Create an access control policy. resource "alicloud_kms_policy" "policy_example" { # The name of the policy. policy_name = "sample_policy" # The description. description = "description_test_module" # The list of permissions, including access to cryptographic service keys and secrets. permissions = ["RbacPermission/Template/CryptoServiceKeyUser", "RbacPermission/Template/CryptoServiceSecretUser"] # The list of resources, which applies to all keys and secrets. resources = ["key/*", "secret/*"] # The ID of the KMS instance. kms_instance_id = alicloud_kms_instance.default.id # The access control rules in JSON format, referencing the previously defined network rule. access_control_rules = <<EOF { "NetworkRules":[ "alicloud_kms_network_rule.network_rule_example.network_rule_name" ] } EOF } # Define the application access point resource. resource "alicloud_kms_application_access_point" "application_access_point_example" { # The name of the application access point. application_access_point_name = "sample_aap" # The list of associated policies, referencing the name of the access control policy created earlier. policies = [alicloud_kms_policy.policy_example.policy_name] # The description of the application access point. description = "aap_description" } # Define the client key resource. resource "alicloud_kms_client_key" "client_key" { # The name of the application access point. aap_name = alicloud_kms_application_access_point.application_access_point_example.application_access_point_name # The password for the client key. Replace this with your own password. password = "testPassword@" # The start time of the validity period for the client key. not_before = "2023-09-01T14:11:22Z" # The end time of the validity period for the client key. not_after = "2032-09-01T14:11:22Z" # The local file path to save the client key. private_key_data_file = "./client_key.json" }ImportantAfter the application access point is created, retrieve the client key from the specified local file path and keep it confidential.
As a best practice, set the
passwordusing sensitive input variables in Terraform to avoid exposing it in plain text.
Run the following command to initialize the Terraform environment:
terraform initThe following output indicates that the initialization is successful:
Initializing the backend...

Initializing provider plugins...
- Reusing previous version of hashicorp/alicloud from the dependency lock file
- Using previously-installed hashicorp/alicloud v1.231.0

Terraform has been successfully initialized!

You may now begin working with Terraform. Try running "terraform plan" to see
any changes that are required for your infrastructure. All Terraform commands
should now work.

If you ever set or change modules or backend configuration for Terraform,
rerun this command to reinitialize your working directory. If you forget, other
commands will detect it and remind you to do so if necessary.
Run the following command to create an execution plan and preview the changes:
terraform planRun the following command to create the application access point:
terraform applyWhen prompted, enter
yesand press Enter. The following output indicates that the application access point was created successfully:Do you want to perform these actions? Terraform will perform the actions described above. Only 'yes' will be accepted to approve. Enter a value: yes ... alicloud_kms_network_rule.network_rule_example: Creating... alicloud_kms_policy.policy_example: Creating... alicloud_kms_network_rule.network_rule_example: Creation complete after 0s [id=sample_network_***] alicloud_kms_policy.policy_example: Creation complete after 0s [id=sample_pol***] alicloud_kms_application_access_point.application_access_point_example: Creating... alicloud_kms_application_access_point.application_access_point_example: Creation complete after 0s [id=sample_***] alicloud_kms_client_key.client_key: Creation complete after 0s [id=KAAP.5093ea57-0b84-4455-a8e9-7679bdc****] ... Apply complete! Resources: 4 added, 0 changed, 0 destroyed.Verify the result.
Terraform show command
Run the following command to view the details of the resources that you created using Terraform:
terraform show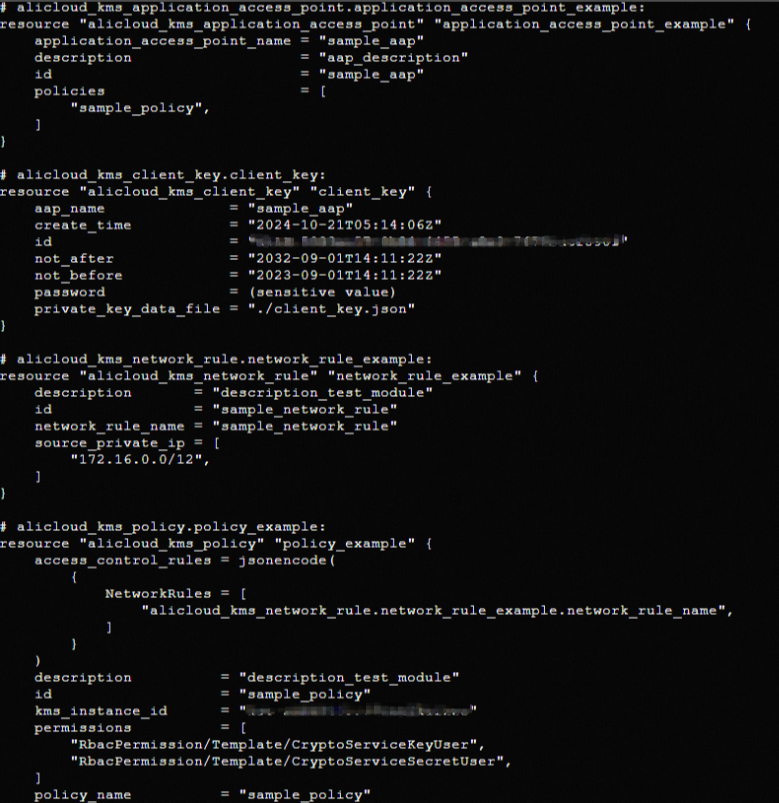
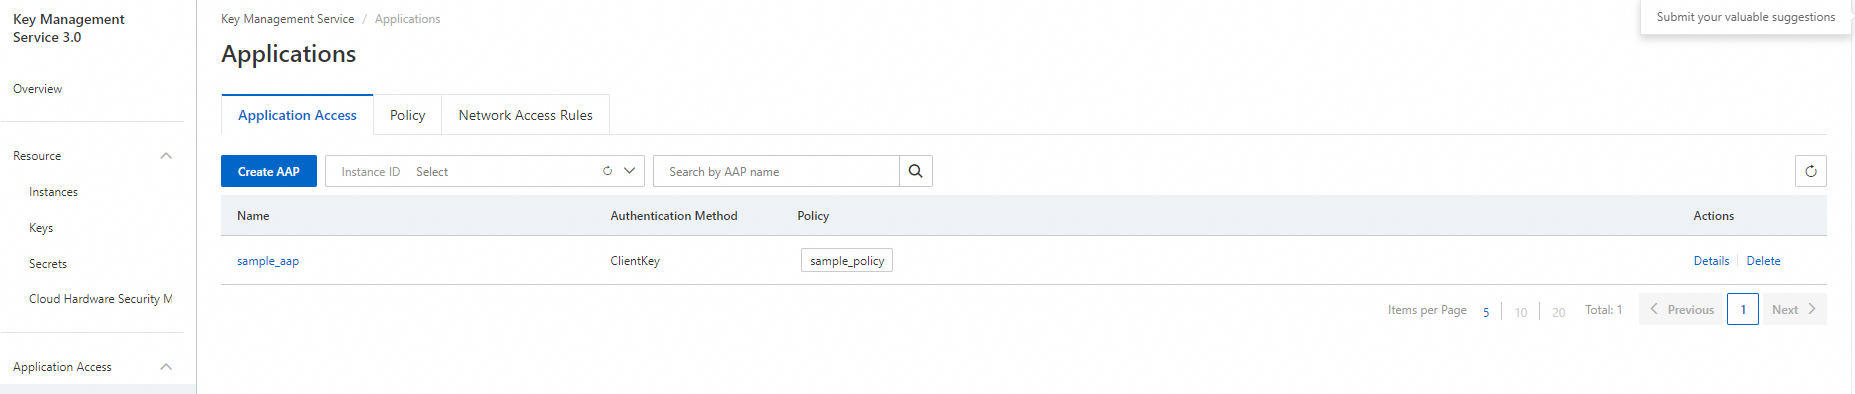
KMS console
Log on to the Key Management Service (KMS) console to view the application access point.
Clean up resources
When you no longer need the resources created or managed by Terraform, run the following command to release them. For more information about the terraform destroy command, see Common commands.
terraform destroyComplete example
You can run the sample code in this topic directly in Terraform Explorer.