Key Management Service (KMS) allows you to back up and restore keys and secrets, enabling quick recovery from accidental deletion or disaster scenarios. This topic describes the backup types available, how to create and manage backups, and how to restore data from a backup.
If you do not back up your keys and secrets, or if your backup expires, these resources become permanently irrecoverable once the keys and secrets are deleted. Back up your data regularly to ensure business continuity.
Supported instance types
Only software key management instances support the backup feature. If the backup feature is not available on your instance, upgrade the image version first. For more information, see Upgrade the image version of a KMS instance.
Hardware key management instances do not support the backup feature. However, hardware-protected keys can partially back up data through the HSM backup feature. A hardware-protected key consists of key material (the encryption key) and key metadata:
Key material is the cryptographic key mapped to the HSM from the hardware-protected key. You can back up key material by using the HSM backup feature. For more information, see Data backup and restoration.
Key metadata is the business information stored in KMS, such as the key ID, the KMS instance to which the key belongs, the Alibaba Cloud Resource Name (ARN), and the key policy. Key metadata cannot be backed up.
Scenarios
Restore a software key management instance after the instance is released.
Recover keys or secrets that were accidentally deleted.
Copy keys or secrets across regions for disaster recovery or latency optimization.
Backup types and features
Each backup resource in KMS stores data from a single software key management instance. KMS supports the following backup types:
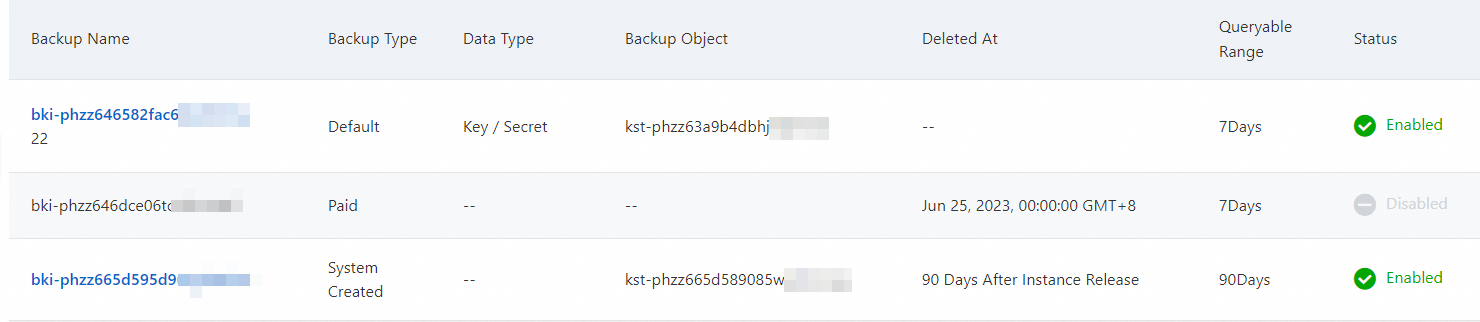
Automatic backup: Enabled by default for software key management instances created after 00:00 on April 26, 2024. The Backup Type is displayed as System Created in the console. We recommend using automatic backup whenever possible. If automatic backup does not meet your requirements, you can create a manual backup.
Manual backup: Available in two tiers: To use manual backup, you must first enable it.
Free default backup (Backup Type: Default): KMS provides one free default backup per region per Alibaba Cloud account.
Purchased backup (Backup Type: Paid): A paid backup resource with additional capabilities.
The following table compares the features of each backup type.
| Feature | Automatic backup | Manual backup (Default) | Manual backup (Purchased) |
|---|---|---|---|
| Pricing | Free | Free | Paid |
| Retention period | 90 days after the associated instance is released | Permanently valid | 15 days after the purchased backup expires. To continue using a backup, renew it before it expires. No operations are supported after expiration. The renewal fee is the same as the cost of a new backup with the same specifications. |
| Manual deletion | Not supported | Supported (by resetting) | Supported (by resetting) |
| Viewable days (queryable range) | 90 days (non-extensible) | 7 days (non-extensible) | 7 to 600 days (selectable at purchase). Can be extended after purchase but cannot be reduced. |
| Daily backup schedule | The first time you enable a backup, a full backup is performed. After that, a full backup runs daily at 00:00, with incremental backups every 5 minutes. | Same | Same |
Viewable days determines how many recent days of backup data you can view and restore. In the console, this value is also displayed as Queryable Range -- both terms refer to the same setting. For purchased backups, choose the number of viewable days based on your key rotation and disaster recovery requirements to balance data availability against storage costs.
Console navigation
All backup operations are performed on the Backups page of the KMS console. To navigate to this page:
Log on to the KMS console.
In the top navigation bar, select a region.
In the left-side navigation pane, choose Security Operations > Disaster Recovery > Backups.
The procedures in subsequent sections assume you have already navigated to the Backups page. When a procedure says "On the Backups page", follow the steps above if you are not already on the page.
Automatic backup
Software key management instances enabled after April 26, 2024 are automatically backed up by KMS. To view the automatic backup data, go to the Backups page and locate the backup where Backup Type is System Created and Backup Object (the source instance) matches your instance.
Manual backup
Step 1: (Optional) Purchase a backup
If you want to use the free default backup, skip this step.
On the Backups page, click Create Backup, configure the following parameters, and then click Buy Now.
Parameter Description Instance Type Select Value-added Plan. This is the purchase category for add-on services such as backup and key rotation. Value-added Plan Select instance backup. Region The region of the software key management instance that you want to back up. Viewable days The number of recent days of backup data you can view and restore. Valid values: 7 to 600. purchase quantity The number of backup resources to purchase. Each backup covers a single software key management instance. Duration The subscription duration of the backup. On the Confirm Order page, read and select Terms of Service, click Pay, and then complete the payment.
Step 2: Enable the backup
On the Backups page, locate the target backup and click Enable in the Actions column.
In the Enable Backup panel, configure the following parameters and click OK.
Parameter Description Instance Type The type of instance to back up. The value is fixed as Software Key Management. Source Instance The software key management instance that you want to back up. Data Type The type of data to back up. Key and Secret are selected by default and cannot be changed. Backup Alias A custom alias for the backup.
The first time you enable a backup, a full backup is performed. After that, a full backup runs daily at 00:00, with incremental backups every 5 minutes.
Step 3: (Optional) View backup data
On the Backups page, locate the target backup and click Details in the Actions column.
On the details page, select a date to view the backup data for that day. The following data types are available:
Data type Description Fully Backed up Keys Keys that were fully backed up at 00:00 on the selected date. Incrementally Backed up Keys Keys created on the selected date. Rotated Keys Keys rotated on the selected date. Fully Backed up Secrets Secrets that were fully backed up at 00:00 on the selected date. Incrementally Backed up Secrets Secrets created on the selected date. Rotated Secrets Secrets rotated on the selected date.
Restore data
You can restore data only to software key management instances within the same Alibaba Cloud account.
Prerequisites
Before restoring, make sure the destination instance meets the following requirements:
The destination instance has a sufficient key or secret quota.
The key or secret that you want to restore does not already exist in the destination instance's region. If it does, delete the existing key or secret before restoring.
If you are restoring a secret, the encryption key used to protect that secret must already exist in the destination instance.
Restoration rules for shared instances
Key and secret restoration rules depend on whether the instance is shared across accounts:
Single account: Keys and secrets can be restored to any software key management instance within the current Alibaba Cloud account.
Multi-account sharing: Only the resource owner can perform backup and restoration operations. For example, if Alibaba Cloud account A shares KMS instance M with Alibaba Cloud account B:
The resource owner (account A) can restore their keys and secrets to any of their software key management instances.
The principal (account B) can only restore to the shared instance M. That is, keys and secrets created by account B in instance M can only be restored to instance M, and both A and B can use them after restoration.
If the sharing arrangement is terminated, the principal's resources can no longer be restored.
Restore procedure
On the Backups page, locate the target backup and click Details in the Actions column. For purchased backups, if the date you need falls outside the current viewable days (queryable range), extend the viewable days first. You cannot restore data from before the backup was enabled. For example, if you enabled the backup on May 1, 2024, with a 10-day viewable period, extending the period to 16 days on May 20 allows you to recover data from May 5 through May 20.
On the details page, select the data type and date from which you want to restore, and click Restore Data in the Actions column.
To restore keys:
Click the appropriate key type tab (such as Fully Backed up Keys), locate the target key, and click Restore Data in the Actions column.
In the Restore Data panel, select the destination instance and click OK.
To restore secrets:
First, make sure the encryption key for the secret exists in the destination instance. If it does not, restore the key first:
Click the appropriate key type tab (such as Fully Backed up Keys), locate the encryption key, and click Restore Data in the Actions column.
In the Restore Data panel, select the destination instance and click OK.
Then restore the secret:
Click the appropriate secret type tab (such as Fully Backed up Secrets), locate the target secret, and click Restore Data in the Actions column.
In the Restore Data panel, select the destination instance and click OK.
Manage backups
Extend the viewable days (queryable range)
You can extend the viewable days only for purchased backups. Reducing the viewable days is not supported.
On the Backups page, locate the target backup and click Details in the Actions column.
On the details page, click Extend Queryable Range, select the number of days to extend to, click Buy Now, and complete the payment.
Renew a backup
Only purchased backups can be renewed.
On the Backups page, locate the target backup and click Renew in the Actions column.
On the Renew page, configure the subscription duration, read and select Terms of Service, click Buy Now, and complete the payment.
Reset a backup
Only free default backups and purchased backups can be reset. Resetting a backup deletes all its data and disassociates it from the source KMS instance.
Resetting will delete all data that has been backed up. Proceed with caution.
On the Backups page, locate the target backup and click Reset in the Actions column.
In the Reset confirmation dialog, verify the information and click Reset.
After the reset, the backup enters the Disabled state. You can then associate the backup with a new software key management instance.
Download backup data
After you download backup data, keep it confidential. Downloaded backup data can only be used to restore data through the KMS console.
On the Backups page, locate the target backup and click Download in the Actions column.
In the Download dialog box, set the Backup Date and click Download. If the date you need is outside the current Queryable Range, extend the viewable days first, and then download the data.
Save the backup data:
Click the
 icon next to Encryption Key to copy the key and save it locally.
Click Download next to Backup Data to download the backup data file.
The Encryption Key displayed during download is the same key you will need to provide as the Decryption Key when uploading backup data. KMS does not store the encryption key or the backup data. Store both the key and the data file securely -- if you lose the encryption key, you will not be able to restore from the downloaded backup.
Upload backup data
If you upload backup data across national borders, you must comply with all applicable laws and regulations governing cross-border data transfer.
On the Backups page, click Upload Backup.
In the Import Backup Data panel, enter the Decryption Key (this is the Encryption Key you saved when you downloaded the backup) and a Backup Name, then click OK.
In the file selection dialog, select the backup data file you want to upload, and click Open.
After the upload completes, the backup appears on the Backups page with a Backup Type of Upload.

FAQ
How do I view the queryable range?
On the Backups page, find the Queryable Range column. This value shows the number of recent days of backup data that you can currently view and restore.
