You can use the rules engine to forward data to DataHub. Then, you can forward the data from DataHub to Realtime Compute for Apache Flink or MaxCompute for computing. This topic describes the data forwarding process. In this example, a Thing Specification Language (TSL) communication topic is used as a source topic.
Prerequisites
An IoT Platform instance whose data can be forwarded to DataHub is created in a region that supports data forwarding to DataHub. For more information about the regions that support data forwarding, see Regions.
A data source named DataSource is created and a TSL communication topic is added to the data source. For more information, see Create a data source.
A DataHub project and a topic that is used to receive data are created. For more information about how to use DataHub, see Manage projects.
ImportantIf you use an Enterprise Edition instance, the DataHub project must reside in the same region in which the Enterprise Edition instance resides.
Usage notes
You can use the new version or previous version of the data forwarding feature to forward data to DataHub. For more information about how to use the previous version of the data forwarding feature, see Forward data to DataHub (by using the previous version of the data forwarding feature).
Create a data destination
- Log on to the IoT Platform console.
On the Overview page, click All environment. On the All environment tab, find the instance that you want to manage and click the instance ID or instance name.
- In the left-side navigation pane, choose .
In the upper-right corner of the Data Forwarding page, click Go to New Version to go to the new version.
NoteIf you have performed this step, the Data Forwarding page of the new version appears after you choose Message Forwarding > Data Forwarding.
- Click the Data Destination tab. On this tab, click Create Data Destination.
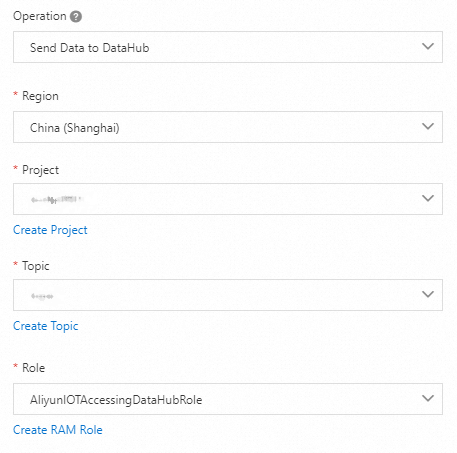
In the Create Data Destination dialog box, enter a name for the data destination. Example: DataPurpose. Configure other parameters and click OK. The following table describes the parameters.
Parameter
Description
Operation
Select Send Data to DataHub from the drop-down list.
Region
Select a region where DataHub is activated.
Project
Select a DataHub project.
You can click Create Project to go to the DataHub console and create a project. For more information, see Manage projects.
Topic
Select a DataHub topic to receive data.
After you select a topic, the rules engine automatically obtains the schema of the topic. Data that is sifted by the rules engine is mapped to the schema.
NoteData must be mapped to the schema in the
${}format. Otherwise, a constant is stored to a schema table.The schema must use the same data type as the rules engine. Otherwise, data cannot be stored.
You can click Create Topic to go to the DataHub console and create a topic.
Roles
Grant IoT Platform the permissions to write data to DataHub.
If no RAM roles exist, click Create RAM Role to go to the Resource Access Management (RAM) console, create a RAM role, and then grant permissions to the RAM role. For more information, see Create a RAM role.
Configure and start a parser
Create a parser named DataParser. For more information, see Create a parser.
On the Parser Details page, associate the parser with the created data source.
In the Data Source step of the wizard, click Associate Data Source.
In the dialog box that appears, select DataSource from the Data Source drop-down list, and then click OK.
On the Parser Details page, associate the parser with the created data destination.
Click Data Destination in the wizard. In the Data Destination section, click Associate Data Destination.
In the dialog box that appears, select DataPurpose from the Data Destination drop-down list, and then click OK.
In the Data Destination section, view and save the data destination ID. In this example, the ID is 1000.
When you write the parser script, you must use the data destination ID.
- On the Parser Details page, click Parser.
In the code editor, enter a script. For information about how modify a script, see Script syntax.
For information about function parameters, see Functions.
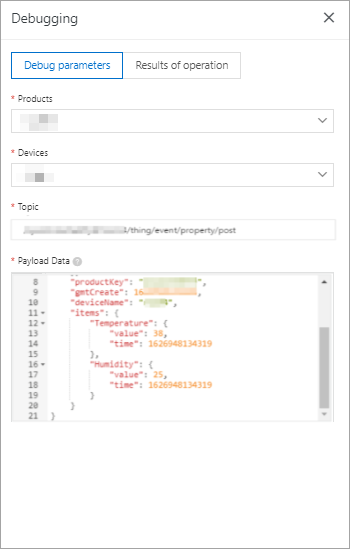
// Use the payload() function to obtain data that is submitted by devices and convert the data to the JSON format.
var data = payload("json");
// Forward the submitted TSL data.
writeDatahub(1000, data);
Click Debugging. In the dialog box that appears, select a product and a device, specify a topic, and then enter payload data to check whether the script runs as expected.
The following figure shows the parameters.
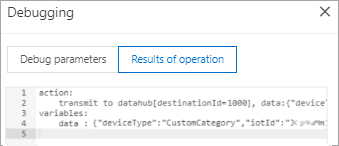
The following result indicates that the script is executed:
- Click Publish.
Go to the Parser tab of the Data Forwarding page. Find the DataParser parser and click Start in the Actions column to start the parser.