This topic explains how to use the Data Forwarding feature of IoT Platform to enable M2M communication between a mobile app and a smart lamp.
Background
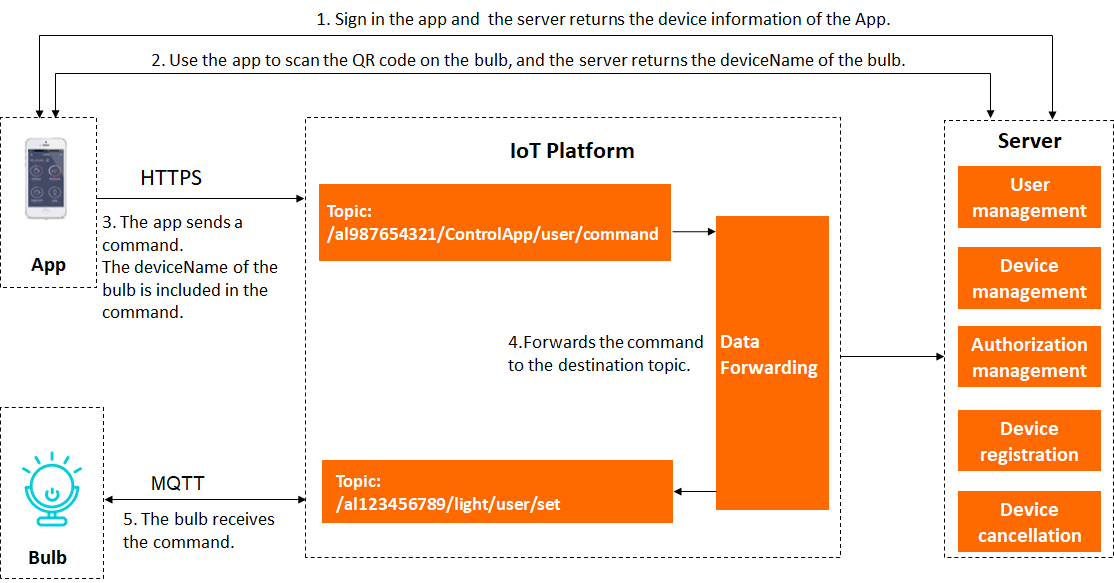
The following figure shows the process of controlling a smart lamp with a mobile app.
Create products and devices
-
In the IoT Platform console, create a product and a device for the mobile app in your instance. For more information, see Create a product and Create a device.
In this example, set the following parameters to create the product: set Product Name to MobileApp, node type to directly connected device. Use the default values for the other parameters.
Set the DeviceName for the device to ControlApp.
In this example, the ProductKey of the MobileApp product is al987654321.
After you create the product and device for the mobile app, you can connect the app to IoT Platform.
When a mobile app user registers and logs in, your server sends device information to the mobile app, allowing the app to connect to the IoT Platform as a device.
-
Add a custom topic with publish permissions for sending control commands.
In this example, add the following topic:
/al987654321/ControlApp/user/command. For more information, see Use custom topics for communication. -
Develop the mobile app.
In this example, the mobile app uses HTTPS to communicate with IoT Platform.
The following code shows the format of the payload data for a control command that the mobile app sends to the smart lamp over the custom topic:
{
    "TargetDevice": "light",
    "Switch": 0,
    "Timestamp": 1557750407000
}
For details about device-side SDK development, see Connect devices by using Link SDK.
-
In the IoT Platform console, in your instance, create a product and a device for the smart lamp and define its features. For more information, see Create a product, Create multiple devices at a time, and Add a Thing Specification Language (TSL) feature.
In this example, set the following parameters to create the product: set Product Name to SmartLamp, node type to directly connected device. Use the default values for the other parameters.
For the device that you create, set DeviceName to light.
In this example, the ProductKey of the SmartLamp product is al123456789.
You can add Thing Specification Language (TSL) features based on your business requirements. For example, add a TSL property named Switch. Set the data type to Boolean (0 for off and 1 for on) to control the smart lamp's switch.
-
Add a custom topic with subscribe permissions to receive control commands from the mobile app.
In this example, add the following topic:
/al123456789/light/user/set. For more information, see Use custom topics for communication. -
Develop the smart lamp device to connect to IoT Platform, and implement the logic to receive and execute commands.
In this example, the device uses MQTT to communicate with IoT Platform. The smart lamp device must subscribe to the topic
/al123456789/light/user/setto receive commands. After the device receives a command, you must develop the logic to execute it.For details about device-side SDK development, see Connect devices by using Link SDK.
Configure Message Forwarding parser
Configure a Message Forwarding parser to forward commands published by the mobile app to the smart lamp's topic.
-
Log on to the IoT Platform console.
On the Overview page, click All environment. On the All environment tab, find the instance that you want to manage and click the instance ID or instance name.
-
In the left-side navigation pane, choose .
Add a data source
For more information about the parameters in the following steps, see Add a data source to be forwarded.
-
Click the Data Source tab and perform the following steps to add a data source.
ImportantIf the page for the previous version is displayed, click Go to New Version in the upper-right corner. On the new page, click the Data Source tab.
-
Click Create Data Source.
-
In the Create Data Source dialog box, enter a name for the data source, such as AppData.
-
Click OK.
-
-
On the AppData page, click Add Topic.
-
In the Add Topic dialog box, select the topic to process and click OK.
In this example, select the topic
/al987654321/ControlApp/user/commandof the mobile app device ControlApp. This allows you to retrieve the values of the TargetDevice, Timestamp, and Switch fields from the message.
Configure a data destination
For more information about the parameters in the following steps, see Add a data destination.
-
Go back to the Data Forwarding page and click the Data Destination tab.
-
Click Create Data Destination.
-
In the dialog box, enter a name for the data destination, such as OtherTopic, and select the SmartLamp product.
For Select Action, select republish to another topic.
-
Click OK.
Configure and start the parser
For more information about the parameters in the following steps, see Configure a parser.
-
Click the Parser tab and perform the following steps to add a parser.
-
Click Create Parser.
-
In the dialog box, enter a name for the parser, such as DataParser.
-
Click OK.
-
-
On the DataParser page, associate a data source.
-
In the Data Source step of the configuration wizard, click Associate Data Source.
-
In the dialog box, select AppData from the Data Source drop-down list.
-
Click OK.
-
-
On the DataParser page, click Data Destination in the configuration wizard to associate a data destination.
-
In the upper-right corner of the Data Destination list, click Associate Data Destination.
-
In the dialog box that appears, select OtherTopic from the Data Destination drop-down list.
-
Click OK.
-
In the data destination list, view and save the data destination ID. In this example, the ID is 1000.
You must use this data destination ID in the parser script.
-
-
On the DataParser page, click Parser Script in the configuration wizard to configure the script.
-
In the script editor, enter a parser script. Set the destination topic to
/al123456789/light/user/set, which the smart lamp device uses to receive commands.For more information about script syntax, see Script syntax. For more information about data forwarding functions, see writeIotTopic() function.
// Use the payload() function to get the message content reported by the device and parse it as JSON. var data = payload("json"); // Get the device name. In this example, the value of TargetDevice is the smart lamp device, light. var dn = data.TargetDevice; // Define the destination topic that the smart lamp subscribes to. var topic_set = "/al123456789/"+dn+"/user/set"; // Call writeIotTopic() to forward the original payload to the destination topic (ID 1000). writeIotTopic(1000, topic_set, data) -
Below the script editor, click Save.
-
Click Debugging. In the panel that appears on the right, select a product and a device, and enter a topic and payload to test the script.
For Product, select MobileApp. For Device, select ControlApp. For Topic, enter
/productKey/ControlApp/user/command. For Payload Data, enter{"TargetDevice": "light", "Switch": 0, "Timestamp": 1557750407000}.A successful test produces the following output.
action: transmit to republish[destinationId=1000], data:{"Switch":0,"Timestamp":1557750407000,"TargetDevice":"light"} variables: data : {"Switch":0,"Timestamp":1557750407000,"TargetDevice":"light"} topic_set : /al123456789/light/user/set dn : light -
In the lower-left corner of the panel, click Close.
-
Below the script editor, click Publish.
-
-
Return to the Parser tab on the Data Forwarding page. In the Actions column for the DataParser parser, click Start.
-
Click OK to start the parser.
Communicate between devices
-
The mobile app user scans a QR code to bind the app to the smart lamp.
When the app sends a binding request to your server, the server returns the DeviceName of the successfully bound smart lamp. In this example, the device name is light.
-
The user sends a control command from the mobile app.
-
The mobile app sends a command over a custom topic. In this example, the topic is
/al987654321/ControlApp/user/command. -
IoT Platform uses the Message Forwarding parser to forward the command to the smart lamp topic. In this example, the topic is
/al123456789/light/user/set. -
After the smart lamp receives the command, it performs the corresponding action.
NoteAfter unbinding, the app can no longer control the smart lamp.
-