This topic describes how to integrate IoT Platform with the Alibaba Cloud big data platform to implement real-time analysis, statistics collection, computation, and visualization of device data.
Prerequisites
-
The services used in this guide include ApsaraDB RDS for MySQL, IoT Platform, and more.
-
This guide assumes you are familiar with the configuration and usage of the services involved.
Background information
-
Goal: Display real-time data from the devices of a specific product on a DataV dashboard.
-
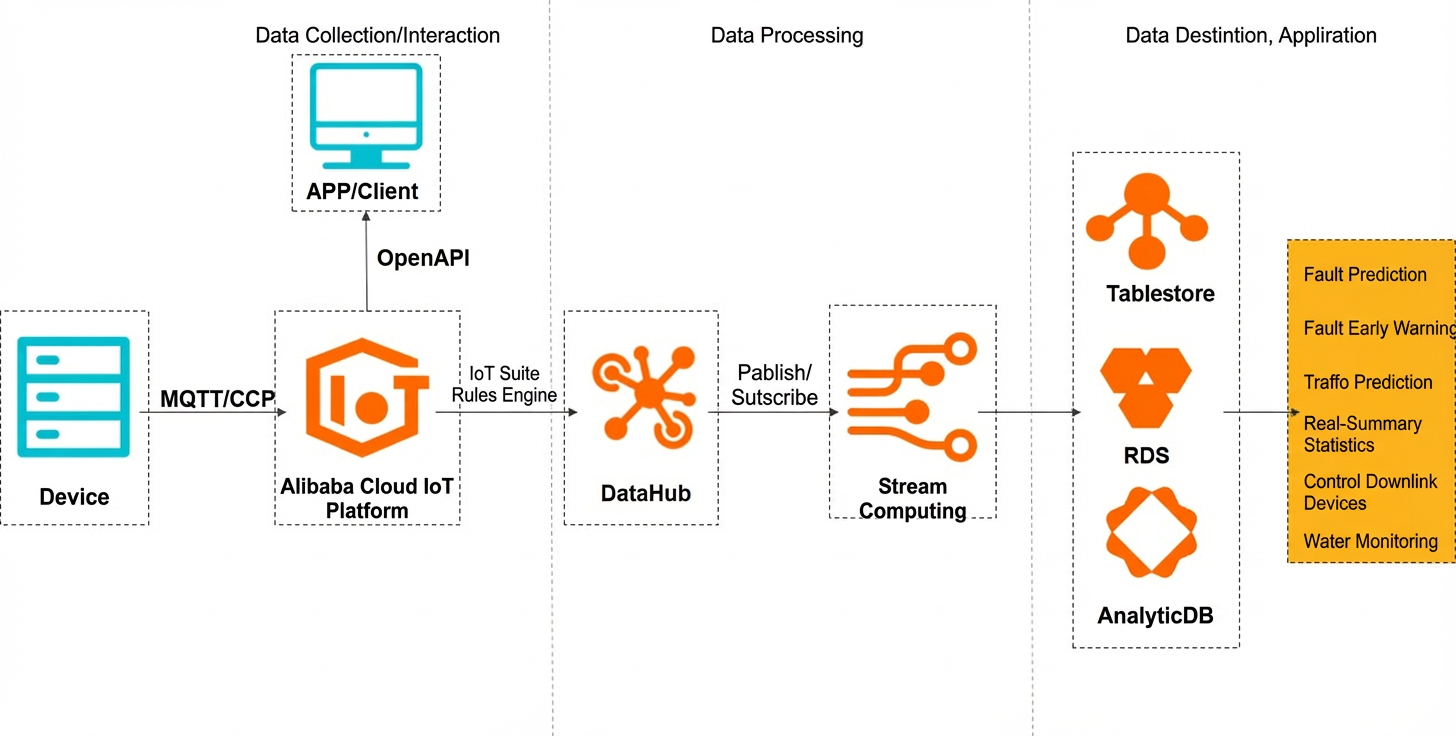
Workflow:
-
IoT Platform collects data from devices.
-
The rules engine in IoT Platform forwards device data of a specific product to the streaming data processing service DataHub.
-
Based on your configuration, DataHub sends device data to Realtime Compute for Apache Flink for processing. Realtime Compute then writes the processed data to an ApsaraDB RDS for MySQL database. If your data does not require processing, you can use DataConnector to sync data directly from DataHub to the ApsaraDB RDS for MySQL database.
-
DataV uses the MySQL database table as a data source to display device data in real time.
-
Procedure
-
Create an ApsaraDB RDS for MySQL database to store device data.
To learn more about ApsaraDB RDS, see the ApsaraDB RDS for MySQL.
-
Log on to the ApsaraDB RDS console.
-
On the Instances page, click Create Instance to create a MySQL database instance.
NoteThe ApsaraDB RDS for MySQL instance must be in the same region as your IoT Platform devices and DataHub project.
-
In your list of database instances, click Manage next to the target instance.
-
In the left-side navigation pane, click Accounts to create a database account.
-
In the left-side navigation pane, click Databases to create a database.
-
In the left-side navigation pane, click Data Security and add a database whitelist. For more information, see Set an IP whitelist.
-
In the left-side navigation pane, click Basic Information to view the information about the database.
You will need this information in later steps to configure data synchronization in DataHub, DataV, and Realtime Compute for Apache Flink.
-
At the top of the Basic Information page, click Log On to Database and enter your credentials to log on to the database.
-
Create a database table. For example, create a table named mytable that contains two fields:
Table 1. mytable
Parameter
Type
Description
d_data
varchar(32)
Timestamp of the data point.
device_num
int
The number of active devices.
-
-
In the IoT Platform console, create a product and a device, and configure the rules engine.
-
Log on to the IoT Platform console.
On the Overview page, click All environment. On the All environment tab, find the instance that you want to manage and click the instance ID or instance name.
-
In the left-side navigation pane, choose , and then create a product. For more information, see Create a product.
-
After the product is created, go to the Product Details page. Based on your business needs, create custom topic categories or define product features (a TSL model) for the product.
-
In the left-side navigation pane, choose , and then register a device.
-
In the left-side navigation pane, choose to create a rule.
ImportantIf the Data Forwarding (New Version) page is displayed, click Back to Previous Version in the upper-right corner, then click View next to the target rule.
-
In the list of rules, click View for the rule.
-
On the Data Forwarding Rule page, click Write SQL in the Data Processing section to write and debug a data processing SQL statement for the rule.
In the Write SQL dialog box, in the Topic configuration area, select TSL Model Data Submitted, Home Thermostat, Device1, and Default Module in sequence. Set the SELECT fields of the SQL statement to
items.temperature.value as temperature,items.humidity.value as humidity,deviceName() as deviceName, andtimestamp() as time, and leave the WHERE condition empty. After you complete the configuration, click OK. -
Click Add Operation in the Data Forwarding section and configure a rule action to forward device data to the DataHub topic. For more information, see Set a data forwarding rule.
-
After the rule is configured, go to the Data Forwarding page. In the list of rules, click Start for the rule to enable it.
After the rule is started, use a simulated device to send messages and verify that the messages are successfully forwarded to DataHub. You can view the device logs on the Device Log page of the device. In the DataHub console, you can monitor the change in data volume in the shards of the corresponding topic and use the data sampling feature to view the specific message content.
-
-
Develop the device-side client and connect the device to IoT Platform.
This example uses the Java Link SDK for device development: Download Java SDK Demo. For development instructions, see Environment requirements and configuration.
After developing the device-side application, flash it onto the physical device. When the device is powered on and connected to the network, it establishes a connection with IoT Platform and can exchange data. The data is forwarded to DataHub through the rules engine, processed by Realtime Compute for Apache Flink, and then written to the database.
-
To test your dashboard, have multiple devices send messages. The number of active devices on the dashboard will update in real time.