Configure Google Workspace as a SAML 2.0 identity provider (IdP) so that enterprise users can access the IDaaS Enterprise Identity and Access Management (EIAM) user portal through single sign-on (SSO).
Prerequisites: Super administrator access to Google Workspace (to create and configure a SAML application in the Google Admin Console). An activated Alibaba Cloud IDaaS EIAM instance with access to the IDaaS management console.
Step 1: Create a SAML application in Google Workspace
-
Go to the Google Admin Console and navigate to Apps > Web and mobile apps.
-
In the first row of the Web and mobile apps list, click Add app and select Add custom SAML app from the dropdown menu.
-
Enter an App name and an optional Description. You can also upload an App icon. Then, click Continue.
-
On the Google Identity Provider details page, obtain the SAML IdP metadata. Click Download metadata to save the metadata file locally. You will need this file when creating the SAML identity provider in IDaaS.
-
On the Service Provider details page, fill in the required fields. ACS URL and Entity ID are mandatory. The actual values are available only after you create the SAML identity provider in IDaaS. You can enter placeholder values for now; a later step will guide you to update these fields. Then, click Continue.
-
On the Attribute mapping page, configure the mapping from Google Directory to SAML attributes. We recommend configuring at least the following attributes:
-
Basic information > Email: Map to
emailornameIDto uniquely identify the user. -
Add other attribute mappings as needed (such as first name and last name).
-
After the configuration is complete, click Done.
By default, Google Workspace signs only the Assertion. If you select the Sign response option, only the Response is signed.
Step 2: Create a SAML identity provider in IDaaS
-
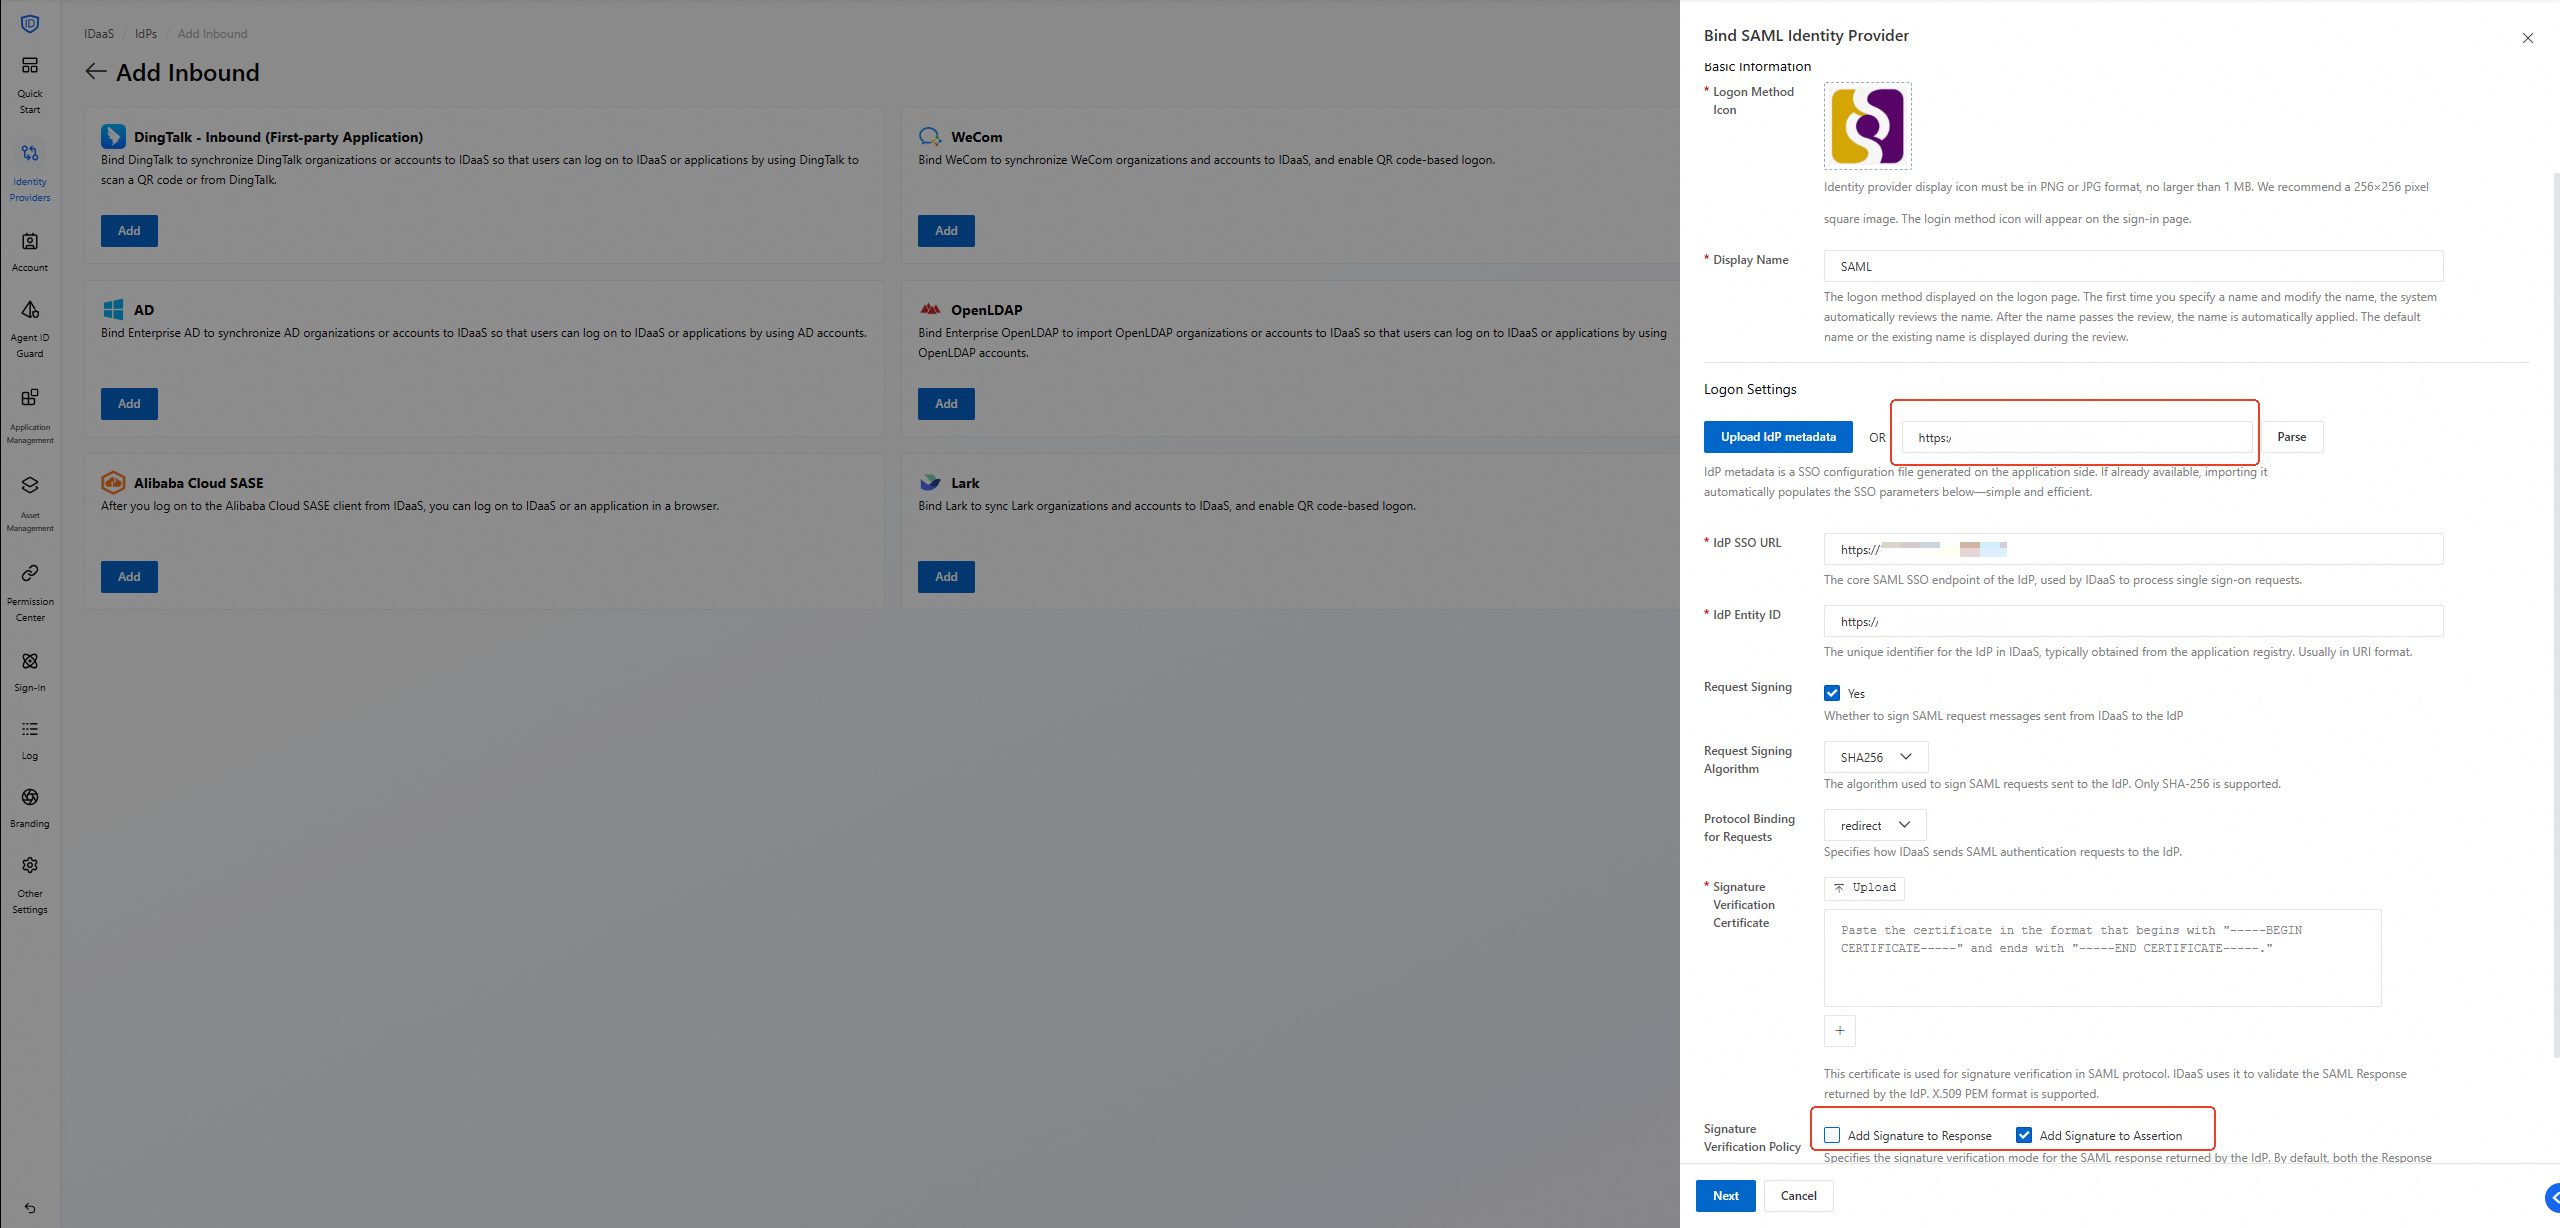
In the IDaaS EIAM console, click Identity Providers > Inbound > Add Inbound, select SAML Identity Provider, and then click Add.
-
In the dialog box that appears, configure the following settings in the Bind SAML Identity Provider section:
-
Display Name: a name for the SAML identity provider. This name appears on the sign-in page.
-
Logon Settings: enter the Metadata URL from your IdP, and then click Parse. The system automatically parses the XML and retrieves the IdP SSO URL, IdP Entity ID, and Signature Verification Certificate.
-
Signature Verification Policy: Select a mode that matches the signing strategy configured on the Google Workspace side. For example, select Assertion signing.
-
-
Click Next to proceed to the scenario selection page.
-
Select the account binding scenarios that match your requirements, and then click Create.
Scenario
Description
Manual Account Binding
Prompts users to manually link their SAML account to an IDaaS account if no binding exists.
Automatic Account Binding
Automatically binds the account if the IDaaS field value matches the NameID in the SAML Response and no binding exists.
Auto create user
Creates a new IDaaS account for unregistered SAML users. Account information updates on each sign-in.
Automatically Update Information
Updates account information from SAML assertion attributes on each sign-in, based on field mapping rules.
If you enable Automatically Update Information, the Field Mapping configuration page appears. For configuration details, see SAML IdP Field Mapping Configuration Guide.
Step 3: Configure SSO information in Google Workspace
-
Go to the IDaaS EIAM console. Navigate to Identity Providers > IdPs > Inbound. Click the SAML IdPs that you created in Step 2, and then click Configuration Information to obtain the following values:
-
SP Entity ID: corresponds to the Entity ID field in the Google Workspace SAML application.
-
SP ACS URL: corresponds to the ACS URL field in the Google Workspace SAML application.
-
-
Return to the Google Admin Console and open the SAML application that you created in Step 1 to go to the Service Provider details page. Replace the Entity ID with the SP Entity ID that you obtained in the previous step. Replace the ACS URL with the SP ACS URL.
-
On the application details page, go to the User access section and click Edit. Select the target Organizational unit or Group to enable SSO for the SAML application for specific organizational units or groups.
Step 4: Verify the user sign-in flow
Verify that the SSO sign-in flow works as expected.
-
Access the IDaaS EIAM user portal. The SAML identity provider login option appears under other sign-in methods.
-
Click the SAML login option. The browser redirects to Google Workspace for authentication.
-
If the Google account is not signed in, the Google sign-in page appears. After you sign in, the browser redirects back to IDaaS.
-
If already signed in, the browser redirects directly back to IDaaS.
-
-
After authentication, the system matches accounts based on the account binding scenario that you configured in Step 2. If automatic matching to an IDaaS user fails, manually bind the account or allow automatic account creation to complete the sign-in, depending on your scenario configuration.