Configure an enterprise identity provider (IdP) such as Okta, Azure AD, or a self-developed system to enable OIDC-based single sign-on (SSO) to IDaaS EIAM.
Terms
Binding an OIDC IdP lets users log on to IDaaS EIAM with accounts from Okta, Azure AD, or a self-developed system.
|
Term |
Description |
|
OIDC |
An upgraded version of the OAuth protocol that builds an identity layer based on OAuth 2.0. For common OIDC configurations, see Configure OIDC SSO. |
|
IdP |
Identity provider. In this context, Okta, Azure AD, or a self-developed system. As defined in Security Assertion Markup Language (SAML), an IdP verifies and authenticates a user and returns the authentication result in a SAML response to a service provider (SP). In general, an IdP refers to a centralized identity management platform. |
|
SP |
Service provider. In this context, IDaaS EIAM. An SP receives and parses authentication responses from an IdP. In general, an SP is an application that interacts with an IdP. |
|
Federated authentication |
An authentication mode where an SP trusts the result from an IdP. IDaaS EIAM trusts results from Okta, Azure AD, or a self-developed system, allowing users to log on with their IdP accounts. Commonly used for single sign-on (SSO). |
Bind IDaaS to an OIDC IdP
IDaaS EIAM uses the OIDC authorization code flow for federated authentication. A user can use an account configured in your IdP such as Okta, Azure AD, or a self-managed system to log on to IDaaS EIAM, provided that your IdP supports the standard OIDC authorization code flow.
SSO can only be initiated from the IDaaS EIAM logon page (SP-initiated). The IdP appears as a logon option on that page. IdP-initiated SSO is not supported.
Binding establishes mutual trust between IDaaS and the IdP. You must configure settings in both systems.
Step 1: Configure basic information
Obtain the configuration information in IDaaS
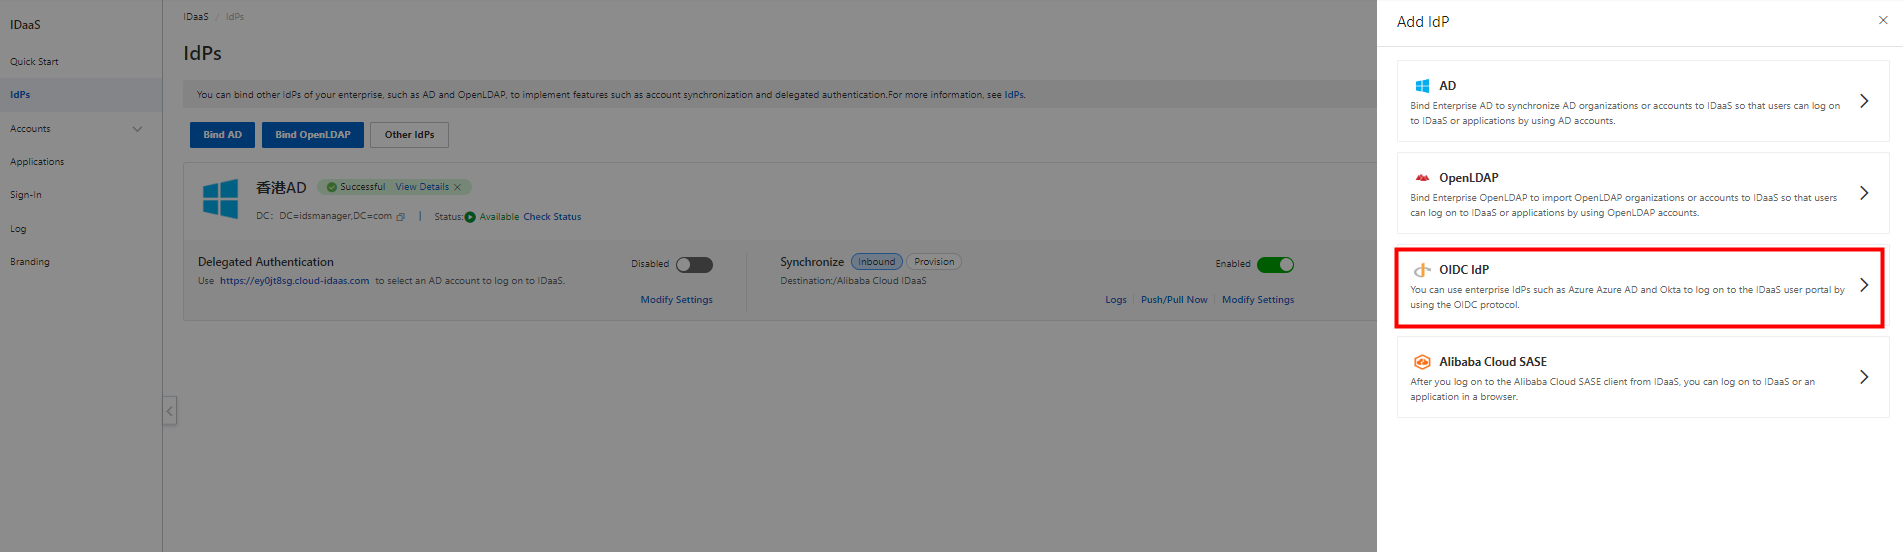
1. On your IDaaS EIAM instance page, click IdPs in the left navigation pane. Click Other IdPs, and then click OIDC IdP in the Add IdP panel.
2. In the Bind OIDC Identity Provider panel, copy the IDaaS Redirect URI. You will use this URI when creating an application in your IdP.

Obtain the configuration information in your IdP
1. Create an OIDC application in your IdP and set the redirect URI to the IDaaS Redirect URI you copied.
2. Obtain the following values from your IdP and enter them in the Bind OIDC Identity Provider panel:
-
Client ID: the ID of your IdP application.
-
Client Secret: the secret of your IdP application.
-
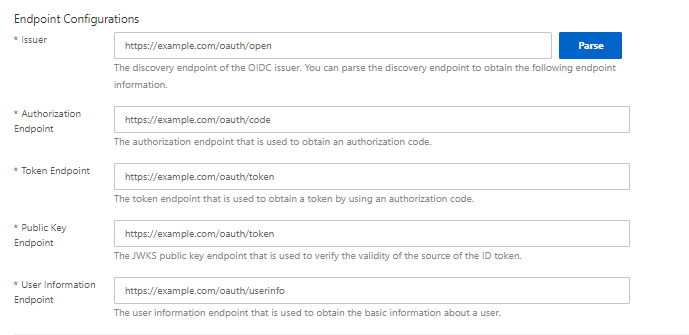
Issuer: the discovery endpoint of the OIDC issuer.
3. In the Endpoint Configurations section, click Parse to auto-populate the endpoints.
4. Verify the settings and click Next.
Step 2: Select a scenario
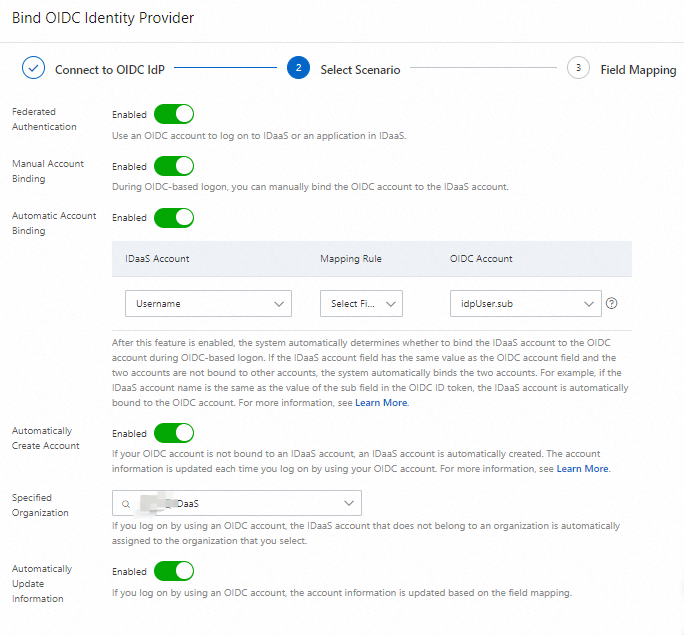
In the Select Scenario step, enable features as needed.
-
Federated Authentication: Enables OIDC-based logon.
-
Manual Account Binding: Lets users manually bind an unbound OIDC account to an IDaaS account during logon. After binding, the user can log on with the OIDC account.
-
Automatic Account Binding: If a matching IDaaS account field exists, the system automatically binds the accounts. Set Mapping Rule to Select Field and choose a field in the ID token, or use an advanced expression for a custom field. For more information, see Advanced account field expressions. After binding, the user can log on with the OIDC account.
-
Automatically Create Account: If no matching IDaaS account exists, one is automatically created during OIDC-based logon. The account information is updated on each subsequent logon.
-
Specified Organization: Assigns unaffiliated IDaaS accounts to a selected organization during OIDC logon. Defaults to the root organization. You can search for an organization or select an organization from the drop-down list.
-
Automatically Update Information: Updates the IDaaS account information based on field mappings on each OIDC logon.
If you enable both Manual Account Binding and Automatic Account Binding, automatic binding takes priority. The Automatic Account Binding feature is available only for IDaaS instances of Trial Edition and Enterprise Edition. If you want to use this feature, make sure that your IDaaS instance meets this requirement in advance.
Verify the settings and click Confirm.
Step 3: (Optional) Configure field mappings
After you turn on Automatically Create Account or Automatically Update Information, the Field Mapping step appears.
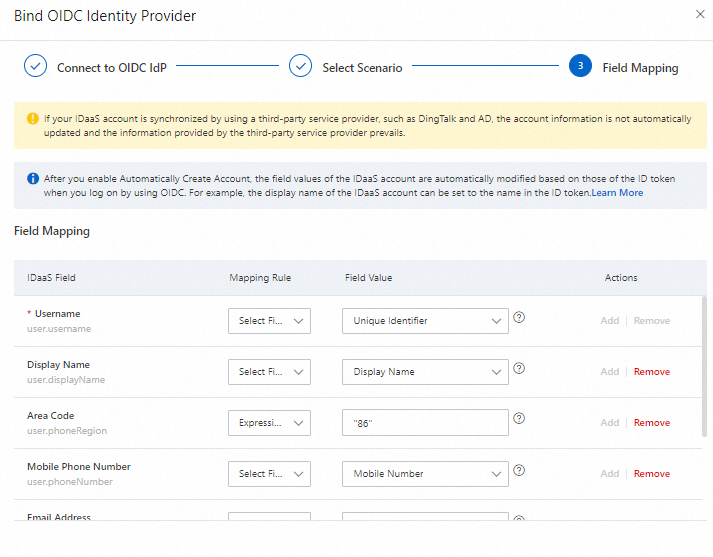
If an IDaaS account is created by an IdP such as DingTalk or Azure AD, the account data is updated based on the IdP instead of field mappings.
With Automatically Create Account enabled, the IDaaS account fields are populated from the ID token on each OIDC logon. For example, the display name is set to the name in the ID token.
Logon priority: bound OIDC account > automatic binding > manual binding or auto-created account.
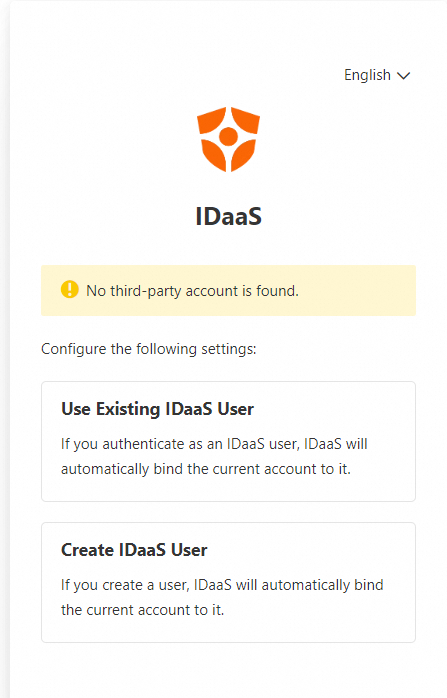
If an OIDC account is not bound and cannot be automatically bound, the following dialog box appears. Users can manually bind to an existing IDaaS account or create a new one.
Deleting an OIDC IdP on the IdPs page immediately removes all related configurations. This action cannot be undone, and the associated features become unavailable.