Bind an outbound corporate Active Directory (AD) to IDaaS as an identity provider (IdP) to synchronize IDaaS organizations and accounts to AD and let users log on with their AD credentials.
How it works
Active Directory is a core directory service in Microsoft Windows Server. It provides centralized identity authentication, authorization, and directory management for enterprise networks.
When you bind AD as an outbound IdP, IDaaS initiates all connections to your AD server — no inbound firewall ports need to be opened. Using the network endpoint feature, you can access AD over a private network or a controlled public egress IP, keeping your directory service off the public internet.
Prerequisites
Before you begin, ensure that you have:
An IDaaS instance
AD administrator account credentials with at least read permissions
The AD server address and port (default port:
389; LDAPS or StartTLS: port636)(Recommended) StartTLS or LDAPS configured on your AD server for encrypted connections
Bind an AD
Complete the following steps in order:
| Step | What you do |
|---|---|
| 1. Connect to the AD | Enter server details and credentials |
| 2. Select scenario | Choose which capabilities to enable |
| 3. Configure field mapping | Map IDaaS fields to AD attributes |
| 4. Attach account | Attach historical AD accounts to IDaaS accounts |
Step 1: Connect to the AD
Log on to the IDaaS console. Select your IDaaS instance and, in the Actions column, click Console.IDaaS console
Click IdPs > Outbound > Add Outbound. Find AD in the list and click Add.

In the Bind AD panel, fill in the following fields.
Field Description Display Name The name users may see when they log on to or use IDaaS. Network Access Endpoint Controls how IDaaS reaches your AD server. Shared endpoints use shared, fixed public egress IP addresses — configure these on your AD server's IP allowlist to restrict access. Dedicated endpoints use dedicated, custom egress IP addresses and can reach your AD over a private network connection to Alibaba Cloud VPC, so no public ports are required. For details, see Network endpoints. Server address The address and port of your AD server. AD uses port 389by default; LDAPS or StartTLS uses port636. Example:127.0.0.1:389.Enable StartTLS Encrypts the connection between IDaaS and AD, improving transmission security. Enable this unless your network is already secured end-to-end. See AD security configuration. Administrator Account The AD account IDaaS uses to read AD data for synchronization and delegated authentication. The account must have at least read permissions. Accepted formats: User Principal Name (UPN) ( example@example.com) or Distinguished Name (DN) (cn=admin,ou=Technical Department,dc=example,dc=com).Administrator Password The password for the administrator account. 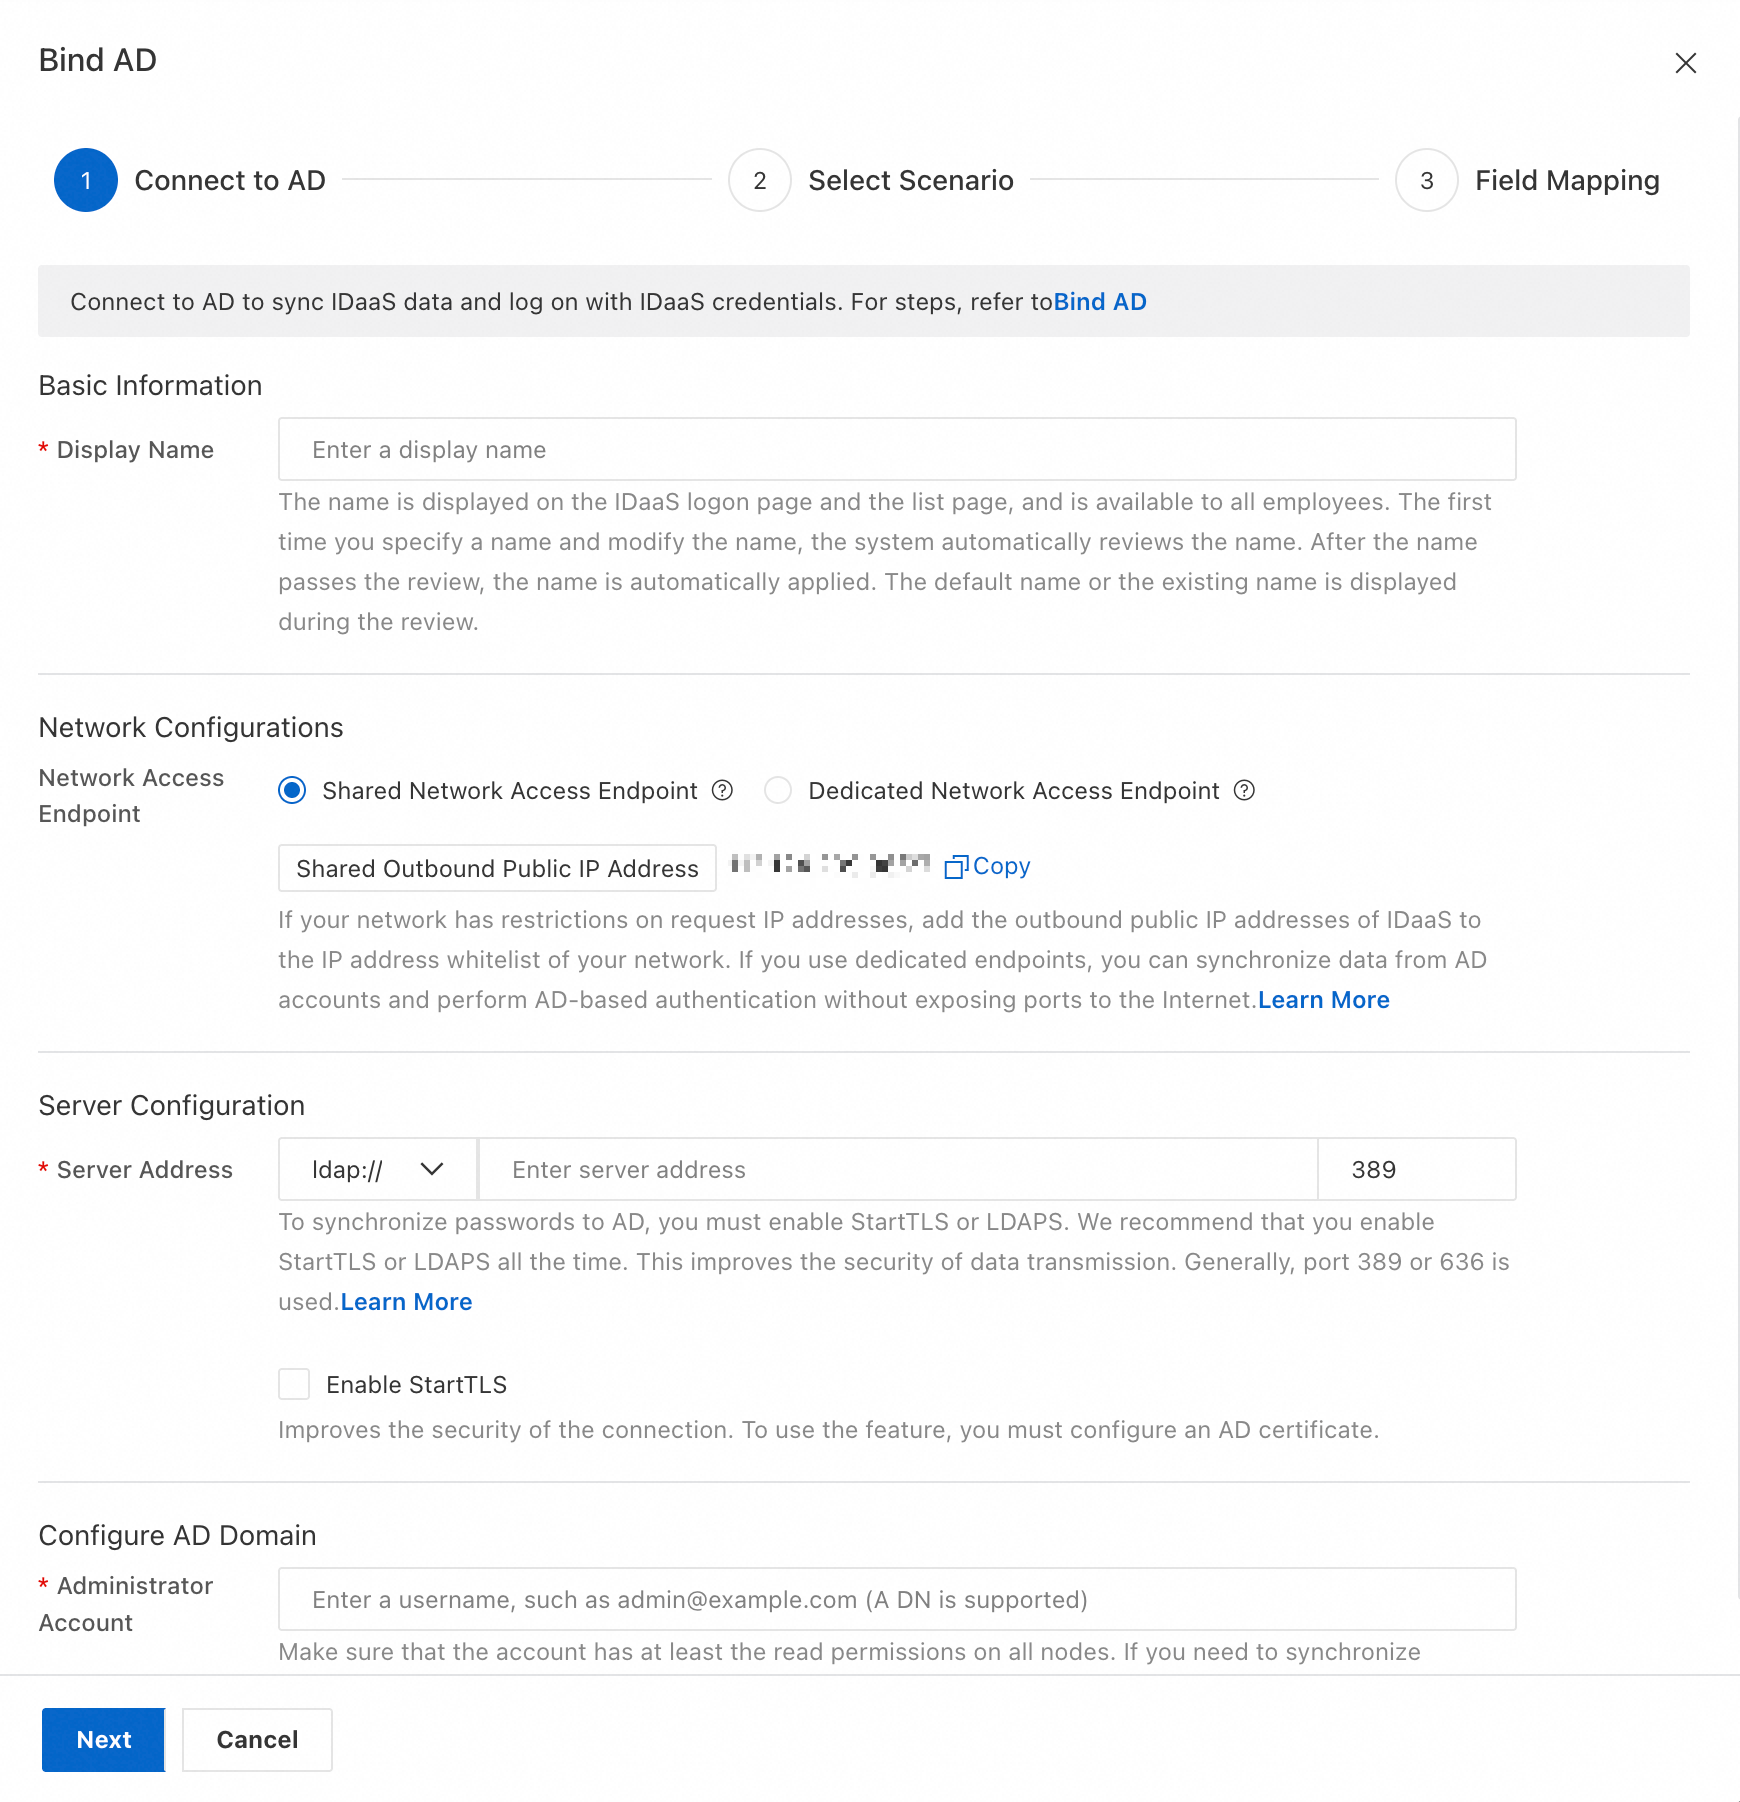
After you confirm the information, click Next.
Step 2: Select scenario
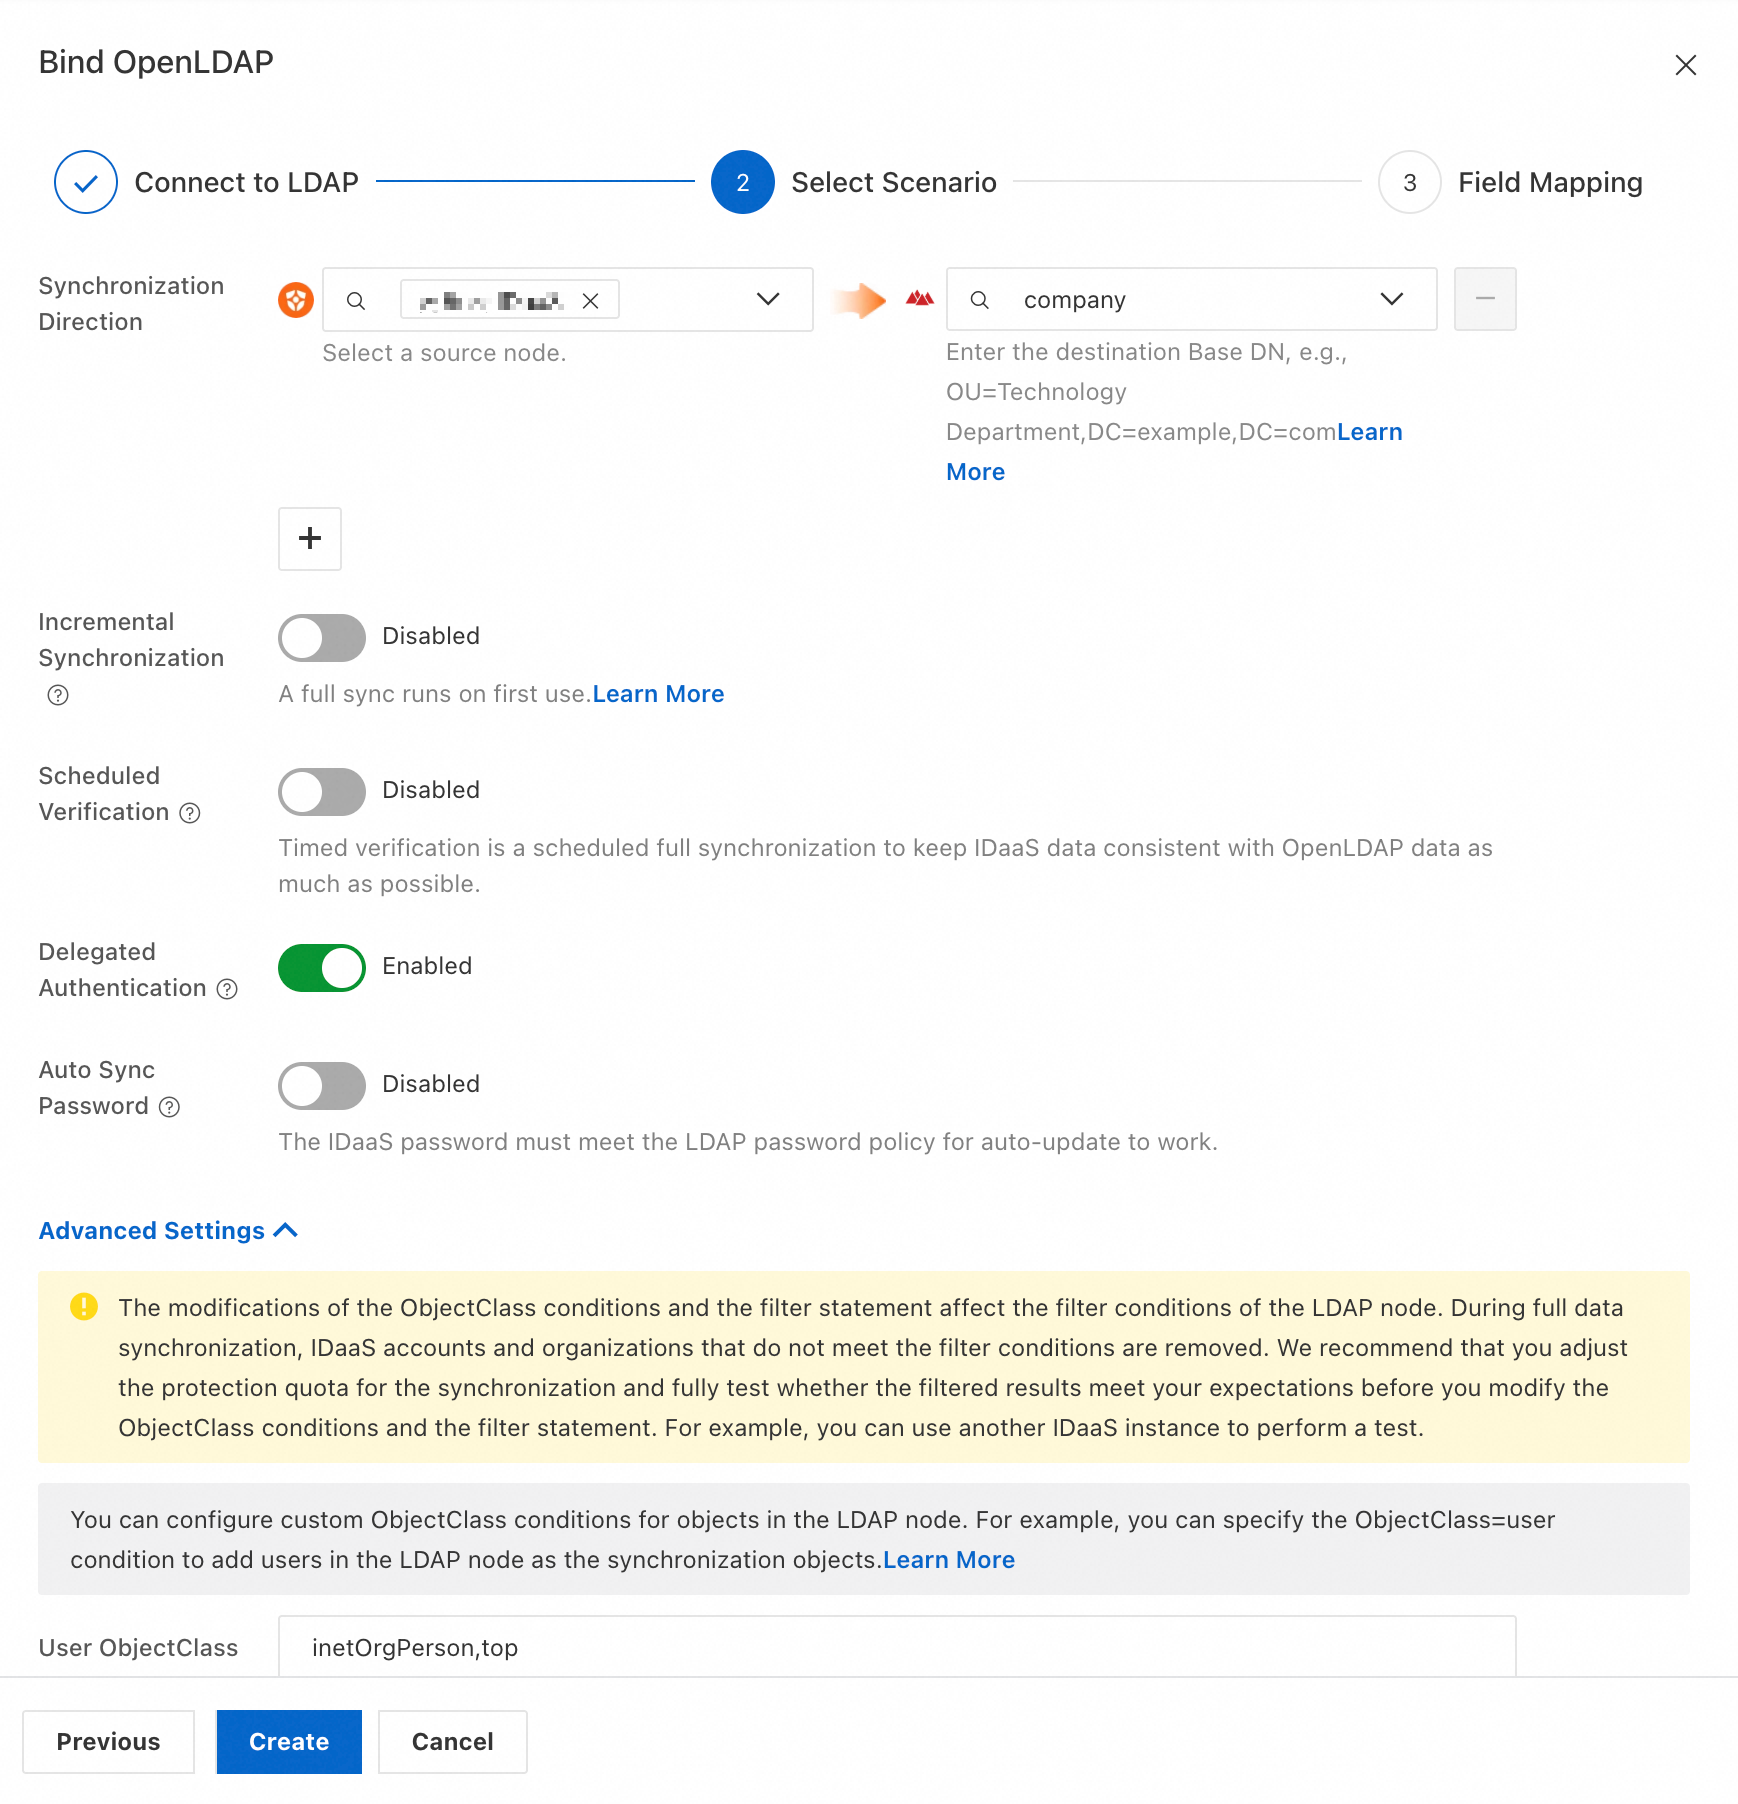
On the Select Scenario page, choose which AD capabilities to enable.
Basic settings
| Setting | What it does |
|---|---|
| Synchronization Direction | Syncs data from a selected IDaaS source node to users or organizations in an AD target node. Set Source Node to the IDaaS node and enter the DN of the AD target node. The AD root node DN is typically dc=example,dc=com. |
| Incremental Synchronization | Exports data changes from IDaaS in real time. |
| Scheduled Verification | Runs a periodic full synchronization to keep IDaaS and AD data consistent. |
| Delegated Authentication | Lets users log on to IDaaS using their AD credentials. |
| Auto Sync Password | Pushes IDaaS password changes to AD automatically. Requires StartTLS or LDAPS to be enabled. The IDaaS password must meet the AD password policy; otherwise the password cannot be automatically synchronized. |
Advanced settings
| Setting | What it does |
|---|---|
| User ObjectClass and Organization ObjectClass | Defines which objectClass values identify users and organizations in query results. For example, objects where objectClass=user are treated as users. The defaults work for standard AD schemas — change these only if your AD uses a custom schema. |
| User RDN and Organization RDN | If you have customized the Relative Distinguished Name (RDN) of objects in your AD, configure the write identity here. By default, IDaaS uses ou as the RDN for organizations when synchronizing. |
| User Sign-in ID | The AD attributes IDaaS queries to look up a user during delegated authentication. IDaaS matches the supplied password against the user found by these attributes. Separate multiple attributes with a comma (,) to create an OR relationship — users can log on with any of the listed attributes. Make sure each attribute value maps to exactly one AD user; otherwise, logon fails. Commonly used attributes: userPrincipalName, sAMAccountName, phone number, email, or employee ID. |
Step 3: Configure field mapping
Field mapping controls how IDaaS account data maps to AD account attributes. Configure field mapping when:
You have existing users in AD and need to attach them to IDaaS accounts.
You want to use a specific IDaaS field as the value of an AD attribute — for example, using the IDaaS mobile number as the AD username.
To use a field as a Mapping Identifier (the key used to match IDaaS accounts to AD accounts), manually enable it for that field. The following figure shows the Mobile Phone field with Mapping Identifier enabled.

After completing the configuration:
Click Save and Push to save the configuration and immediately trigger a full data synchronization. All data from the IDaaS source node is imported and placed under the AD target node.
Click Save Only to save the configuration without triggering synchronization.
For a complete reference on field mapping options, see Field mapping.
Step 4: Attach account
If historical data for users or organizations exists in AD, you must attach the AD accounts to the IDaaS accounts. Use the field mapping configured in Step 3 to match existing AD accounts to their corresponding IDaaS accounts.
AD security configuration
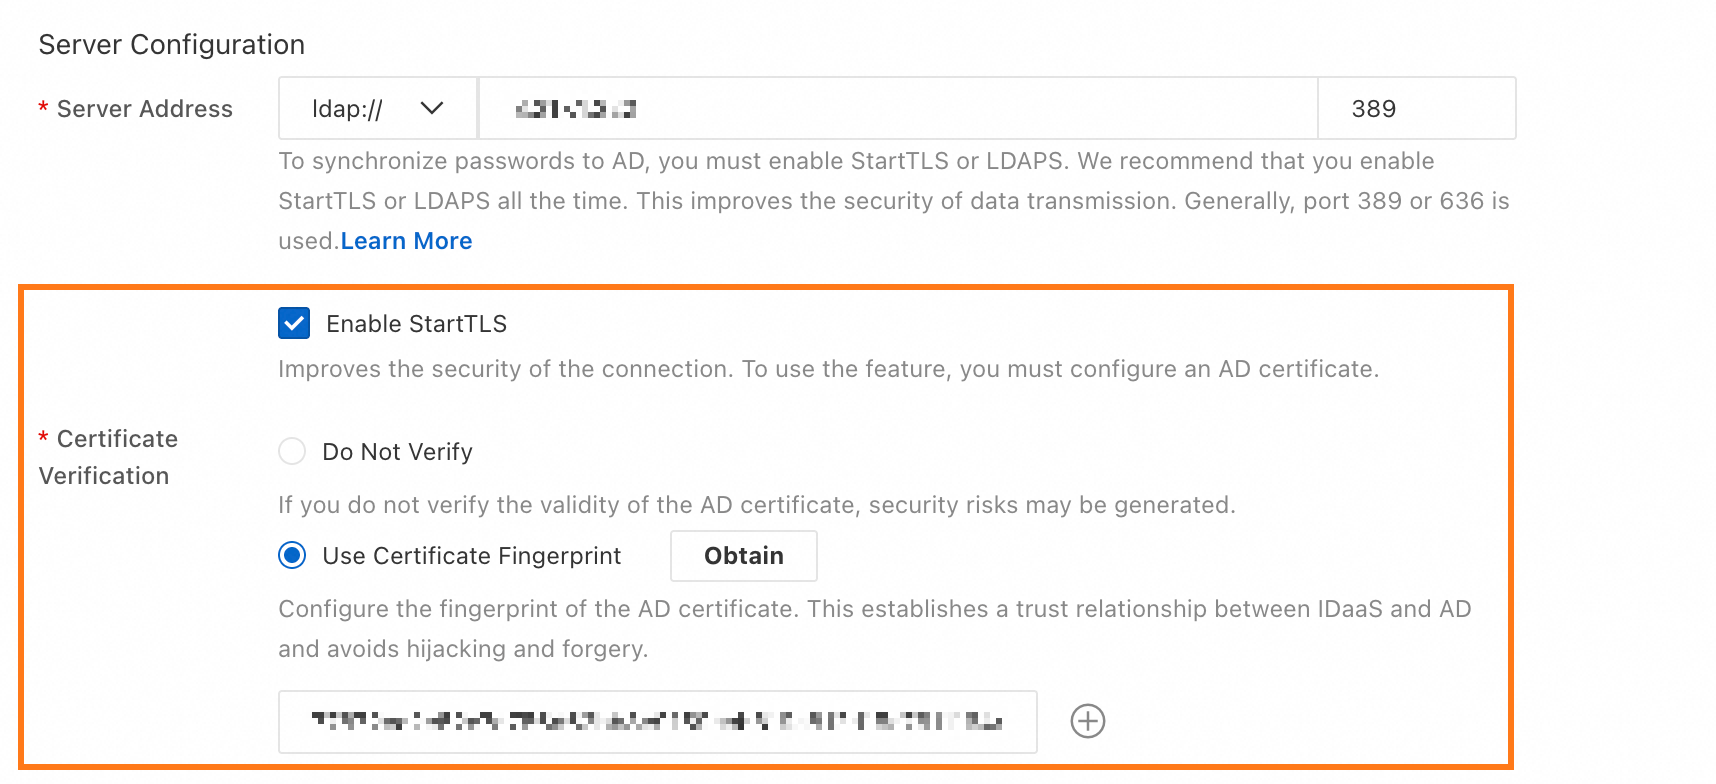
By default, LDAP transmits data without encryption, leaving it exposed to plaintext interception. Use LDAPS or StartTLS to encrypt the connection. After you install a certificate on your AD server, IDaaS can use either protocol.
To configure a certificate on your AD server:
In Server Configuration, install the required role and upgrade the server to a domain controller.
Add a certificate. Use SHA-256 as the signature algorithm.
After the certificate is installed, IDaaS can retrieve the certificate fingerprint with a single click. This establishes a trust relationship between IDaaS and the AD certificate, reducing exposure to forged certificate attacks.
To verify that the certificate fingerprint shown in the AD interface matches the one retrieved by IDaaS, run:
openssl s_client -connect server_host:port | openssl x509 -noout -pubkey | openssl pkey -pubin -outform DER | openssl dgst -sha256Key concepts
objectClass
In AD, objectClass is a collection of attributes that every object must have. It defines what an object is — a user, an organization, a computer, and so on. For example, you can find a user with the filter objectClass=person or objectClass=user. To view the objectClass of an AD object, open its Properties.

Base DN
The Base DN is the path identifier of a node in AD. IDaaS performs queries and data synchronization only within the subtree rooted at this node. Set the Base DN of the target node in Synchronization Direction.
The DN format follows the pattern ou=Sample-OU,dc=example,dc=com. The root node DN is typically dc=example,dc=com, corresponding to your domain. You can view the DN of any node directly in the AD Management Center.

When the path of a node changes, its Base DN also changes. To prevent synchronization errors caused by node path adjustments, IDaaS stores the node's objectGUID as a fingerprint when you configure the target synchronization node. If the Base DN changes and no longer matches the stored fingerprint, IDaaS blocks synchronization until you reconfigure the target node.
Incremental synchronization
When user or organization data in IDaaS changes and the changed data falls within the configured target synchronization node, IDaaS pushes the change to AD automatically.
What's next
Network endpoints — Configure shared or dedicated endpoints for controlled AD access
Field mapping — Set up attribute mapping between IDaaS and AD accounts
AD security configuration — Enable StartTLS or LDAPS for encrypted connections