You can use Cloud Backup clients to back up files on on-premises servers or virtual machines (VMs). Then, you can use the backup files to restore data based on your business requirements. This topic describes the operations that you need to perform before you back up data.
Background information
Before you use Cloud Backup to back up files from on-premises servers or VMs, take note of the following items:
You can also back up files from Elastic Compute Service (ECS) instances. For more information, see ECS file backup.
To achieve the optimal backup performance, we recommend that you run a Cloud Backup client on a host that has the following configurations: 64-bit processors, two or more CPU cores, and more than 8 GB available memory.
The volume of data that can be backed up depends on the available memory. If a host has 4 GB available memory, a maximum of one million files or 8 TB data can be backed up.
(Recommended) Create an AccessKey pair for a RAM user
Resource Access Management (RAM) is an Alibaba Cloud service that allows you to manage user identities and control access to resources. RAM allows you to create and manage multiple identities for an Alibaba Cloud account, and grant multiple permissions to a single identity or a group of identities. This way, you can authorize different identities to access different Alibaba Cloud resources.
An AccessKey pair is required when you activate a Cloud Backup client. If you use the AccessKey pair of your Alibaba Cloud account, the AccessKey pair may be leaked and all cloud resources that belong to your account may be exposed to security risks. We recommend that you use the AccessKey pair of a RAM user to activate Cloud Backup clients. Before you back up data, make sure that you have created a RAM user and an AccessKey pair. For more information, see Create a RAM user and Create an AccessKey pair.
Step 1: Download a Cloud Backup client
Before you back up and restore files for an on-premises server or VM, you must install a Cloud Backup client on the on-premises server or VM. You can add a Cloud Backup client in the Cloud Backup console. Perform the following steps:
Log on to the Cloud Backup console.
If your server or VM runs a Linux operating system that does not provide a graphical user interface (GUI), use an intermediate host that provides a GUI as an agent to log on to the Cloud Backup console.
In the left-side navigation pane, choose .
In the top navigation bar, select a region.
NoteIf you use a virtual private cloud (VPC), select the region of the VPC. This guarantees a high backup speed.
If you do not use a VPC and you need to achieve optimal backup performance, select a region that is close to the location of the data that you want to back up.
If you do not use a VPC and you need to implement disaster recovery, select a region that is distant from the location of the data that you want to back up.
Select the version of the Cloud Backup client.
ImportantIf you do not use the old Cloud Backup client, the Old Version and New Version buttons do not appear in the console. In this case, you can directly perform operations. We recommend that you upgrade the old Cloud Backup client to the new Cloud Backup client in a timely manner.
If you use the old Cloud Backup client, click Old Version on the On-Premises File Backup page.
If you use the new Cloud Backup client, click New Version on the On-Premises File Backup page. For more information, see On-premises file backup (default new).
Click Add Client.
In the Add Client panel, configure the parameters and then click Create.
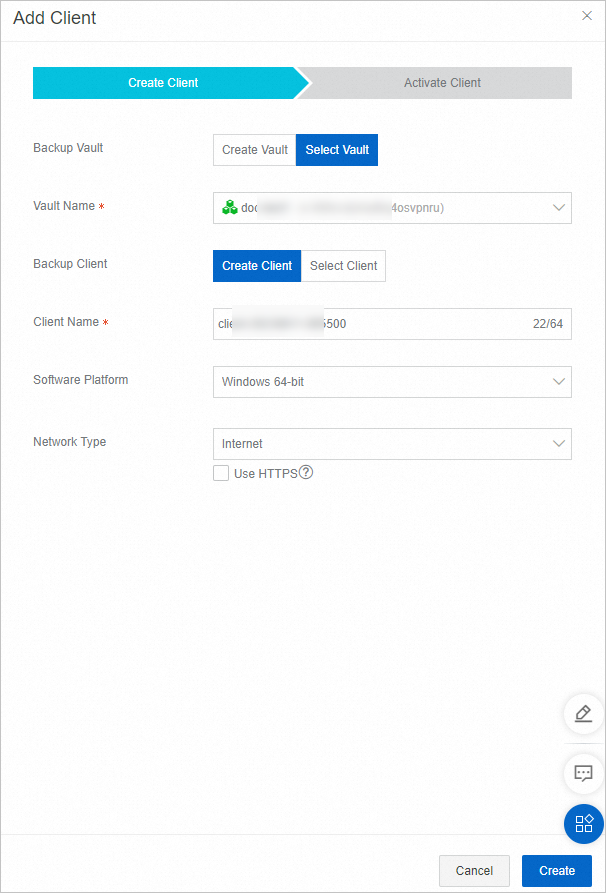
The following table describes the parameters.
Parameter
Description
Backup Vault
The backup vault where you want to store the backup data. A backup vault is a repository that Cloud Backup uses to store backup data. You can use a single vault to store backup data that is received from multiple Cloud Backup clients. Backup vaults reside in different regions. You can select or create a backup vault only in the specified region.
If you have created backup vaults, click Select Vault and select a backup vault from the Vault Name drop-down list.
If no backup vault is available, click Create Vault and specify a name in the Vault Name field to create a backup vault. The vault name must be 1 to 64 characters in length.
Backup Client
The Cloud Backup client that you want to add. You can select an activated client or create a client.
Client Name
The name of the Cloud Backup client. The name must be 1 to 64 characters in length.
Software Platform
The operating system that is running on the server from which you want to back up data. Valid values:
Windows 32-bit
Windows 64-bit
Linux 32-bit
Linux 64-bit
Network Type
VPC: Select this option if the source host resides in a VPC and resides in the same region as the backup vault.
Internet: If no VPC is available, select this option.
Use HTTPS
Specifies whether to use HTTPS to transmit encrypted data that is stored in the backup vault. If you use HTTPS to transmit data, the performance of data transmission is degraded. If you modify the setting of this parameter, the modification takes effect on the next backup or restore job.
Click Download Client.
NoteThe Cloud Backup client is used to connect your VM to Cloud Backup. You can also download the client and the certificate from the client list.
Step 2: Install and activate the Cloud Backup client
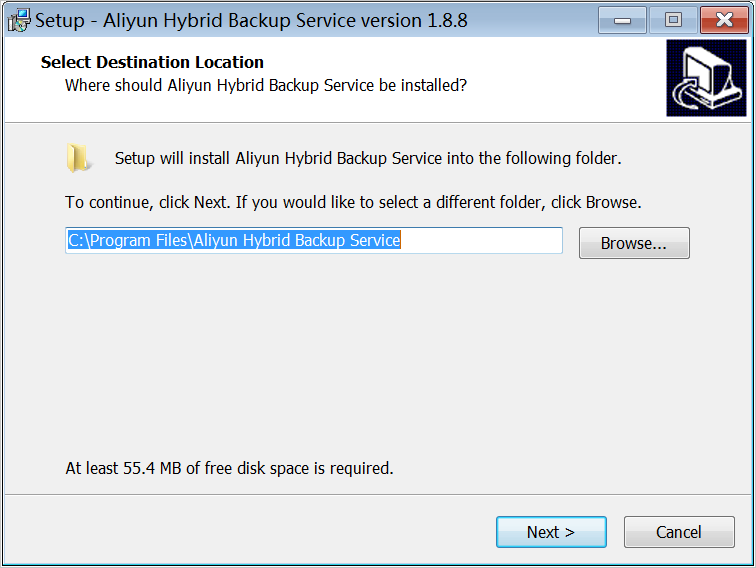
After you download the installation package of the Cloud Backup client, perform the following steps to install and activate the client:
Select an installation directory, decompress the installation package, and then install the Cloud Backup client.
NoteMake sure that sufficient space is available in the installation directory because operational logs and an executable file are all stored in the installation directory.
If the host runs Windows, run the executable file that is decompressed from the installation package, select an installation directory, and then follow the instructions to install the Cloud Backup client.
If the host runs Linux, decompress the installation package to a specified directory and run the
./setupcommand to install the client.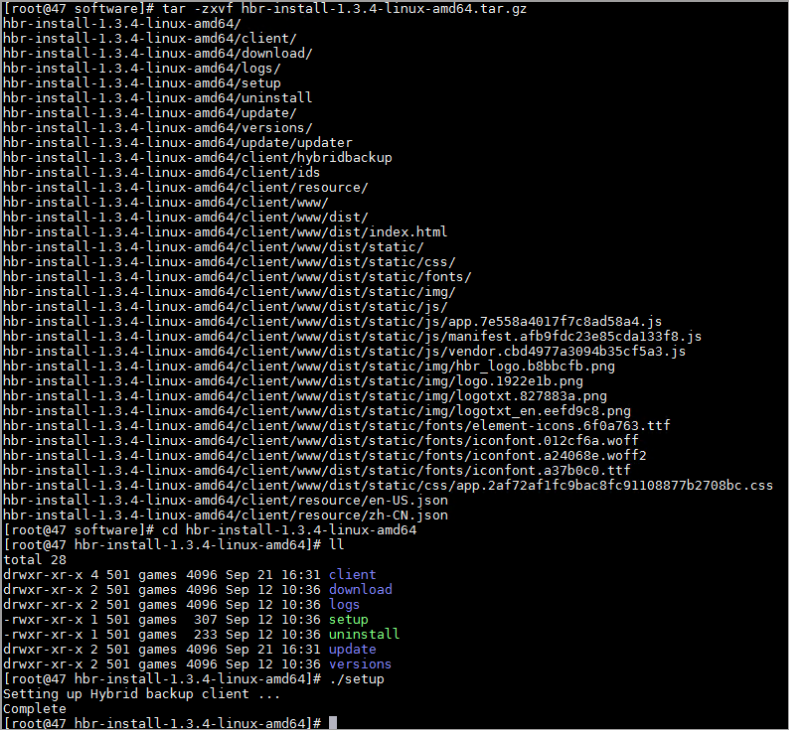
Activate the installed Cloud Backup client. Log on to the Cloud Backup console. On the On-Premises File Backup page, click Clients. Find the Cloud Backup client, and choose More > Activate Client in the Actions column. In the Activate Client step, configure the parameters described in the following table. Then, click Activate Client.
 Note
NoteMake sure that the Cloud Backup client is installed before you activate the client.
Parameter
Required
Description
Client IP
Yes
The IP address of the Cloud Backup client that your host can access. You can specify an internal IP address or a public IP address. For example, the IP address can be 127.0.0.1 (default), 47.100.XX.XX:8011, or 47.100.XX.XX:8443.
NoteMake sure that the IP address can be accessed by using your browser.
AccessKey Id
Yes
The AccessKey ID and AccessKey secret of the RAM user. For more information, see How do I create an AccessKey pair for a RAM user?
AccessKey Secret
Yes
Client Password
Yes
The login password of the Cloud Backup client. The password must be at least six characters in length.
Control Network Proxy
No
The information of the proxy server that is used to call the Cloud Backup API.
Data Network Proxy
No
The information of the proxy server that is used to transmit backup data. Specify the information if a proxy server is used for data transmission.
NoteYou can configure a data network proxy only for a Cloud Backup client whose version is 1.11.11 or later.
Control Network Type
No
The type of the network that is used to call the Cloud Backup API. The network type can be automatically selected, VPC, or Internet.
Message Network Type
No
The type of the network that is used to send messages from Cloud Backup to the Cloud Backup client. The network type can be automatically selected, VPC, or Internet.
The operations page of the Cloud Backup client automatically appears. Back up data on the client.
 Note
NoteIf the Cloud Backup client fails to be activated, you can reactivate the client. For more information, see How do I reactivate a file backup client?
(Optional) Create a backup policy
Before you back up data, we recommend that you plan the backup time and backup interval based on your business requirements.
If you do not require scheduled backup, skip this step.
If you require scheduled backup, perform the following steps to create a scheduled backup plan:
Log on to the Cloud Backup client.
Open a browser, and enter
http://localhost:8011in the address bar. Enter the password to log on to the client.NoteIf you are using an intermediate host, replace
localhostwith the IP address of the on-premises server or VM from which you want to back up data.Port 8011 is the default port that you can use to log in to a Cloud Backup client. If port 8011 on the on-premises server or VM is occupied by another application, specify another port number for the client. For more information, see How can I select a different port as the logon port of a file client?
In the left-side navigation pane, click Backup Policies.
On the Backup Policies page, click Create Policy.
In the Create Policy dialog box, configure the parameters and then click Submit.
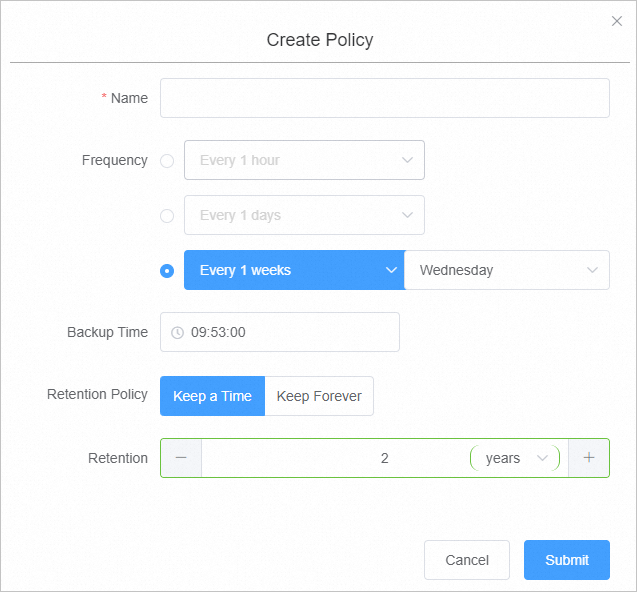
Parameter
Description
Name
The name of the backup policy.
Frequency
The interval at which data is backed up. Data can be backed up on an hourly, daily, or weekly basis.
Backup Time
The time to start the first backup. The first backup is a full backup.
Retention Policy
Data can be retained for a specified period of time or permanently.
Data can be retained on a daily, monthly, or yearly basis.
The maximum specified retention period is 3650 days (10 years).