This topic describes how to configure custom DNS resolution using Function Compute.
Prerequisites
You have added the domain name for which you want to configure custom DNS resolution. For more information, see Add a domain name.
1. Authorize the service-linked role
When HTTPDNS calls Function Compute to implement custom DNS resolution, you must grant permissions to a service-linked role in the HTTPDNS console so that HTTPDNS can use Function Compute.
Procedure
Log on to the EMAS console.
In the left navigation pane, choose Resolution Management > Custom Resolution.
Click Add Custom Resolution. If you select Function Compute Policy as the policy type and do not have the required permissions, an authorization message appears. Click Authorize.
On the service-linked role authorization page, click OK to complete the authorization. Without this authorization, you cannot use the Function Compute policy feature.
You must grant permissions the first time you use a Function Compute policy. Authorization is triggered in the following scenarios:
When you create a custom DNS record and select Function Compute Policy.
After you navigate to the policy management list, a message prompts you to grant permissions in the Function Compute policy list.

2. Create a custom resolution function
First, activate Alibaba Cloud Function Compute and develop a custom resolution function. After development, publish the service and function, and then generate a formal version or alias.
To ensure the security and stability of the HTTPDNS Function Compute policy, do not use the default Latest version when you configure the policy. You must specify a published service and function version.
HTTPDNS supports both FC 2.0 and FC 3.0, but FC 3.0 is recommended (FC 2.0 is deprecated). For more information about the differences between them, see Differences between FC 2.0 and FC 3.0.
If you still need to create an FC 2.0 function, see Create an FC 2.0 function.
Create an FC 3.0 function
Log on to the Function Compute console. In the top menu bar, select a Region.
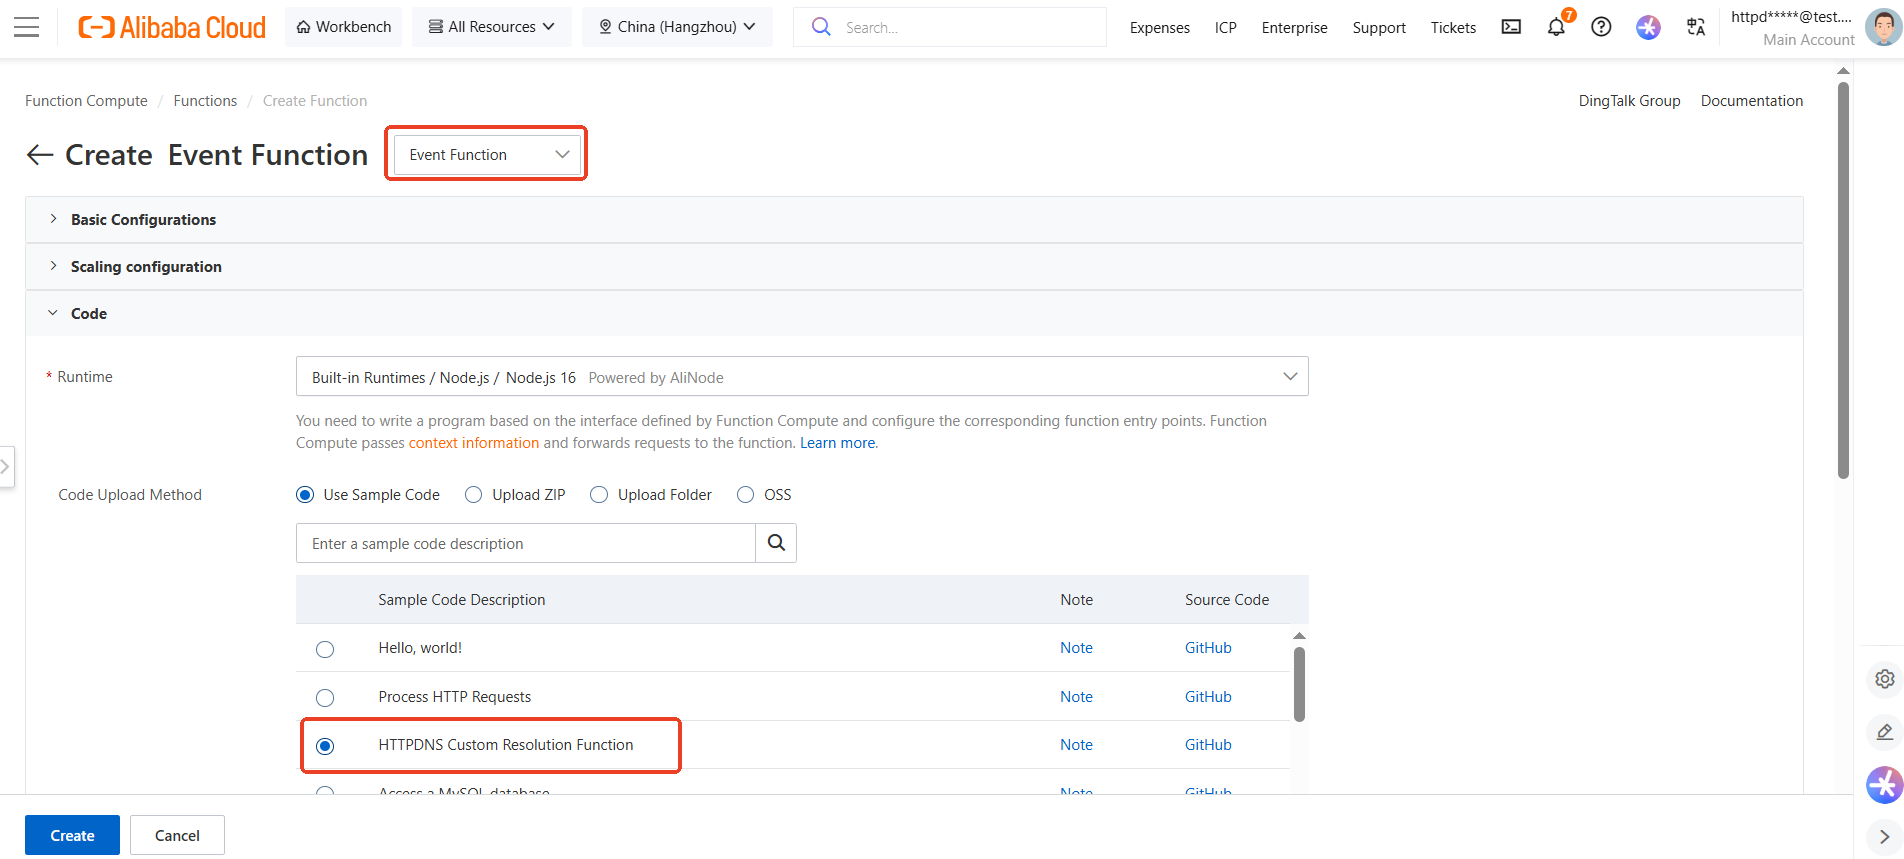
In the left navigation pane, choose the Functions menu. On the function list page, click Create Function.

On the Create Function page, select Event Function, configure the parameters as needed, and select the HTTPDNS Custom Resolution template for the code example. After you configure the parameters, click Create to begin writing the function.
After the editor initializes, enter the function code. For information about how to configure the function code, see Write the custom resolution function code. If you selected the HTTPDNS Custom Resolution template, you can skip this step.
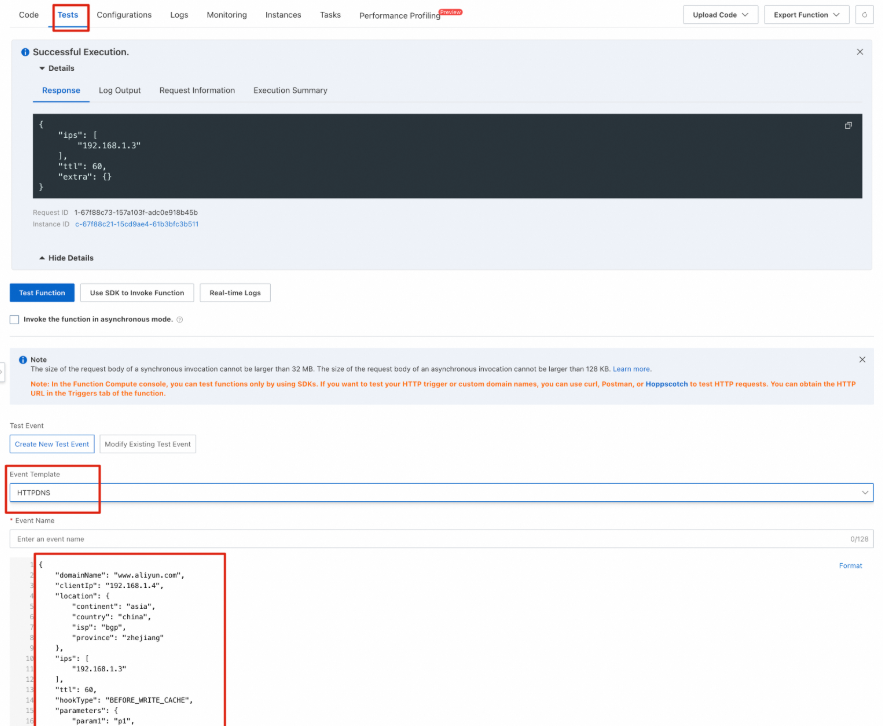
Next, test your function. For information about how to set the input parameters for the function, see Write the custom resolution function code. Click Test Function and confirm that the function runs correctly and returns the expected data.
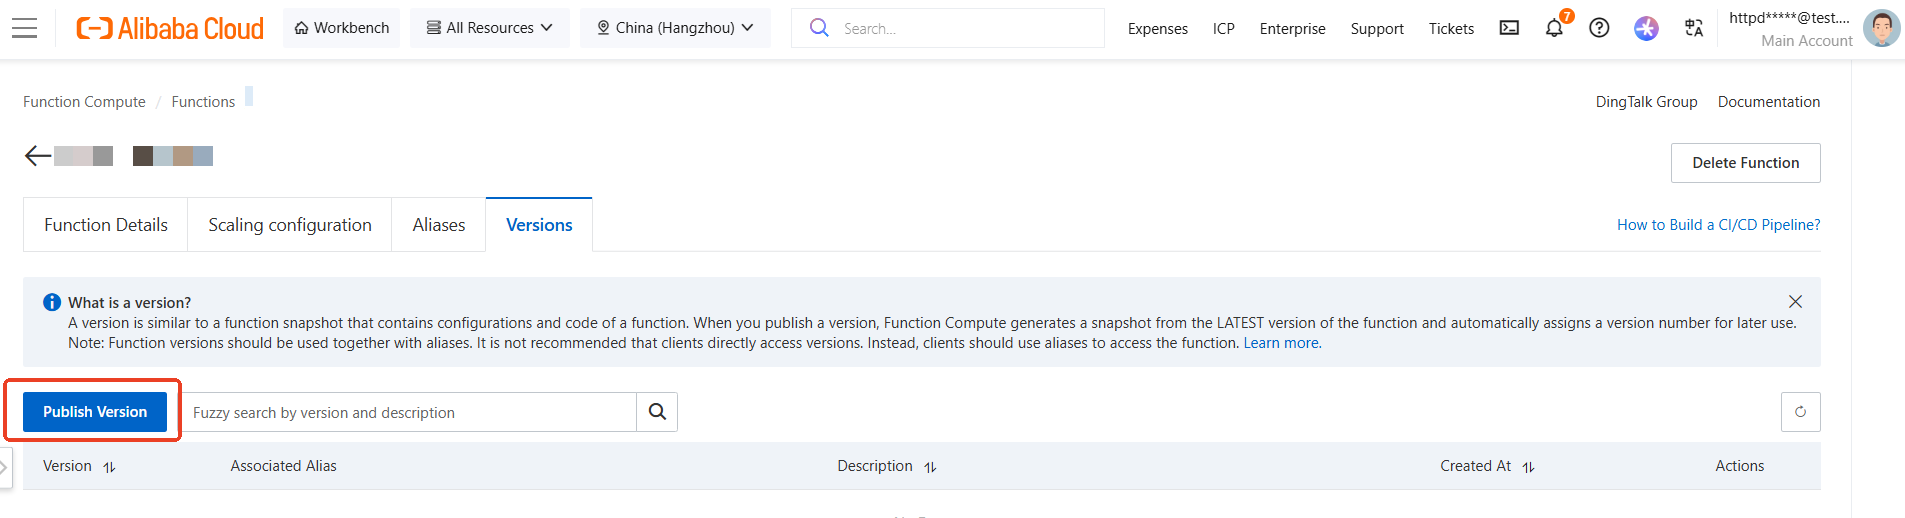
After the test completes, click Deploy Code and confirm that the code is deployed.
Click Version Management, enter the prompt content, and create a version.
3. Write the custom resolution function code
Write the function code
In the function editor, enter your custom resolution logic. The function must accept context parameters passed by HTTPDNS, such as client IP, region, and ISP, and return the processed resolution result. For example:
The programming language in this example is
nodejs6ornodejs8.'use strict'; exports.handler = (event, context, callback) => { // Format the input parameters into an object. const eventObj = JSON.parse(event.toString()); const { location, // Region ips, // Resolution result from the authoritative server ttl, // Original TTL } = eventObj; if (location.province === 'zhejiang' && location.isp === 'chinanet') { // When a user from Zhejiang Telecom accesses the domain name, return the specified IP address. callback(null, { ips: ips.concat(['1.1.X.X']), // Add the specified IP address to the returned IP array. ttl: event.ttl * 2, // Modify the TTL. extra: "", // Carry additional parameters for the client. }); } else { // Default return. callback(null, { ips, ttl, extra: "", }); } };Configure test input parameters
Before you click Test Function, set mock input parameter data to verify that the function behaves as expected. The test event must simulate the actual HTTPDNS call format. For example:
{
  "domainName": "www.aliyun.com", // The domain name being resolved
  "clientIp": "192.168.1.4", // Client IP
  "location": {
    "continent": "asia", // Continent of the client IP
    "region": "cn", // Country or region of the client IP
    "isp": "bgp", // ISP line of the client IP
    "province": "zhejiang" // Province of the client IP
  },
  "ips": ["192.168.1.3"], // List of resolution results. This result is not available in the BEFORE_READ_CACHE stage.
  "ttl": 60, // TTL of the resolution result. This result is not available in the BEFORE_READ_CACHE stage.
  "hookType": "BEFORE_WRITE_CACHE", // Stage in which the function runs
  "parameters":{ // Parameter object carried in the resolution request
    "param1":"p1",   // Corresponds to the parameter "sdns-param1=p1" in the URL
    "param2":"p2"
   }
}
Run the test and verify the result
Click Test Function and check whether the returned result contains the expected ips, ttl, or extra fields and is in the correct format. Example response:
{ "ips": event.ips.concat(['192.168.1.2']), "ttl": event.ttl * 2, "extra": "some-thing-send-to-user" // ,"domainName": "www.alibabacloud.com" // Valid only in the BEFORE_READ_CACHE stage // ,"cacheKey": "cache-key-001" // Valid only in the BEFORE_READ_CACHE and BEFORE_WRITE_CACHE stages }NoteFor more information about the custom resolution function mechanism and complete descriptions of input and response parameter fields, see the detailed documentation: Write the custom resolution function code.
4. Attach the Function Compute service to the domain name for resolution
For each domain name that requires custom resolution, you can configure Function Compute services in multiple regions. You can also configure the same Function Compute service for the Function Compute policies of multiple domain names that require custom resolution.
Procedure
Log on to the EMAS console.
In the left navigation pane, choose Resolution Management > Custom Resolution.
Click Add Custom Resolution and set the Policy Type to Function Compute Policy.

You can make the following configurations. After you complete the configuration, click OK to return to the policy list.
Parameter
Description
Region
Required. Select the region where the Function Compute service is located. For example, if you created a Function Compute service in the China (Shanghai) region, select China (Shanghai).
FC Version
Both FC 2.0 and FC 3.0 are supported. FC 3.0 is the default and recommended version.
Differences and compatibility between Function Compute 3.0 and 2.0
Service
Required. Select the Function Compute service in the specified region. This field applies only to FC 2.0.
Service Version/Alias
Required. Select the version or alias of the service. This field applies only to FC 2.0.
NoteUsing the LATEST version of Function Compute is not recommended.
Custom resolution function for the BEFORE_READ_CACHE stage
In the hook stage before the HTTPDNS server-side cache is read, you can optionally configure the corresponding Function Compute function.
Custom resolution function for the BEFORE_WRITE_CACHE stage
In the hook stage after recursive resolution by the HTTPDNS server-side and before writing to the cache, you can optionally configure the corresponding Function Compute function.
Custom resolution function for the BEFORE_WRITE_RESPONSE stage
In the hook stage after the HTTPDNS server-side writes to the cache and before the response is constructed, you can optionally configure the corresponding Function Compute function.
Hook function unit test
Use this test to verify connectivity between the HTTPDNS service and the Function Compute service:
Test succeeded: The HTTPDNS service can connect to the configured Function Compute service.
Test failed: The HTTPDNS service cannot connect to the configured Function Compute service.
What to do next
After you configure custom DNS resolution based on Function Compute as described in this topic, see Overall workflow to complete the subsequent steps.